1998 JAGUAR X308 charging
[x] Cancel search: chargingPage 12 of 2490

Coolant E x
pansion
Tank (26.15.01)
Coolant Outlet Pipe (26.31.08)
Cooling Fan Motor (26.25.24)
Cooling Fan Motor and Shroud (26.25.25)
Cooling Fan Motors (26.25.25)
Cooling Fan Shroud (26.25.30)
Engine Coolant Level Switch (26.40.11)
Radiator (26.40.01) ‐ 3.2L NA V8 ‐ AJ26/4.0L NA V8 ‐ AJ27
Radiator (26.40.01) ‐ 4.0L SC V8 ‐ AJ26
Radiator Lower Hose (26.30.07) ‐ 3.2L NA V8 ‐ AJ26/4.0L NA V8 ‐ AJ27
Radiator Lower Hose (26.30.07) ‐ 4.0L SC V8 ‐ AJ26
Radiator Upper Ho
se (26.30.01) ‐ 3.2L NA V8 ‐ AJ26/4.0L NA V8 ‐ AJ27
Radiator Upper Hose (26.30.01) ‐ 4.0L SC V8 ‐ AJ26
Thermostat (26.45.07) ‐ 3.2L NA V8 ‐ AJ26/4.0L NA V8 ‐ AJ27
Thermostat (26.45.07) ‐ 4.0L SC V8 ‐ AJ26
Thermostat Housing Cover (26.
45.22) ‐ 3.2L NA V8 ‐ AJ26/4.0L NA V8 ‐ AJ27
Thermostat Housing Cover (26.45.22) ‐ 4.0L SC V8 ‐ AJ26
Thermostat Housing Cover Seal (26.45.20) ‐ 3.2L NA V8 ‐ AJ26/4.0L NA V8 ‐ AJ27
Thermostat Housing Cover Seal (26.45.20) ‐ 4.0L SC V8 ‐ AJ26
Water Pump (26.50.
01) ‐ 3.2L NA V8 ‐ AJ26/4.0L NA V8 ‐ AJ27
Water Pump (26.50.01) ‐ 4.0L SC V8 ‐ AJ26
Water Pump Pulley (26.50.05) ‐ 3.2L NA V8 ‐ AJ26/4.0L NA V8 ‐ AJ27
Water Pump Pulley (26.50.05) ‐ 4.0L SC V8 ‐ AJ26
303‐03B : Supercharger Cooling
Removal and Installation
Water Pump
303‐04: Fu
el Charging and Controls
Diagnosis and Testing
Fuel Charging and Controls
Inspection and Verification
Driver Information Chart
Default mode Definitions
Diagnostic Trouble Code (DTC) index
Pinpoint Tests
Page 20 of 2490

310‐01: Fu el Tank and Lines
Removal and Installation
Fuel Level Sensor (88.25.32)
Fuel Pump (19.45.08)
Fuel Tank (19.55.01)
310‐02
:
Acceleration Control
General Procedures
Accelerator Cable Adjustment (12.20.05)
Removal and Installation
Accelerator Cable (19.20.06)
310‐03: Speed Control
Diagnosis and Testing
Speed Con
trol
4: Electrical
412: Climate Control System
412‐00: Climate Control System ‐ General Information
Specification
Description and Operation
Climate Control System
Diagnosis and Testing
Climate Control System
General Procedures
Air Conditioning (A/C) System Check ‐ Retail Procedure
Air Conditioning (A/C) System Recovery, Evacuation and Charging (82.30.30)
Contaminated Refrigerant Ha
ndling
Manifold Gauge Set Connection
Refrigerant Adding (82.30.02)
Refrigerant Oil Adding
Refrigerant System Tests
412‐01: Air Distribution and Filtering
Description and Operation
Page 23 of 2490

413‐08: Information and Message Ce nter
Descriptio
n
and Operation
Information and Message Center
Diagnosis and Testing
Information and Message Center
Removal and Installation
Message Center Switch (86.66.11)
413‐13: Parking Aid
Description and Operation
Parking Aid
Diagnosis and Testing
Parking Aid
Removal and Installation
Parking Aid Module (86.80.39)
Rear Parking Aid Sensor (86.54.
14) (86.62.01)
Rear Parking Aid Speaker (86.54.19) (86.62.02)
414: Battery and Charging System
414‐00: Battery and Charging System ‐ General Information
Description and Operation
414
‐01: Battery, Mounting and Ca
bles
Description
and Operation
Battery
and Cables
General
Procedures
Battery
Connect (86.15.15)
Removal
and Installation
Battery
(86.15.01)
Battery
Ground Cable (86.15.19)
Battery
Positive Cable (86.15.17)
Battery
Retaining Bracket (86.15.12)
Page 436 of 2490

Pinpoint tests
W
S
S circuit: short
circuit to power
WSS f
ailure
C1
175Left -hand re
ar wheel speed
sensor (WSS) circuit failure
W S
S circuit: open
circuit
WS
S circuit: short
circuit to ground
W S
S circuit: short
circuit to power
WSS f
ailure
F
or l
eft-hand rear WSS test
s. GO to Pinpoint Test E.
C1267Modulat or valv
e failure
Supply volt
ages
to valve
solenoids or sensors out of range
Fo
r power and ground tests. GO to Pinpoint Test
A.
B1342CAN co
mmunication circuit
failure
CAN :
open circuit fault
CAN:
short circuit to
ground
CAN :
short circuit to
power
Fo
r CAN tests. GO to Pinpoint Test
F.
B1676Supply volt
age out of range
Supply voltage:
too
low
Supply volt age:
too
high
Check fo
r DTCs indicating a charging system fault.
Rectify as necesssary.
PI
NPOINT TEST A : MODULE
POWER AND GROUND SUPPLIES
TES
T
CONDITIONS
D E
TAILS/RESULTS/ACTIONS
A
1
: CHECK THE POWER SUPPLY FUSES
Make sure the igniti
on is turned off. 1
Chec
k fuses 04, 16 and 18 of the engine compartment junction box.
2
Are th
e fus
es in good condition?
Yes GO to A2
.
No
Install a new f
use as
necessary. Check the syst em for normal operation. If the fuse fails again,
check the circuit for a short circuit to ground. Refer to the electrical guides.
A2: CHECK THE PERMANENT
POWER SUPPLY (1) TO THE MODULE
Disc
onnect the ABS module connector, LF27.
1
Measure the voltage between LF
2
7, pin 09 (NR) and ground.
2
Is the vol
t
age greater than 10 volts?
Yes GO to A3
.
No Re
pair the circuit between the engine compartment
junction box, fuse 16, and LF27 pin 09. Refer to
the electrical guides. Clear the DTC, check for normal operation.
A3: CHECK THE PERMANENT
POWER SUPPLY (2) TO THE MODULE
Meas
ure t
he voltage between LF27, pin 25 (NW) and ground.
1
Is the vol
t
age greater than 10 volts?
Yes GO to A4
.
No
Re
pair the circuit between the engine compartment ju
nction box, fuse 18, and LF27 pin 25. Refer to
the electrical guides. Clear the DTC, check for normal operation.
A4: CHECK
THE IGNITION POWER SUPPLY TO THE MODULE
Make sure the ignition is on. 1
Measure the
voltage between LF 2
7, pin 20 (WU) and ground.
2
Is the vol
t
age greater than 10 volts?
Yes GO to A5
.
No Re
pair the circuit between the engine compartment ju
nction box, fuse 04, and LF27 pin 20. Refer to
the electrical guides. Clear the DTC, check for normal operation.
A5: CHECK
THE GROUND SUPPLY TO THE MODULE
Page 1014 of 2490

Fuel Char
ging and Controls - Fuel Charging and Controls
Description an
d Operation
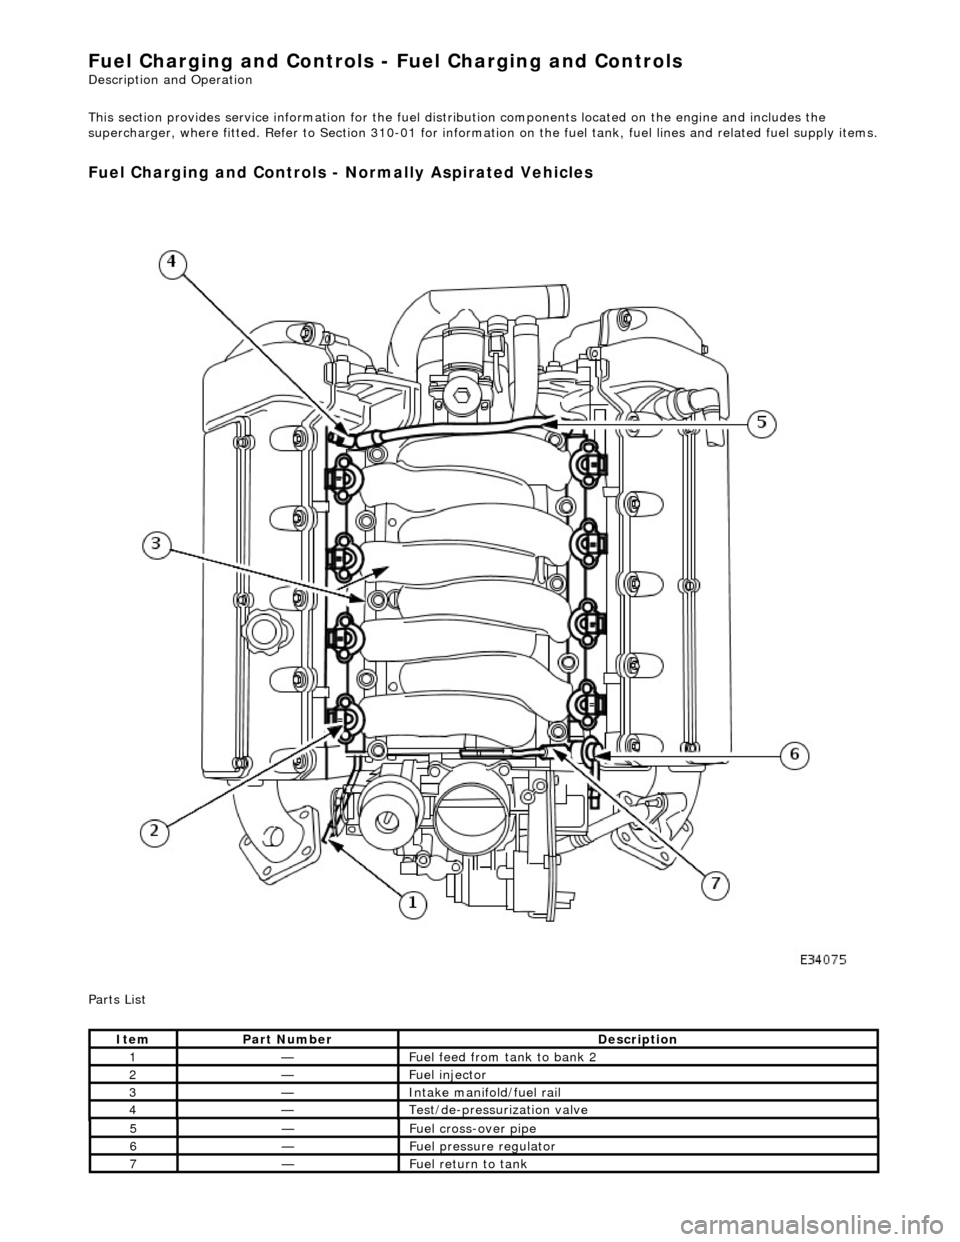
This section provides service informatio n for the fuel distribution components located on the engine and includes the
supercharger, where fitted. Refer to Section 310-01 for informatio n on the fuel tank, fuel lines and related fuel supply items.
Fuel Charging and Controls -
Normally Aspirated Vehicles
P
a
rts List
It
e
m
Par
t
Number
De
scr
iption
1—F
u
el feed from tank to bank 2
2—Fue
l
injector
3—Inta
k
e manifold/fuel rail
4—Te
st
/de-pressurization valve
5—F
u
el cross-over pipe
6—F
u
el pressure regulator
7—F
u
el return to tank
Page 1020 of 2490

Fuel Char
ging and Controls - Fuel Charging and Controls
D
iagn
osis and Testing
I
n
spection and Verification
1.
1. Veri fy the customer concern.
2. 2. Confi
rm which, if any, warning li
ghts and/or messages were displayed on the instrument cluster.
• NOTE: If any warning lights and/or me ssages were displayed when the fault occurred, refer to the Driver Information
table for DTCs associated with the display, then to the DTC index table for possible sources and actions. Some warnings will
appear to clear when the ignition is cycl ed. This is often because the warning has flagged as a resu lt of one of the vehicle's
on-board diagnostic routines having run to detect the fault. If the same routine is not run when the ignition is switched ON,
the warning will not reflag until the routine does run. See the DTC summaries for drive cycle routines.
3. 3. Visually inspect for obvious signs of mechanical or electrical damage.
Vi
sual Inspection Chart
4.
4. Veri fy the foll
owing syst
ems are working correctly:
Air intake
system
Cooling system
Charging system
5. 5. If
an obvious cause for an observed or
reported concern is found, correct th e cause (if possible) before proceeding
to the next step.
6. 6. Where the Jaguar approved diagnostic sy stem is available, complete the S93 report before clearing any or all fault
codes from the vehicle.
• NOTE: If a DTC cannot be cleared, then there is a permanent fault present that flag s again as soon as it is cleared (the
exception to this is P1260, which will only clear following an ignition OFF/ON cycle after rectification).
7. 7. If the cause is not visually evident and the Jaguar approv ed diagnostic system is not available, use a fault code
reader to retrieve the fault codes be fore proceeding to the Diagnostic Trou ble Code (DTC) Index Chart, or the
Symptom Chart if no DTCs are set.
• NOTE: If the DTC flagged was not present for two or more co nsecutive cycles, it is classed as temporary, and will be
deleted following three cycl es during which no fault was present. This could result in a reported wa rning light/message with
no stored DTCs. If a fault is present for three consecutive cycles, the DTC becomes permanent, and will remain in the
module's memory for 40 drive cycl es (a cycle is an ignition OFF/ON, which will occur during the owner's normal use of the
vehicle. No action on the part of the technician is necessary to perform this cycle. A drive cycle is a series of conditions
needed to make the on-board diagnostic ro utine run, and may need a specific action on the part of the technician. See the
DTC summaries for drive cycle routines).
8. 8. Using the Jaguar approved diagnostic system where available, and a scan tool where not, check the freeze frame
data for information on the conditions applicable when the fault was flagged. The format of this will vary,
depending on the tool used, but can pr ovide information useful to the technician in diagnosing the fault.
MechanicalElectrical
Engine
oil level
Coo
ling system coolant
lev
el
Fuel contamination
Throttle body Poly-ve
e belt
Fu
ses
W
i
ring harness
E
l
ectrical connector(s)
Sens
o
r(s)
Engine
control module (E
CM)
Tran
s
mission control module
Check spark plu
g type. Only r
e
sisted plugs should be fitted. Refer to specifications
section for gap
Relay date codes. I
f the date on the rela
y is between R6 k1 and R6 k8, replace the
relay
Page 1039 of 2490

Fuel Charging and Controls
- Fuel Injector4.0L SC V8 - AJ26
Rem
oval and Installation
Remov
al
Installation
1.
Disconnect battery ground cabl e (IMPORTANT, see SRO 86.15.19
for further information).
2. WARNING: BEFORE PROCEEDING, IT IS ESSENTIAL THAT
THE WARNING NOTES GIVEN IN SECTION 100-00 (UNDER THE
HEADING 'SAFETY PRECAUTIONS') ARE READ AND UNDERSTOOD.
Depressurize fuel system; refer to 19.50.02.
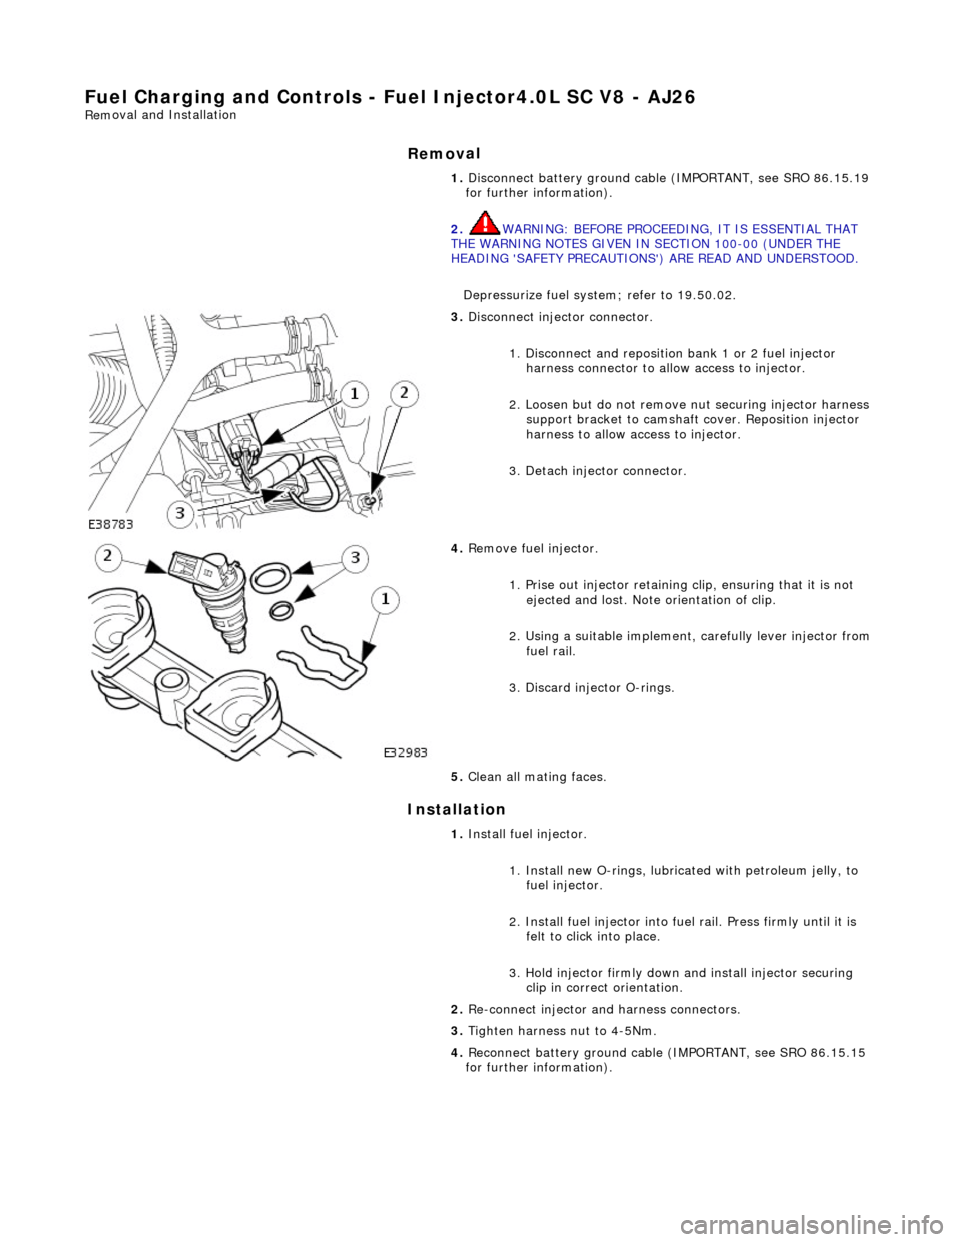
3.
Disconnect injector connector.
1. Disconnect and reposition bank 1 or 2 fuel injector harness connector to allow access to injector.
2. Loosen but do not remove nut securing injector harness support bracket to camshaft cover. Reposition injector
harness to allow access to injector.
3. Detach injector connector.
4.
Remove fuel injector.
1. Prise out injector retaining clip, ensuring that it is not ejected and lost. Note orientation of clip.
2. Using a suitable implement, carefully lever injector from
fuel rail.
3. Discard injector O-rings.
5. Clean all mating faces.
1. Install fuel injector.
1. Install new O-rings, lubricat ed with petroleum jelly, to
fuel injector.
2. Install fuel injector into fuel rail. Press firmly until it is felt to click into place.
3. Hold injector firmly down and install injector securing clip in correct orientation.
2. Re-connect injector and harness connectors.
3. Tighten harness nut to 4-5Nm.
4. Reconnect battery ground cable (IMPORTANT, see SRO 86.15.15
for further information).
Page 1048 of 2490

Fuel Charging and Controls - Throt
tle Body Gasket
Re
mo
val and Installation
Remov
a
l
Installation
1.
Re
move throttle body; refer to 19.70.04.
1. Installation is a reversal of the removal procedure.