Page 1644 of 2490
In
stallation
12
. R
emove gasket from the manifold flange.
Clean and inspect th
e manif
old joint faces.
Clean and inspect th
e threads on th
e downpipe studs.
1. Fit
the oxygen sensor(s).
The downstream sensor i
s
fitt
ed only for North American
markets.
2. Fit a new gasket to the mani fold mating flange on the
downpipe.
3. Fit
the downpipe catalytic converter.
1. Fit the downpipe assembly to the manifold.
Fit,
but do not fully tighten, the mounting bracket securing
bolts. (Leave loose until the nu ts securing the downpipe to
the exhaust manifold are fitted.)
4. Lower the ramp.
5. Tighten the nuts securing the downpipe flange to the manifold
flange.
Page 1648 of 2490
In
stallation
8.
Re
move gasket from the manifold flange.
Clean and inspect th
e manif
old joint faces.
Clean and inspect th
e threads on th
e downpipe studs.
1. Fit
the oxygen sensor(s).
The downstream sensor i
s
fitt
ed only for North American
markets.
2. Fit a new gasket to the mani fold mating flange on the
downpipe.
3. Fit
the downpipe catalytic converter.
Fit the down
pipe assemb l
y to the manifold.
Fi
t,
but do not fully tighten, the mounting bracket securing
bolts. (Leave loose until the nu ts securing the downpipe to
the exhaust manifold are fitted.)
4. Lower the ramp.
5. Tighten the nuts securing the downpipe flange to the manifold
flange.
Page 1651 of 2490
I
nstallation
7.
R
emove the gasket from the front
muffler flange at each side.
R
eposition the front silencer rearwards.
R
emove the gasket from each flange.
8. R
emove the downpipe catalytic converter.
R
emove the bolts which se
cure the downpipe lower
mounting bracket.
Remove the
downpipe assembly.
9. R
emove the oxygen sensor(s).
The downstream sensor i
s fitt
ed only for North American
markets.
10. Remove gasket from the manifold flange.
Clean and inspect th
e manifold joint faces.
Clean and inspect th
e threads
on the downpipe studs.
Page 1655 of 2490
I
nstallation
7.
R
aise the vehicle on a ramp.
8. R
emove the downpipe catalytic converter.
R
emove the bolts which se
cure the downpipe lower
mounting bracket.
Remove the
downpipe assembly.
9. Remove gasket from the manifold flange.
Clean and inspect th
e manifold joint faces.
Clean and inspect th
e threads
on the downpipe studs.
1. Fit a new gasket to the mani fold mating flange on the
downpipe.
2. F
it the downpipe catalytic converter.
Fit the down
pipe assemb
ly to the manifold
Fi
t, but do not fully tighten, the mounting bracket securing
bolts. (Leave loose until the nu ts securing the downpipe to
the exhaust manifold are fitted.)
3. Lower the ramp.
4. Tighten the nuts securing the downpipe flange to the manifold
flange.
Page 1659 of 2490
6. R
aise the vehicle on a ramp.
7. R
emove the bolts which secure
the rear of the front muffler
assembly to the engine rear mounting.
8. R
emove the nuts which secure
the front flanges of the front
muffler to the downpipe flanges.
9. R
emove the gasket from the front
muffler flange at each side.
R
eposition the front silencer rearwards.
R
emove the gasket from each flange.
10
.
Remove the downpipe catalytic converter.
R
emove the bolts which se
cure the downpipe lower
mounting bracket.
Remove the
downpipe assembly.
11. Remove gasket from the manifold flange.
Clean and inspect th
e manifold joint faces.
Clean and inspect th
e threads
on the downpipe studs.
Page 1662 of 2490

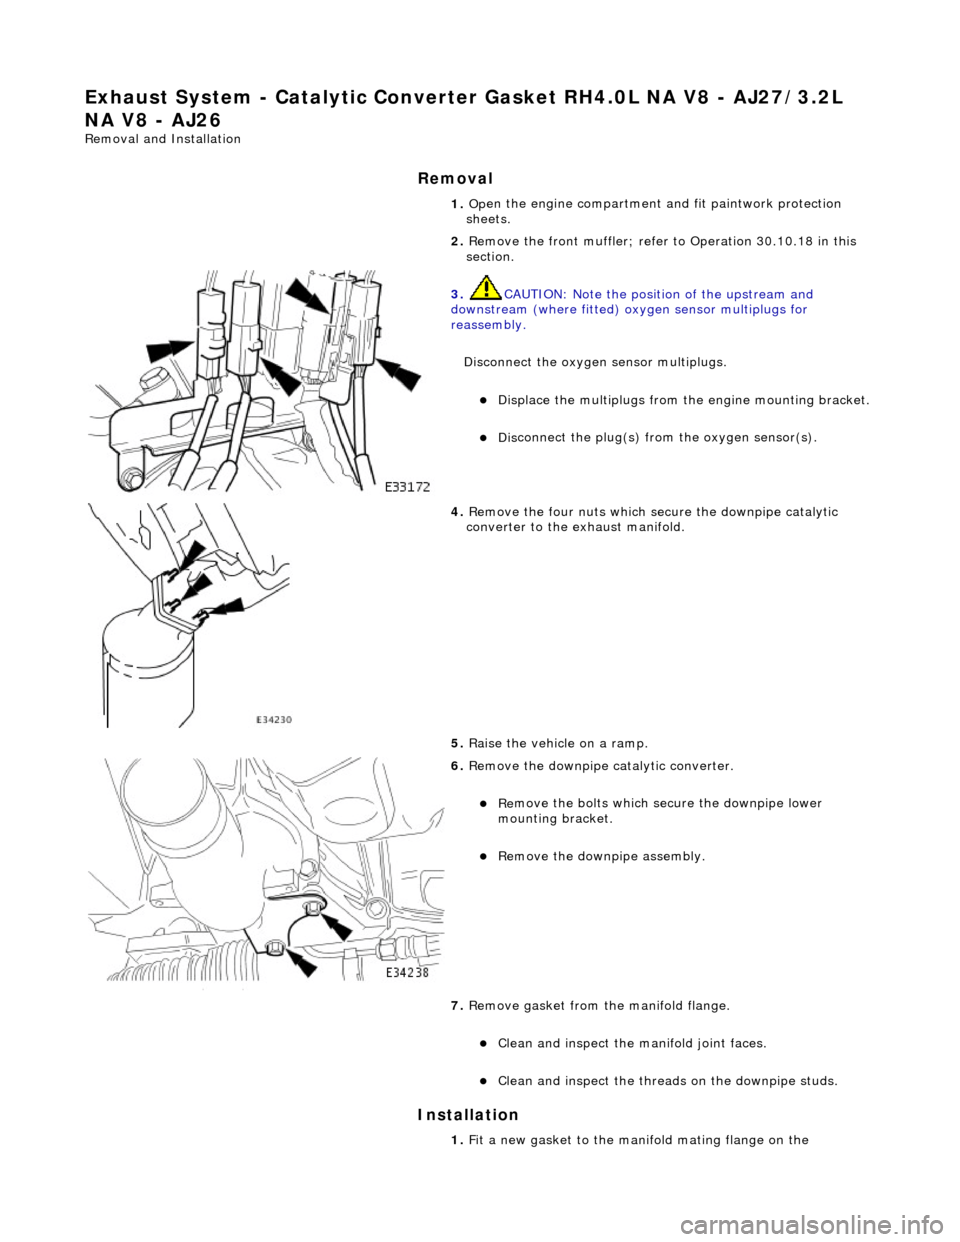
Exha
ust System - Catalyti
c Converter Gasket RH4. 0L NA V8 - AJ27/3.2L
NA V8 - AJ26
Re mo
val and Installation
Remova
l
Installation
1. Op
en the engine compartment and fit paintwork protection
sheets.
2. Remove the front muffler; refer to Operation 30.10.18 in this
section.
3. CAUT
ION: Note the position of the upstream and
downstream (where fitted) o xygen sensor multiplugs for
reassembly.
Disconnect the oxygen sensor multiplugs.
Di spl
ace the multiplugs from the engine mounting bracket.
Dis
connect the plug(s) from the oxygen sensor(s).
4.
Re
move the four nuts which se
cure the downpipe catalytic
converter to the exhaust manifold.
5. Raise the vehicle on a ramp.
6. Re
move the downpipe catalytic converter.
R
e
move the bolts which se
cure the downpipe lower
mounting bracket.
Remove the down
pipe assembly.
7. Remove gasket from the manifold flange.
Clean and inspect th e manif
old joint faces.
Clean and inspect th
e threads on th
e downpipe studs.
1. Fit a new gasket to the mani fold mating flange on the
Page 1665 of 2490
I
nstallation
7.
R
emove the gasket from the front
muffler flange at each side.
R
eposition the front silencer rearwards.
R
emove the gasket from each flange.
8. R
emove the downpipe catalytic converter.
R
emove the bolts which se
cure the downpipe lower
mounting bracket.
Remove the
downpipe assembly.
9. Remove gasket from the manifold flange.
Clean and inspect th
e manifold joint faces.
Clean and inspect th
e threads
on the downpipe studs.
1. Fit a new gasket to the mani fold mating flange on the
downpipe.
2. Fit the downpipe catalytic converter.
1. Fit the downpipe assembly to the manifold.
Fi
t, but do not fully tighten, the mounting bracket securing
bolts. (Leave loose until the nu ts securing the downpipe to
the exhaust manifold are fitted.)
Page 1668 of 2490

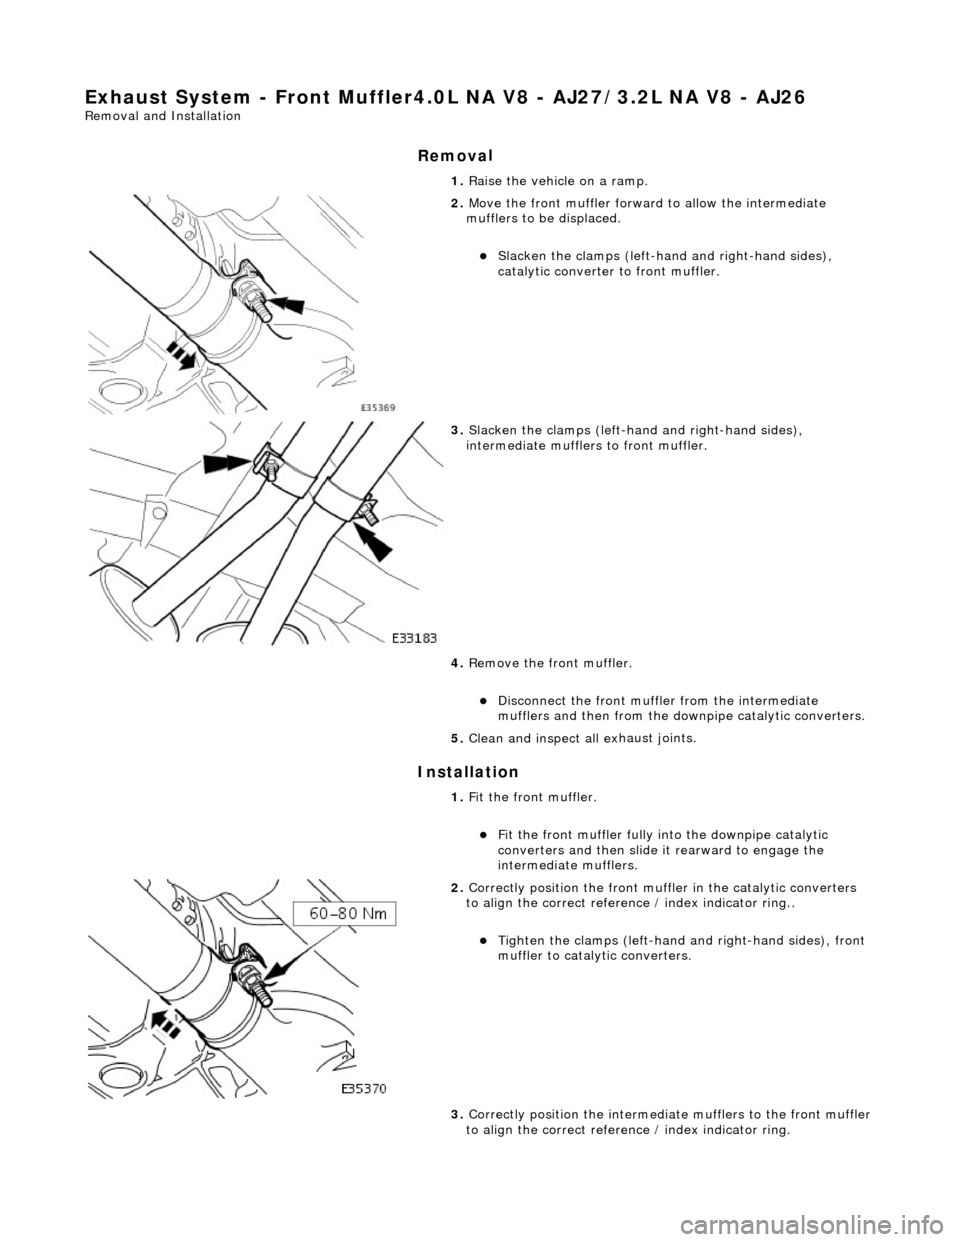
Ex
haust System - Front Muffler4.0L
NA V8 - AJ27/3.2L NA V8 - AJ26
Remo
val and Installation
Remov
a
l
Installation
1. Ra
ise the vehicle on a ramp.
2. Move the front muf f
ler forwar
d to allow the intermediate
mufflers to be displaced.
Slac ken t
he clamps (left-hand and right-hand sides),
catalytic converter to front muffler.
3. Slacken the clamps (left-ha nd and right-hand sides),
i
ntermediate mufflers to front muffler.
4. Remove the front muffler.
Di
sconnect the front muffler
from the intermediate
mufflers and then from the downpipe catalytic converters.
5. Clean and inspect al l ex
haust joints.
1. Fit the front muffler.
Fi
t the front muffler fully into the downpipe catalytic
converters and then slide it rearward to engage the
intermediate mufflers.
2. Correctl
y position the front muffl
er in the catalytic converters
to align the correct reference / index indicator ring..
Tigh ten th
e clamps (left-hand
and right-hand sides), front
muffler to catalytic converters.
3. Correctly position the intermedia te mufflers to the front muffler
to align the correct refere nce / index indicator ring.