Page 1529 of 3573
SERVICE INFORMATION 00 Ð 29
FUEL SYSTEM
Fuel Filter
Replacement Procedure
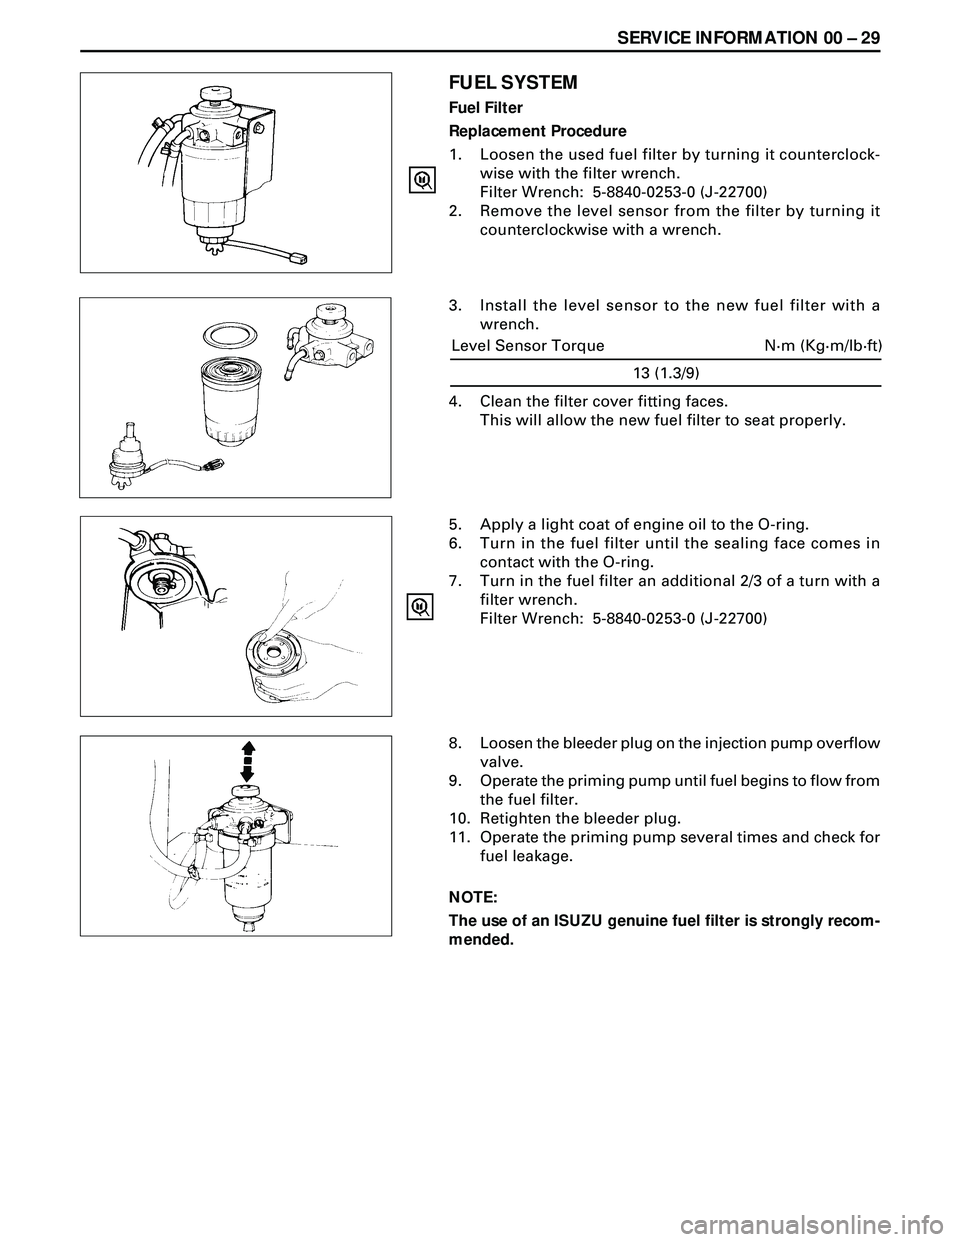
1. Loosen the used fuel filter by turning it counterclock-
wise with the filter wrench.
Filter Wrench: 5-8840-0253-0 (J-22700)
2. Remove the level sensor from the filter by turning it
counterclockwise with a wrench.
3. Install the level sensor to the new fuel filter with a
wrench.
5. Apply a light coat of engine oil to the O-ring.
6. Turn in the fuel filter until the sealing face comes in
contact with the O-ring.
7. Turn in the fuel filter an additional 2/3 of a turn with a
filter wrench.
Filter Wrench: 5-8840-0253-0 (J-22700)
8. Loosen the bleeder plug on the injection pump overflow
valve.
9. Operate the priming pump until fuel begins to flow from
the fuel filter.
10. Retighten the bleeder plug.
11. Operate the priming pump several times and check for
fuel leakage.
NOTE:
The use of an ISUZU genuine fuel filter is strongly recom-
mended.
13 (1.3/9)
N·m (Kg·m/lb·ft) Level Sensor Torque
4. Clean the filter cover fitting faces.
This will allow the new fuel filter to seat properly.
Page 1530 of 3573
00 Ð 30 SERVICE INFORMATION
Fuel Filter Water Draining Procedure
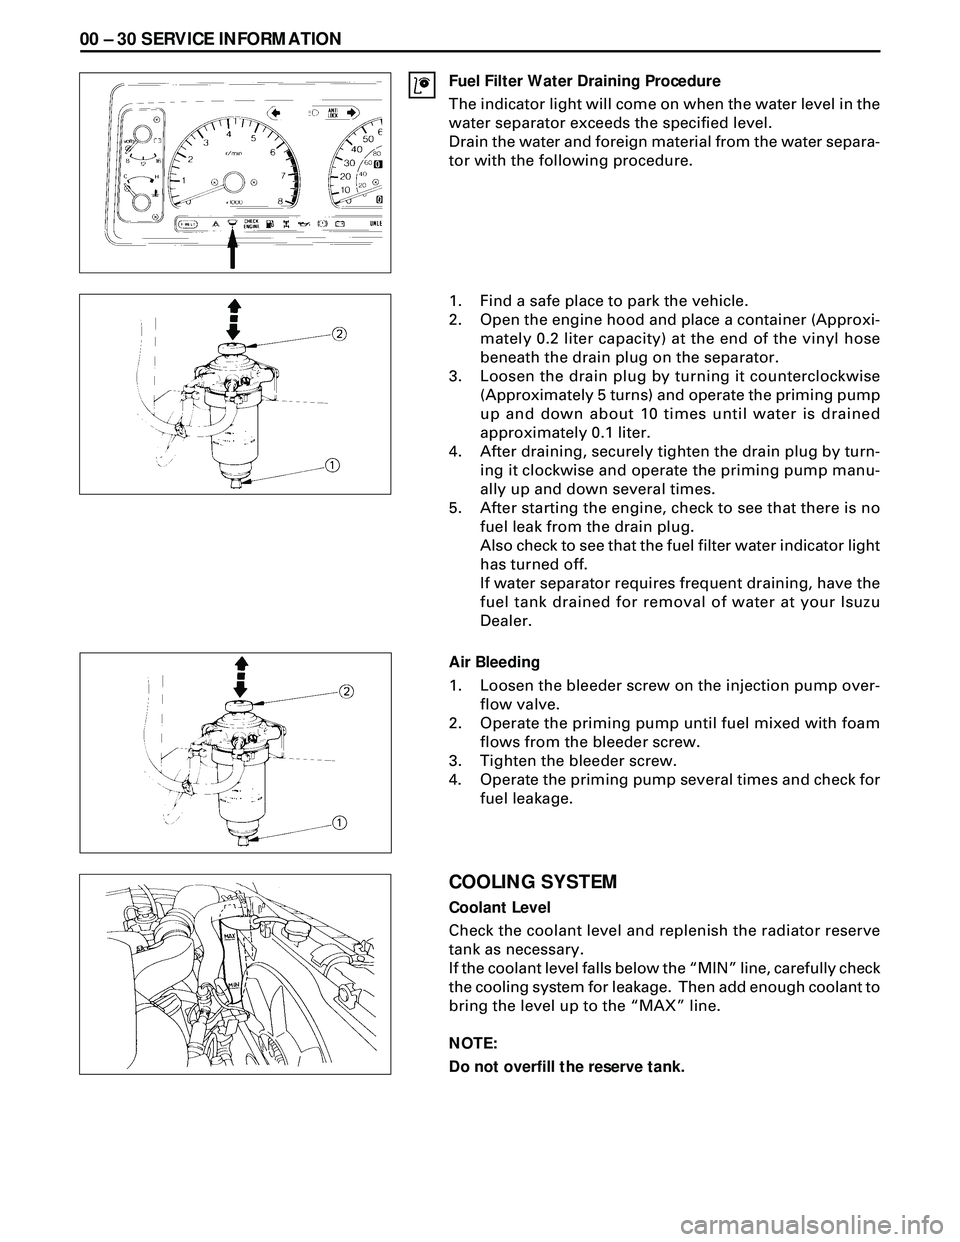
The indicator light will come on when the water level in the
water separator exceeds the specified level.
Drain the water and foreign material from the water separa-
tor with the following procedure.
1. Find a safe place to park the vehicle.
2. Open the engine hood and place a container (Approxi-
mately 0.2 liter capacity) at the end of the vinyl hose
beneath the drain plug on the separator.
3. Loosen the drain plug by turning it counterclockwise
(Approximately 5 turns) and operate the priming pump
up and down about 10 times until water is drained
approximately 0.1 liter.
4. After draining, securely tighten the drain plug by turn-
ing it clockwise and operate the priming pump manu-
ally up and down several times.
5. After starting the engine, check to see that there is no
fuel leak from the drain plug.
Also check to see that the fuel filter water indicator light
has turned off.
If water separator requires frequent draining, have the
fuel tank drained for removal of water at your Isuzu
Dealer.
Air Bleeding
1. Loosen the bleeder screw on the injection pump over-
flow valve.
2. Operate the priming pump until fuel mixed with foam
flows from the bleeder screw.
3. Tighten the bleeder screw.
4. Operate the priming pump several times and check for
fuel leakage.
COOLING SYSTEM
Coolant Level
Check the coolant level and replenish the radiator reserve
tank as necessary.
If the coolant level falls below the ÒMINÓ line, carefully check
the cooling system for leakage. Then add enough coolant to
bring the level up to the ÒMAXÓ line.
NOTE:
Do not overfill the reserve tank.
Page 1594 of 3573
6A Ð 44 ENGINE MECHANICAL
INSPECTION REPAIR
Make the necessary adjustments, repairs, and part replacements if excessive wear or damage is discovered
during inspection.
1. Remove the gasket and any other material adhering to
the upper surface of the cylinder block.
Be very careful not to allow any material to accidentally
drop into the cylinder block.
Be very careful not to scratch the cylinder block.
2. Carefully remove the oil pump, Rear Oil Seal retainer,
and oil pan installation surface seal.
3. Wipe the cylinder block clean.
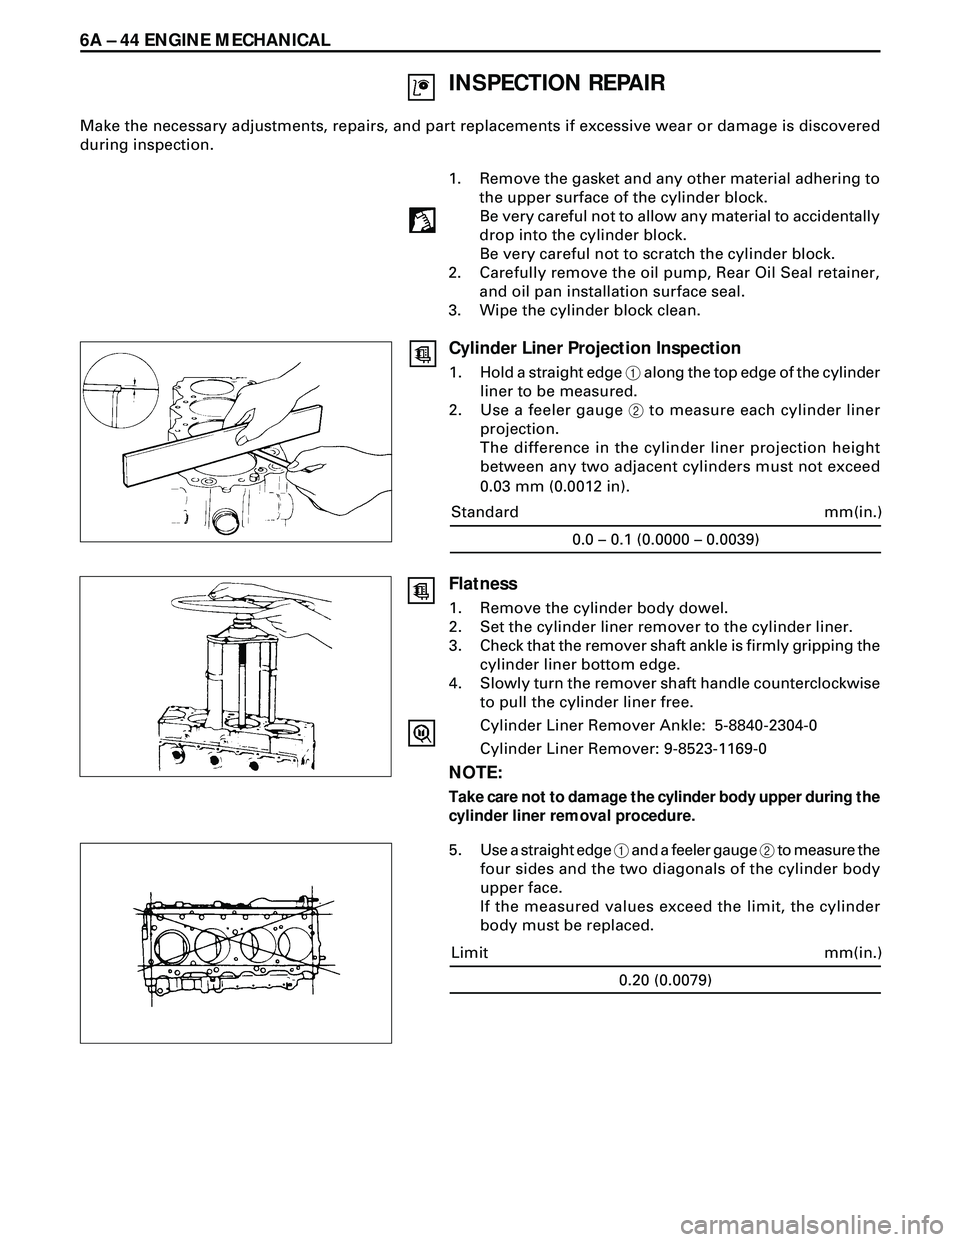
Cylinder Liner Projection Inspection
1. Hold a straight edge 1 along the top edge of the cylinder
liner to be measured.
2. Use a feeler gauge 2 to measure each cylinder liner
projection.
The difference in the cylinder liner projection height
between any two adjacent cylinders must not exceed
0.03 mm (0.0012 in).
0.0 – 0.1 (0.0000 – 0.0039)
mm(in.) Standard
Flatness
1. Remove the cylinder body dowel.
2. Set the cylinder liner remover to the cylinder liner.
3. Check that the remover shaft ankle is firmly gripping the
cylinder liner bottom edge.
4. Slowly turn the remover shaft handle counterclockwise
to pull the cylinder liner free.
Cylinder Liner Remover Ankle: 5-8840-2304-0
Cylinder Liner Remover: 9-8523-1169-0
NOTE:
Take care not to damage the cylinder body upper during the
cylinder liner removal procedure.
5. Use a straight edge 1 and a feeler gauge 2 to measure the
four sides and the two diagonals of the cylinder body
upper face.
If the measured values exceed the limit, the cylinder
body must be replaced.
0.20 (0.0079)
mm(in.) Limit
Page 1689 of 3573
FUEL SYSTEM 6C Ð 23
ACCELERATOR PEDAL
Installation Steps
To install, follow the removal steps in the
reverse order.
Removal Steps
1. Accelerator control cable
2. Accelerator pedal assembly
REMOVAL
1. Accelerator Control Cable
2. Accelerator Pedal Assembly
INSTALLATION
2. Accelerator Pedal Assembly
1. Accelerator Control Cable
Adjustment of Pedal Stroke
Manual Transmission
·Turn counterclockwise and loosen the stopper bolts
sufficiently.
·Step on the pedal fully and hold it with your hand.
Next turn the stopper bolt until it comes into contact
with the stopper of pedal bracket. Then, lock the
stopper bolt in that position.
Page 1737 of 3573
6A – 4 ENGINE MECHANICAL
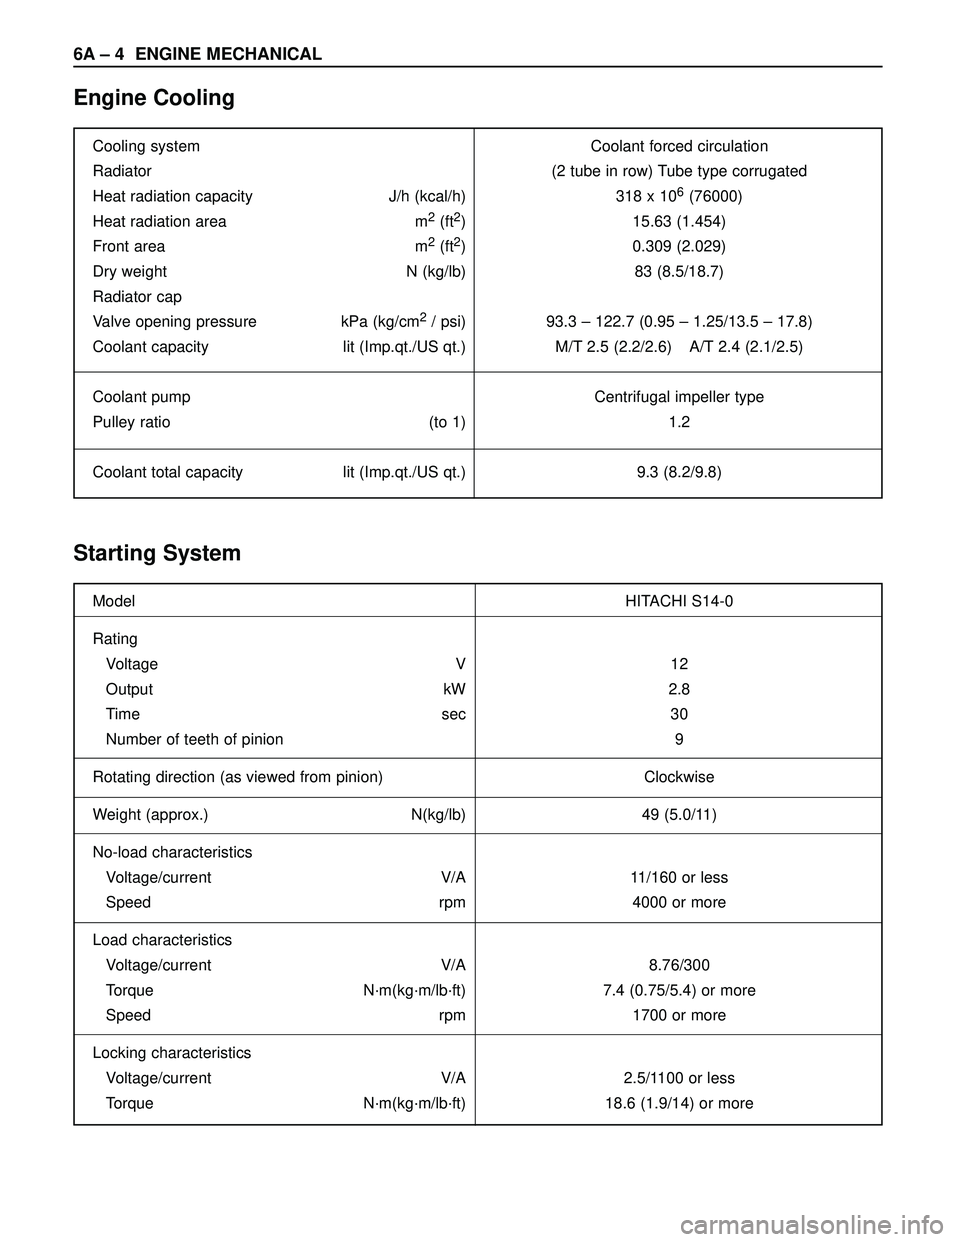
Engine Cooling
Starting System
Cooling system Coolant forced circulation
Radiator (2 tube in row) Tube type corrugated
Heat radiation capacity J/h (kcal/h) 318 x 10
6(76000)
Heat radiation area m
2(ft2) 15.63 (1.454)
Front area m
2(ft2) 0.309 (2.029)
Dry weight N (kg/lb) 83 (8.5/18.7)
Radiator cap
Valve opening pressure kPa (kg/cm
2/ psi) 93.3 – 122.7 (0.95 – 1.25/13.5 – 17.8)
Coolant capacity lit (Imp.qt./US qt.) M/T 2.5 (2.2/2.6) A/T 2.4 (2.1/2.5)
Coolant pump Centrifugal impeller type
Pulley ratio (to 1) 1.2
Coolant total capacity lit (Imp.qt./US qt.) 9.3 (8.2/9.8)
Model HITACHI S14-0
Rating
Voltage V 12
Output kW 2.8
Time sec 30
Number of teeth of pinion 9
Rotating direction (as viewed from pinion) Clockwise
Weight (approx.) N(kg/lb) 49 (5.0/11)
No-load characteristics
Voltage/current V/A 11/160 or less
Speed rpm 4000 or more
Load characteristics
Voltage/current V/A 8.76/300
Torque N·m(kg·m/lb·ft) 7.4 (0.75/5.4) or more
Speed rpm 1700 or more
Locking characteristics
Voltage/current V/A 2.5/1100 or less
Torque N·m(kg·m/lb·ft) 18.6 (1.9/14) or more
Page 1738 of 3573
ENGINE MECHANICAL 6A – 5
Charging System
Model (HITACHI) LR190-750B LR1100 – 731
Rated voltage V 12
Rated output A 90 100
Rotation direction
Clockwise
(As viewed from pulled)
Pulley effective diameter mm (in) 69 (2.72)
Weight N (kg/lb) 52 (5.3/11.7)
Page 1742 of 3573
ENGINE MECHANICAL 6A – 9
SERVICING
Servicing refers to general maintenance procedures to
be performed by qualified service personnel.
MODEL IDENTIFICATION
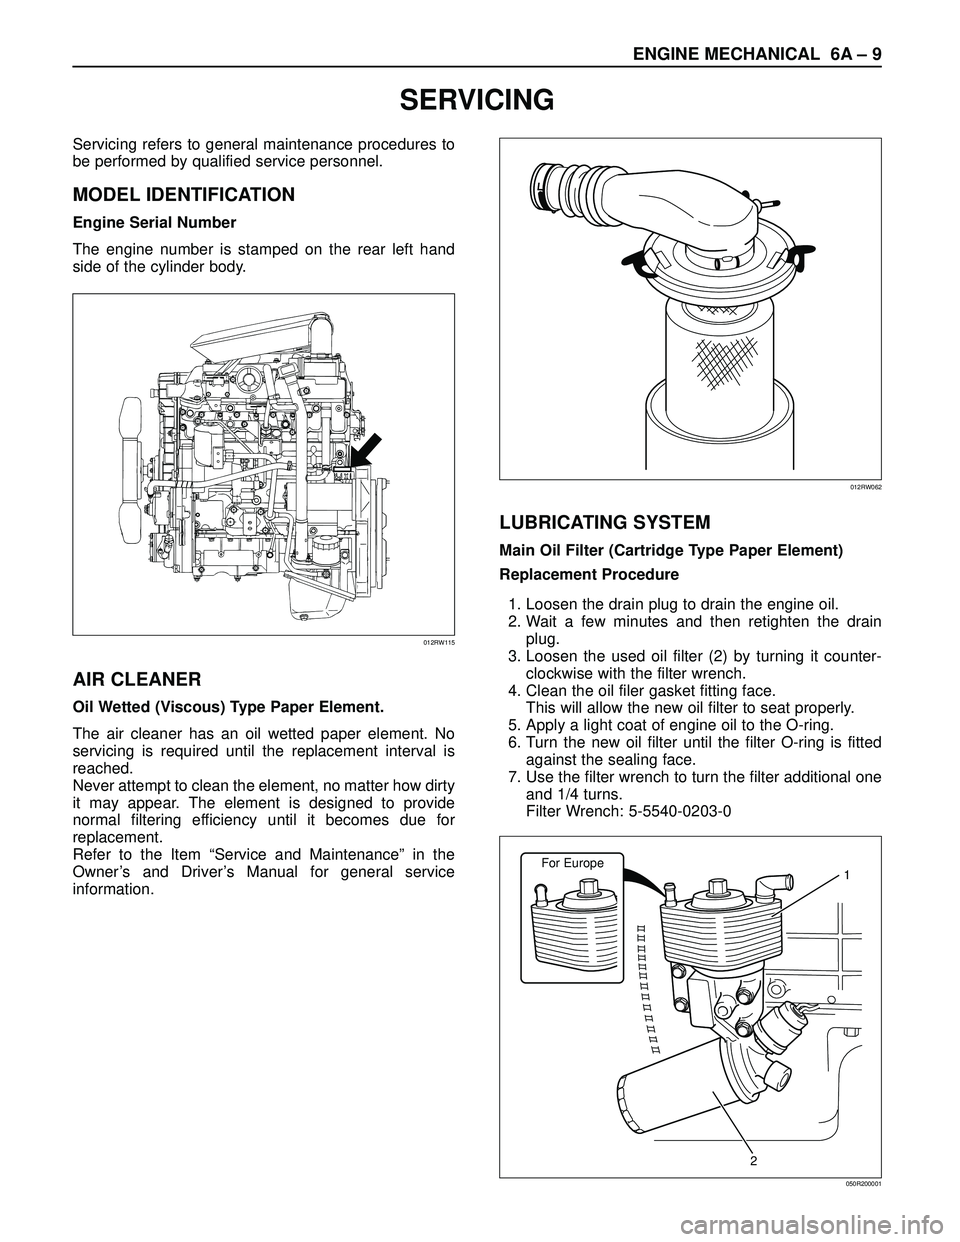
Engine Serial Number
The engine number is stamped on the rear left hand
side of the cylinder body.
AIR CLEANER
Oil Wetted (Viscous) Type Paper Element.
The air cleaner has an oil wetted paper element. No
servicing is required until the replacement interval is
reached.
Never attempt to clean the element, no matter how dirty
it may appear. The element is designed to provide
normal filtering efficiency until it becomes due for
replacement.
Refer to the Item “Service and Maintenance” in the
Owner’s and Driver’s Manual for general service
information.
LUBRICATING SYSTEM
Main Oil Filter (Cartridge Type Paper Element)
Replacement Procedure
1. Loosen the drain plug to drain the engine oil.
2. Wait a few minutes and then retighten the drain
plug.
3. Loosen the used oil filter (2) by turning it counter-
clockwise with the filter wrench.
4. Clean the oil filer gasket fitting face.
This will allow the new oil filter to seat properly.
5. Apply a light coat of engine oil to the O-ring.
6. Turn the new oil filter until the filter O-ring is fitted
against the sealing face.
7. Use the filter wrench to turn the filter additional one
and 1/4 turns.
Filter Wrench: 5-5540-0203-0
012RW115
012RW062
For Europe1
2
050R200001
Page 1743 of 3573
6A – 10 ENGINE MECHANICAL
8. Check the engine oil level and replenish to the
specified level if required.
9. Start the engine and check for oil leakage from the
main oil filter.
FUEL SYSTEM
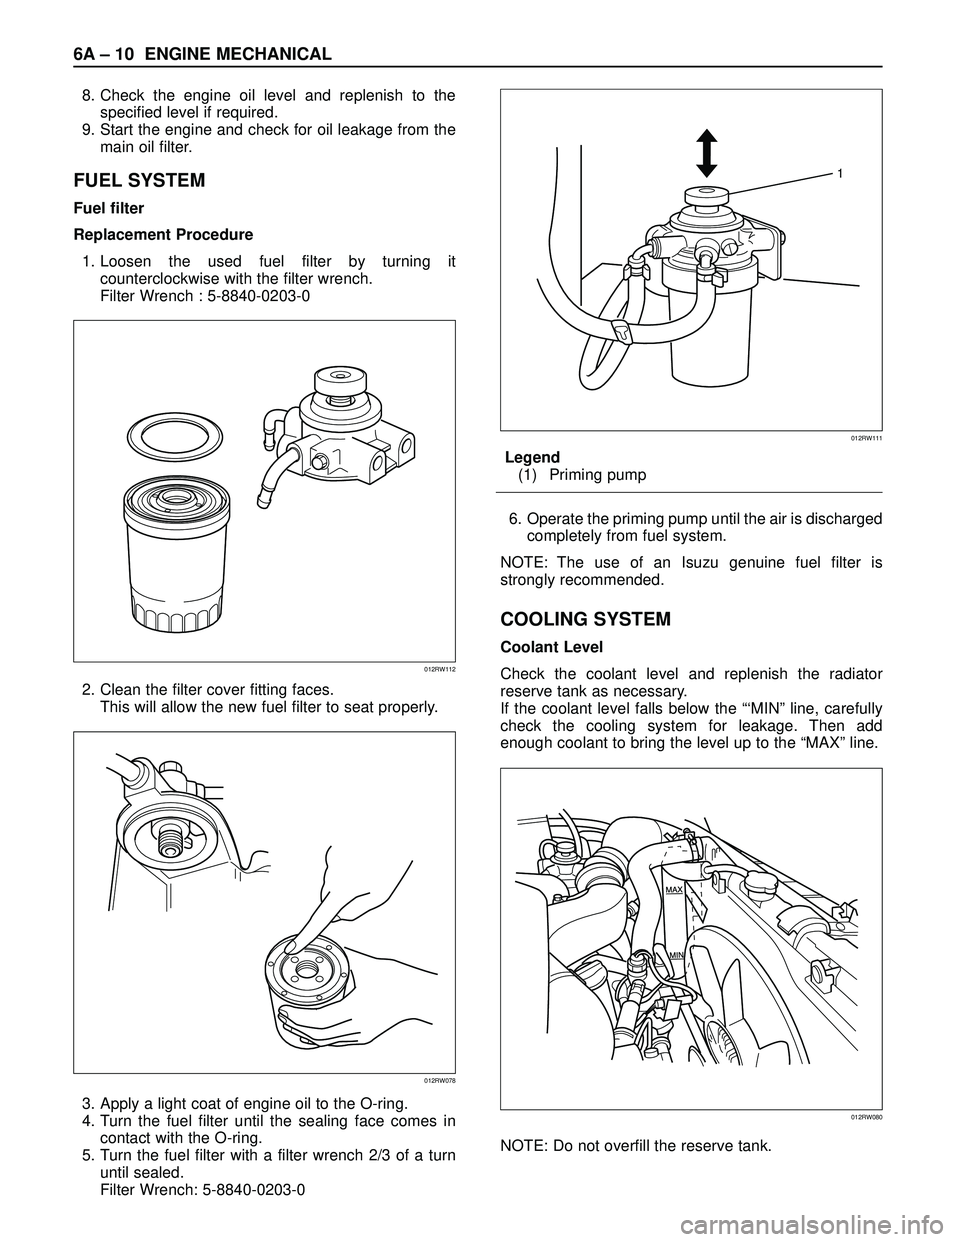
Fuel filter
Replacement Procedure
1. Loosen the used fuel filter by turning it
counterclockwise with the filter wrench.
Filter Wrench : 5-8840-0203-0
2. Clean the filter cover fitting faces.
This will allow the new fuel filter to seat properly.
3. Apply a light coat of engine oil to the O-ring.
4. Turn the fuel filter until the sealing face comes in
contact with the O-ring.
5. Turn the fuel filter with a filter wrench 2/3 of a turn
until sealed.
Filter Wrench: 5-8840-0203-0Legend
(1) Priming pump
6. Operate the priming pump until the air is discharged
completely from fuel system.
NOTE: The use of an Isuzu genuine fuel filter is
strongly recommended.
COOLING SYSTEM
Coolant Level
Check the coolant level and replenish the radiator
reserve tank as necessary.
If the coolant level falls below the “‘MIN” line, carefully
check the cooling system for leakage. Then add
enough coolant to bring the level up to the “MAX” line.
NOTE: Do not overfill the reserve tank.
012RW112
012RW078
1
012RW111
012RW080