Page 190 of 251
Lights
6. If either indicator is not aligned with its "0" mark as described, anadjustment can be made using a
Phillips-head screwdriver to
realign it with the "0" mark. Please
refer to the illustrations. 7. If you cannot get an indicator to
align, have your Honda dealer
inspect the vehicle for body
damage or suspension problems.
Replacing a Headlight Bulb
Your vehicle has halogen headlight bulbs, one on each side. Whenreplacing a bulb, handle it by its steel
base and protect the glass from contact with your skin or hardobjects. If you touch the glass, clean
it with denatured alcohol and a clean
cloth.
Halogen headlight bulbs get very hot when lit Oil perspiration, or a scratch
on the glass can cause the bulb to
overheat and shatter.
CONTINUED
Maintenance
HORIZONTAL ADJUSTMENT
VERTICAL ADJUSTMENT
NOTICEMain Menu Table of Contents s t
Page 191 of 251

Lights
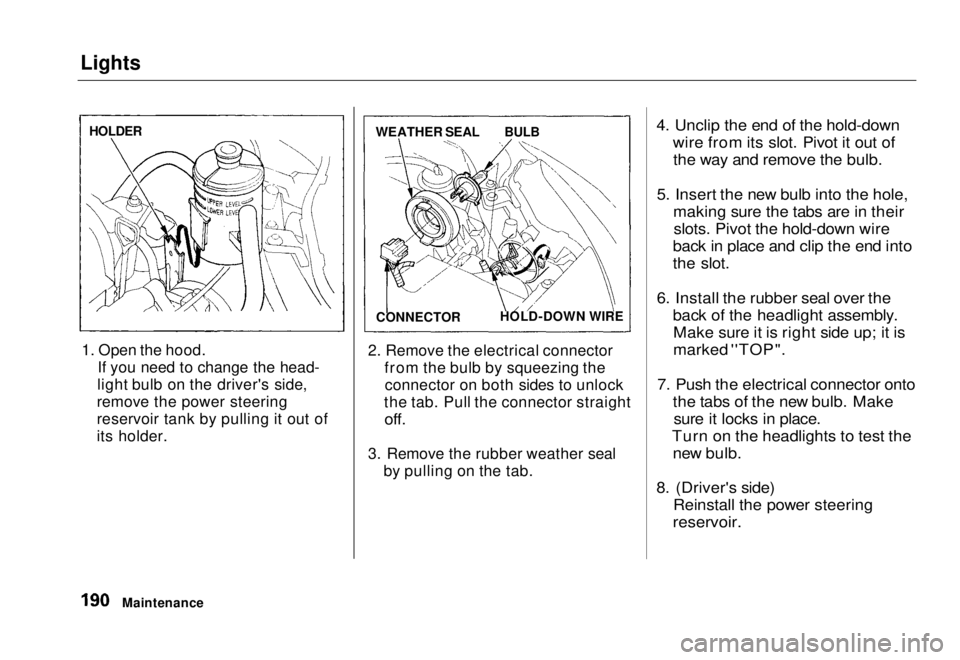
1. Open the hood. If you need to change the head-
light bulb on the driver's side,
remove the power steering
reservoir tank by pulling it out of
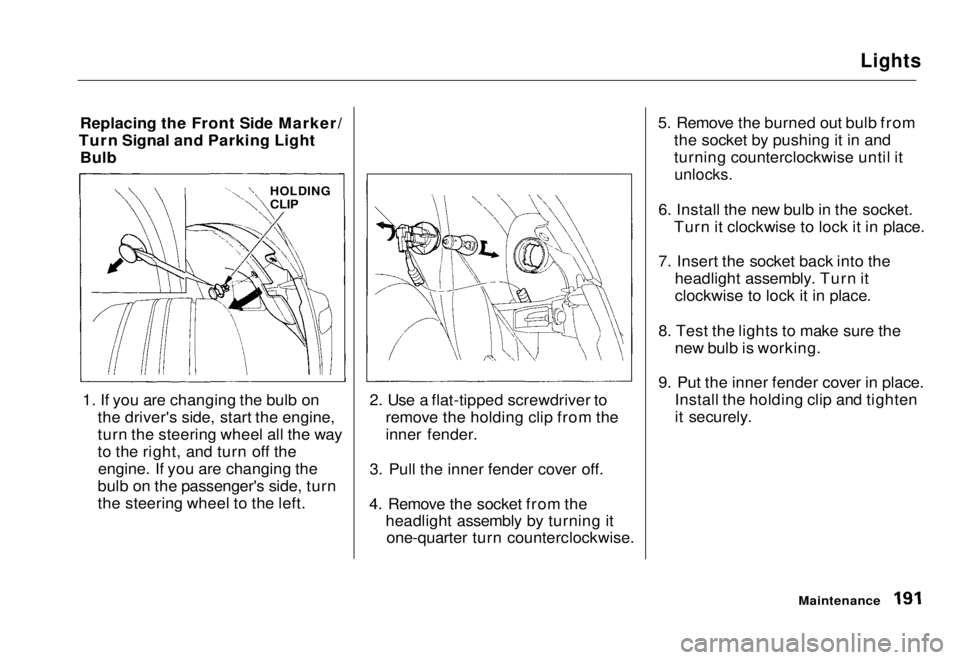
its holder. 2. Remove the electrical connector
from the bulb by squeezing theconnector on both sides to unlock
the tab. Pull the connector straight
off.
3. Remove the rubber weather seal by pulling on the tab.
4. Unclip the end of the hold-down
wire from its slot. Pivot it out ofthe way and remove the bulb.
5. Insert the new bulb into the hole, making sure the tabs are in theirslots. Pivot the hold-down wire
back in place and clip the end into
the slot.
6. Install the rubber seal over the back of the headlight assembly.Make sure it is right side up; it is
marked ''TOP".
7. Push the electrical connector onto the tabs of the new bulb. Makesure it locks in place.
Turn on the headlights to test the new bulb.
8. (Driver's side) Reinstall the power steering
reservoir.
Maintenance
HOLDER
WEATHER SEAL
BULB
CONNECTOR HOLD-DOWN WIREMain Menu Table of Contents s t
Page 192 of 251

Lights
Replacing the Front Side Marker/
Turn Signal and Parking Light Bulb
1. If you are changing the bulb on the driver's side, start the engine,
turn the steering wheel all the way
to the right, and turn off theengine. If you are changing the
bulb on the passenger's side, turn
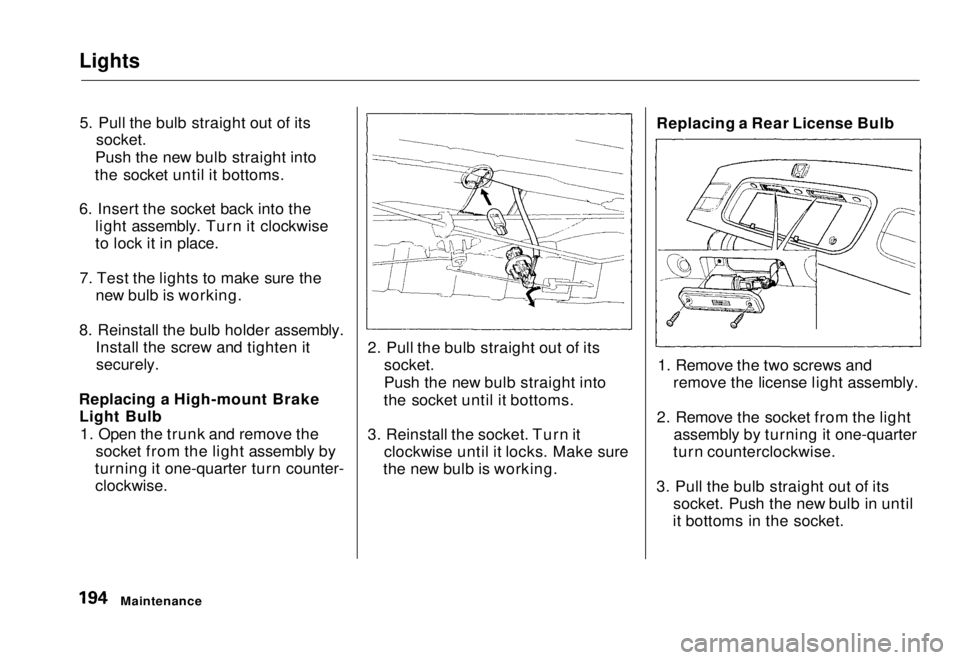
the steering wheel to the left. 2. Use a flat-tipped screwdriver to
remove the holding clip from the
inner fender.
3. Pull the inner fender cover off.
4. Remove the socket from the headlight assembly by turning itone-quarter turn counterclockwise. 5. Remove the burned out bulb from
the socket by pushing it in and
turning counterclockwise until it
unlocks.
6. Install the new bulb in the socket. Turn it clockwise to lock it in place.
7. Insert the socket back into the headlight assembly. Turn it
clockwise to lock it in place.
8. Test the lights to make sure the new bulb is working.
9. Put the inner fender cover in place. Install the holding clip and tighten
it securely.
Maintenance
HOLDING
CLIPMain Menu Table of Contents s t
Page 193 of 251
Lights
Replacing Rear Bulbs (in Fenders)
1. Open the trunk.
Undo the fastener on the side of the
trunk lining by pushing on the center of the fastener's head until it pops in.
Pull the lining back. 2. Determine which of the two bulbs
is burned out: stop/taillight/side
marker light or turn signal.
3. Remove the socket by turning it one-quarter turn counterclockwise. 4. Pull the bulb straight out of its
socket.
Push the new bulb straight into
the socket until it bottoms.
5. Reinstall the socket into the light assembly by turning it clockwise
until it locks.
6. Test the lights to make sure the new bulb is working.
7. Reinstall the trunk lining.
MaintenanceMain Menu Table of Contents s t
Page 194 of 251
Lights
8. Reset the fastener by pushing on the pointed end until it pops backalmost flush with the fingers on
the housing.
9. Put the fastener in the hole of the side of the trunk lining and push
on the center until it locks (the
center is flush with the head).
Replacing Rear Bulbs (in Trunk
Lid)
1. Open the trunk.
2. Use a Phillips-head screwdriver to remove the two screws from the
bulb holder. Remove the holder
from the taillight assembly. 3. Determine which of the two bulbs
is burned out: stop/taillight/sidemarker or back-up light.
4. Remove the socket by turning it one-quarter turn counterclockwise.
CONTINUED
Maintenance
SCREWMain Menu Table of Contents s t
Page 195 of 251

Lights
5. Pull the bulb straight out of its
socket.
Push the new bulb straight into
the socket until it bottoms.
6. Insert the socket back into the light assembly. Turn it clockwise
to lock it in place.
7. Test the lights to make sure the new bulb is working.
8. Reinstall the bulb holder assembly. Install the screw and tighten it
securely.
Replacing a High-mount Brake Light Bulb
1. Open the trunk and remove the socket from the light assembly by
turning it one-quarter turn counter-
clockwise.
2. Pull the bulb straight out of its
socket.
Push the new bulb straight into
the socket until it bottoms.
3. Reinstall the socket. Turn it clockwise until it locks. Make sure
the new bulb is working. Replacing a Rear License Bulb
1. Remove the two screws and remove the license light assembly.
2. Remove the socket from the light assembly by turning it one-quarter
turn counterclockwise.
3. Pull the bulb straight out of its socket. Push the new bulb in until
it bottoms in the socket.
MaintenanceMain Menu Table of Contents s t
Page 196 of 251
Lights
4. Turn on the parking lights and check that the new bulb is
working.
5. Reinstall the socket. Turn it clock- wise until it locks.
6. Put the license light assembly in place. Reinstall the two screws and
tighten them securely. Replacing an Interior Light Bulb
(U.S.: EX, Canada: Si)
1. Remove the lens by carefully prying on the edge of the lens in
the middle with a fingernail file ora small flat-tip screwdriver. Do not
pry on the edge of the housing
around the lens.
(U.S.: DX, HX, Canada: DX)
2. Remove the bulb by pulling it straight out of its metal tabs.
3. Push the new bulb into the metal tabs. Snap the lens back in place.
CONTINUED
Maintenance
INTERIOR LIGHT
INTERIOR LIGHTMain Menu Table of Contents s t
Page 197 of 251
Lights
(U.S.: EX)
Replacing the Trunk Light Bulb
The trunk light is available on HX and
EX models in the U.S., and all models in
Canada
1. Remove the lens by carefully prying on the edge of the lens in
the middle with a fingernail file or
a small flat-tip screwdriver. Do not
pry on the edge of the housing around the lens. 2. Remove the bulb by pulling it
straight out of its metal tabs.
3. Push the new bulb into the metal tabs. Snap the lens back in place.
Maintenance
SPOTLIGHT
TRUNK LIGHTMain Menu Table of Contents s t