Page 82 of 251
Mirrors, Parking Brake
Adjusting the Power Mirrors
On HX and EX models in the U.S., and Si
model in Canada
Adjust the outside mirrors with the adjustment switch on the left side of
the dashboard:
1. Turn the ignition switch ON (II).
2. Move the selector switch to L (driver's side) or R (passenger's
side).
3. Push the appropriate edge of the
adjustment switch to move the
mirror right, left, up or down.
4. When you finish, move the
selector switch to the center (off)
position. This turns off the
adjustment switch so you can't
move a mirror out of position by
accidentally bumping the switch. Parking Brake
To apply the parking brake, pull the lever up fully. To release it, pull upslightly, push the button, and lower
the lever. The parking brake light on
the instrument panel should go out
when the parking brake is fully released (see page 53).
Instruments and Controls
SELECTOR SWITCH
ADJUSTMENT SWITCH
PARKING BRAKE LEVERMain Menu Table of Contents s t
Page 85 of 251
Accessory Power Socket, Ashtrays
Accessory Power Socket
To use the accessory power socket,
pull down the cover. The ignition
switch must be in ACCESSORY (I)
or ON (II). This socket is intended to supply
power for 12 volt DC accessories
that are rated 120 watts or less (10
amps).
It will not power an automotive type
cigarette lighter element. Ashtrays
(Optional)
Front and rear ashtrays are available
as options. The front ashtray fits in
the beverage holder.
The rear ashtray fits in the rear of the center armrest.
Open the rear ashtray by swinging
the upper edge down. To remove the ashtray for emptying, open the
ashtray and then lift it up and out.
Use the ashtray only for cigarettes,
cigars, and other smoking materials. To prevent a possible fire and damage
to your vehicle, don't put paper or
other things that can burn in the
ashtray.
Instruments and Controls
ACCESSORY POWER SOCKET
NOTICEMain Menu Table of Contents s t
Page 86 of 251
Interior Light
(U.S.: EX, Canada: Si)
The interior light has a three- position switch. In the OFF position,
the light does not come on. In thecenter position, the interior lightcomes on when you open any door.
In the ON position, the interior light stays on continuously.
(U.S.: DX, HX, Canada: DX)
On U.S. vehicles with remote
transmitter
The interior light (with the switch in the center position) also comes on
when you unlock the door with the
remote transmitter (see page 70).
If you installed a non-Honda radio in
your vehicle, the interior light will no longer work.
(U.S.: EX)
Turn on the spotlight by pushing the button next to each light. Push the
button again to turn it off. You canuse the spotlights at all times.
Instruments and Controls
DOOR ACTIVATED
OFF ON
DOOR ACTIVATED
ON
OFFMain Menu Table of Contents s t
Page 88 of 251

Heating and Cooling
Proper use of the Heating and
Cooling system can make the
interior dry and comfortable, and
keep the windows clear for best
visibility.
If your vehicle does not have air
conditioning, it can be installed at
any time. Your dealer will install a
Genuine Honda air conditioning
system that meets Honda's high
quality standards and is designed to
exactly fit your vehicle. Please
contact your dealer for more
information.
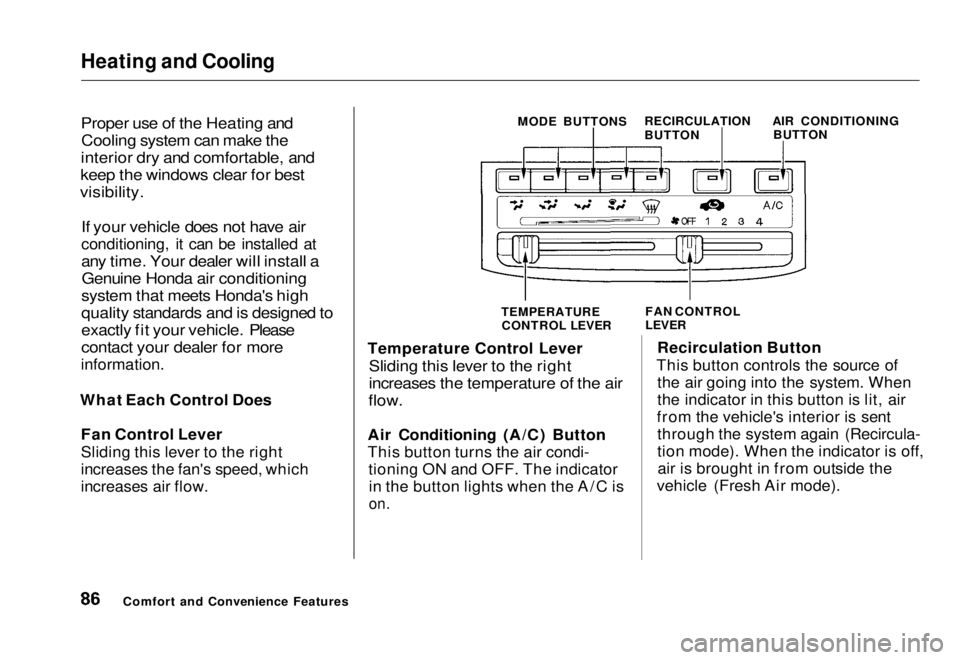
What Each Control Does Fan Control Lever
Sliding this lever to the right
increases the fan's speed, which
increases air flow.
Comfort and Convenience Features MODE BUTTONS
RECIRCULATION
BUTTON AIR CONDITIONING
BUTTON
TEMPERATURE
CONTROL LEVER FAN CONTROL
LEVER
Temperature Control Lever
Sliding this lever to the right
increases the temperature of the air
flow.
Air Conditioning (A/C) Button
This button turns the air condi- tioning ON and OFF. The indicatorin the button lights when the A/C is
on.
Recirculation Button
This button controls the source of the air going into the system. When
the indicator in this button is lit, air
from the vehicle's interior is sent through the system again (Recircula-
tion mode). When the indicator is off,air is brought in from outside the
vehicle (Fresh Air mode).Main Menu Table of Contents s t
Page 92 of 251

Heating and Cooling
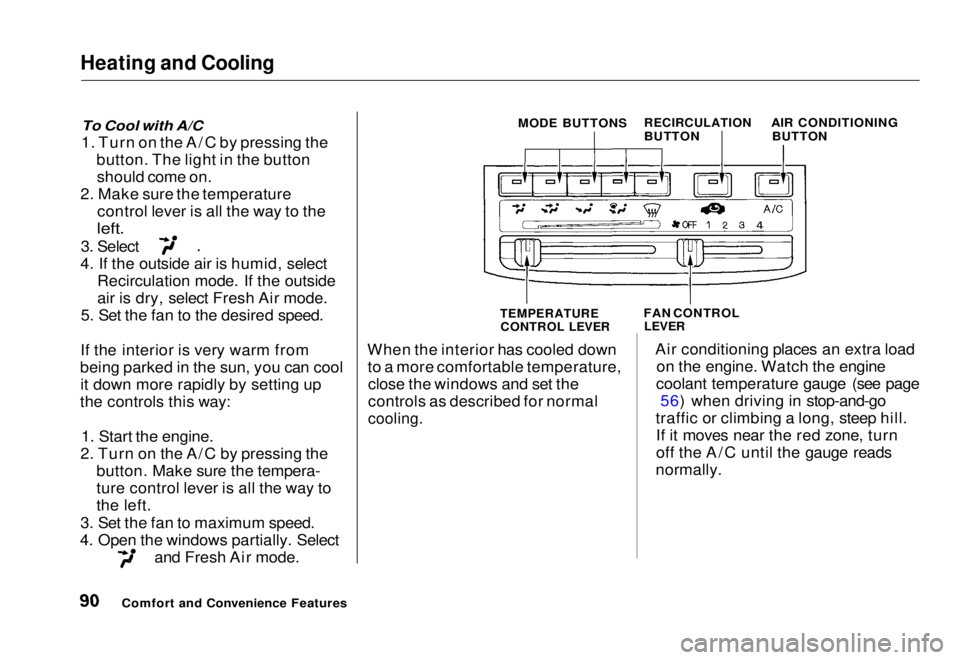
To Cool with A/C
1. Turn on the A/C by pressing the button. The light in the buttonshould come on.
2. Make sure the temperature control lever is all the way to the
left.
3. Select
4. If the outside air is humid, select Recirculation mode. If the outside
air is dry, select Fresh Air mode.
5. Set the fan to the desired speed.
If the interior is very warm from
being parked in the sun, you can cool it down more rapidly by setting up
the controls this way:
1. Start the engine.
2. Turn on the A/C by pressing the button. Make sure the tempera-
ture control lever is all the way to
the left.
3. Set the fan to maximum speed.
4. Open the windows partially. Select and Fresh Air mode. When the interior has cooled down
to a more comfortable temperature,close the windows and set the
controls as described for normal
cooling.
Air conditioning places an extra load
on the engine. Watch the engine
coolant temperature gauge (see page 56) when driving in stop-and-go
traffic or climbing a long, steep hill. If it moves near the red zone, turn
off the A/C until the gauge reads
normally.
Comfort and Convenience Features MODE BUTTONS
RECIRCULATION
BUTTON AIR CONDITIONING
BUTTON
TEMPERATURE CONTROL LEVER
FAN CONTROL
LEVERMain Menu Table of Contents s t
Page 102 of 251

Audio System
Operating the Cassette Player
Standard on Si model in Canada
The cassette system features Dolby
B* noise reduction, automatic
sensing of chromium-dioxide (CrO2)
tape, and autoreverse for continuous
play.
* Dolby noise reduction manufactured under
license from Dolby Laboratories Licensing Corpo-
ration. "DOLBY" and the double-D symbol
are trademarks of Dolby Laboratories
Licensing Corporation.
Make sure the tape opening on the
cassette is facing to the right, then
insert the cassette most of the way
into the slot. The system will pull it
in the rest of the way, and begin to
play.
The tape direction indicator will light to show you which side of the
cassette is playing. The
indicates
the side you inserted facing upward
is now playing. If you want to play the other side, press the PROG
button.
Dolby B noise reduction turns on
when you insert a cassette. If the tape was not recorded with Dolby Bnoise reduction, turn it off by
pressing the NR button.
When the system reaches the end of the tape, it will automatically reversedirection and play the other side. If
you want to remove the cassette
from the drive, press the EJECT
button.
If you turn the system off while a
tape is playing, either with the PWR/
VOL knob or by turning off the ignition, the cassette will remain in
the drive. When you turn the system
back on, the tape will begin playing
where it left off.
To switch to the radio or optional CD changer while listening to a tape, press the AM/FM or CD/TAPE
button. To change back to the cassette player, press the CD/TAPE
button.
Tape Search Functions
With a cassette playing, you can use the FF, REW, TMS, or REPEAT
function to find a desired program.FF/REW — Fast Forward and
Rewind mov e
the tape rapidly. Press
and release the REW side of the
TUNE/SEEK bar to rewind the tape, or the FF side to fast forward. Press
the PLAY button to take the system
out of rewind or fast forward. If the system reaches the end of the tape
while in fast forward or rewind, it automatically stops that function,
reverses direction, and begins to play.
Comfort and Convenience FeaturesMain Menu Table of Contents s t
Page 104 of 251

Audio System
Caring for the Cassette Player
The cassette player picks up dirt and oxides from the tape. This contami-
nation builds up over time and
causes the sound quality to degrade.
To prevent this, you should clean the player after every 30 hours of use.
Your dealer has a cleaning kit
available.
If you do not clean the cassette
player regularly, it may eventually
become impossible to remove the
contamination with a normal
cleaning kit.
Use 100-minute or shorter cassettes.Cassettes longer than that use
thinner tape that may break or jam
the drive. Look at the cassette before you
insert it. If the tape is loose, tighten
it by turning a hub with a pencil or
your finger.
If the label is peeling off, remove it
from the cassette or it could cause the cassette to jam in the player.
Never try to insert a warped ordamaged cassette in the player.
When they are not in use, store cassettes in their cases to protect
them from dust and moisture. Never
place cassettes where they will be exposed to direct sunlight, high heat,
or high humidity. If a cassette is
exposed to extreme heat or cold, letit reach a moderate temperature
before inserting it in the player.
Never try to insert foreign objects
into the cassette player. If you see the error indication " " on the display, press the
EJECT button and remove the
cassette from the unit. Make sure
the tape is not damaged. If the cassette will not eject or the error
indication stays on after the cassette
ejects, take the vehicle to your
Honda dealer.
If a problem develops in the connec-
tion between the cassette player and
the radio, you will see " " in
the display. Take the vehicle to your Honda dealer.
Comfort and Convenience FeaturesMain Menu Table of Contents s t
Page 107 of 251
Audio System
Protecting Compact Discs
Handle a CD by its edges; never
touch either surface. Contamination
from fingerprints, liquids, felt-tip
pens, and labels can cause the CD to
not play properly, or possibly jam in
the drive.
When a CD is not being played, store
it in its case to protect it from dust
and other contamination. To prevent
warpage, keep CDs out of direct
sunlight and extreme heat.
To clean a disc, use a clean soft cloth.
Wipe across the disc from the center
to the outside edge. A new CD may be rough on the
inner and outer edges. The small
plastic pieces causing this roughness can flake off and fall on the re-
cording surface of the disc, causingskipping or other problems. Remove
these pieces by rubbing the inner and outer edges with the side of a
pencil or pen.
Never try to insert foreign objects in
the CD player or the magazine.
Comfort and Convenience FeaturesMain Menu Table of Contents s t