1998 HONDA CIVIC COUPE light
[x] Cancel search: lightPage 198 of 251
Storing Your Vehicle
If you need to park your vehicle for
an extended period (more than one
month), there are several things you should do to prepare it for storage.
Proper preparation helps prevent deterioration and makes it easier to
get your vehicle back on the road. If
possible, store your vehicle indoors.
Fill the fuel tank.Change the engine oil and filter (see page 157).
Wash and dry the exterior
completely.
Clean the interior. Make sure the
carpeting, floor mats, etc. are
completely dry.
Leave the parking brake off. Put
the transmission in Reverse (5- speed manual) or Park (automatic). Block the rear wheels.
If the vehicle is to be stored for a
longer period, it should be supported on jackstands so the
tires are off the ground.
Leave one window open slightly (if
the vehicle is being stored
indoors).
Disconnect the battery.
Support the front wiper bladearms with a folded towel or rag so
they do not touch the windshield.
To minimize sticking, apply a silicone spray lubricant to all door
and trunk seals. Also, apply a
vehicle body wax to the painted surfaces that mate with the door
and trunk seals. Cover the vehicle with a
"breathable" vehicle cover, one
made from a porous material such
as cotton. Nonporous materials, such as plastic sheeting, trap
moisture, which can damage the
paint.
If possible, run the engine for a
while periodically (preferably once a month).
If you store your vehicle for 12
months or longer, have your Honda dealer perform the inspections called
for in the 24 months/30,000 miles (48,000 km) maintenance schedule
(Normal Conditions) as soon as you
take it out of storage (see page 146).
The replacements called for in the maintenance schedule are riot
needed unless the vehicle has actually reached that time or mileage.
MaintenanceMain Menu Table of Contents s t
Page 200 of 251
Exterior Care
Washing
Frequent washing helps preserve
your vehicle's beauty. Dirt and grit can scratch the paint, while tree sap
and bird droppings can permanently
ruin the finish.
Wash your vehicle in a shady area, not in direct sunlight. If the vehicle is
parked in the sun, move it into the shade and let the exterior cool down
before you start.
Only use the solvents and cleaners
recommended in this Owner's
Manual.
Chemical solvents and strong cleaners
can damage the paint, metal, and
plastic on your vehicle.
Rinse the vehicle thoroughly with
cool water to remove loose dirt. Fill a bucket with cool water. Mix
in a mild detergent, such as
dishwashing liquid or a product
made especially for vehicle
washing.
Wash the vehicle using the water and detergent solution and a soft-
bristle brush, sponge, or soft cloth.
Start at the top and work your way down. Rinse frequently.
Check the body for road tar, treesap, etc. Remove these stains with
tar remover or turpentine. Rinse it off immediately so it does not
harm the finish. Remember to re-
wax these areas, even if the rest of the vehicle does not need waxing.
When you have washed and rinsed the whole exterior, dry it with a
chamois or soft towel. Letting itair-dry will cause dulling and water
spots.
As you dry the vehicle, inspect it for
chips and scratches that could allow
corrosion to start. Repair them with
touch-up paint (see page 201).
Waxing Always wash and dry the wholevehicle before waxing it. You should
wax your vehicle, including the metal
trim, whenever water sits on the surface in large patches. It should
form into beads or droplets after
waxing.
You should use a quality liquid or paste wax. Apply it according to the
instructions on the container. In
general, there are two types of
products:
Waxes — A wax coats the finish and protects it from damage by exposure
to sunlight, air pollution, etc. Youshould use a wax on your Honda
when it is new.
Appearance Care
NOTICEMain Menu Table of Contents s t
Page 207 of 251
Changing a Flat Tire
If you have a flat tire while driving, stop in a safe place to change it.
Stopping in traffic or on the shoulder
of a busy road is dangerous. Drive
slowly along the shoulder until you
get to an exit or an area to stop that is far away from the traffic lanes.
1. Park the vehicle on firm, levelground away from traffic. Turn on
the hazard warning lights and turn
the ignition switch to LOCK (0).
2. Put the transmission in Park (automatic) or Reverse (manual).
Apply the parking brake. Have all of the passengers get out of the
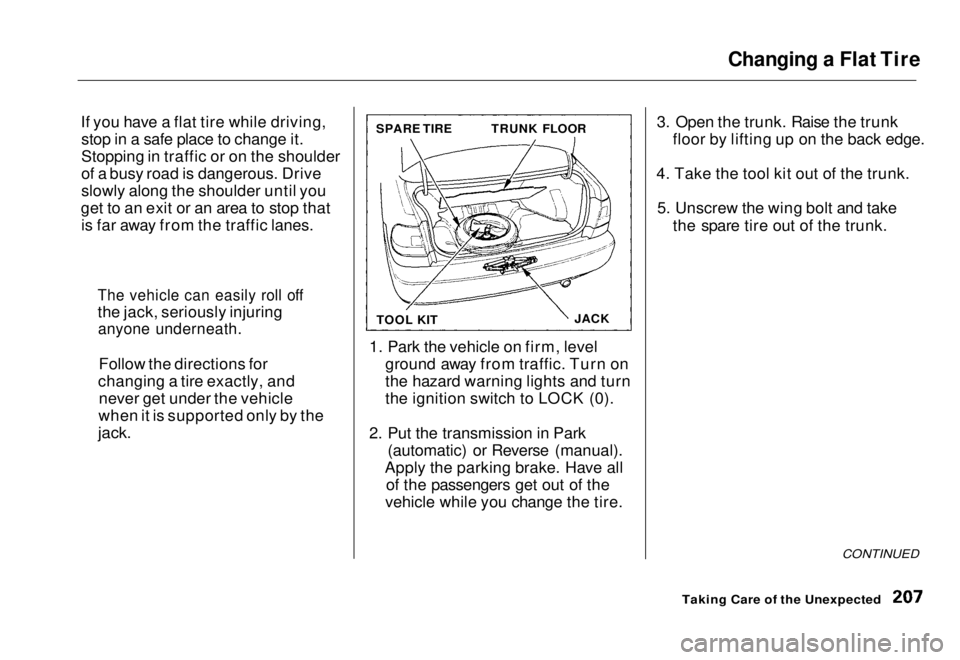
vehicle while you change the tire. 3. Open the trunk. Raise the trunk
floor by lifting up on the back edge.
4. Take the tool kit out of the trunk. 5. Unscrew the wing bolt and take the spare tire out of the trunk.
CONTINUED
Taking Care of the Unexpected
The vehicle can easily roll off
the jack, seriously injuring
anyone underneath.
Follow the directions for
changing a tire exactly, and never get under the vehicle
when it is supported only by the
jack.
SPARE TIRE
TRUNK FLOOR
TOOL KIT JACKMain Menu Table of Contents s t
Page 212 of 251
If Your Engine Won't Start
Diagnosing why your engine won't
start falls into two areas, depending
on what you hear when you turn the
key to START (III):
You hear nothing, or almostnothing. The engine's starter
motor does not operate at all, or
operates very slowly.
You can hear the starter motor operating normally, or the starter
motor sounds like it is spinning
faster than normal, but the engine does not start up and run. Nothing Happens or the Starter
Motor Operates Very Slowly
When you turn the ignition switch to START (III), you do not hear the
normal noise of the engine trying to
start. You may hear a clicking sound
or series of clicks, or nothing at all.
Check these things:
Check the transmission interlock.
If you have a manual transmission,
the clutch pedal must be pushed
all the way to the floor or the
starter will not operate. With an
automatic transmission, it must be
in Park or Neutral.
Turn the ignition switch to ON (II).
Turn on the headlights and check their brightness. If the headlights
are very dim or don't light at all,
the battery is discharged. See
Jump Starting on page 213.
Turn the ignition switch to START
(III). If the headlights do not dim,
check the condition of the fuses. If
the fuses are OK, there is proba-
bly something wrong with the
electrical circuit for the ignition switch or starter motor. You will
need a qualified technician to determine the problem. (See
Emergency Towing on page 227).
If the headlights dim noticeably or
go out when you try to start the engine, either the battery is dis-
charged or the connections are
corroded. Check the condition of
the battery and terminal connec-
tions (see page 173). You can
then try jump starting the vehicle
from a booster battery (see page 213).
Taking Care of the UnexpectedMain Menu Table of Contents s t
Page 213 of 251
If Your Engine Won't Start, Jump Starting
The Starter Operates Normally In this case, the starter motor'sspeed sounds normal, or even faster
than normal, when you turn the ignition switch to START (III), but
the engine does not run.
Are you using the proper startingprocedure? Refer to Starting the
Engine on page 121.
Do you have fuel? Turn the
ignition switch to ON (II) for a
minute and watch the fuel gauge.
The low fuel level warning light may not be working, so you were
not reminded to fill the tank.
There may be an electrical problem, such as no power to the
fuel pump. Check all the fuses (see page 223).
If you find nothing wrong, you will
need a qualified technician to find
the problem. See Emergency Towing on page 227. Jump Starting
If your vehicle's battery has rundown, you may be able to start the
engine by using a booster battery.
Although this seems like a simple procedure, you should take several
precautions.
You cannot start a Honda with anautomatic transmission by pushing
or pulling it. To jump start your vehicle, follow
these directions closely:
1. Open the hood and check the physical condition of the battery(see page 150). In very cold
weather, check the condition of the electrolyte. If it seems slushyor like ice, do not try jump starting
until it thaws.
If a battery sits in extreme cold, the
electrolyte inside can freeze.
Attempting to jump start with a frozen
battery can cause it to rupture.
2. Turn off all the electrical acces- sories: heater, A/C, stereo system,
lights, etc.
Put the transmission in Neutral or
Park and set the parking brake.
CONTINUED
Taking Care of the Unexpected
A battery can explode if you do
not follow the correct procedure,
seriously injuring anyone nearby.
Keep all sparks, open flames,
and smoking materials away
from the battery.
NOTICEMain Menu Table of Contents s t
Page 217 of 251
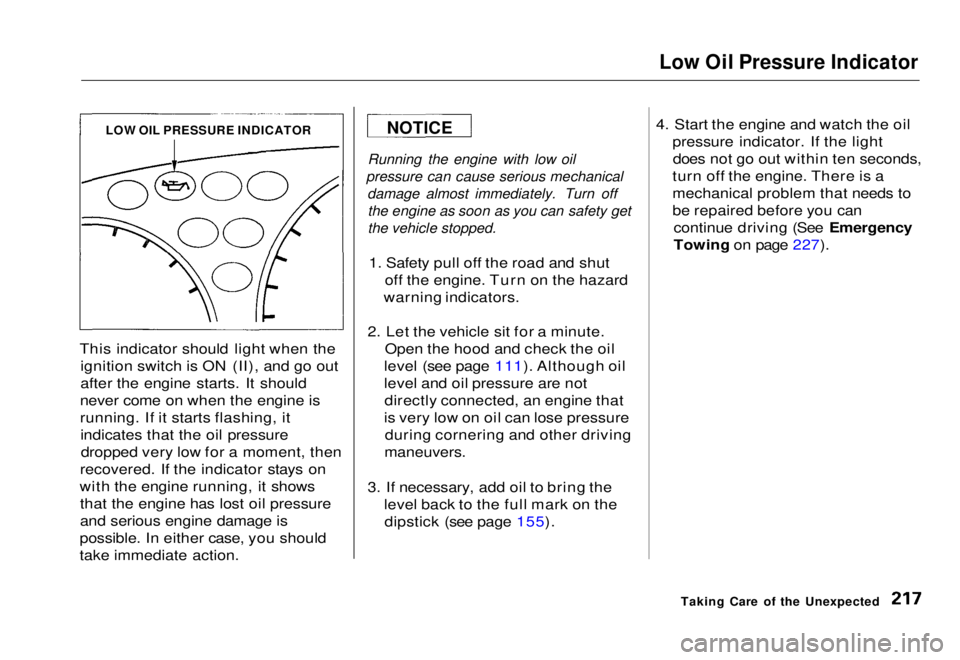
Low Oil Pressure Indicator
This indicator should light when the ignition switch is ON (II), and go out
after the engine starts. It should
never come on when the engine is
running. If it starts flashing, it indicates that the oil pressuredropped very low for a moment, then
recovered. If the indicator stays on
with the engine running, it shows that the engine has lost oil pressure
and serious engine damage is
possible. In either case, you should
take immediate action.
Running the engine with low oil
pressure can cause serious mechanical damage almost immediately. Turn offthe engine as soon as you can safety get
the vehicle stopped.
1. Safety pull off the road and shut off the engine. Turn on the hazard
warning indicators.
2. Let the vehicle sit for a minute. Open the hood and check the oil
level (see page 111). Although oil
level and oil pressure are not directly connected, an engine that
is very low on oil can lose pressure during cornering and other driving
maneuvers.
3. If necessary, add oil to bring the level back to the full mark on thedipstick (see page 155). 4. Start the engine and watch the oil
pressure indicator. If the lightdoes not go out within ten seconds,
turn off the engine. There is a
mechanical problem that needs to
be repaired before you can continue driving (See Emergency
Towing on page 227).
Taking Care of the Unexpected
LOW OIL PRESSURE INDICATOR
NOTICEMain Menu Table of Contents s t
Page 220 of 251
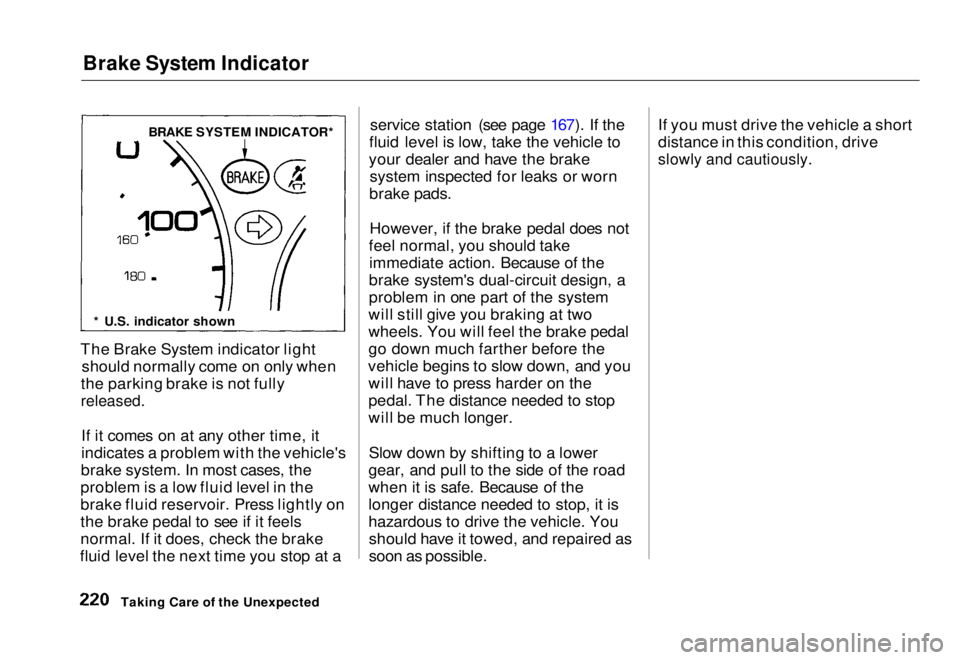
Brake System Indicator
The Brake System indicator light should normally come on only when
the parking brake is not fully
released.
If it comes on at any other time, it
indicates a problem with the vehicle's
brake system. In most cases, the
problem is a low fluid level in the
brake fluid reservoir. Press lightly on
the brake pedal to see if it feels
normal. If it does, check the brake
fluid level the next time you stop at a service station (see page 167). If the
fluid level is low, take the vehicle to
your dealer and have the brake system inspected for leaks or worn
brake pads.
However, if the brake pedal does not
feel normal, you should take immediate action. Because of the
brake system's dual-circuit design, a
problem in one part of the system
will still give you braking at two
wheels. You will feel the brake pedal
go down much farther before the
vehicle begins to slow down, and you will have to press harder on the
pedal. The distance needed to stop
will be much longer.
Slow down by shifting to a lower
gear, and pull to the side of the road
when it is safe. Because of the
longer distance needed to stop, it is
hazardous to drive the vehicle. You should have it towed, and repaired as
soon as possible. If you must drive the vehicle a short
distance in this condition, drive
slowly and cautiously.
Taking Care of the Unexpected BRAKE SYSTEM INDICATOR*
* U.S. indicator shownMain Menu Table of Contents s t
Page 223 of 251
Fuses
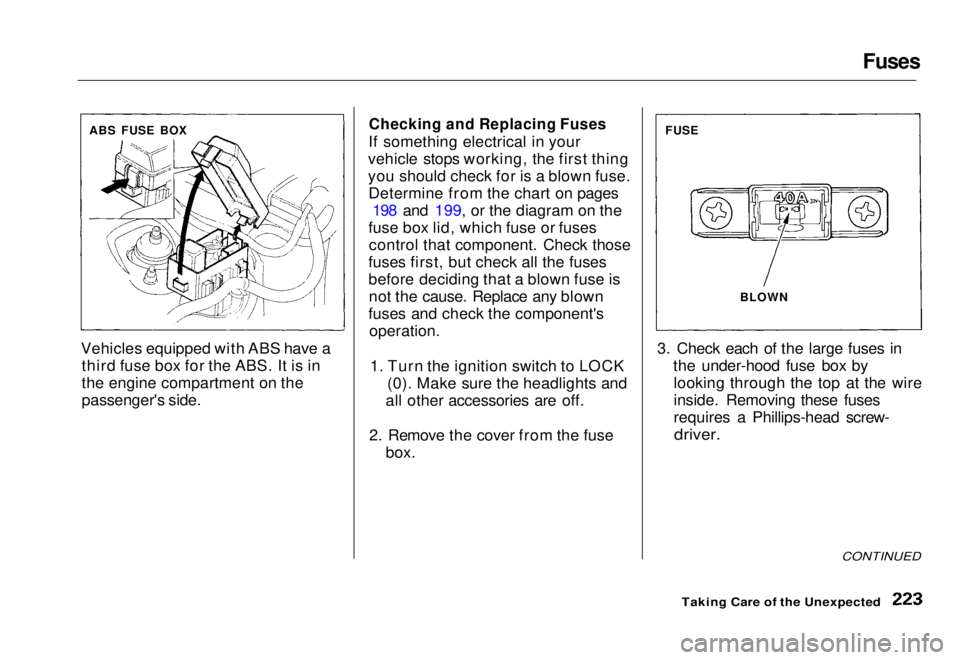
Vehicles equipped with ABS have a third fuse box for the ABS. It is in
the engine compartment on the
passenger's side.
Checking and Replacing Fuses
If something electrical in your
vehicle stops working, the first thing
you should check for is a blown fuse. Determine from the chart on pages 198 and 199, or the diagram on the
fuse box lid, which fuse or fuses control that component. Check those
fuses first, but check all the fuses
before deciding that a blown fuse is not the cause. Replace any blown
fuses and check the component's
operation.
1. Turn the ignition switch to LOCK (0). Make sure the headlights and
all other accessories are off.
2. Remove the cover from the fuse box. 3. Check each of the large fuses in
the under-hood fuse box bylooking through the top at the wire
inside. Removing these fuses
requires a Phillips-head screw-
driver.
CONTINUED
Taking Care of the Unexpected
ABS FUSE BOX
FUSE
BLOWNMain Menu Table of Contents s t