1998 HONDA CIVIC COUPE cruise control
[x] Cancel search: cruise controlPage 51 of 251
Instruments and Controls
This section gives information about the controls and displays that
contribute to the daily operation of
your Honda. All the essential
controls are within easy reach.
Control Locations............................ 50
Indicator Lights................................ 51
Gauges.............................................. 55
Speedometer................................ 55
Tachometer.................................. 55 Odometer...................................... 55
Trip Meter.................................... 55 Fuel Gauge................................... 56
Temperature Gauge.................... 56
Maintenance Required
Indicator.................................... 57
Controls Near the Steering
Wheel........................................58
Headlights.................................... 59
Daytime Running Lights............. 59
Instrument Panel Brightness..... 60
Turn Signals................................. 60
Windshield Wipers...................... 61
Windshield Washers................... 61
Hazard Warning........................... 62
Rear Window Defogger.............. 62
Steering Wheel Adjustment....... 63
Steering Wheel Controls ................ 64
Cruise Control.............................. 64
Keys and Locks................................ 67
Keys...............................................67
Ignition Switch............................. 67
Door Locks................................... 68
Power Door Locks....................... 69
Remote Transmitter.................... 70
Trunk............................................ 73
Seat Adjustments............................. 74
Front Seat Adjustments.............. 74
Rear Seat Access......................... 75
Head Restraints........................... 75
Folding Rear Seat............................ 76
Power Windows............................... 77
Moonroof.......................................... 79
Mirrors.............................................. 79
Adjusting the Power Mirrors..... 80
Parking Brake.................................. 80
Glove Box......................................... 81
Beverage Holder.............................. 82
Accessory Power Socket................ 83
Ashtrays............................................ 83
Interior Light.................................... 84
Instruments and ControlsMain Menu s t
Page 53 of 251
Indicator Lights
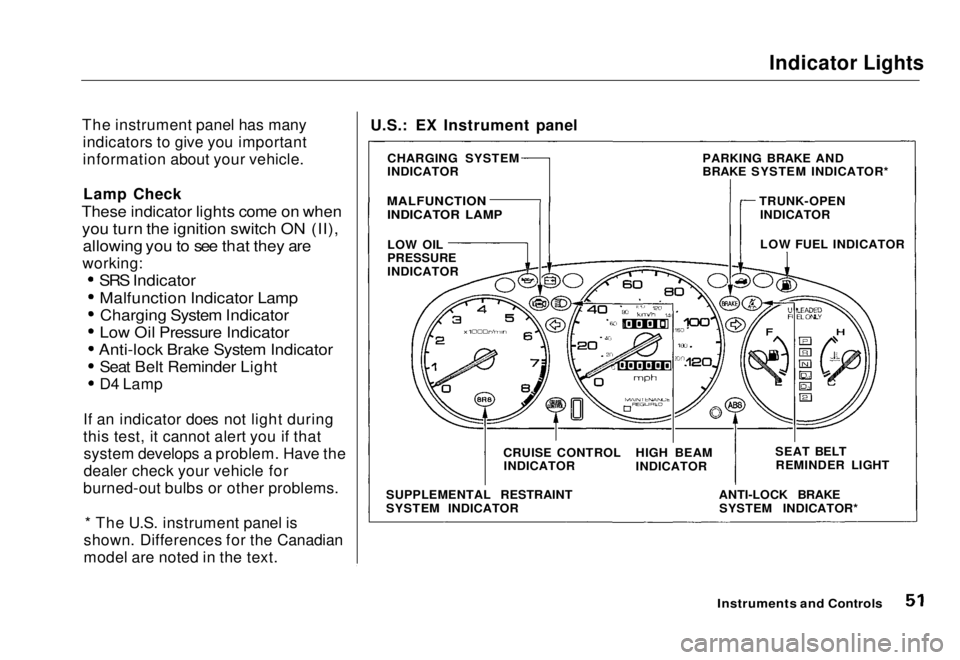
The instrument panel has many indicators to give you important
information about your vehicle.
Lamp Check
These indicator lights come on when
you turn the ignition switch ON (II), allowing you to see that they are
working:
SRS Indicator
Malfunction Indicator LampCharging System Indicator
Low Oil Pressure Indicator
Anti-lock Brake System Indicator
Seat Belt Reminder Light
D4 Lamp
If an indicator does not light during
this test, it cannot alert you if that system develops a problem. Have the
dealer check your vehicle for
burned-out bulbs or other problems.
* The U.S. instrument panel is
shown. Differences for the Canadian
model are noted in the text.
Instruments and Controls
U.S.: EX Instrument panel
CHARGING SYSTEM
INDICATOR
MALFUNCTION
INDICATOR LAMP
LOW OIL
PRESSURE
INDICATOR
SUPPLEMENTAL RESTRAINT
SYSTEM INDICATOR CRUISE CONTROL
INDICATOR HIGH BEAM
INDICATOR
ANTI-LOCK BRAKESYSTEM INDICATOR* SEAT BELT
REMINDER LIGHT
LOW FUEL INDICATOR
PARKING BRAKE AND
BRAKE SYSTEM INDICATOR*
TRUNK-OPENINDICATORMain Menu Table of Contents s t
Page 56 of 251
Indicator Lights
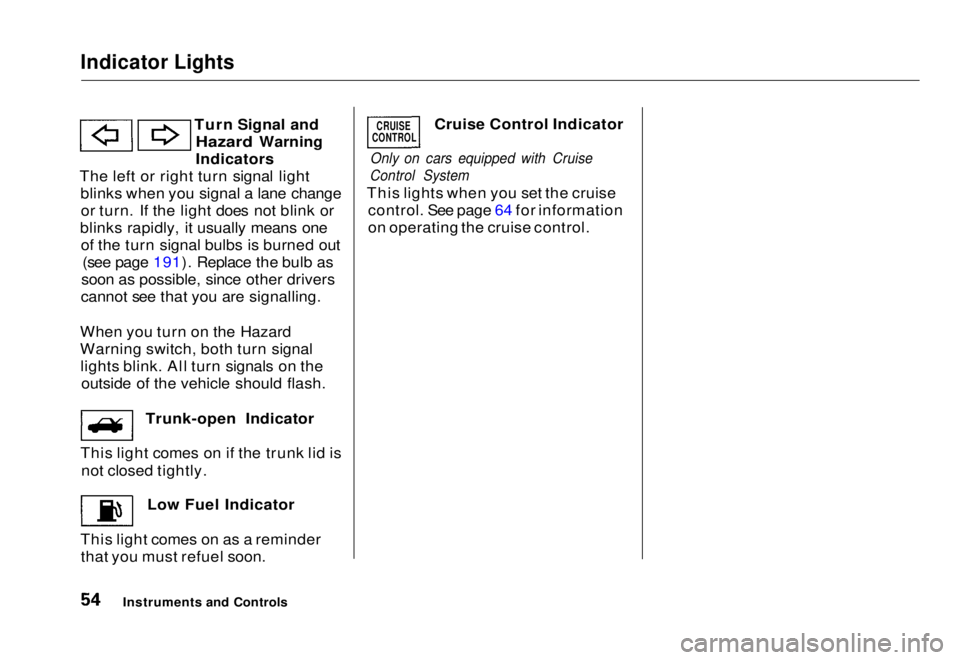
Turn Signal and
Hazard Warning
Indicators
The left or right turn signal light blinks when you signal a lane changeor turn. If the light does not blink or
blinks rapidly, it usually means one of the turn signal bulbs is burned out (see page 191). Replace the bulb as
soon as possible, since other drivers
cannot see that you are signalling.
When you turn on the Hazard
Warning switch, both turn signal lights blink. All turn signals on the outside of the vehicle should flash. Trunk-open Indicator
This light comes on if the trunk lid is not closed tightly. Low Fuel Indicator
This light comes on as a reminder that you must refuel soon. Cruise Control Indicator
Only on cars equipped with Cruise
Control System
This lights when you set the cruise control. See page 64 for information
on operating the cruise control.
Instruments and Controls
CRUISE
CONTROLMain Menu Table of Contents s t
Page 60 of 251
Controls Near the Steering Wheel
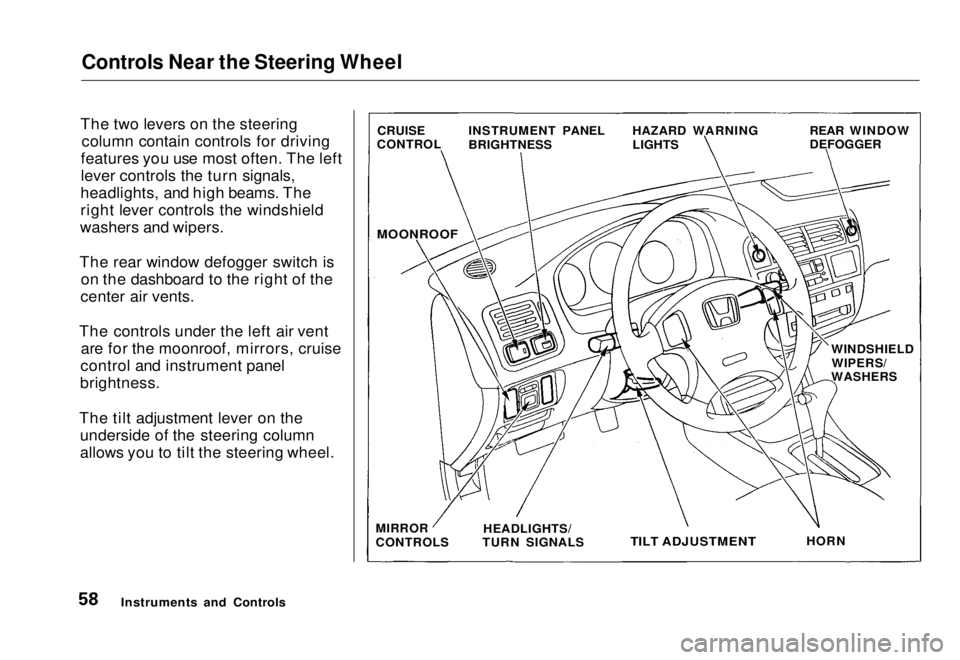
The two levers on the steering column contain controls for driving
features you use most often. The left
lever controls the turn signals,
headlights, and high beams. The
right lever controls the windshield
washers and wipers.
The rear window defogger switch is on the dashboard to the right of the
center air vents.
The controls under the left air vent are for the moonroof, mirrors, cruise
control and instrument panel
brightness.
The tilt adjustment lever on the underside of the steering column
allows you to tilt the steering wheel.
Instruments and Controls CRUISE
CONTROL INSTRUMENT PANEL
BRIGHTNESS HAZARD WARNING
LIGHTS REAR WINDOW
DEFOGGER
MOONROOF
WINDSHIELDWIPERS/
WASHERS
MIRROR
CONTROLS HEADLIGHTS/
TURN SIGNALS
TILT ADJUSTMENT
HORNMain Menu Table of Contents s t
Page 66 of 251
Steering Wheel Controls
Cruise Control On EX model in the U.S., and Si model
in Canada
Cruise control allows you to maintain
a set speed above 25 mph (40 km/h)
without keeping your foot on the accelerator pedal. It should be used
for cruising on straight, open highways. It is not recommended for
conditions such as city driving,
winding roads, slippery roads, heavy rain, or bad weather. You should
have full control of the vehicle under
those conditions. The cruise control, as it operates,
moves the accelerator pedal. You can
damage your vehicle's accelerator mechanism by resting your foot underthe pedal and blocking the movement.
Using the Cruise Control
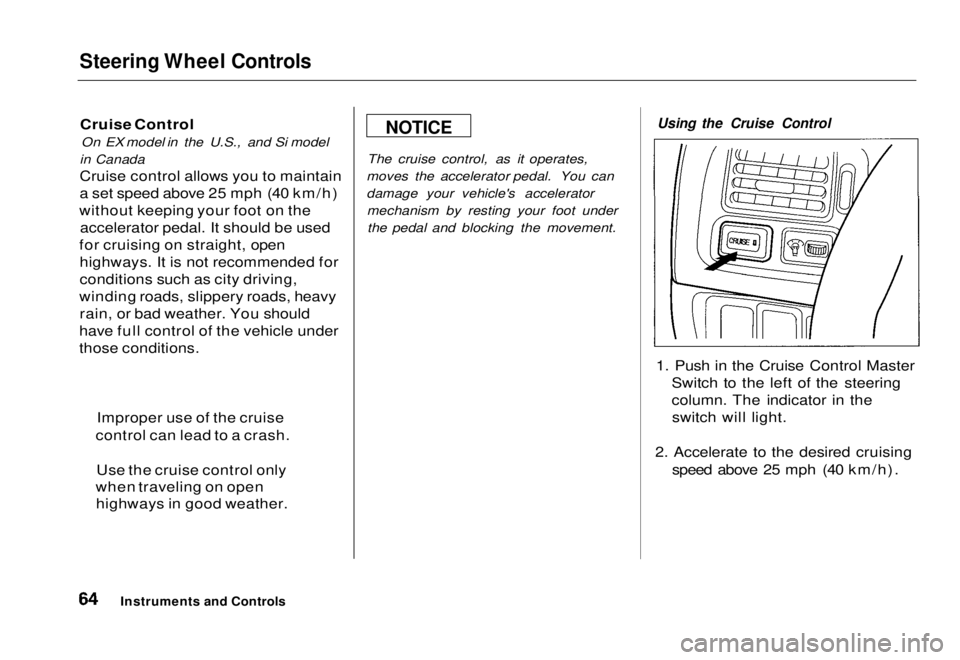
1. Push in the Cruise Control Master Switch to the left of the steering
column. The indicator in theswitch will light.
2. Accelerate to the desired cruising speed above 25 mph (40 km/h).
Instruments and Controls
NOTICE
Improper use of the cruise
control can lead to a crash.
Use the cruise control only
when traveling on open highways in good weather.Main Menu Table of Contents s t
Page 67 of 251
Steering Wheel Controls
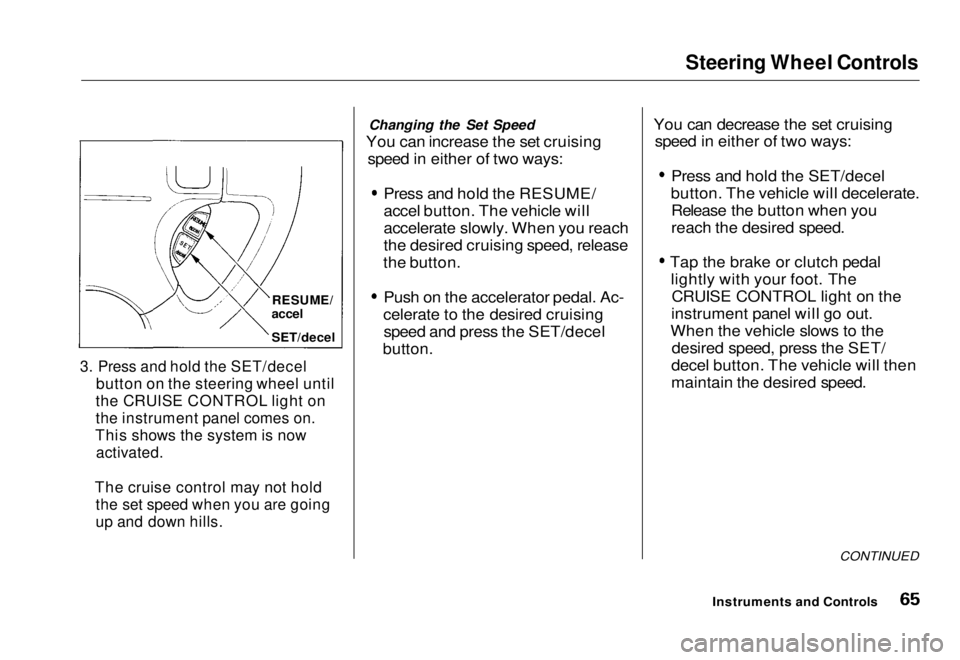
3. Press and hold the SET/decel
button on the steering wheel until
the CRUISE CONTROL light on
the instrument panel comes on.
This shows the system is now
activated.
The cruise control may not hold
the set speed when you are going
up and down hills.
Changing the Set Speed
You can increase the set cruising speed in either of two ways:
Press and hold the RESUME/
accel button. The vehicle will
accelerate slowly. When you reach
the desired cruising speed, release
the button. Push on the accelerator pedal. Ac-
celerate to the desired cruising speed and press the SET/decel
button.
You can decrease the set cruising
speed in either of two ways:
Press and hold the SET/decel
button. The vehicle will decelerate. Release the button when you
reach the desired speed.
Tap the brake or clutch pedal lightly with your foot. The
CRUISE CONTROL light on the
instrument panel will go out.
When the vehicle slows to the desired speed, press the SET/
decel button. The vehicle will then
maintain the desired speed.
CONTINUED
Instruments and Controls
RESUME/
accel
SET/decelMain Menu Table of Contents s t
Page 68 of 251
Steering Wheel Controls
Even with the cruise control turned
on, you can still use the accelerator
pedal to speed up for passing. After
completing the pass, take your foot
off the accelerator pedal. The vehicle
will return to the set cruising speed.
Resting your foot on the brake or
clutch pedal will cause the cruise
control to cancel.
Cancelling the Cruise Control
You can cancel the cruise control in any of these ways:
Tap the brake or clutch pedal.Press the SET/decel and RE-
SUME/accel buttons at the same
time.
Press the Cruise Control Master
Switch.
When you tap the brake or clutch pedal, or press the SET and RE-SUME buttons at the same time, theCRUISE CONTROL light on the
instrument panel will go out and the
vehicle will begin to slow down. You can use the accelerator pedal in the
normal way.
If you use the brake or clutch pedal
to cancel cruise control, the system
remembers the previously-set cruising speed. To return to that speed, accelerate to above 25 mph
(40 km/h) and press the RESUME/
accel button until the CRUISE CON-
TROL light comes on. The vehicle will accelerate to the same cruising
speed as before.
If you cancel cruise control by
pressing the SET and RESUME
buttons at the same time, the
previously-set cruising speed is erased. To use the cruise control,
accelerate to the desired cruisingspeed and press the SET/decel
button.
Pressing the Cruise Control MasterSwitch turns the system completely
off and erases the previous cruising
speed from memory. To use the
system again, refer to Using the
Cruise Control.
Instruments and ControlsMain Menu Table of Contents s t
Page 115 of 251
Fuel Economy
The condition of your vehicle and your driving habits are the two mostimportant things that affect the fuel
mileage you get.
Vehicle Condition Always maintain your vehicle accord- ing to the maintenance schedule.
This will keep it in top operating
condition.
An important part of that mainte- nance is the Owner Maintenance
Checks (see page 153). For
example, an underinflated tire
causes more "rolling resistance,"
which uses fuel. It also wears out
faster, so check the tire pressure at
least monthly.
In winter, the build-up of snow on
your vehicle's underside adds weight and rolling resistance. Frequent
cleaning helps your fuel mileage and
reduces the chance of corrosion. Driving Habits
You can improve fuel economy by driving moderately. Rapid acceler-
ation, abrupt cornering, and hard
braking use more fuel.
Always drive in the highest gear that allows the engine to run and acceler-ate smoothly.
Depending on traffic conditions, try
to maintain a constant speed. Every time you slow down and speed up,
your vehicle uses extra fuel. Use the cruise control, when appropriate, to
increase fuel economy. A cold engine uses more fuel than a
warm engine. It is not necessary to "warm-up" a cold engine by letting it
idle for a long time. You can drive
away in about a minute, no matter
how cold it is outside. The engine
will warm up faster, and you get better fuel economy. To cut down on
the number of "cold starts," try tocombine several short trips into one.
The air conditioning puts an extra load on the engine which makes ituse more fuel. Turn off the A/C to
cut down on air conditioning use.
Use the flow-through ventilation
when the outside air temperature is moderate.
Before DrivingMain Menu Table of Contents s t