Page 736 of 1680
Hub Bearing Unit
lllustrated Index
Note the following during installation;
. Before installing the brake disc, clean the mating surfaces ofthe rear hub and the brake disc.
. Before installing the wheel, clean the mating surfaces ofthe brake disc and the wheel.
All oxcopt Typo R Modol3:
6 mm FLANGE BOL
SPINDLE22 x 1.5 mmReplace.
6 mm BRAKE DISC RETAINING
WHEEL12 x 1.5 mm
(cont'd)
18-27
Page 737 of 1680
Rear Suspension
Hub Bearing Unit (cont'd)
Type R Model:
TRAIUNG ARMREAR WHEELSPLASH GUARDHUB BEARING UNIT
SPINDLE WASHER
SPIND1I NUT22 x 1.5 mm
HUB CAP.Replace.
6 mm FLANGE BOLT
6 mm BRAKE DISC RETAINING SCREW
WHEEL NUT12 x 1.5 mm
II
18-28
Page 738 of 1680
- Hub Bearing Unit
Removal
1. Loosen the wheel nuts slightly.
2. Raise the rear of vehicle, and support it with safety
stands in the proper locations (see section 1).
3. Remove the wheel nuts and rear wheel.
NOTE: Take care not to damage the hub uniton disassembly.
4. Pull the parking brake lever up.
5. Remove the hub cap.
6. Raise the locking tab on the spindle nut, then
remove the nut.
7. Remove the 6 mm brake disc retaining screws.
Replace.
8.
9.
Release the parking brake lever.
Remove the 6 mm flange bolts and caliper shield.
CALIPER SHIELDCheck for bending or damage.
6 mm FLANGE BOLTS
(cont'd)
18-29
Page 739 of 1680

10.
11.
't2.
13.
't 4.
Rear Suspension
Hub Bearing Unit {cont'dl
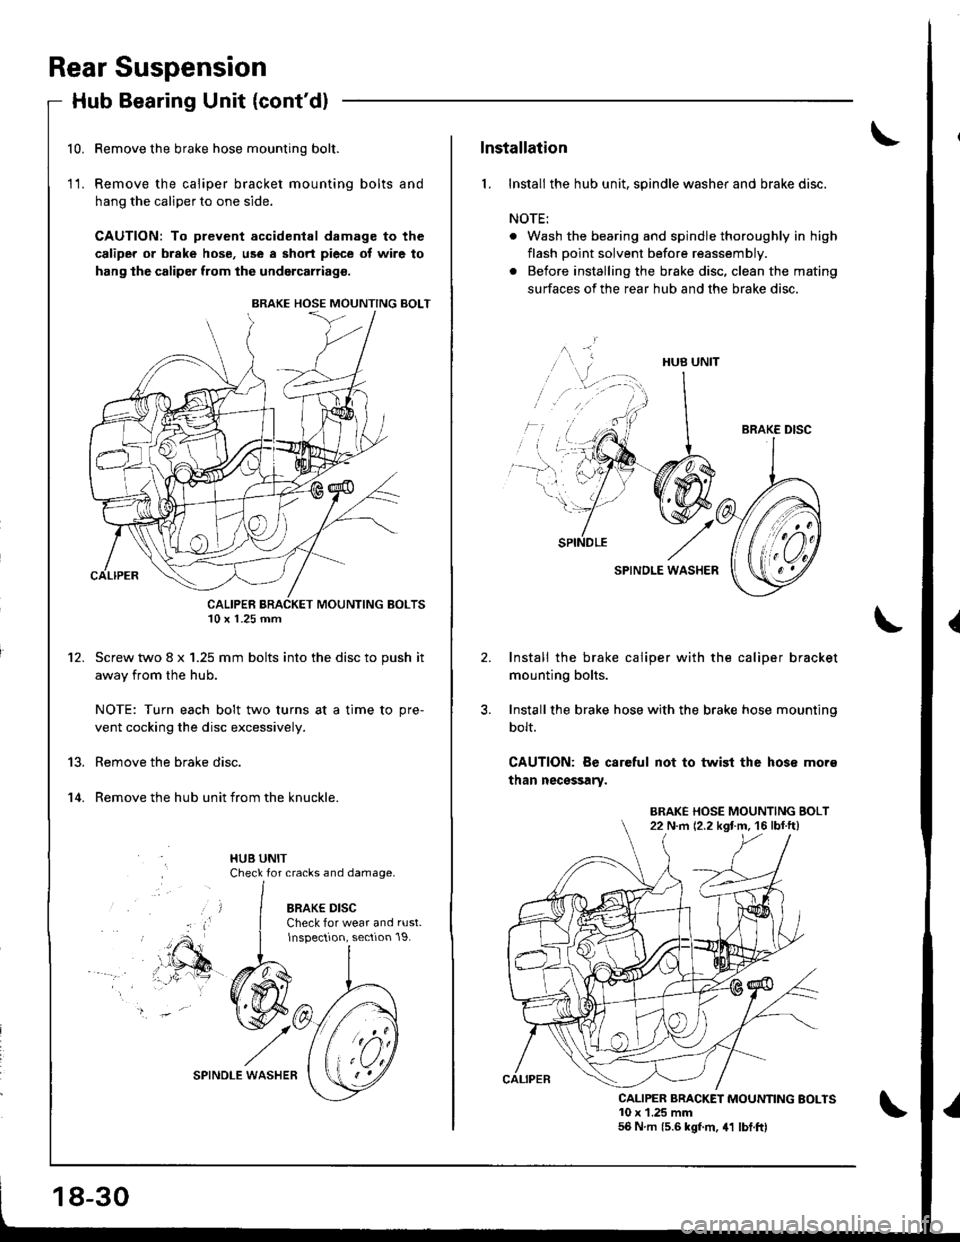
Remove the brake hose mounting bolt.
Remove the caliper bracket mounting bolts and
hang the caliper to one side.
CAUTION: To prevent accidenlal damage to the
caliper or brake hose, use a short piece of wire to
hang the caliper from the undgrcarriag€.
Screw two 8 x 1.25 mm bolts into the disc to push it
away from the hub.
NOTE: Turn each bolt two turns at a time to pre-
vent cocking the disc excessively.
Remove the brake disc.
Remove the hub unit from the knuckle.
BRAKE HOSE MOUNTING BOLT
10 x 1.25 mm
18-30
lnstallation
l. Install the hub unit, spindle washer and brake disc.
NOTE:
. Wash the bearing and spindle thoroughly in high
flash point solvent before reassembly.
. Before installing the brake disc, clean the mating
surfaces of the rear hub and the brake disc.
HUS UNIT
SPINOLE WASHER
Install the brake caliper with the caliper bracket
mounting bolts.
Install the brake hose with the brake hose mounting
bolt.
CAUTION: Be careful not to twist the hos€ mor€
than nec€ssary.
CALIPER BRACKET MOUNNNG EOLTS10 x 1.25 mm56 N m 15.6 kgf.m, 41 lbt.ftl
^ri
t,--�-
BRAKE DISC
BRAKE HOSE MOUNTING BOLT22 N.m 12.2 kgt m. 16 lbf ftl
Page 740 of 1680
- Hub Bearing Unit
4. Install the caliper shield with the 6 mm flange bolts.
6 mm FLANGE BOLTS9.8 N.m 11.0 kgI.m, 7 lbr.ftl
5. Tighten the 6 mm brake disc retaining screws,
6 mm BBAKE D|SC RETA|NTNG SCREWS9.8 N.m 11.0 kgf.m, 7.2 tbtftl
6. Install a new spindle nut, then tighten the nut.
7. Install a new hub cap.
8. Install the rear wheel with the wheel nuts.
NOTE: Before installing the wheel, clean the mating
surfaces of the brake disc and the wheel.
REAR WHEEL
WHEEL12 x 1.5 mm
SPINDLE NUT22 x 1.5 mm181 N.m {18.5 kgt.m. 134lbl.ftl
108 N.m 111.0 kg'f.m.80 lbf.tr)
Beplace.NOTE: After tightening, use a drift tostake the spindle nut shoulder againstthe spindle.
(cont'd)
18-31
Page 741 of 1680
Rear Suspension
Suspension Arms (cont'dl
Removal/lnspection
All except Type R Models:mm BOLT
STABILIZER BARCheck for bending and damage.
AOJUSTING BOLT(FLANGE BOLT)'10 x 1.25 mm
FLANGE BOLT10 x 1.25 mm
UPPER ARMCheck for bending and damage.
UPPER ARM BUSHINGCheck for deteriorationand damage.
COMPENSATOR ARMCheck for bendingand damage,
FLANGE BOLT'10 x 1.25 mm
STABILIZER END BUSHING
Check for deterioration and damage.COMPENSATORARM BUSHINGCheck for deteriorationand damage-
FLANGE EOLTl0 x 1.25 mmBOL8 x 1.25 mmSTABILIZER LINK. Check for bending and damage.. Check the bushing for deterioration and damage.
ARM BUSHING
18-32
. Check for deterioration and damage.. See page 18-37Ior bushing replacement.
Page 743 of 1680

Rear Suspension
Suspension Arms (cont'dl
Installation
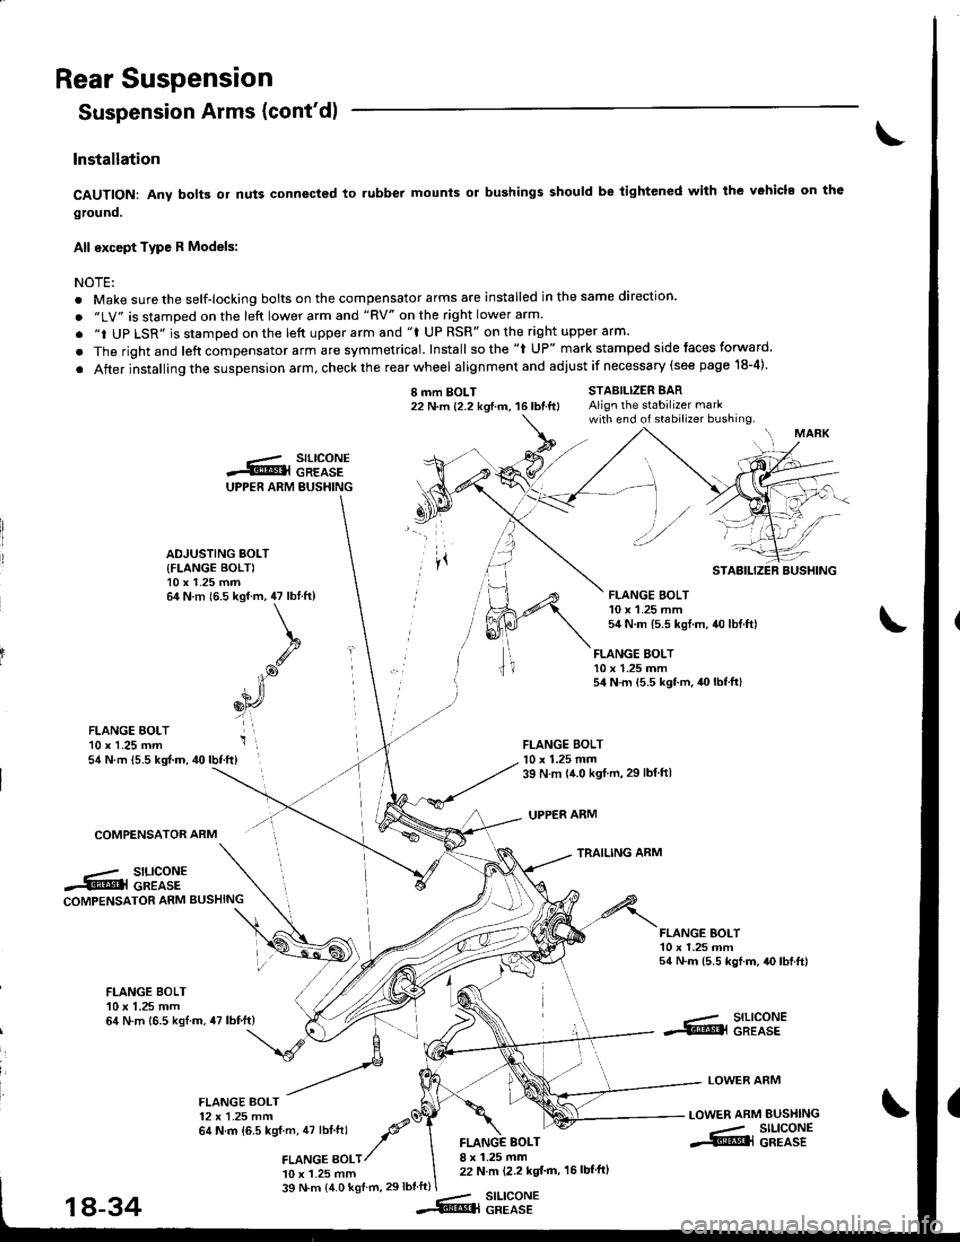
CAUTION: Any bolB or nuts connected to rubber mounts or bushings should be tightened with the vehicl. on th6
ground.
All except Type R Models:
NOTEi
. Make sure the self-locking bolts on the compensator arms are installed in the same direction.
. "LV" is stamped on the left lower arm and "RV" on the right lower arm.
. "i UP LSR" is stamped on the lett upper arm and "f UP RSR" on the right upper arm.
. The rightand left compensator arm are symmetrical. Install sothe "l UP" mark stamped side faces forward.
. After installing the suspension arm, check the rear wheel alignmentand adjust if necessary (see page 18-4).
I mm BOLT22 N.m {2.2 kgtm, 16lbtft}STABILIZER BARAlign the stabilizer markwith end of stabilizer bushing.
FLANGE BOLT10 x 1.25 mm54 N.m {5.5 kgf.m.40lbtft}
FLANGE BOLTl0 x 1.25 mm39 N m {{.0 kgt.m,29 lbtftl
UPPER ARM
TRAILING ARM
FLANGE EOLT'10 x 1.25 mm54 N.m {5.5 kgf.m, 40lbf.ft}
COMPENSATOR ARM
.-/ SILICONE.5tr@l GREASECOMPENSATOR ARM BUSHING
FLANGE BOI-T10 x 1.25 mm54 N.m (5.5 kgf.m, {O lbf.ft)
FLANGE BOLT10 x 1.25 mm64 N.m 16.5 kgl.m.47 lbf.ft)--- SILICONE.S!@l GREASE
LOWER ARM
LOWER ARM BUSI{ING
-- SILIGONE.S@l GREASE
FLANGE BOLT12 x 1.25 mm64 N.m {6.5 kgf m, 47 lbt.ftl -P'a
,amce gotr/
10 x 1.25 mm
BOLT8 x 1.25 mm22 N.m (2.2 kgt'm, 16 lbf'ftl
39 N.m (4.0 kgf m.29lbtft)stLtcoNEGREASE
UPPER ARM BUSHING
.-.- SILICONES@l GREASE
ADJUSTING BOLT
{FLANGE BOLT)10 x 1.25 mm64 N.m (6.5 kgf.m, 47 lbtft)
k
.g
iP
6[r,
i',
STABILIZER BUSHING
FLANGE BOLT10 x 1.25 mm54 N.m 15.5 kgt.m, 40 lbf.ftl
18-34--Rq
Page 744 of 1680

)Installation
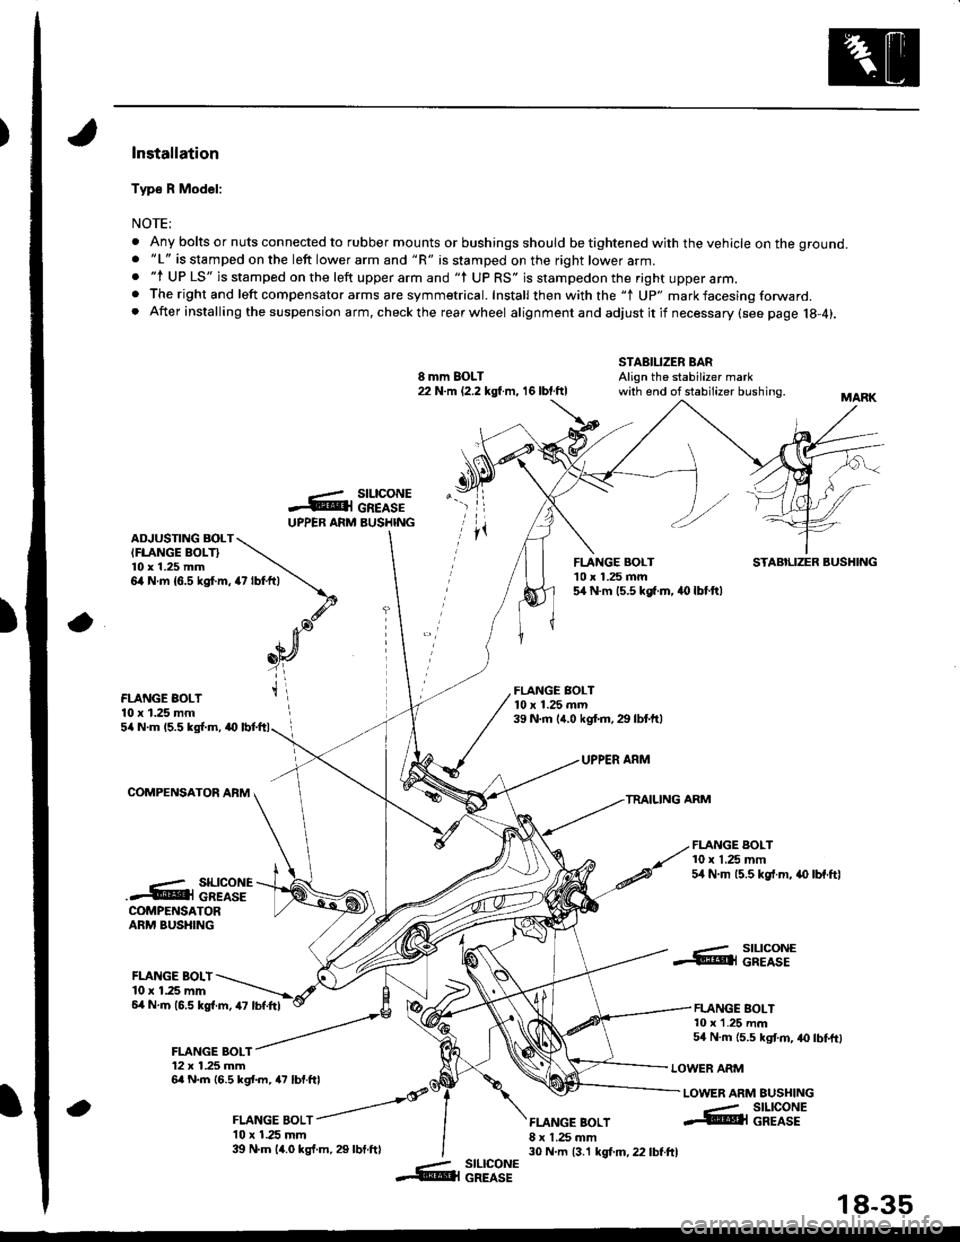
Typ€ R Model:
NOTE;
. Any bolts or nuts connected to rubber mounts or bushings should be tightened with the vehicle on the ground.. "L" is stamped on the left lower arm and "R" is stamped on the right lower arm.. "l UP LS" is stamped on the left upper arm and "l UP RS" is stampedon the right upper arm.. The right and left compensator arms are symmetrical. Install then with the "1 Up" mark facesing forward. After installing the suspension arm, checkthe rearwheel alignmentand adjustitif necessary(see page 18-4).
8 mm BOLT22 N.m (2.2 kgl m, 16 lbt.ftl
STABILIZER BARAlign the stabilizer markwith end of stabilizer bushing.
-ArUPPEB ARM
rz tot+,t \
\.d'. Ja),n[
_oY
t\
a
stLtcoNEGREASEBUSHINGADJUSTING BOLTIFLANGE BOLT}l0 x 1.25 mm6,4 N.m {6.5 kgt m,
FLANGE BOLT'10 x 1.25 mm5,[ N.m 15.5 kg[.m. 40 lbt.ftl
STABILIZER BUSHING
FLANGE BOLT10 x 1.25 mm
FLANGE BOLT10 x 1.25 mrn39 N.m (,r.0 kgf.m.29 lbtftl5/a N.m 15.5 kgl.m, a0
COMPENSATOR AFM
UPPER ARM
TRAILING ARM
FLANGE BOLT10 x 1.25 mm54 N.m 15.5 kgf.m, .{) lbf.ftl..- SILICONE.4@i cREAsECOMPENSATORARM BUSHING
FLANGE BOLI10 r 1.25 mm6,4 N.m (6.5 kgl.m, 47 lbf.Itl
FLANGE BOLT12 x 1.25 mm6a N.m 16.5 kgl.m, a7 lbf.ftl
, ror"orr /
l0 x 1.25 mm39 N.m 14.0 kgf.m, 29 lbt.ftl
FLANGE BOLT8 x 1.25 mm30 N.m 13.1 kgt m, 22 lbf.ftl
..- SILICONE.@ll GREASE
FLANGE BOLT10 x 1.25 mm54 N.m {5.5 kgt m, 40 lbtftl
LOWER ARM
LOWER ARM EUSHING
a
--- SILICONE@l GREASE
-- slLlcoNE&l GREASE
18-35