Page 891 of 1680
Moonroof
lndex
Hatchback
CAELE ASSEMBLYReplacement, page 20-81SUNSHAOEReplacement, page
MOTOBReplacement, page 20-80
GLASS BRACKETReplacement, page 20 81
SUNSHADE RAIL
FRONT DRAINCHANNELDRAIN CHANNEL
FRAME SEAL
FRONT DRAIN TUBE
V,
/
SLIDE STOPPERLINK
FRAMEReplacement, page 20 80
FRONT RAILHOLDER
REAR DRAIN TUSE
GUIDE RAILReplacement, page 20 81
(@
II RIGHT REARllj DRA|N vaLVE.fr/
,rr, ^*^/& IDRAIN VALVE I
[il
ir/l
@'\'FRoNT DRATNVALVE
20-77
Page 893 of 1680

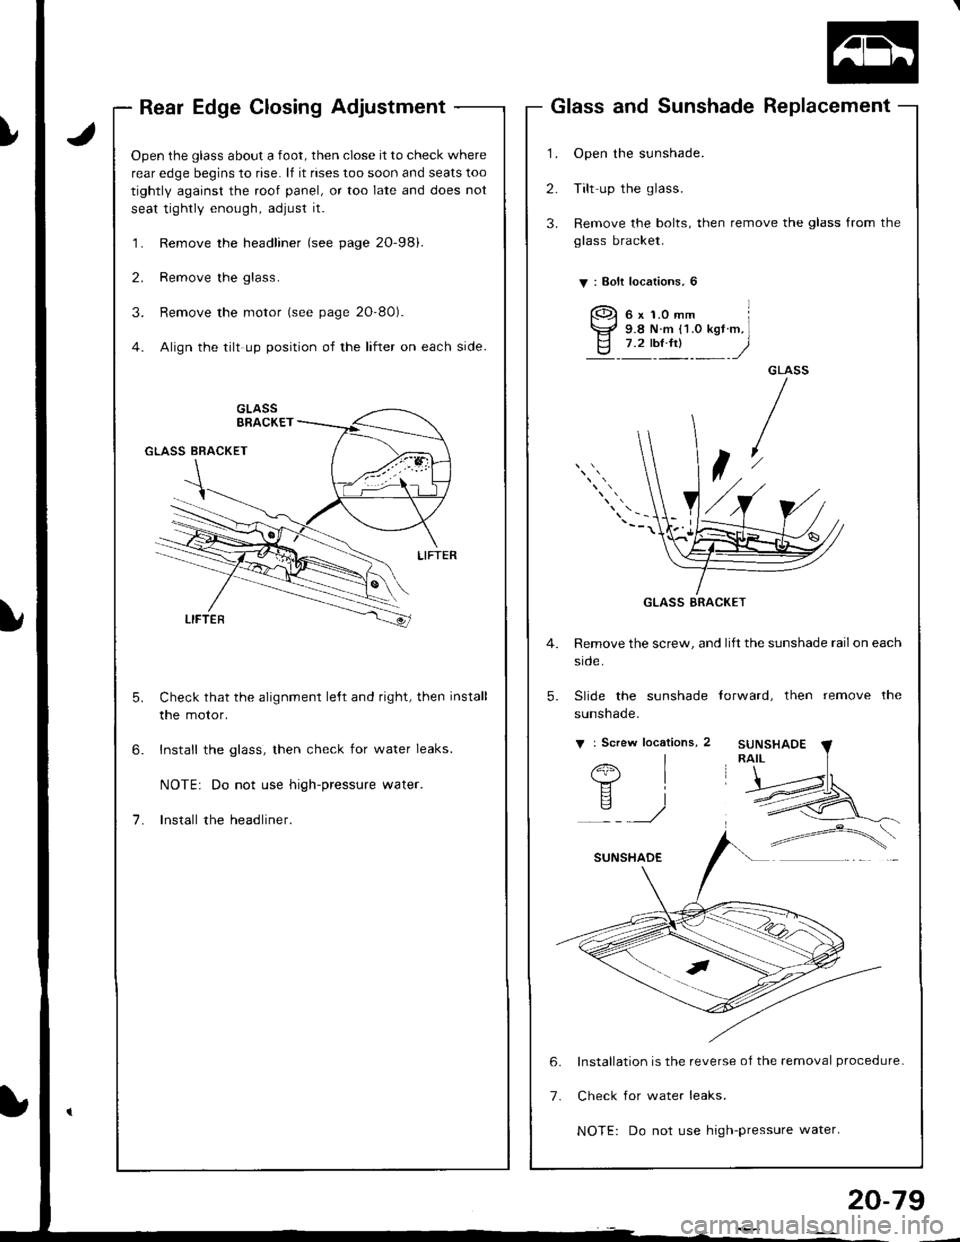
Rear Edge Closing Adjustment
Open the glass about a foot, then close it to check where
rear edge begins to rise. lf it rises too soon and seats too
tightly against the roof panel, or too late and does not
seat tightly enough, adjust it.
'l . Remove the headliner (see page 2O-98).
2. Remove the glass.
3. Remove the motor (see page 2O-80).
4. Align the tilt up position of the lifter on each side.
Check that the alignment le,ft and right, then install
the motor.
Install the glass, then check for water leaks.
NOTE: Do not use high-pressure water.
Install the headliner.
1.
2.
3.
Glass and Sunshade Replacement
Open the sunshade.
Tilt up the glass.
Remove the bolts, then remove the glass from the
glass bracket.
V : Bolt localions, 6
GLASS
t
4. Remove the screw, and lift the sunshade railon each
srcle.
5. Slide the sunshade torward, then remove the
sunshade.
v : Screw locations, 2
I
I
i
6x1.0mm l9.8 N.m {1.O kgt.m,l7.2 tbt.ftt )
Installation is the reverse of the removal procedure-
Check for water leaks.
NOTE: Do not use high-pressure water.
GLASS BRACKET
20-79
Page 894 of 1680

Moonroof
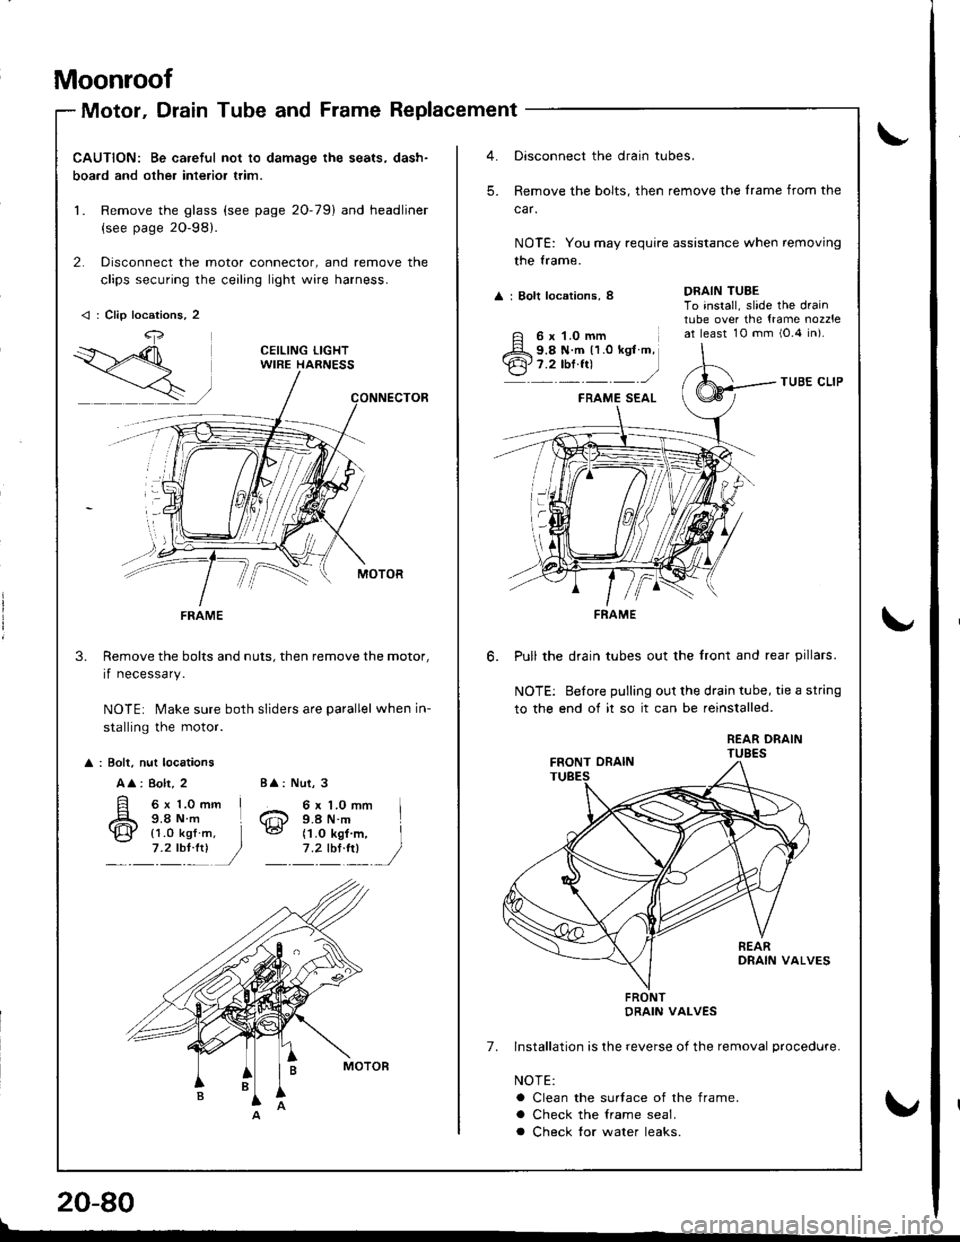
Motor, Drain Tube and Frame Replacement
CAUTION: Be careful not to damage the seats, dash-
boa.d and other interior trim.
1. Remove the glass (see page 20-79) and headliner
{see page 2O-98}.
2. Disconnect the motor connector, and remove the
clips securing the ceiling light wire harness.
Remove the bolts and nuts, then remove the motor,
if necessary.
NOTE: Make sure both sliders are parallel when in-
stalling the motor.
3.
: Bolt, nut locations
A
: 8olt, 2
6x 1.0mm I9.8Nm L
Nut, 3
6 x 1.0 mm I9.4 N.m
BA:
6@{1.0 kgf7 .2 tbl:!)(1.O kgf m, I
1'�lIltl /
< : Clip locations, 2
4,
FRAME
Oisconnect the drain tubes.
Remove the bolts, then remove the lrame from the
car.
NOTE: You may require assistance when removing
the trame.
A : Bolt locations, 8
TUBE CLIP
FRAME SEAL
Pull the drain tubes out the front and rear pillars.
NOTE: Before pulling out the drain tube, tie a string
to the end of it so it can be reinstalled.
REAR DRAINTUBES
7. Installation is lhe reverse of the removal procedure.
NOTE:
a Clean the surtace of the frame.
a Check the lrame seal.
a Check tor water leaks.
DRAIN TUBETo install, slide the draintube over the {rame nozzleat least 10 mm i0.4 in).
-'
6 x 1.0 mm9.8 N.m 11.0 kgt m,7.2 tbf.fr)
FRAME
FRONTDRAIN VALVES
!
\"
20-80
\
v
Page 898 of 1680
Moonroof
lndex
Sedan
GLASS BRACKETReplacement, page 20 88
SUNSHADEBeplacement, page
MOTORReplacement, page 20 87
FRONT DRAINCHANNEL
SUNSHADE RAIL
GUIOE RAILReplacemenl, page 20-88
REAR RAILHOLDER
SEAL
FRONT DRAIN TUBE
\,r,
r
/
REAR DRAIN TUBE
RIGHT REARORAIN VALVE
A FRONT ORAINq!-vawe
20-84
z=2,>
ORAIN CHANNEL
HoR I
v#,o**,"*
%bYP
FRAMEReplacement, page 20-87
\u 51-'--q€ \"
I
Page 900 of 1680

Moonroof
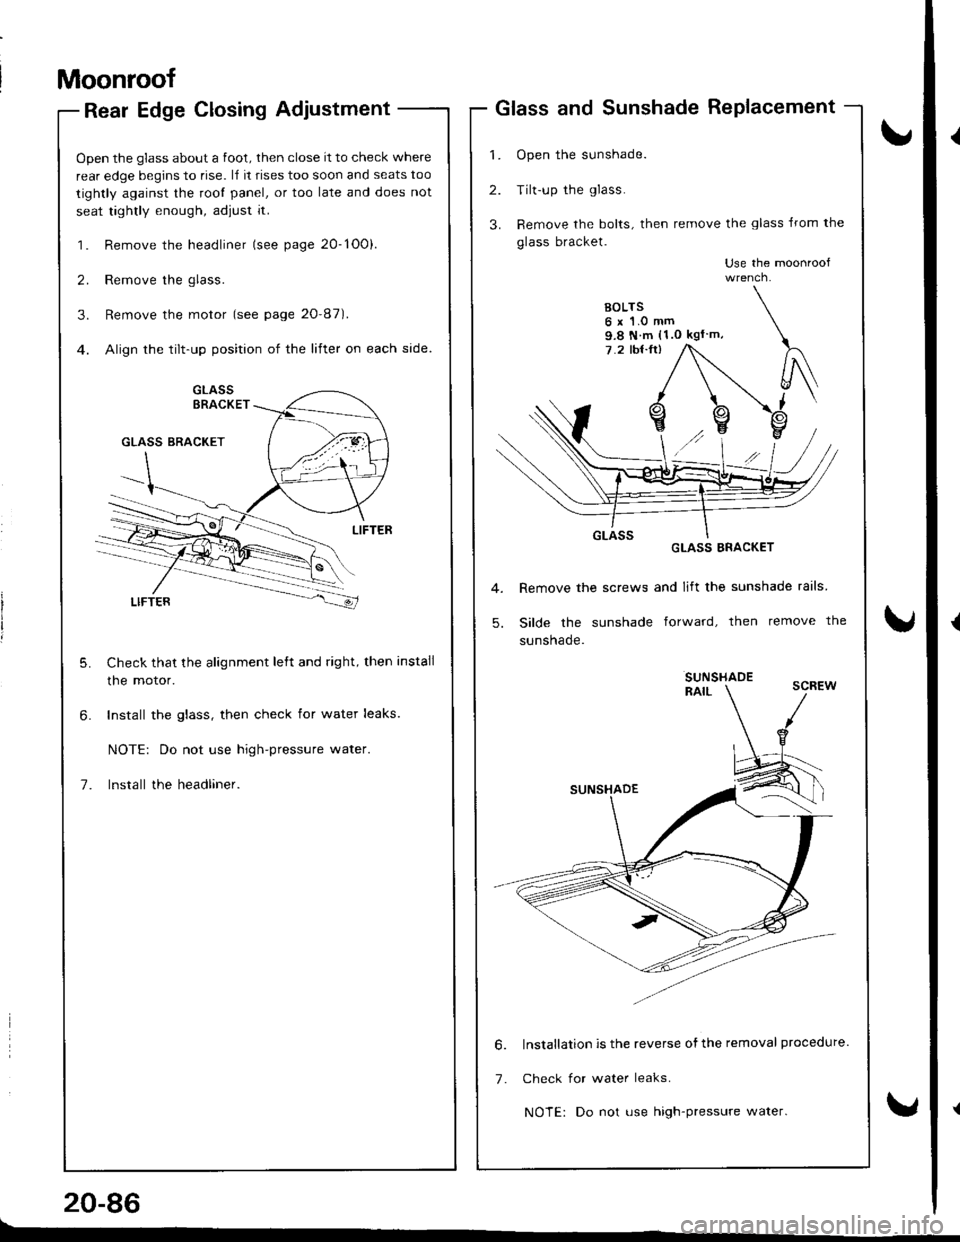
Rear Edge Closing Adjustment
Open the glass about a foot, then close it to check where
rear edge begins to rise. l,f it rises too soon and seats too
tightly against the root panel, or too late and does not
seat tightly enough, adjust it.
1. Remove the headliner (see page 20-1O0).
2. Remove the glass.
3. Remove the motor (see page 20'87).
4. Align the tilt-up position of the lifter on each side.
Check that the alignment left and right, then install
the motor.
Install the glass, then check for water leaks.
NOTE: Do not use high-pressure water.
lnstall the headliner.
20-86
Glass and Sunshade RePlacement
1. Open the sunshade.
2. Tilt-up the glass.
3. Remove the bolts, then remove the glass lrom the
glass bracket.
Use the moonroof
GLASS ERACKET
Remove the screws and lift the sunshade rails
Silde the sunshade forward, then remove the
sunsnaqe.
SUNSHADERAIL
lnstallation is the reverse ofthe removal procedure.
Check for water leaks.
NOTE: Do not use high-pressure water.
9.8 N m (1.0 kgl m,
6.
7.
Page 901 of 1680

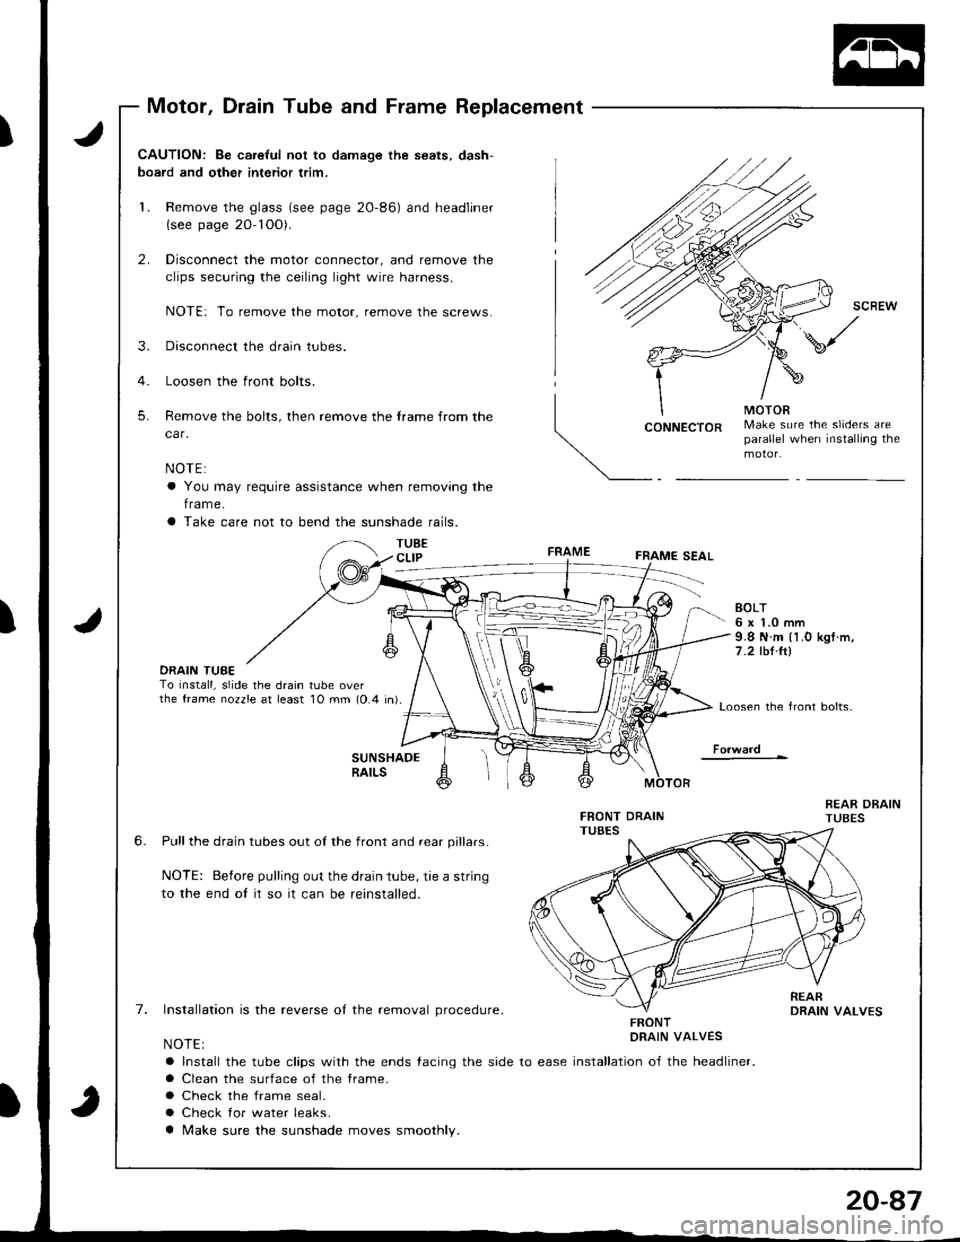
Motor, Drain Tube and Frame Replacement
J
J
CAUTION: Be ca.eful not to damage the seats, dash-
board and other interior trim,
1. Remove the glass (see page 2O-86) and headliner(see page 20- 1OO).
2. Disconnect the motor connector, and remove the
clips securing the ceiling light wire harness.
NOTE: To remove the motor, remove the screws.
3. Disconnect the drain tubes.
4. Loosen the front bolts.
5. Remove the bolts, then remove the frame from the
car.
NOTE:
a You may require assistance when removing the
f rame.
a Take care not to bend the sunshade rails.
TUBECLIP
CONNECTORMake sure the sliders areparallel when installing themotor.
FRAMEFRAME SEAL
DRAIN TUBETo Install, slide the drain tube overthe frame nozzle at least 10 mm (0.4 in).
EOLT6 x 1.0 mm9.8 N.m l1.O kgf .m,
7 .2 tbt.ltl
Loosen the front bolts,
Fo.ward
6.
7.
SUNSHADERAILS
Pull the drain tubes out of the front and rear pillars.
NOTE: Before pulling out the drain tube, rie a string
to the end oI it so it can be reinstalled.
Installation is the reverse ol the removal procedure.
NOTE:
a Install the tube clips with the ends {acing the side to ease
a Clean the surface of the frame.
a Check the frame seal.
a Check lor water leaks.
a Make sure the sunshade moves smoothly.
FRONTDRAIN VALVES
installation of the headliner.
Page 902 of 1680
Moonroof
Remove the frame (see page 20-87).
Remove the drain channel.
NOTE: Take care not to damage, twist or lift the
seal.
SCREW
Remove the motor (see page 20-87).
Remove the tront drain channel.
Remove the nut, then remove the front rail holder'
Glass Bracket/Slider, Lifter. Guide Rails and Cable Assembly Replacement -
1.
2.
5.
6.
NUT6x1.0mm9.8 N m 11.0 kgf rrt,7 .2 lbl.lrl
GLASS BRACKET/SLIDER, LIFTERSUB.SEAL
rnorur / r.l .i:'r
RAIL . ',.;.
"o.ol.. i\
9. Slide rhe qldss brackel slrder, liftel backward, then remove it
NOTE: Install the rear rail holder, then glue
the sub seal to the lrame.
FRAME
20-88
3. Remove the screwg, then remove the sunshade rail
by sliding it backward.
SUNSHADERAIL
SUNSHADE RAIL
7. Remove the screws @ attaching the guide rail, then lilt the guide rail.
8. Remove the nut, then remove the rear rail holder.
NOTE: Remove the anchor spring.
FRONT DRAINCHANNEL
NUT6 x 1.0 mm9.8 N m {1.0 kgl m,
7.2 tbf ft)
L-
Page 905 of 1680
Interior Trim
Replacement
a Weai gloves to remove and installthe ttim and panels.
a When prying with a flat tip screwdriver, wrap it with
protective tape to prevent damage.
NOTE: Take care not to bend or scratch the trim andpanels.
Kick panel/Front pillar trim removali
1. Remove the kick panel.
< : Clip locations
A<: Clip, 1 B<:Clip, 1 CV: Clip,'l
fl,ffi,ry
NOTE: Remove the driver's kick panel while pulling
the hood release handle.
KICK PANEL
Pull the door trim back, then remove the front pillar
trim.
< : Clip locations, 4
lnstallation is the reverse of the removal procedure.
NOTE: lf necessary, replace any damaged clips.
FRONT PILLAR
'1.
2.
Hatchback
Rear trim panel/Side t?im panel/Ouarter pillar trim panel
removal:
REAR SHELF
Remove the rear seat (see page 20-110).
Remove the trunk mat and spare tire lid
TRUNK MAT FASTENER
5. Remove the rear body stiffener (Type R).
>: Boh locltionr, 2
8 x 1.25 mmZ2 N-ml?.2 kgt m,18 tbf.ftl
REAR SHELF
20-91