Page 914 of 1680

Headliner
Replacement (cont'd)
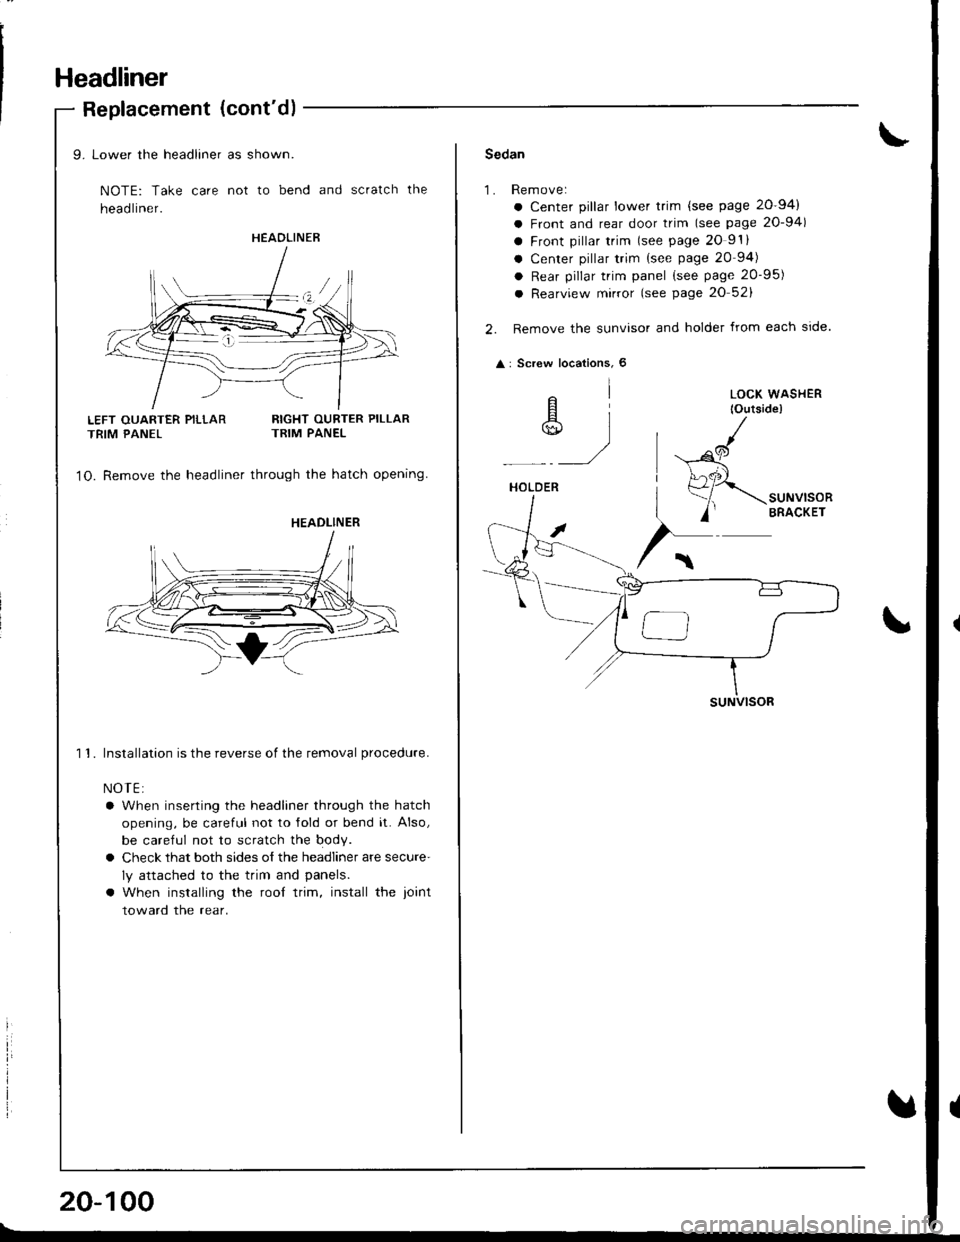
LEFT OUARTER PILLARTRIM PANEL
9. Lower the headliner as shown.
NOTE: Take care not to bend and scratch the
head liner.
RIGHT OURTER PILLARTRIM PANEL
1O. Remove the headliner through the hatch opening
1 1. Installation is the reverse of the removal procedure.
NOTE:
a When inserting the headliner through the hatch
opening, be careful not to lold or bend it. Also,
be careful not to scratch the body.
a Check that both sides o{ the headliner are secure'
ly attached to the trim and panels.
a When installing the rool trim, install the ioint
toward the rear.
HEAOLINER
HEADLINER
20-100
Sedan
1.Rem ove:
a Center pillar lower trim {see page 20-94)
a Front and rear door trim (see page 20-94)
a Front pillar trim lsee page 20 9'.
a Center pillar trim {see page 20 94)
a Rear pillar trim panel (see page 20-95)
a Rearview mirror (see page 20 52)
Remove the sunvisor and holder from each side.
: Screw locations, 6
elA]*)
HOLDER
suNVlsoR
LOCK WASHER
lOutside)
,al
(
Page 915 of 1680
3. Remove the front and rear ceiling lights, then djs
connect the connectofs.
: Screw, nut locations
AA
CONNECTOR
FRONTLIGHTCEILING
REAR CEILINGLIGHT
HOOK
A
N
LENS
CONNECTOR
Remove the grab handles (Iront and
senger's) and grab holF caps {dl|ver'sr.
GRAB HANDLE
GRAE HOLE CAPS
Screw locations.
ciEI
6t
J-.
20-101
Page 916 of 1680
Headliner
Replacement (cont'd)
5.
6.
Remove the roof trim (moonroof model).
Detach the clips by sliding the headliner torward.
ROOF TRIM
Remove the headliner through the passenger's door
openrng.
Installation is the reverse of the removal procedure.
NOTE:
a When inserting the headliner through the door
opening, be caretul not to fold or bend it. Also,
be careful not to scratch the body.
o Check that both sides of the headliner are secure-
ly attached to the trim and panels.
a When installing the roof trim, install the joint
toward the rear.
)
7.
8.
HEAOLINER
HEAOLINER
Page 919 of 1680
8. Separate the seat cushion and seat tracks.
NOTE:
a Before separating, slide the seat cushlon
backward.
a Take care not to bend the joint rod.
<: Bolt locations, 4
10 r 1.25 mm i47 N.m t4.a kd.m, I"::'^ _*_L
Disconnect the rear seat access cable (hatchback
passenger sl.
REAR SEATACCESS CAELE
RECLINEADJUSTER
9. Separate the seat track and recline adjuster'
: Boli, nut locations
AA : Bolt, 1
iI8 x 1.25 mm !ii rrr.- rz.z ror'., I**:_
_/
BV: Nut, 2
8 t 1.25 mm
.1QL zz ttt.-\S2 (2.2 kef m.16 tbl.ttl
I
RECLINEADJUSTER
1O. lnstallation is the reverse of the removal proceclure.
NOTE:
a To prevent wrinkles when installing a seat-back
cover, make sure the material is stretched even-
ly over the pad betore securing all the hooks.
a Apply grease to the moving surfaces.
20-10:
Page 920 of 1680
Seats
Front Seat Disassembly and Reassembly
CAUTION: When prying with a tlat tip screwdriver, wrap it with protective tape to pravont damage.
NOTE: Take care not to scratch the body or tear the seat covers.
Driver's seat (manual height adiustment):
HEADREST
SEAT CUSHION
PIVOT NUT8 x 1.25 mm22 N.m 12.2 kg{.m,16 |bnft)
BUSHING
HOOK
LUMBERSUPPORTKNOB
cuP
CENTER
RECLINEAI!USTER
8 x 1 .25 mm2.2 N.m {2.2 kgf.m,10 x 1.25 mm47Nm{4.Ekgl.m,35 tbt.ftl
CLIP
16 tbf.ftlRECUNECOVER
SEATTRACK
WASHER
8 x 1.25 mm22N-m l2.2kgl.m,16 tbtftl
SEAT TRACK
Reassembly in the reverse order of disassembly.
REARHEIGHTKNOA
8 x 1.25 mm20 N.m 12.0 kgt.m,14 tbtft)
CLIP
8 x 1.25 mm22 N.n 12.2 kgl.m,16 tbf.tt)
NOTE:
. Make sure the bushing and pivot washer are installed properly.
a To prevent wrinkles when installing the seat-back cover. make sure the material is stretched evenly over the pad.
a Grease all moving portion.
SEAT-BACK
RECLINELEVER
Page 924 of 1680
Seats
Rear Seat Replacement
Hatchback
NOTEr Take care not to scratch the seat covers and
body.
1. Fold the seat backs lorward.
2. Remove the clips, then lold the trunk mat.
V : Clip locations, 14
I=+ i---M- l
_Y/
STRIKER
I\.
TRUNK MAT
20-110
3. Remove the clip pin on each side.
Slide the seat-backs outward, then remove the seat-
backs Jrom the pivot bracket.
SEAT.BACK
SEAT-BACK PTVOTBRACKET
\
CLIP PIN
Page 925 of 1680

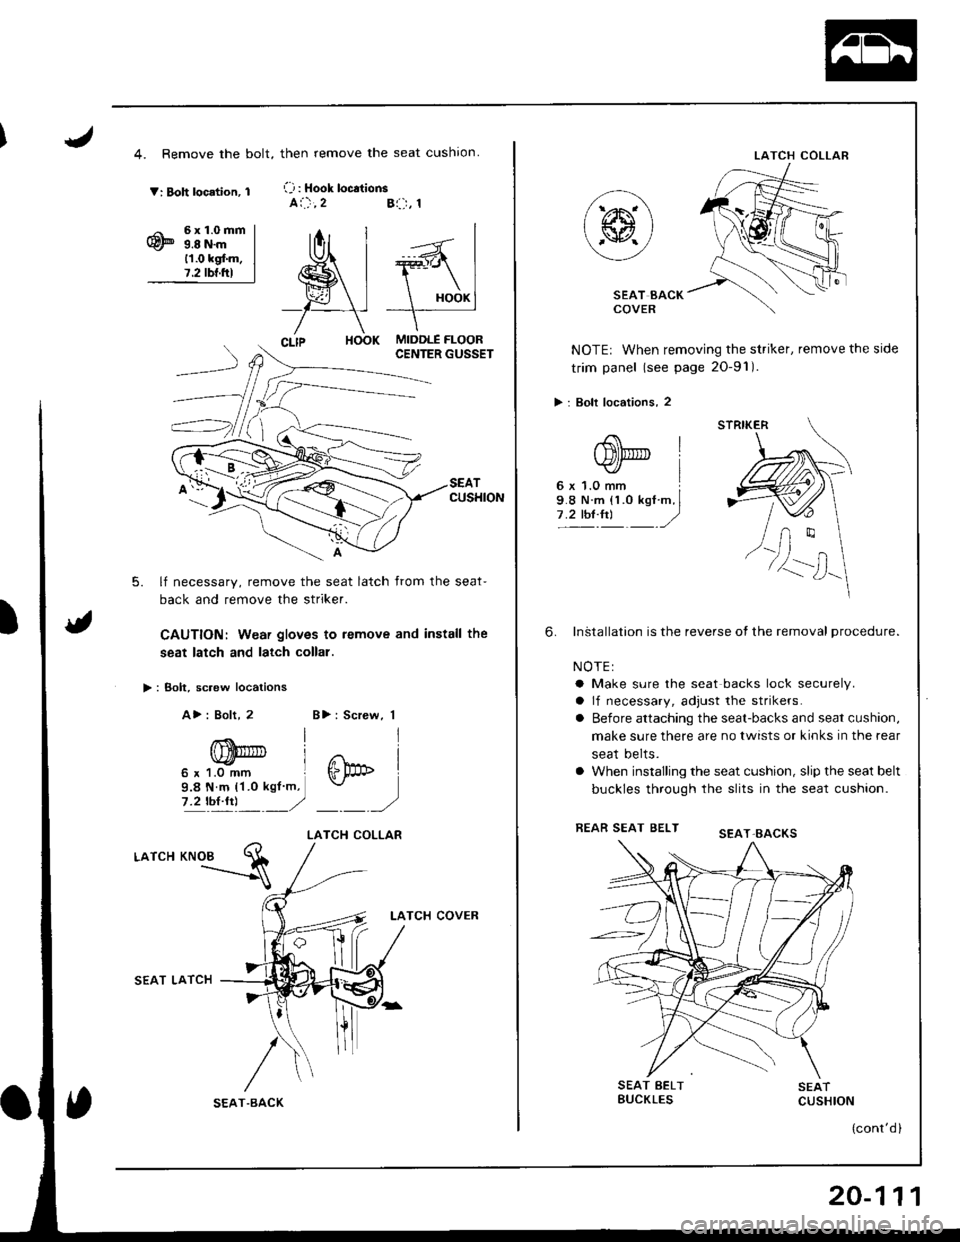
4. Remove the bolt,
V: Boh location, 1
6x1.0mm9.8 N.m11.0 kgf.m.7.2 tbf.ftl
>: Bolt, sc.ew locations
A>: Bolt, 2
CUSHION
5. lf necessary, remove the seat latch from the seat-
back and remove the striker.
CAUTION: Weai gloves to remove and install the
seat latch and latch collal.
-"":=s
then remove the seat cushron.
(-j : Hook loc.tionsai.),2Bl:-r, 1
MIDDLE FLOORCENTER GUSSET
T
)
B>: Screw, 1
j
I
ffipb I
)
LATCH COLLAR
LATCH
SEAT LATCH
LATCH COVER
/
T.BACK
LATCH COLLAR
SEAT BACKCOVER
NOTE: When removing the striker, remove the side
trim panel (see page 2O-91).
> : Bolt locations, 2
InStallation is the reverse ot the removal procedure.
NOTEI
a Make sure the seat backs lock securely.
a lf necessary, adjust the strikers.
o Before attaching the seat-backs and seat cushion,
make sure there are no twists or kinks in the rear
seat belts.
a When installing the seat cushion, slip the seat belt
buckles through the slits in the seat cushion.
FEAR SEAT BELT
6.
SEAT BELTBUCKLESSEATCUSHION
(cont'd )
STRIKER
SEAT.EACKS
20-111
Page 926 of 1680
Seats
Rear Seat Replacement {cont'd)
Sedan
NOTE: Take care not to scratch the seat covers and
oooy.
1. Fold the seat-back forward.
2. Remove the clips.
V : Clip locations. 8
SEAT-BACK
TRUNI( MAT
SEAT-BACK
20-112
3. Detach the hook. then remove the trunk mat.
TRUNK
/--x'
w
YHOOK
4. Remove the bolts, then remove the seat-back.
V : Bolt locations, 4
REAR SEAT LATCH/LOCK CYUiIDEB(see pog€ 2G113)REAR SEATHVOT BNACKET(s6e page 20-113)
SEAT-BACK
I
(\Jr', 6 x 1.0 mm I-ET- 9.8 N m (1.0 kgl'm, I
E 7.2 tbt.ht Iq7 ,2'/.
SEAT.BACK