Page 295 of 1807
N08522
N08520
N08521
1
Retainer
2
3
N08523
- BODYQUARTER WINDOW GLASS
BO-39
2119 Author�: Date�:
1997 SUPRA (RM502U)
4. REMOVE QUARTER WINDOW GLASS
(a) Remove the 3 nuts.
(b) Push piano wire through from the interior.
(c) Tie both wire ends to a wooden block or similar object.
HINT:
Apply adhesive tape to the outer surface to keep the surface
from being scratched.
NOTICE:
When separating the glass, take care not to damage the
paint and exterior.
(d) Cut the adhesive by pulling the piano wire around it.
HINT:
Cut the adhesive areas in the order as shown in the illustration,
so leave the adhesive where the glass retainer stays.
(e) Let the piano wire pass as shown on the illustration, cut
off the adhered part to the pin.
NOTICE:
Do not damage the glass retainers.
(f) Remove the glass.
NOTICE:
Leave as much of the adhesive on the body as possible
when cutting off the glass.
Page 296 of 1807

BO0R4-01
BO4420
Adhesive
N00141
Primer M
Adhesive Primer M
Primer M
N19393
A
BC A
BC
A-AB-B
C-C BO-40
- BODYQUARTER WINDOW GLASS
2120 Author�: Date�:
1997 SUPRA (RM502U)
INSTALLATION
1. CLEAN AND SHAPE CONTACT SURFACE OF BODY
(a) Using a knife, cut away any rough areas on the body.
HINT:
Leave as much of the adhesive on the body as possible.
(b) Clean the cutting surface of the adhesive with a piece of
shop rag saturated in cleaner.
HINT:
Even if all the adhesive has been removed, clean the body.
2. CLEAN REMOVED GLASS
(a) Using a scraper, remove the adhesive sticking to the
glass.
(b) Clean the glass with cleaner.
NOTICE:
Do not touch the glass after cleaning it.
3. COAT CONTACT SURFACE OF BODY WITH PRIMER
ºMº
Using a brush, coat the contact surface on the body with Primer
M.
NOTICE:
�Let the primer coating dry for 3 minutes or more.
�Do not coat primer M to the adhesive.
�Do not keep any of the opened primer M for later use.
4. COAT CONTACT SURFACE OF GLASS WITH PRIMER
ºGº
(a) Using a brush or sponge, coat the edge of the glass and
the contact surface with Primer G.
(b) Before the primer dries, wipe it off with a clean shop rag.
NOTICE:
�Let the primer coating dry for 3 minutes or more.
�Do not keep any of the opened primer G for later use.
Page 297 of 1807
N19392
A
BC
A-A
B-B
C-C A
BC
H
HH
- BODYQUARTER WINDOW GLASS
BO-41
2121 Author�: Date�:
1997 SUPRA (RM502U)
5. APPLY ADHESIVE
(a) Cut off the tip of the cartridge nozzle.
Part No. 08850-00801 or equivalent
HINT:
After cutting off the tip, use all adhesive within the time de-
scribed in the table below.
TemperatureTackfree time
35 °C (95 °F)15 minute
20 °C (68 °F)100 minute
5 °C (41 °F)8 hour
(b) Load the cartridge into the sealer gun.
(c) Coat the glass with adhesive as shown.
H: 12 mm (0.47 in.)
6. INSTALL QUARTER WINDOW GLASS
(a) Install the 3 nuts and glass to the body.
7. INSPECT FOR LEAKS AND REPAIR
(a) Perform a leak test after the hardening time has elapsed.
(b) Seal any leak with sealant.
Part No. 08833-00030 or equivalent
8. INSTALL REMOVED PARTS IN REVERSE ORDER TO
REMOVAL ORDER
Page 378 of 1807

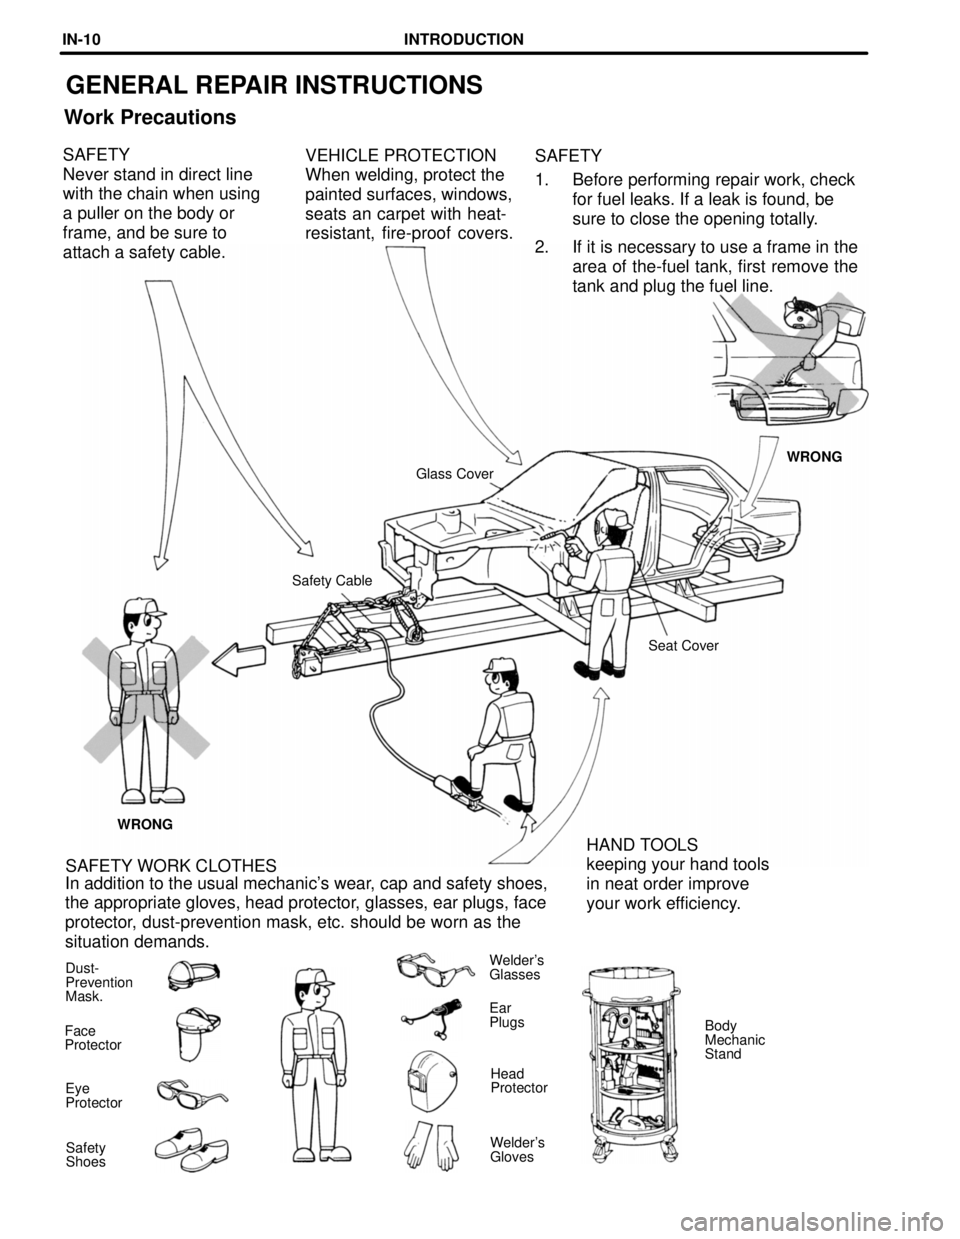
GENERAL REPAIR INSTRUCTIONS
Work Precautions
VEHICLE PROTECTION
When welding, protect the
painted surfaces, windows,
seats an carpet with heat-
resistant, fire-proof covers.SAFETY
1. Before performing repair work, check
for fuel leaks. If a leak is found, be
sure to close the opening totally.
2. If it is necessary to use a frame in the
area of the-fuel tank, first remove the
tank and plug the fuel line. SAFETY
Never stand in direct line
with the chain when using
a puller on the body or
frame, and be sure to
attach a safety cable.
WRONG
Glass Cover
Safety Cable
Seat Cover
WRONG
HAND TOOLS
keeping your hand tools
in neat order improve
your work efficiency. SAFETY WORK CLOTHES
In addition to the usual mechanic's wear, cap and safety shoes,
the appropriate gloves, head protector, glasses, ear plugs, face
protector, dust-prevention mask, etc. should be worn as the
situation demands.
Dust-
Prevention
Mask.Welder's
Glasses
Ear
Plugs
Body
Mechanic
Stand Face
Protector
Head
Protector
Eye
Protector
Welder's
Gloves Safety
Shoes
INTRODUCTIONIN-10
Page 406 of 1807

PLEASE ROUTE THIS BULLETIN TO YOUR COLLISION REPAIR CENTER
MANAGER AND COLLISION REPAIR TECHNICIANS
00408-03000-146
• Prying, pushing, or pulling on body panels may cause stretching beyond the
flexible limits of the paint coatings causing delamination (paint coating
separation) or micro-cracking. These conditions may not be immediately
detectable (use a 30X magnifying hand-held microscope to inspect for
cracks).
Important
: The PDR process uses special tools to access otherwise
inaccessible areas. Drilling of holes, prying away or cutting
reinforcements or welded structural components to gain access to perform
a PDR is strictly prohibited and, if done, may void the manufacturer’s
corrosion protection warranty.
• Using blocks or wedges between window moldings and door glass (for tool
access) is also prohibited. This process can damage window moldings and
reduce the factory designed-in pressure of the inner belt molding on the base of
the door glass.
• Window guard protectors must be used to protect window glass during PDR
operations.
Specific Repair Guidelines
• Panels with multiple dents, including hail damage, may be considered for
PDR as long as the original panel integrity (strength) is maintained. If a panel
exhibits any evidence of loss of strength due to the number of dents, the
panel should not be considered for PDR. If after performing a PDR repair the
panel exhibits evidence of loss of strength, the panel must be repaired using
conventional body shop processes.
• Round/oval dents may be removed if they are 2 inches or more away from
panel edges or body lines and are no larger than the diameter of a soft ball.
• Creases that are up to 4” long
may be considered for removal.
Note
: sharp creases cannot be removed using PDR.
• Dents or protrusions, of up to 6mm, from the reverse side, on hoods, trunks,
fenders, and quarter panels may be considered, but extreme caution must be
used during this type of repair due to the higher potential of damaging the
paint surface. Remember no broken paint
.
Page 511 of 1807

FOR THE TOYOTA DEALER
COLLISION REPAIR INFORMATION
TITLE: URETHANE ADHESIVE SEALANT FOR PAGE 1 of 3
FIXED GLASS INSTALLATION
SECTION: STRUCTURAL REPAIR BULLETIN #31
MODELS: ALL
DATE: NOVEMBER 1988
In order to comply with FMVSS 212 ± Windshield Retention and FMVSS 216 ± Roof Crush
Resistance, the factory uses a urethane adhesive sealant with bonded strength of not less
than 40 kilograms per square centimeter or 569
pounds per square inch for certain bonded
windshields and rear windows on Toyota vehicles.
A Urethane adhesive sealant of at least equivalent strength must
be used to maintain
these retention and roof crush standards when windshield glass replacements are
performed by either the dealer or an outside glass shop.
Since the adhesive kits listed in Toyota Repair Manuals are not available in the U.S.A.
, a
listing of some locally available equivalent materials is provided below. Be sure to follow
the sealant manufacturer's instructions for best results.
�CVS Urethane Auto Glass Sealer by American Sure Seal
Bonding strength = 600 pounds per square in. (approximate)
�Super Fast Urethane by 3M
Bonding strength = 1000 pounds per square in. (approximate)
�Unrest 212 by Kent Industries
Bonding strength = 600 pounds per square in. (approximate)
�Urethane E Auto Glass Sealer by Protective Treatment Inc.
Bonding strength = 600 pounds per square in. (approximate)
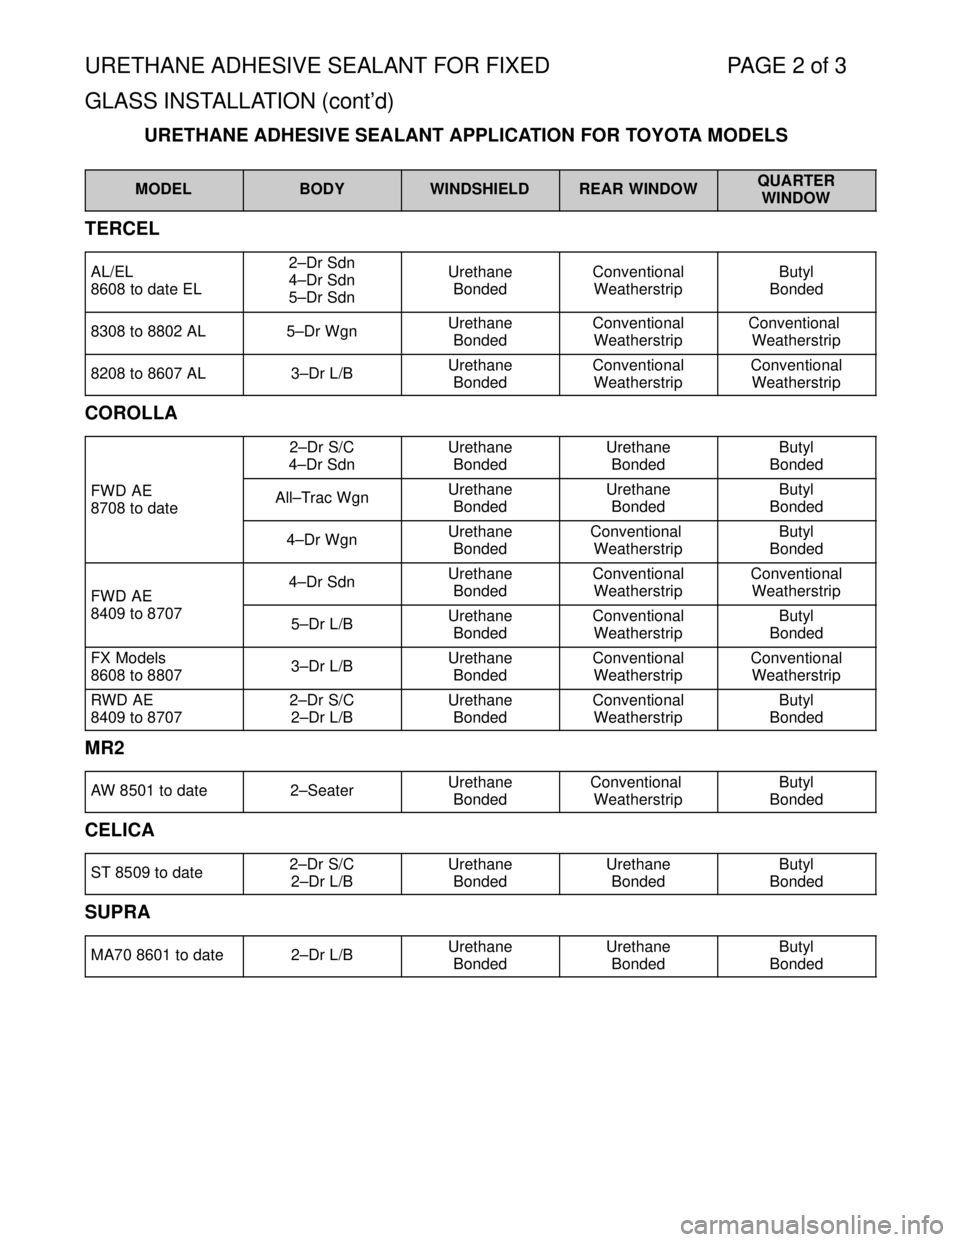
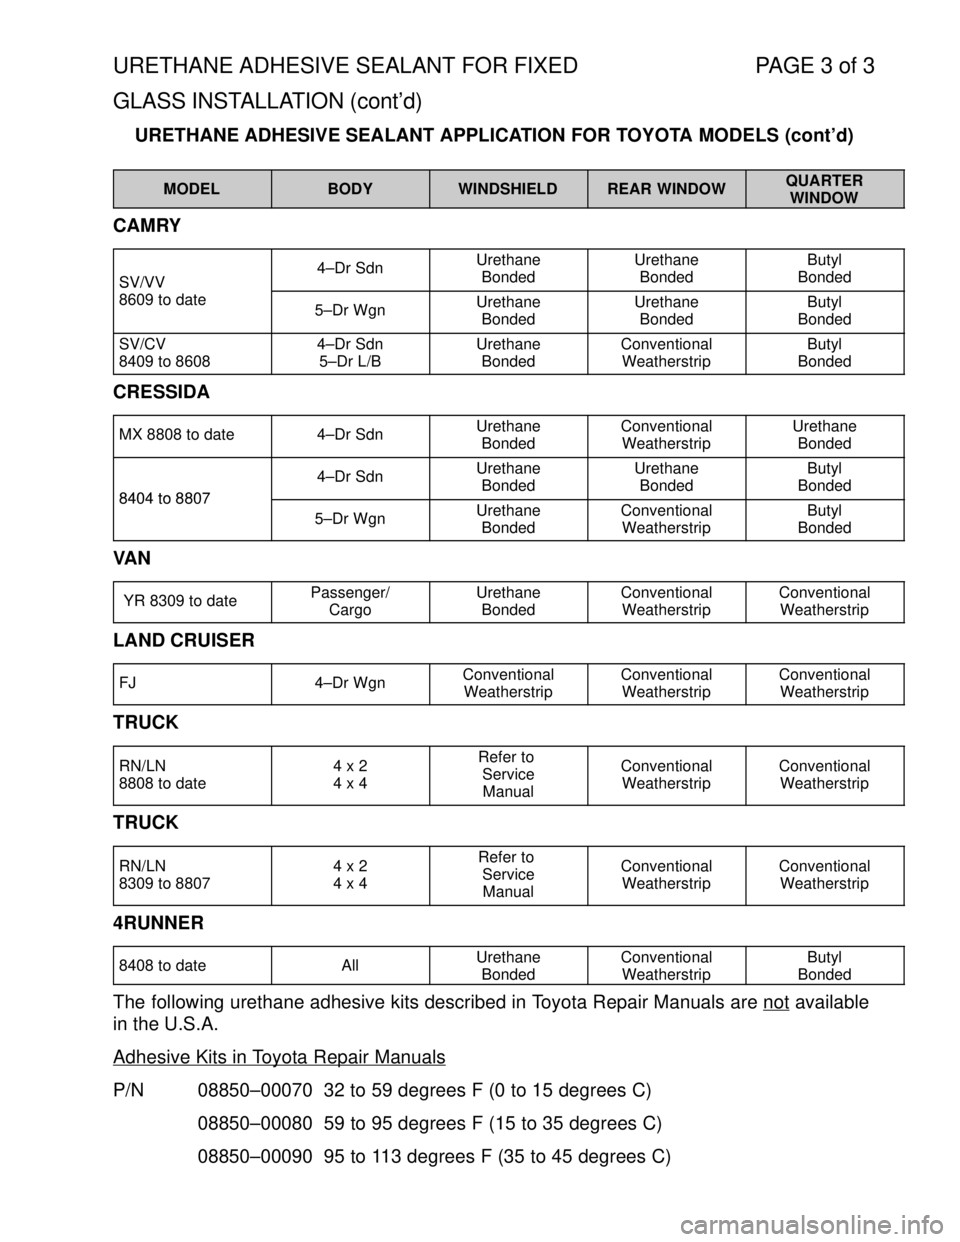
For more detailed application information, see the attached ªUrethane Adhesive Sealant
Application for Toyota Modelsº.
Rear quarter windows on some models are bonded, however, the adhesive for these
windows requires less bonding strength and therefore, use of Butyl sealer may be sufficient
for these windows.
This bulletin is for information and clarification purposes only. Existing Warranty policy and
Flat Rate information have not been changed. Toyota is not responsible for problems that
occur from usage of improper sealants or procedures which fail to meet Toyota
specifications. PLEASE CONSULT THE APPROPRIATE TOYOTA SERVICE MANUAL
FOR THE PROPER REPAIR PROCEDURES.
NOTE: PLEASE ROUTE THIS BULLETIN TO YOUR COLLISION REPAIR CENTER
MANAGER
Page 512 of 1807

URETHANE ADHESIVE SEALANT FOR FIXED PAGE 2 of 3
GLASS INSTALLATION (cont'd)
URETHANE ADHESIVE SEALANT APPLICATION FOR TOYOTA MODELS
MODELBODYWINDSHIELDREAR WINDOWQUARTER
WINDOW
TERCEL
AL/EL
8608 to date EL2±Dr Sdn
4±Dr Sdn
5±Dr SdnUrethane
BondedConventional
WeatherstripButyl
Bonded
8308 to 8802 AL5±Dr WgnUrethane
BondedConventional
WeatherstripConventional
Weatherstrip
8208 to 8607 AL3±Dr L/BUrethane
BondedConventional
WeatherstripConventional
Weatherstrip
COROLLA
2±Dr S/C
4±Dr SdnUrethane
BondedUrethane
BondedButyl
Bonded
FWD AE
8708 to dateAll±Trac WgnUrethane
BondedUrethane
BondedButyl
Bonded
4±Dr WgnUrethane
BondedConventional
WeatherstripButyl
Bonded
FWD AE4±Dr SdnUrethane
BondedConventional
WeatherstripConventional
Weatherstrip
FWD AE
8409 to 87075±Dr L/BUrethane
BondedConventional
WeatherstripButyl
Bonded
FX Models
8608 to 88073±Dr L/BUrethane
BondedConventional
WeatherstripConventional
Weatherstrip
RWD AE
8409 to 87072±Dr S/C
2±Dr L/BUrethane
BondedConventional
WeatherstripButyl
Bonded
MR2
AW 8501 to date2±SeaterUrethane
BondedConventional
WeatherstripButyl
Bonded
CELICA
ST 8509 to date2±Dr S/C
2±Dr L/BUrethane
BondedUrethane
BondedButyl
Bonded
SUPRA
MA70 8601 to date2±Dr L/BUrethane
BondedUrethane
BondedButyl
Bonded
Page 513 of 1807

URETHANE ADHESIVE SEALANT FOR FIXED PAGE 3 of 3
GLASS INSTALLATION (cont'd)
URETHANE ADHESIVE SEALANT APPLICATION FOR TOYOTA MODELS (cont'd)
MODELBODYWINDSHIELDREAR WINDOWQUARTER
WINDOW
CAMRY
SV/VV4±Dr SdnUrethane
BondedUrethane
BondedButyl
Bonded
SV/VV
8609 to date5±Dr WgnUrethane
BondedUrethane
BondedButyl
Bonded
SV/CV
8409 to 86084±Dr Sdn
5±Dr L/BUrethane
BondedConventional
WeatherstripButyl
Bonded
CRESSIDA
MX 8808 to date4±Dr SdnUrethane
BondedConventional
WeatherstripUrethane
Bonded
8404 to 8807
4±Dr SdnUrethane
BondedUrethane
BondedButyl
Bonded
8404 to 8807
5±Dr WgnUrethane
BondedConventional
WeatherstripButyl
Bonded
VA N
YR 8309 to datePassenger/
CargoUrethane
BondedConventional
WeatherstripConventional
Weatherstrip
LAND CRUISER
FJ4±Dr WgnConventional
WeatherstripConventional
WeatherstripConventional
Weatherstrip
TRUCK
RN/LN
8808 to date4 x 2
4 x 4Refer to
Service
ManualConventional
WeatherstripConventional
Weatherstrip
TRUCK
RN/LN
8309 to 88074 x 2
4 x 4Refer to
Service
ManualConventional
WeatherstripConventional
Weatherstrip
4RUNNER
8408 to dateAllUrethane
BondedConventional
WeatherstripButyl
Bonded
The following urethane adhesive kits described in Toyota Repair Manuals are not available
in the U.S.A.
Adhesive Kits in Toyota Repair Manuals
P/N 08850±00070 32 to 59 degrees F (0 to 15 degrees C)
08850±00080 59 to 95 degrees F (15 to 35 degrees C)
08850±00090 95 to 113 degrees F (35 to 45 degrees C)