Page 1338 of 3342

G4M0744
2. AIR TIGHTNESS CHECK
Start engine, and run it for 1 to 2 minutes, then turn it off.
Depress brake pedal several times applying the same
pedal force as that used in ordinary braking operations.
The pedal stroke should be greatest on the 1st depression,
and it should become smaller with each successive
depression. If no change occurs in the pedal height while
in a depressed state, brake booster is faulty.
NOTE:
�In the event of defective operation, inspect the condition
of the check valve and vacuum hose.
�Replace them if faulty and conduct the test again.
�If no improvement is observed, check precisely with
gauges.
G4M0914
3. OPERATION CHECK
1) With engine off, depress brake pedal several times
applying the same pedal force and make sure that the
pedal height does not vary with each depression of the
pedal.
2) With brake pedal depressed, start engine.
3) As engine starts, brake pedal should move slightly
toward the floor. If no change occurs in the pedal height,
brake booster is faulty.
NOTE:
If faulty, check precisely with gauges.
4. LOADED AIR TIGHTNESS CHECK
Depress brake pedal while engine is running, and turn off
engine while the pedal is still depressed. Keep the pedal
depressed for 30 seconds; if no change occurs in the pedal
height, brake booster is functioning normally; if the pedal
height increases, it is faulty.
NOTE:
If faulty, check precisely with gauges.
57
4-4SERVICE PROCEDURE
6. Brake Booster
Page 1426 of 3342
B4M0366A
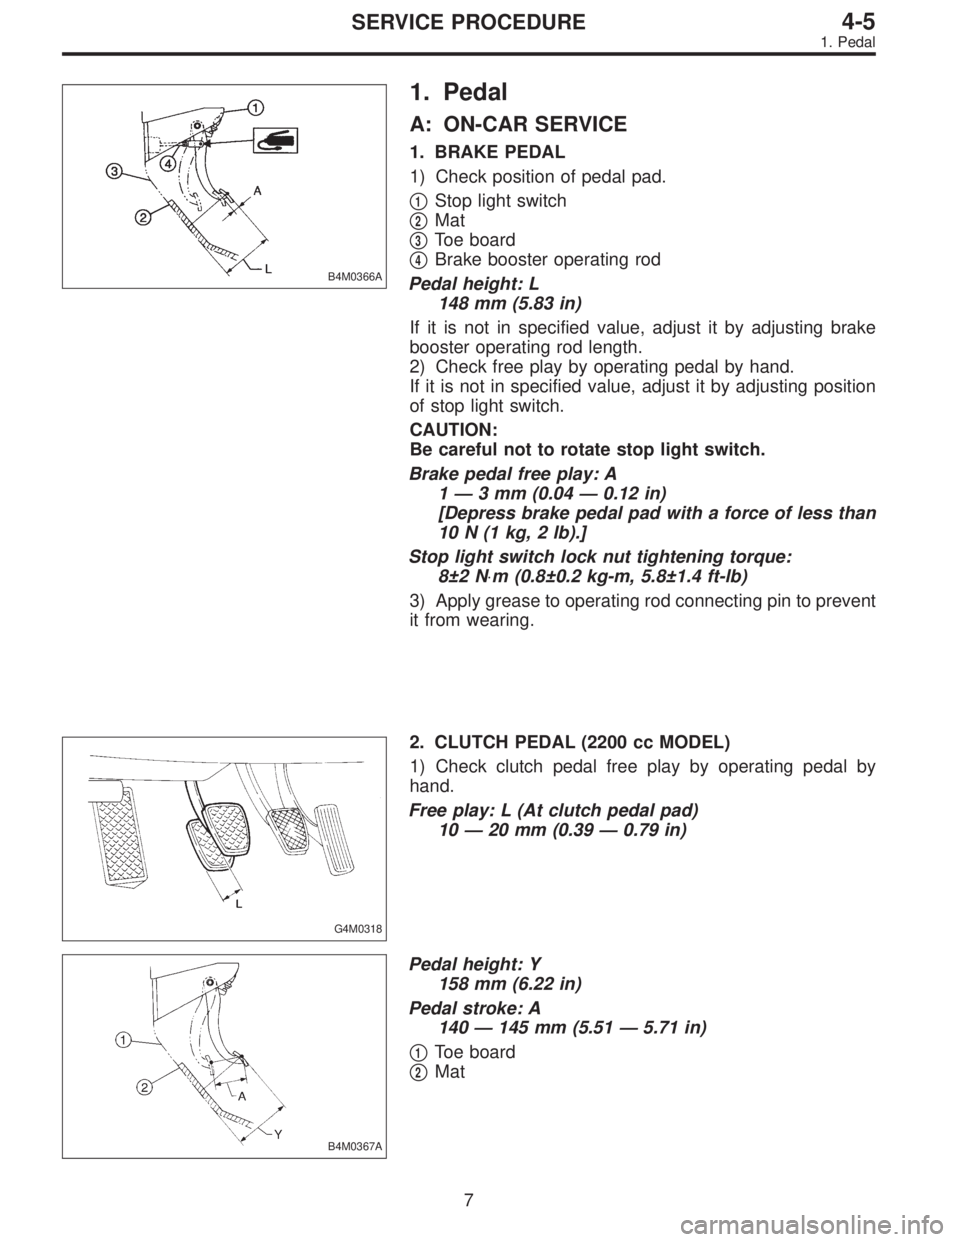
1. Pedal
A: ON-CAR SERVICE
1. BRAKE PEDAL
1) Check position of pedal pad.
�
1Stop light switch
�
2Mat
�
3Toe board
�
4Brake booster operating rod
Pedal height: L
148 mm (5.83 in)
If it is not in specified value, adjust it by adjusting brake
booster operating rod length.
2) Check free play by operating pedal by hand.
If it is not in specified value, adjust it by adjusting position
of stop light switch.
CAUTION:
Be careful not to rotate stop light switch.
Brake pedal free play: A
1 — 3 mm (0.04 — 0.12 in)
[Depress brake pedal pad with a force of less than
10 N (1 kg, 2 lb).]
Stop light switch lock nut tightening torque:
8±2 N⋅m (0.8±0.2 kg-m, 5.8±1.4 ft-lb)
3) Apply grease to operating rod connecting pin to prevent
it from wearing.
G4M0318
2. CLUTCH PEDAL (2200 cc MODEL)
1) Check clutch pedal free play by operating pedal by
hand.
Free play: L (At clutch pedal pad)
10 — 20 mm (0.39 — 0.79 in)
B4M0367A
Pedal height: Y
158 mm (6.22 in)
Pedal stroke: A
140 — 145 mm (5.51 — 5.71 in)
�
1Toe board
�
2Mat
7
4-5SERVICE PROCEDURE
1. Pedal
Page 1441 of 3342
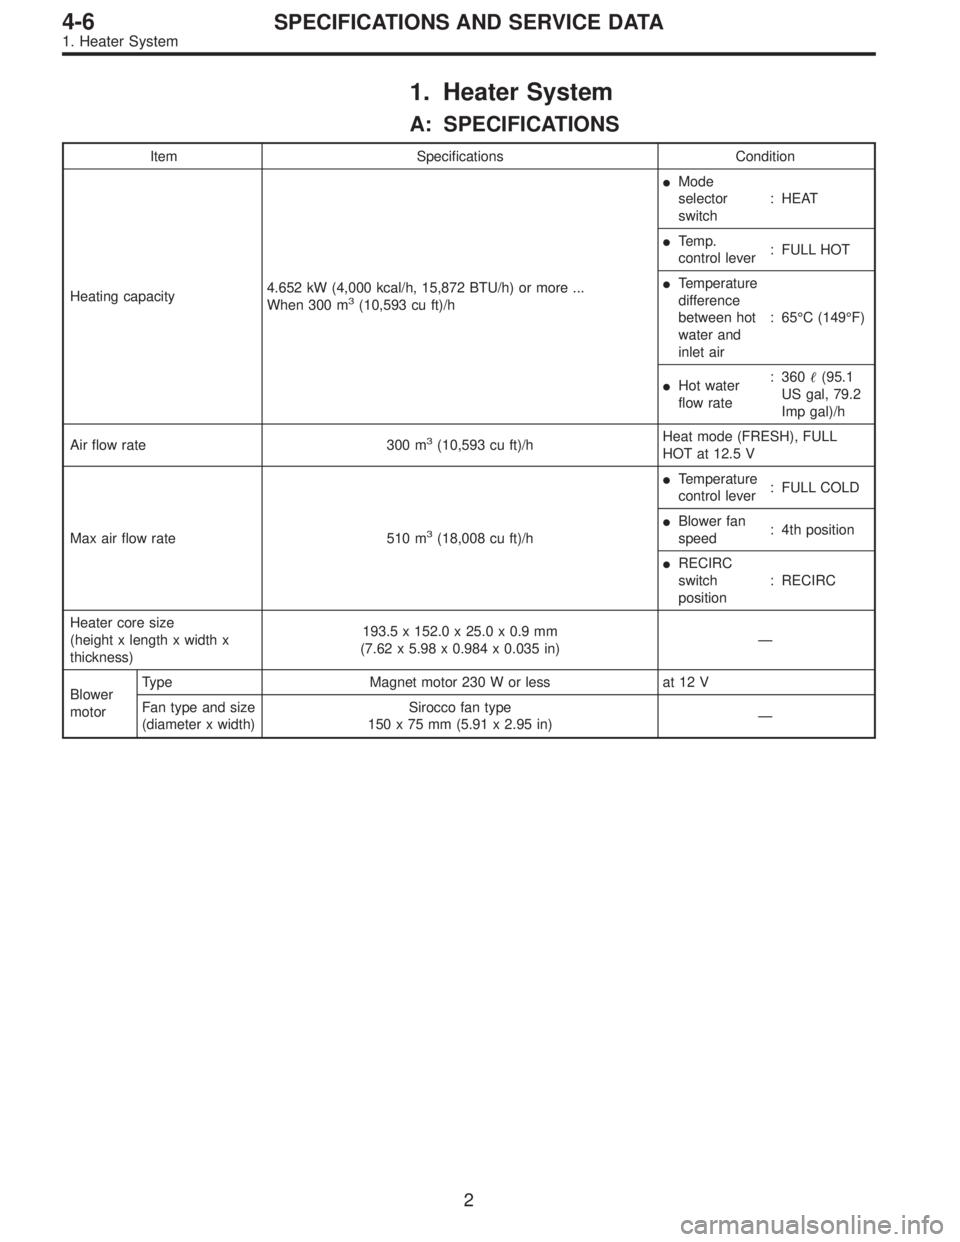
1. Heater System
A: SPECIFICATIONS
Item Specifications Condition
Heating capacity4.652 kW (4,000 kcal/h, 15,872 BTU/h) or more ...
When 300 m
3(10,593 cu ft)/h�Mode
selector
switch: HEAT
�Te m p .
control lever: FULL HOT
�Temperature
difference
between hot
water and
inlet air:65°C (149°F)
�Hot water
flow rate: 360�(95.1
US gal, 79.2
Imp gal)/h
Air flow rate 300 m
3(10,593 cu ft)/hHeat mode (FRESH), FULL
HOT at 12.5 V
Max air flow rate 510 m
3(18,008 cu ft)/h�Temperature
control lever: FULL COLD
�Blower fan
speed: 4th position
�RECIRC
switch
position: RECIRC
Heater core size
(height x length x width x
thickness)193.5 x 152.0 x 25.0 x 0.9 mm
(7.62 x 5.98 x 0.984 x 0.035 in)—
Blower
motorType Magnet motor 230 W or less at 12 V
Fan type and size
(diameter x width)Sirocco fan type
150 x 75 mm (5.91 x 2.95 in)—
2
4-6SPECIFICATIONS AND SERVICE DATA
1. Heater System
Page 1543 of 3342
G5M0140
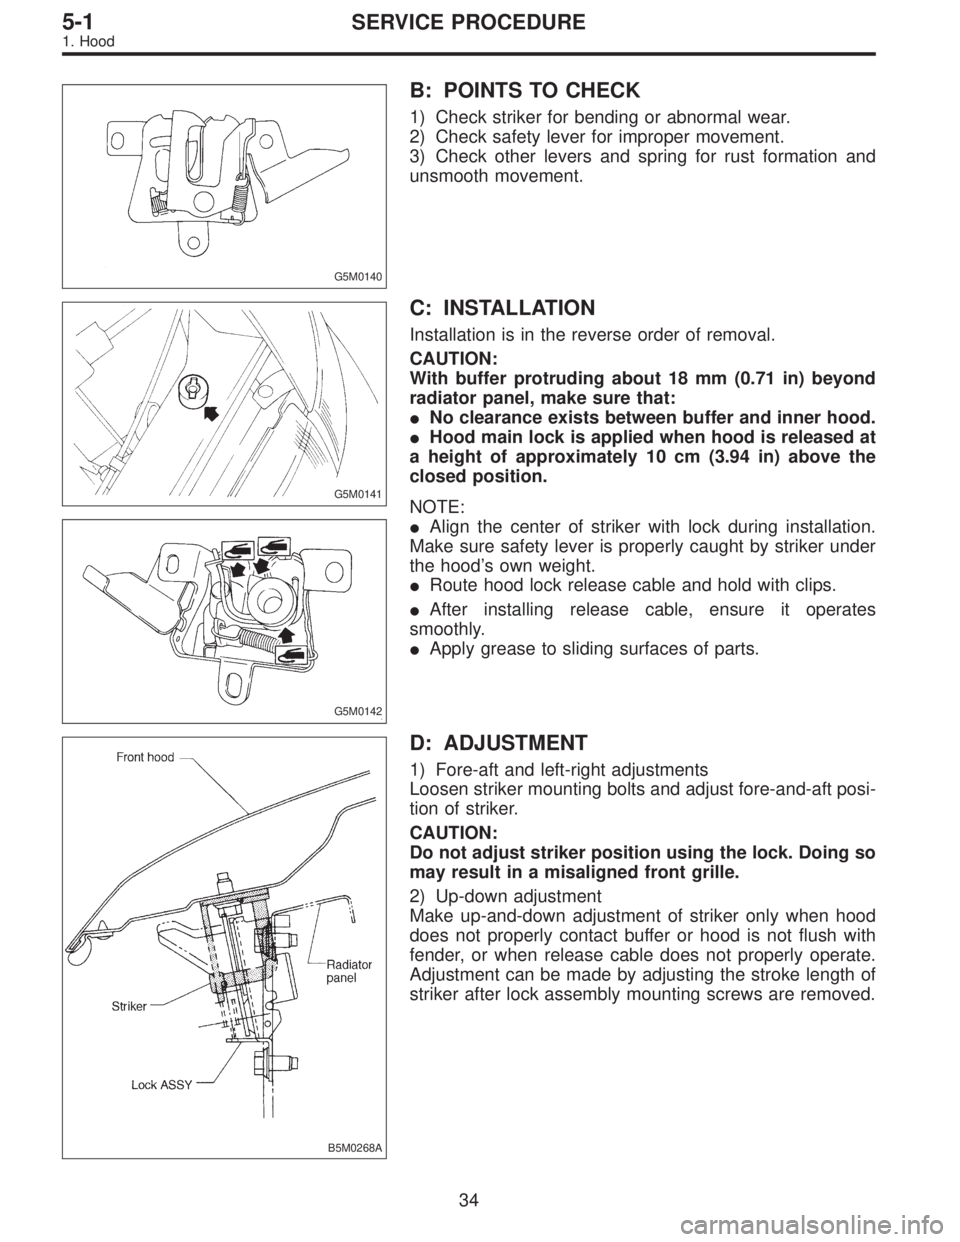
B: POINTS TO CHECK
1) Check striker for bending or abnormal wear.
2) Check safety lever for improper movement.
3) Check other levers and spring for rust formation and
unsmooth movement.
G5M0141
C: INSTALLATION
Installation is in the reverse order of removal.
CAUTION:
With buffer protruding about 18 mm (0.71 in) beyond
radiator panel, make sure that:
�No clearance exists between buffer and inner hood.
�Hood main lock is applied when hood is released at
a height of approximately 10 cm (3.94 in) above the
closed position.
G5M0142
NOTE:
�Align the center of striker with lock during installation.
Make sure safety lever is properly caught by striker under
the hood’s own weight.
�Route hood lock release cable and hold with clips.
�After installing release cable, ensure it operates
smoothly.
�Apply grease to sliding surfaces of parts.
B5M0268A
D: ADJUSTMENT
1) Fore-aft and left-right adjustments
Loosen striker mounting bolts and adjust fore-and-aft posi-
tion of striker.
CAUTION:
Do not adjust striker position using the lock. Doing so
may result in a misaligned front grille.
2) Up-down adjustment
Make up-and-down adjustment of striker only when hood
does not properly contact buffer or hood is not flush with
fender, or when release cable does not properly operate.
Adjustment can be made by adjusting the stroke length of
striker after lock assembly mounting screws are removed.
34
5-1SERVICE PROCEDURE
1. Hood
Page 1573 of 3342

B5M0314B
B5M0315B
C: ADJUSTMENTS
1. ALIGNMENT OF HEIGHT BETWEEN GLASS LID
ASSEMBLY AND ROOF PANEL
1) Remove guide rail cover.
2) Loosen nuts and adjust height by adding (Max: two
pieces) and extracting (Max: one piece) shim(s) (Standard:
one piece) between glass lid assembly and lid bracket.
Difference in height between glass lid assembly and
roof panel:
0±0.5 mm (0±0.020 in)
B5M0316A
2. ALIGNMENT OF GLASS LID ASSEMBLY WITH
ROOF PANEL
1) Remove guide rail cover.
2) Loosen nuts and move glass lid assembly to either side
to adjust front, rear, right, and left side partitions.
Partition clearance:
7.0±0.5 mm (0.276±0.020 in)
B5M0317
3. CHECKING FOR MOVEMENT OF GLASS LID
ASSEMBLY ITSELF
1) Before installing sunroof motor, check glass lid assem-
bly for movement.
2) Place a cloth on glass lid assembly and sun shade, and
attach a spring scale to glass lid assembly edge using the
cloth.
3) Pull spring scale to measure force required to move
glass lid assembly.
Force required to move glass lid assembly and sun
shade trim:
Less than 196 N (20 kg, 44 lb)
Considerable effort is required to start glass lid assembly
moving, so take scale reading while glass lid assembly is
moving smoothly.
4) If force required exceeds specifications, check the fol-
lowing points:
�Glass lid assembly, sun shade and deflector and guide
rail assembly for improper installation
�Cable for seizure
58
5-1SERVICE PROCEDURE
16. Sunroof
Page 1617 of 3342
G5M0409
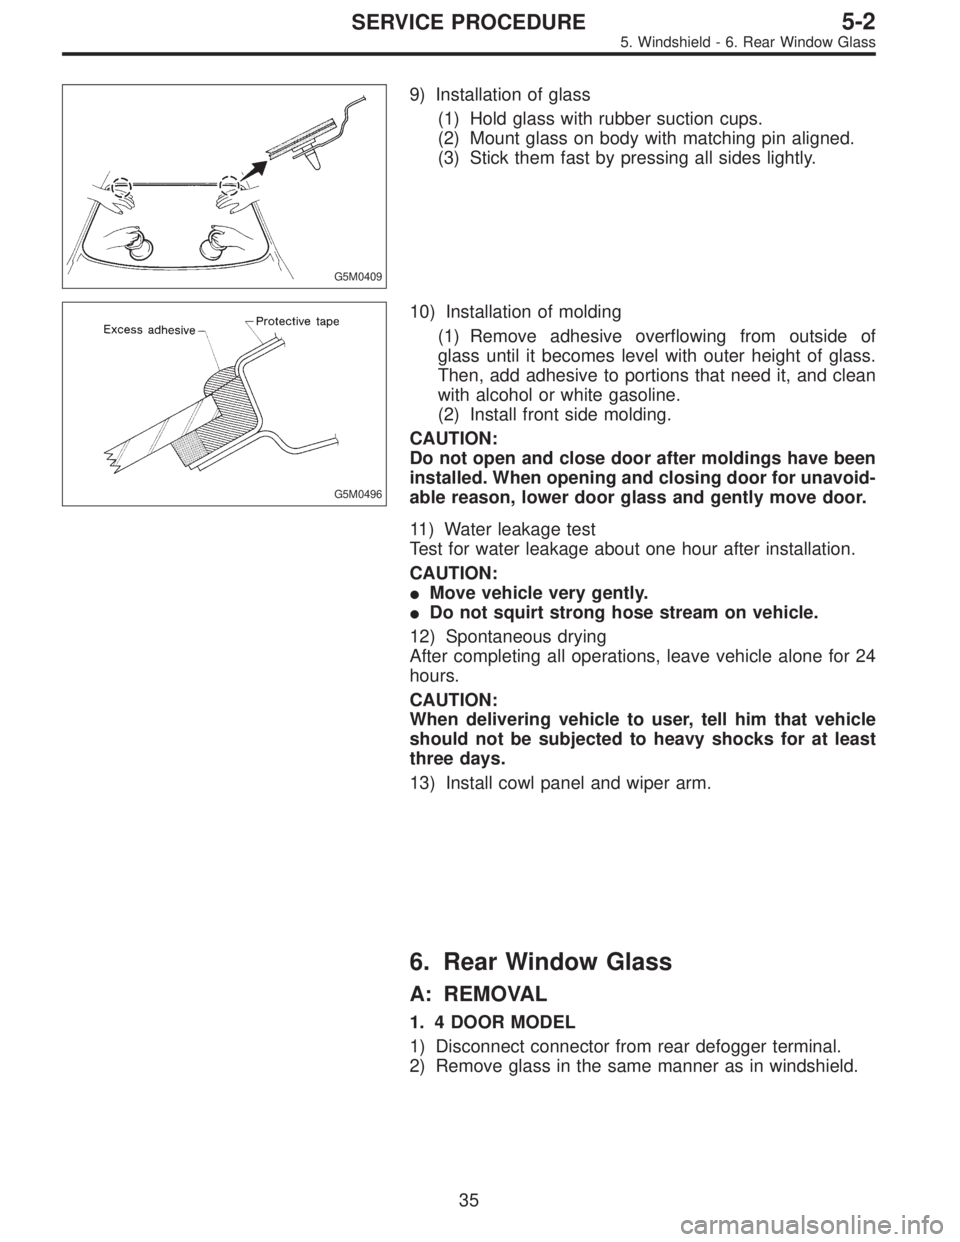
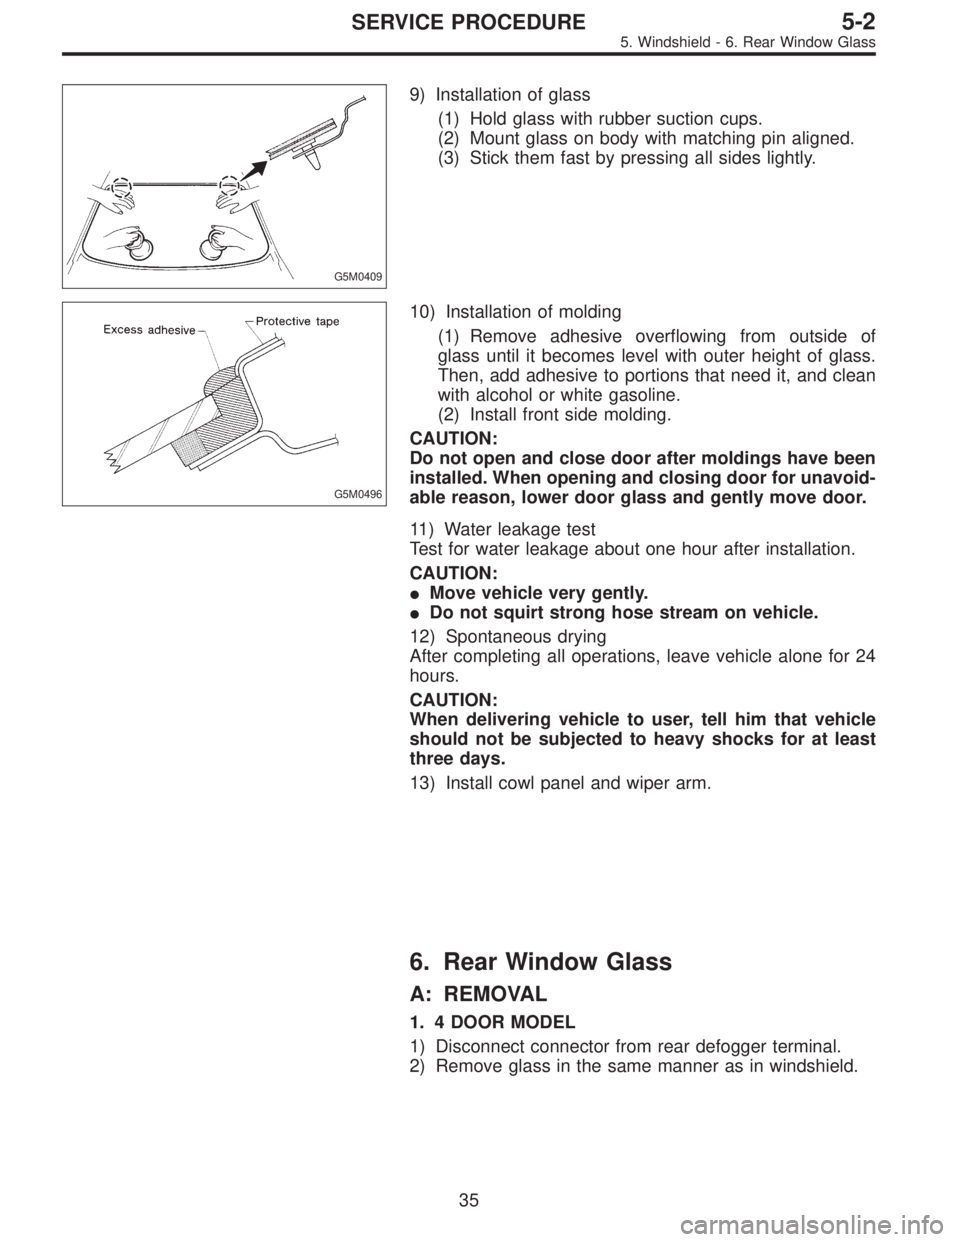
9) Installation of glass
(1) Hold glass with rubber suction cups.
(2) Mount glass on body with matching pin aligned.
(3) Stick them fast by pressing all sides lightly.
G5M0496
10) Installation of molding
(1) Remove adhesive overflowing from outside of
glass until it becomes level with outer height of glass.
Then, add adhesive to portions that need it, and clean
with alcohol or white gasoline.
(2) Install front side molding.
CAUTION:
Do not open and close door after moldings have been
installed. When opening and closing door for unavoid-
able reason, lower door glass and gently move door.
11) Water leakage test
Test for water leakage about one hour after installation.
CAUTION:
�Move vehicle very gently.
�Do not squirt strong hose stream on vehicle.
12) Spontaneous drying
After completing all operations, leave vehicle alone for 24
hours.
CAUTION:
When delivering vehicle to user, tell him that vehicle
should not be subjected to heavy shocks for at least
three days.
13) Install cowl panel and wiper arm.
6. Rear Window Glass
A: REMOVAL
1. 4 DOOR MODEL
1) Disconnect connector from rear defogger terminal.
2) Remove glass in the same manner as in windshield.
35
5-2SERVICE PROCEDURE
5. Windshield - 6. Rear Window Glass
Page 1618 of 3342
G5M0409
9) Installation of glass
(1) Hold glass with rubber suction cups.
(2) Mount glass on body with matching pin aligned.
(3) Stick them fast by pressing all sides lightly.
G5M0496
10) Installation of molding
(1) Remove adhesive overflowing from outside of
glass until it becomes level with outer height of glass.
Then, add adhesive to portions that need it, and clean
with alcohol or white gasoline.
(2) Install front side molding.
CAUTION:
Do not open and close door after moldings have been
installed. When opening and closing door for unavoid-
able reason, lower door glass and gently move door.
11) Water leakage test
Test for water leakage about one hour after installation.
CAUTION:
�Move vehicle very gently.
�Do not squirt strong hose stream on vehicle.
12) Spontaneous drying
After completing all operations, leave vehicle alone for 24
hours.
CAUTION:
When delivering vehicle to user, tell him that vehicle
should not be subjected to heavy shocks for at least
three days.
13) Install cowl panel and wiper arm.
6. Rear Window Glass
A: REMOVAL
1. 4 DOOR MODEL
1) Disconnect connector from rear defogger terminal.
2) Remove glass in the same manner as in windshield.
35
5-2SERVICE PROCEDURE
5. Windshield - 6. Rear Window Glass
Page 1754 of 3342
B6M0340A
3. HIGH-MOUNT STOP LIGHT (SEDAN)
1) Disconnect connector of high-mount stop light from
body harness.
2) Remove screws which secure high-mount stop light to
rear shelf panel.
3) Remove high-mount stop light.
B6M0341A
4. HIGH-MOUNT STOP LIGHT (WAGON)
1) Remove high-mount stop light cover from rear gate trim
panel.
2) Remove screws which secure high-mount stop light.
3) Remove high-mount stop light while disconnecting con-
nector from body harness.
5. STOP LIGHT SWITCH
Refer to 4-5 [C101 (MT) or C201 (AT)] as for removal and
installation of stop light switch.
NOTE:
When installing the stop light switch, adjust the pedal
height by adjusting the stop light switch position.
6. COMBINATION SWITCH
Refer to 6-2 [W4B3] as for removal and installation of com-
bination switch.
B: DISASSEMBLY AND ASSEMBLY
1. COMBINATION SWITCH
Refer to 6-2 [W4C1] as for disassembly and assembly of
combination switch.
16
6-2SERVICE PROCEDURE
5. Stop and Tail Light