Page 447 of 3342
B2M0302
7) Remove timing belt.
B2M0303
8) Remove belt tension adjuster.
G2M0417
9) Remove camshaft position sensor.
G2M0207
10) Remove left side camshaft pulley by using ST.
ST 499207100 CAMSHAFT SPROCKET WRENCH
G2M0208
11) Remove left side rear timing belt cover.
10
2-5SERVICE PROCEDURE
2. Engine Coolant Pump
Page 448 of 3342
G2M0210
12) Remove tensioner bracket.
13) Disconnect heater hose from engine coolant pump.
14) Remove engine coolant pump.
B: INSPECTION
1) Check engine coolant pump bearing for smooth rota-
tion.
2) Check engine coolant pump pulley for abnormalities.
G2M0211
3) Using a dial gauge, measure impeller runout in thrust
direction while rotating the pulley.
“Thrust”runout limit:
0.5 mm (0.020 in)
G2M0212
4) Check clearance between impeller and pump case.
Clearance between impeller and pump case:
Standard
0.5—0.7 mm (0.020—0.028 in)
Limit
1.0 mm (0.039 in)
5) After engine coolant pump installation, check pulley
shaft for engine coolant leaks. If leaks are noted, replace
engine coolant pump assembly.
11
2-5SERVICE PROCEDURE
2. Engine Coolant Pump
Page 449 of 3342

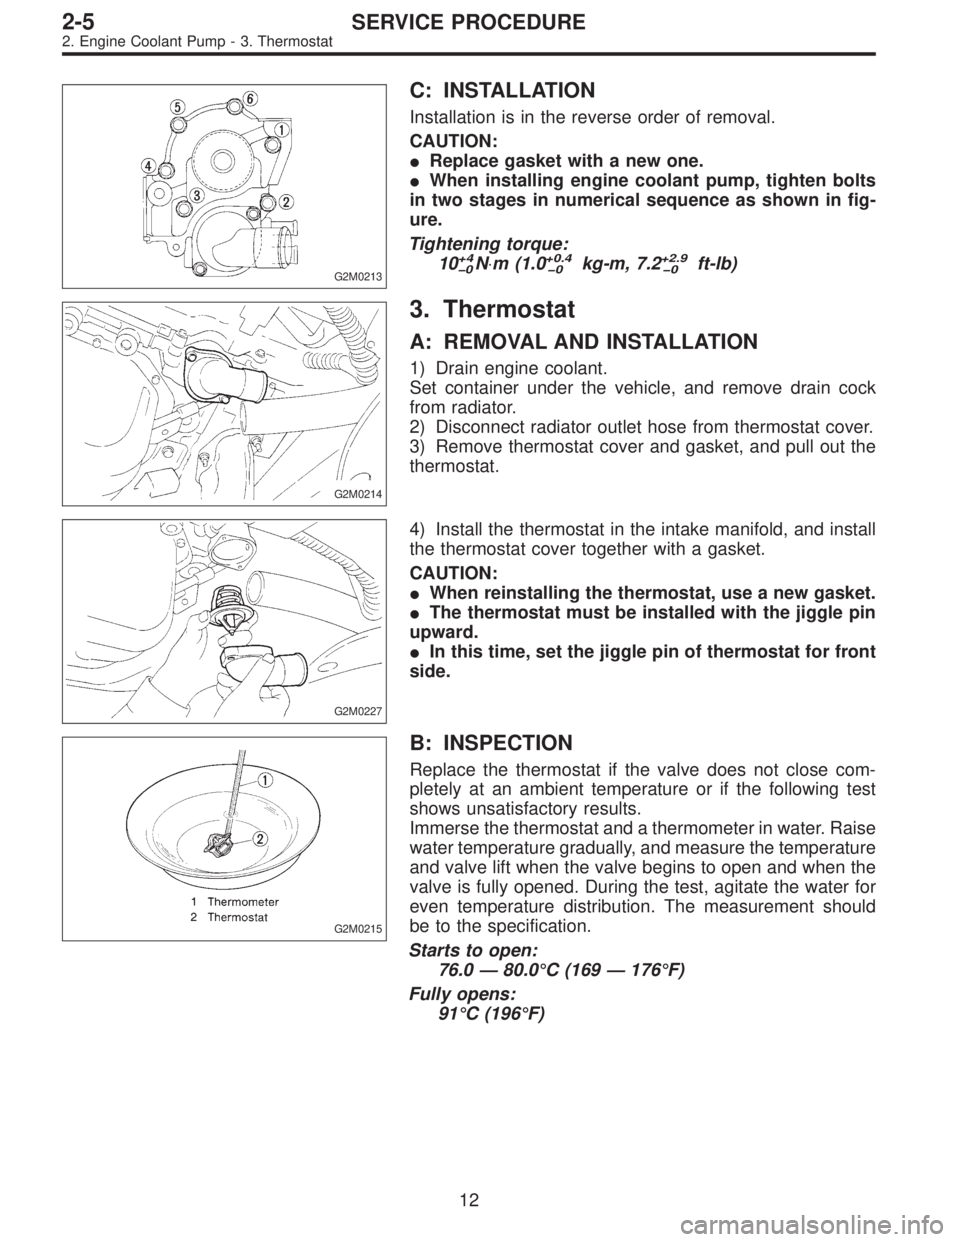
G2M0213
C: INSTALLATION
Installation is in the reverse order of removal.
CAUTION:
�Replace gasket with a new one.
�When installing engine coolant pump, tighten bolts
in two stages in numerical sequence as shown in fig-
ure.
Tightening torque:
10
+4
�0N⋅m (1.0+0.4
�0kg-m, 7.2+2.9
�0ft-lb)
G2M0214
3. Thermostat
A: REMOVAL AND INSTALLATION
1) Drain engine coolant.
Set container under the vehicle, and remove drain cock
from radiator.
2) Disconnect radiator outlet hose from thermostat cover.
3) Remove thermostat cover and gasket, and pull out the
thermostat.
G2M0227
4) Install the thermostat in the intake manifold, and install
the thermostat cover together with a gasket.
CAUTION:
�When reinstalling the thermostat, use a new gasket.
�The thermostat must be installed with the jiggle pin
upward.
�In this time, set the jiggle pin of thermostat for front
side.
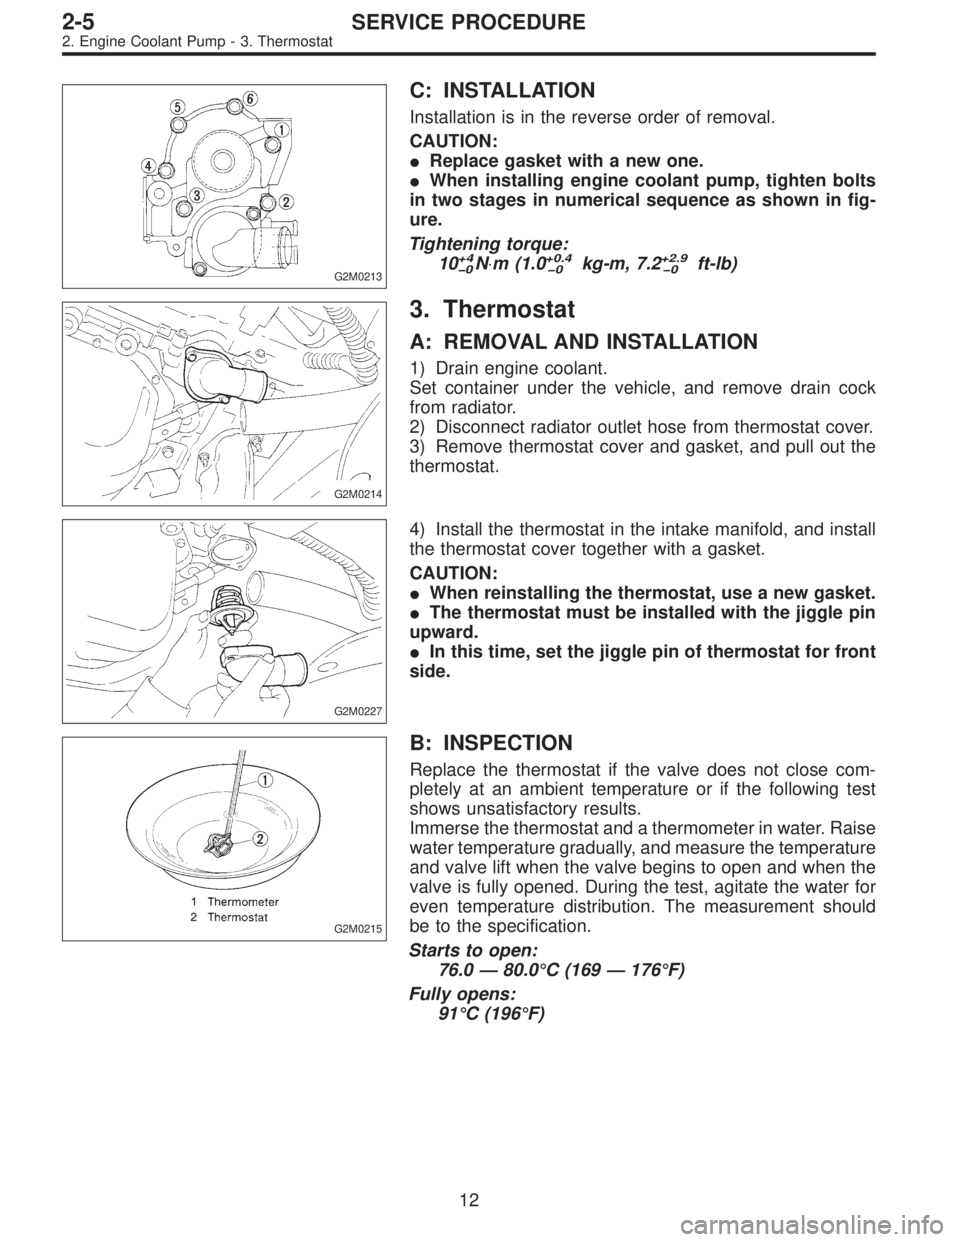
G2M0215
B: INSPECTION
Replace the thermostat if the valve does not close com-
pletely at an ambient temperature or if the following test
shows unsatisfactory results.
Immerse the thermostat and a thermometer in water. Raise
water temperature gradually, and measure the temperature
and valve lift when the valve begins to open and when the
valve is fully opened. During the test, agitate the water for
even temperature distribution. The measurement should
be to the specification.
Starts to open:
76.0—80.0°C (169—176°F)
Fully opens:
91°C (196°F)
12
2-5SERVICE PROCEDURE
2. Engine Coolant Pump - 3. Thermostat
Page 450 of 3342

G2M0213
C: INSTALLATION
Installation is in the reverse order of removal.
CAUTION:
�Replace gasket with a new one.
�When installing engine coolant pump, tighten bolts
in two stages in numerical sequence as shown in fig-
ure.
Tightening torque:
10
+4
�0N⋅m (1.0+0.4
�0kg-m, 7.2+2.9
�0ft-lb)
G2M0214
3. Thermostat
A: REMOVAL AND INSTALLATION
1) Drain engine coolant.
Set container under the vehicle, and remove drain cock
from radiator.
2) Disconnect radiator outlet hose from thermostat cover.
3) Remove thermostat cover and gasket, and pull out the
thermostat.
G2M0227
4) Install the thermostat in the intake manifold, and install
the thermostat cover together with a gasket.
CAUTION:
�When reinstalling the thermostat, use a new gasket.
�The thermostat must be installed with the jiggle pin
upward.
�In this time, set the jiggle pin of thermostat for front
side.
G2M0215
B: INSPECTION
Replace the thermostat if the valve does not close com-
pletely at an ambient temperature or if the following test
shows unsatisfactory results.
Immerse the thermostat and a thermometer in water. Raise
water temperature gradually, and measure the temperature
and valve lift when the valve begins to open and when the
valve is fully opened. During the test, agitate the water for
even temperature distribution. The measurement should
be to the specification.
Starts to open:
76.0—80.0°C (169—176°F)
Fully opens:
91°C (196°F)
12
2-5SERVICE PROCEDURE
2. Engine Coolant Pump - 3. Thermostat
Page 451 of 3342
B2M0015A
4. Radiator
A: REMOVAL
1) Disconnect battery cables and remove battery from
body.
2) Drain engine coolant.
Set container under the vehicle, and remove drain cock
from radiator.
B2M0304
3) Disconnect radiator outlet hose from thermostat cover.
4) Disconnect ATF cooler hoses from radiator. (AT model)
B2M0017
5) Remove V-belt cover.
B2M0305
6) Disconnect inlet hose from radiator.
G2M0263
7) Disconnect connectors of radiator main fan and sub fan
motor.
13
2-5SERVICE PROCEDURE
4. Radiator
Page 452 of 3342
B2M0320
8) Remove radiator upper brackets.
NOTE:
Place left upper radiator bracket between grille and body.
9) While slightly lifting radiator, slide it to left.
G2M0220
10) Lift radiator up and away from vehicle.
B2M0307A
B: INSTALLATION
1) Attach radiator mounting cushions to body.
G2M0220
2) Install radiator while fitting radiator pins to cushions.
14
2-5SERVICE PROCEDURE
4. Radiator
Page 453 of 3342
B2M0320
3) Install radiator brackets and tighten bolts.
4) Connect radiator main fan motor and sub fan motor
connectors.
B2M0137
5) Connect radiator inlet and outlet hoses.
6) Connect ATF cooler hoses. (AT model)
B2M0017
7) Install V-belt cover.
G6M0095
8) Connect ground cable to battery terminal.
15
2-5SERVICE PROCEDURE
4. Radiator
Page 454 of 3342
G2M0223
5. Radiator Cap
A: INSPECTION
1) Attach radiator cap to tester.
2) Increase pressure until tester gauge pointer stops.
Radiator cap is functioning properly if it holds the service
limit pressure for five to six seconds.
Standard pressure:
78—98 kPa (0.8—1.0 kg/cm
2,11—14 psi)
Service limit pressure:
69 kPa (0.7 kg/cm
2, 10 psi)
CAUTION:
Be sure to remove foreign matter and rust from the cap
in advance; otherwise, results of pressure test will be
incorrect.
G2M0263
6. Radiator Fan and Fan Motor
A: REMOVAL
1) Disconnect ground cable from battery terminal.
2) Disconnect connector of fan motor.
G2M0224
3) Remove reservoir tank.
B2M0308
4) Remove four bolts holding shroud to radiator.
16
2-5SERVICE PROCEDURE
5. Radiator Cap - 6. Radiator Fan and Fan Motor