Page 1318 of 2053
SSANGYONG MY2002
5B-10 MANUAL TRANSMISSION
TRANSMISSION ASSEMBLY
YAD5B270
1 Clutch Housing
2 Oil Filler Plug.......................................... 25 N•m
3 Transmission Assembly
4 Back-up Switch
5 Washer
6 Bolt..................................................... 77-87 Nm
7 Oil Drain Plug.......................................... 25 Nm
8 Bolt..................................................... 81-89 Nm
9 Washer
10 Front Propeller Shaft
11 Transfer Case Assembly12 Speedometer Cable
13 Rear Propeller Shaft
14 Washer
15 Bolt..................................................... 70-80 Nm
16 Cross Member
17 Washer
18 Bolt..................................................... 21-35 Nm
19 Washer
20 Bolt..................................................... 62-93 Nm
21 Breather Hose
Page 1321 of 2053
MANUAL TRANSMISSION 5B-13
SSANGYONG MY2002
115 Bolt
116 Spacer Seal and O-ring
117 Pivot Pin
118 Back-up Switch
119 Transmission Case
120 Filler/Drain Plug
121 Plug
122 Bolt123 Input Bearing Retainer
124 Oil Seal
125 Shim
126 Bearing Cap
127 Bearing Corn
128 Input Drive Shaft
129 Roller Bearing
Page 1332 of 2053
SSANGYONG MY2002
5B-24 MANUAL TRANSMISSION
UNIT REPAIR
MAJOR UNIT
Disassembly Procedure
1. Remove the shift lever from the extension housing.
YAD5B470
YAD5B480
YAD5B500
YAD5B490
2. Install the removed transmission into a fixture.
3. Remove the drain plug and drain the oil. Using a
10 mm wrench, remove the clamp bolt and position
the offset lever in the 3-4 position of neutral.
Notice: Removal of the offset lever in a position
other than 3-4 of neutral will be difficult.
4. Using a pin punch and a hammer, remove the roll
pin to remove the shift lever from the offset lever.
5. Using a 15 mm wrench, remove the 8 bolts from
the extension housing.
6. Separate the extension housing from the case and
shift cover.
Separate the offset lever from the shift.
Notice: Do not remove the offset lever while the
extension housing is still assembled to the case.
Page 1333 of 2053
MANUAL TRANSMISSION 5B-25
SSANGYONG MY2002
7. Remove the offset lever from the extension
housing with the detent ball and spring.
8. Remove the roll pin from either the offset lever or
extension housing.
YAD5B510
YAD5B520
YAD5B540
YAD5B530
9. Remove the counter shaft thrust race and bearing.
10. Carefully remove the oiling funnel from the end of
the counter shaft.
11. Using a 10 mm wrench, remove the 10 bolts from
the shift cover.
Notice: For assembly, note the location of the two
bolts.
12. Lift up the shift cover after sliding it toward the
drain plug about 3 cm. At this time remove sealer
bond.
Page 1341 of 2053

MANUAL TRANSMISSION 5B-33
SSANGYONG MY2002
YAD5B820
YAD5B830
YAD5B840
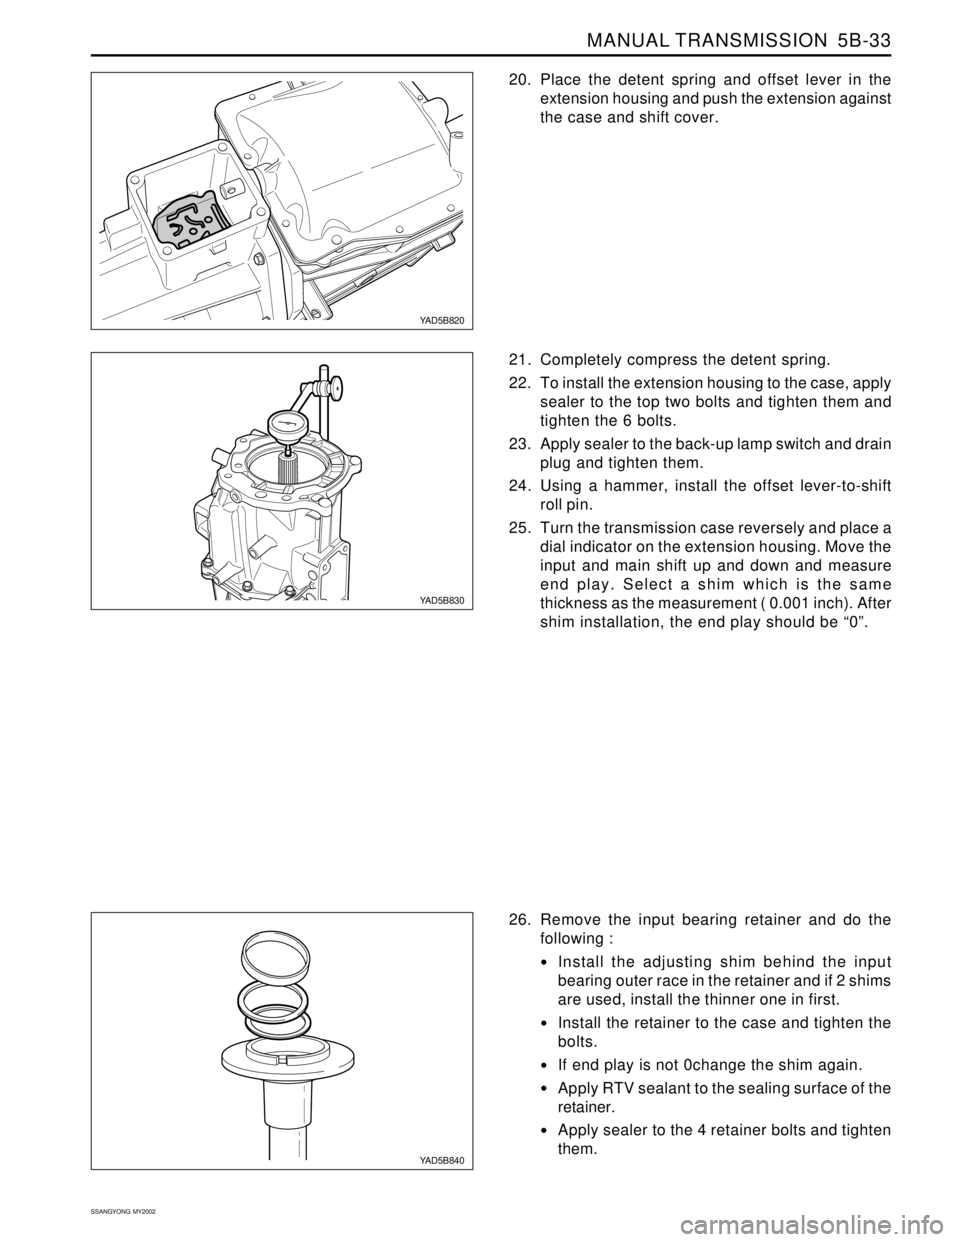
20. Place the detent spring and offset lever in the
extension housing and push the extension against
the case and shift cover.
21. Completely compress the detent spring.
22. To install the extension housing to the case, apply
sealer to the top two bolts and tighten them and
tighten the 6 bolts.
23. Apply sealer to the back-up lamp switch and drain
plug and tighten them.
24. Using a hammer, install the offset lever-to-shift
roll pin.
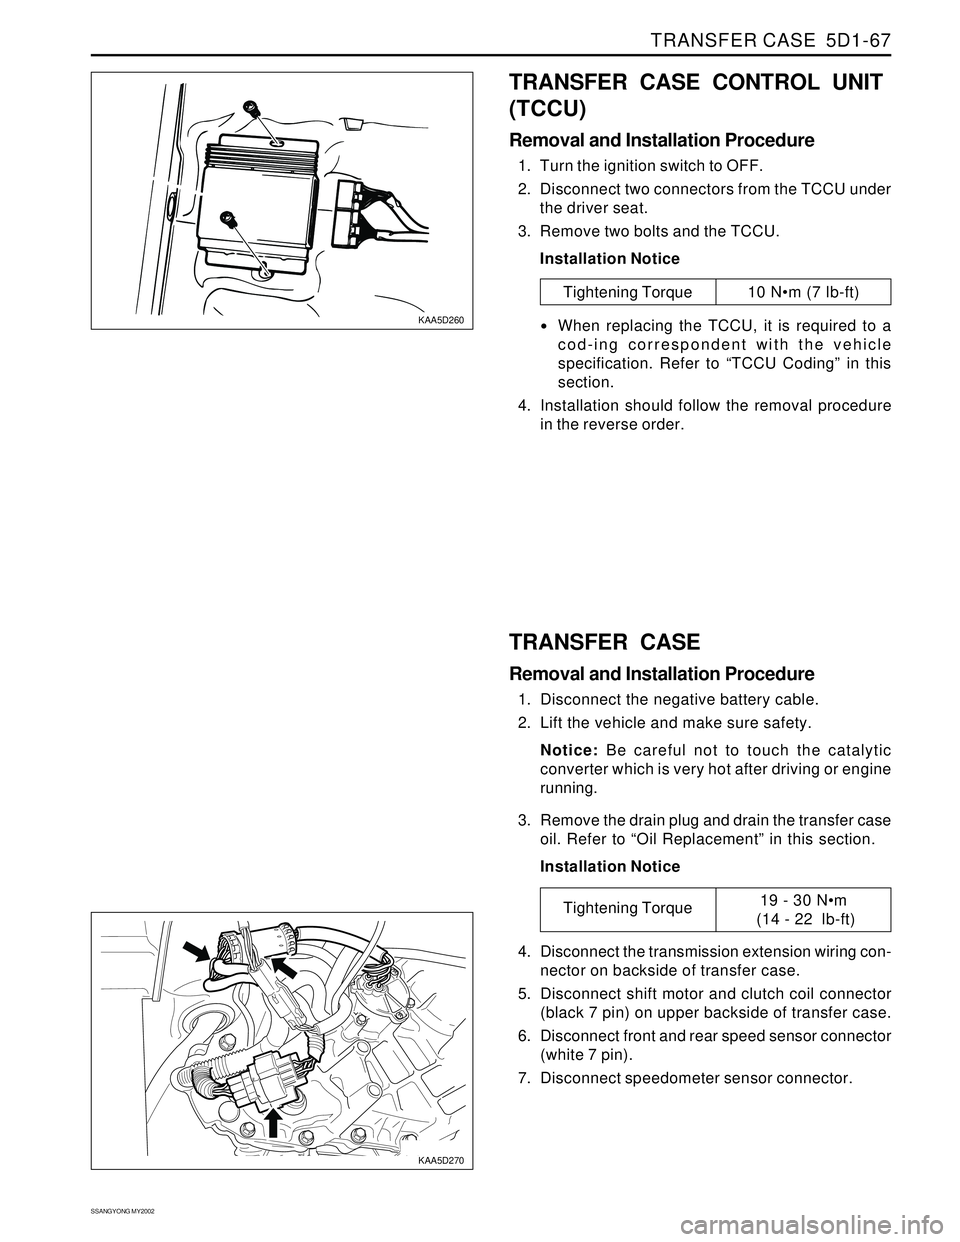
25. Turn the transmission case reversely and place a
dial indicator on the extension housing. Move the
input and main shift up and down and measure
end play. Select a shim which is the same
thickness as the measurement ( 0.001 inch). After
shim installation, the end play should be “0”.
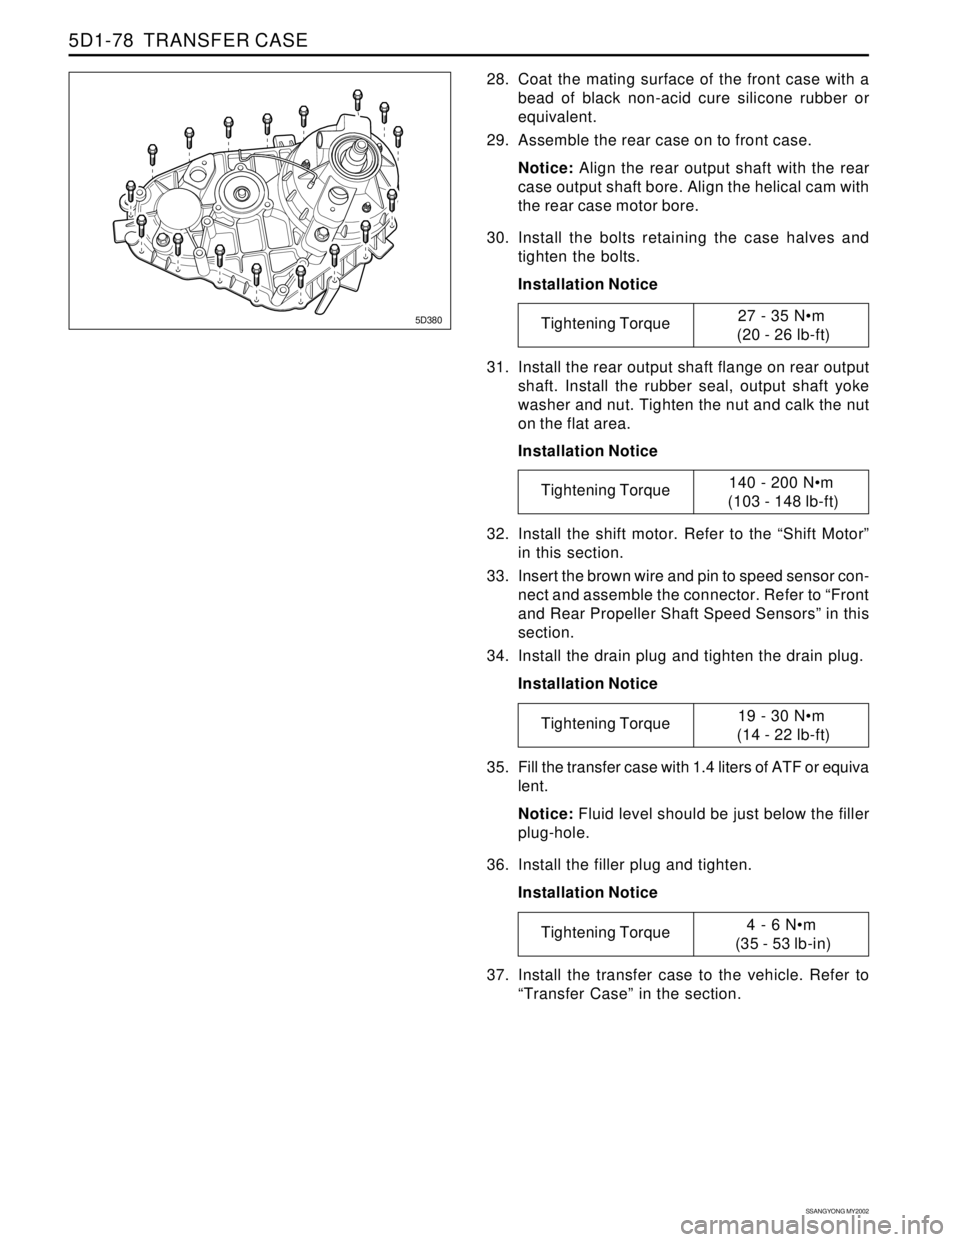
26. Remove the input bearing retainer and do the
following :
Install the adjusting shim behind the input
bearing outer race in the retainer and if 2 shims
are used, install the thinner one in first.
Install the retainer to the case and tighten the
bolts.
If end play is not 0change the shim again.
Apply RTV sealant to the sealing surface of the
retainer.
Apply sealer to the 4 retainer bolts and tighten
them.
Page 1389 of 2053

TRANSFER CASE 5D1-67
SSANGYONG MY2002
KAA5D260
KAA5D270
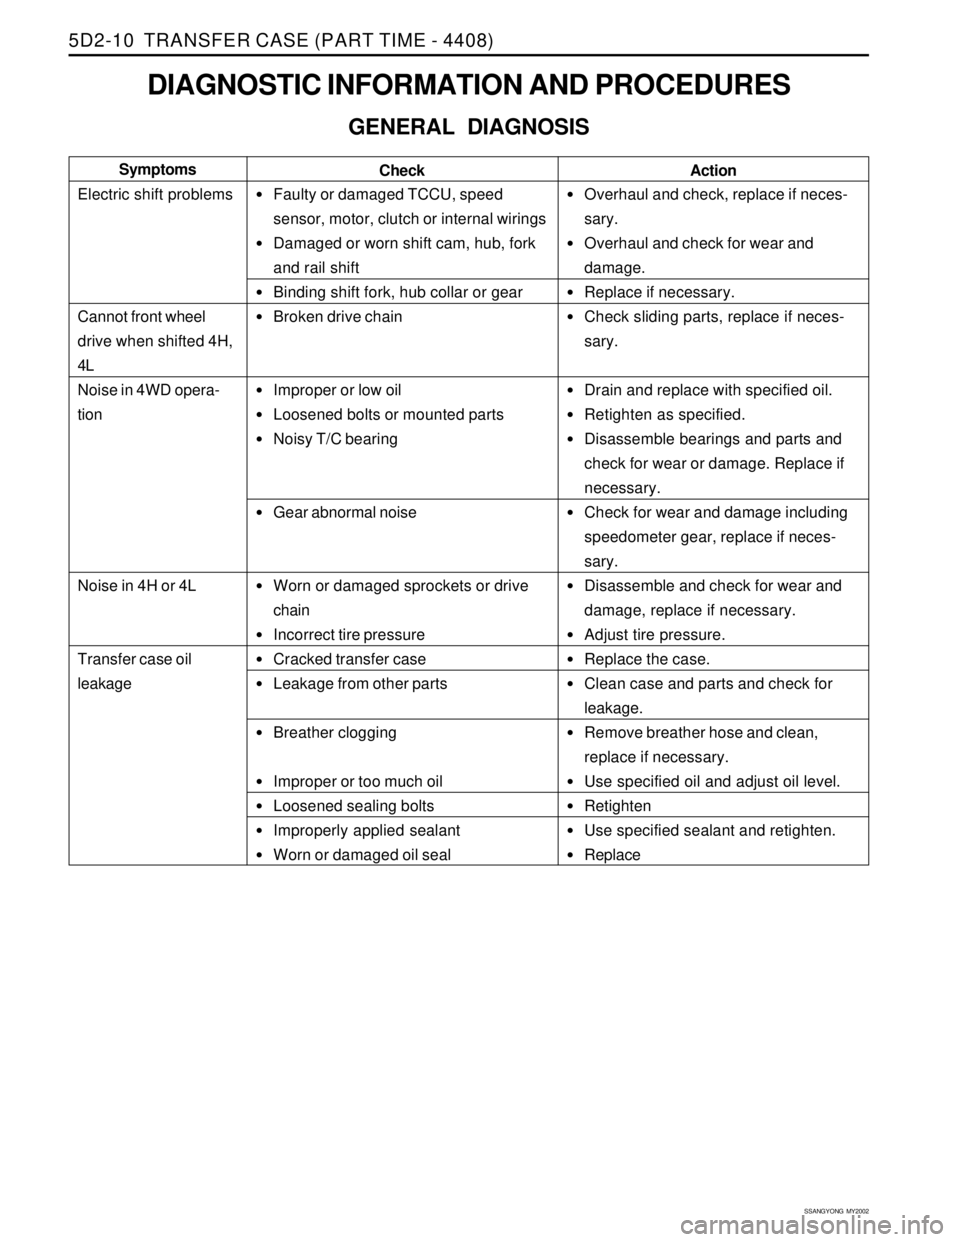
TRANSFER CASE CONTROL UNIT
(TCCU)
Removal and Installation Procedure
1. Turn the ignition switch to OFF.
2. Disconnect two connectors from the TCCU under
the driver seat.
3. Remove two bolts and the TCCU.
Installation Notice
Tightening Torque 10 Nm (7 lb-ft)
When replacing the TCCU, it is required to a
cod-ing correspondent with the vehicle
specification. Refer to “TCCU Coding” in this
section.
4. Installation should follow the removal procedure
in the reverse order.
TRANSFER CASE
Removal and Installation Procedure
1. Disconnect the negative battery cable.
2. Lift the vehicle and make sure safety.
Notice: Be careful not to touch the catalytic
converter which is very hot after driving or engine
running.
3. Remove the drain plug and drain the transfer case
oil. Refer to “Oil Replacement” in this section.
Installation Notice
4. Disconnect the transmission extension wiring con-
nector on backside of transfer case.
5. Disconnect shift motor and clutch coil connector
(black 7 pin) on upper backside of transfer case.
6. Disconnect front and rear speed sensor connector
(white 7 pin).
7. Disconnect speedometer sensor connector.
Tightening Torque19 - 30 Nm
(14 - 22 lb-ft)
Page 1400 of 2053

SSANGYONG MY2002
5D1-78 TRANSFER CASE
31. Install the rear output shaft flange on rear output
shaft. Install the rubber seal, output shaft yoke
washer and nut. Tighten the nut and calk the nut
on the flat area.
Installation Notice
32. Install the shift motor. Refer to the “Shift Motor”
in this section.
33. Insert the brown wire and pin to speed sensor con-
nect and assemble the connector. Refer to “Front
and Rear Propeller Shaft Speed Sensors” in this
section.
34. Install the drain plug and tighten the drain plug.
Installation Notice
35. Fill the transfer case with 1.4 liters of ATF or equiva
lent.
Notice: Fluid level should be just below the filler
plug-hole.
36. Install the filler plug and tighten.
Installation Notice
37. Install the transfer case to the vehicle. Refer to
“Transfer Case” in the section.
5D380
28. Coat the mating surface of the front case with a
bead of black non-acid cure silicone rubber or
equivalent.
29. Assemble the rear case on to front case.
Notice: Align the rear output shaft with the rear
case output shaft bore. Align the helical cam with
the rear case motor bore.
30. Install the bolts retaining the case halves and
tighten the bolts.
Installation Notice
Tightening Torque27 - 35 Nm
(20 - 26 lb-ft)
Tightening Torque140 - 200 Nm
(103 - 148 lb-ft)
Tightening Torque19 - 30 Nm
(14 - 22 lb-ft)
Tightening Torque4 - 6 Nm
(35 - 53 lb-in)
Page 1410 of 2053

SSANGYONG MY2002
5D2-10 TRANSFER CASE (PART TIME - 4408)
DIAGNOSTIC INFORMATION AND PROCEDURES
GENERAL DIAGNOSIS
Faulty or damaged TCCU, speed
sensor, motor, clutch or internal wirings
Damaged or worn shift cam, hub, fork
and rail shift
Binding shift fork, hub collar or gear
Broken drive chain
Improper or low oil
Loosened bolts or mounted parts
Noisy T/C bearing
Gear abnormal noise
Worn or damaged sprockets or drive
chain
Incorrect tire pressure
Cracked transfer case
Leakage from other parts
Breather clogging
Improper or too much oil
Loosened sealing bolts
Improperly applied sealant
Worn or damaged oil seal
Overhaul and check, replace if neces-
sary.
Overhaul and check for wear and
damage.
Replace if necessary.
Check sliding parts, replace if neces-
sary.
Drain and replace with specified oil.
Retighten as specified.
Disassemble bearings and parts and
check for wear or damage. Replace if
necessary.
Check for wear and damage including
speedometer gear, replace if neces-
sary.
Disassemble and check for wear and
damage, replace if necessary.
Adjust tire pressure.
Replace the case.
Clean case and parts and check for
leakage.
Remove breather hose and clean,
replace if necessary.
Use specified oil and adjust oil level.
Retighten
Use specified sealant and retighten.
Replace Check Symptoms
Electric shift problems
Cannot front wheel
drive when shifted 4H,
4L
Noise in 4WD opera-
tion
Noise in 4H or 4L
Transfer case oil
leakage
Action