Page 1821 of 2053
SSANGYONG MY2002
9P-4 DOORS
DOOR LOCK STRIKER
Removal and Installation Procedure
1. Remove the screws and the door lock striker.
Installation Notice
Dissimilar metals in direct contact with each
other may corrode rapidly. Make sure to use
the correct fasteners to prevent premature
corrosion.
2. Installation should follow the removal procedure
in the reverse order.
KAA9P020
ON-VEHICLE SERVICE
UNIT REPAIR
DOOR GLASS RUN
Removal and Installation Procedure
1. Lower the window.
2. Remove the glass from the door.
3. Remove the front door glass run.
4. Installation should follow the removal procedure
in the reverse order.
REPAIR INSTRUCTIONS
KAA9P030
DOOR SIDE OPENING
WEATHERSTRIP
Removal and Installation Procedure
1. Remove the side opening weatherstrip.
2. Installation should follow the removal procedure
in the reverse order.
Tightening Torque9.8 - 18.62 Nm
(7.23 - 13.74 lb-ft)
KAA9P040
Page 1836 of 2053
SECTION 9R
BODY FRONT END
CAUTION: Disconnect the negative battery cable before removing or installing any electrical unit or when a
tool or equipment could easily come in contact with exposed electrical terminals. Disconnecting this cable
will help prevent personal injury and damage to the vehicle. The ignition must also be in LOCK unless
otherwise noted.
TABLE OF CONTENTS
Description and Operation...................................9R-2
Body Front End....................................................9R-2
Components Locator............................................9R-3
Body Front End....................................................9R-3
Repair Instructions................................................9R-4
On-Vehicle Service Unit Repair................................9R-4
Lubrication..........................................................9R-4
Fasteners ............................................................9R-4Anticorrosion Materials .........................................9R-4
Cowl Vent Grille...................................................9R-5
Hood...................................................................9R-5
Hood Hinges.......................................................9R-6
Hood Gas Spring.................................................9R-6
Specifications.......................................................9R-7
Fastener Tightening Specifications.......................9R-7
Page 1839 of 2053
SSANGYONG MY2002
9R-4 BODY FRONT END
ON-VEHICLE SERVICE
UNIT REPAIR
LUBRICATION
The hood hinges and the locking mechanisms require
periodic lubrication for proper operation. Refer to
Section 0B, General Information for the specific types
and intervals of lubrication.
FASTENERS
Notice: Dissimilar metals in direct contact with each
other may corrode rapidly. Make sure to use the correct
fasteners to prevent premature corrosion.
Many aluminum components are used on current
models. Aluminum in contact with steel may corrode
rapidly if it is not protected by special finishes or
isolators.
The fasteners used have a special finish which provides
adequate protection from corrosion. These special
fasteners differ in color to easily identify them from
the standard metric fasteners, which are medium blue
in color.
When replacing fasteners, avoid substituting otherwise
similar fasteners in the same location.
ANTICORROSION MATERIALS
To provide rust resistance, anticorrosion materials have
been applied to the interior surfaces of most of most
of the metal panels. When servicing these panels,
properly recoat them with a service-type anticorrosion
material if any of the original material has been
disturbed.
REPAIR INSTRUCTIONS
Page 1843 of 2053
SECTION 9S
BODY REAR END
CAUTION: Disconnect the negative battery cable before removing or installing any electrical unit or when a
tool or equipment could easily come in contact with exposed electrical terminals. Disconnecting this cable
will help prevent personal injury and damage to the vehicle. The ignition must also be in LOCK unless
otherwise noted.
TABLE OF CONTENTS
Description and Operation...................................9S-2
Fuel Filler Door.....................................................9S-2
Components Locator............................................9S-3
Lighting System..................................................9S-3
Repair Instructions................................................9S-4On-Vehicle Service Unit Repair................................9S-4
Fuel Filler Door.....................................................9S-4
Fuel Filler Door Remote Handle and Cable............9S-4
Specifications.......................................................9S-5
Fastener Tightening Specifications.......................9S-5
Page 1846 of 2053
SSANGYONG MY2002
9S-4 BODY REAR END
ON-VEHICLE SERVICE
UNIT REPAIR
FUEL FILLER DOOR
Removal and Installation Procedure
1. Remove the bolts and the fuel filler door.
Installation Notice
Dissimilar metals in direct contact with each
other may corrode rapidly. Make sure to use
the correct fasteners to prevent premature
corrosion.
2. Installation should follow the removal procedure
in the reverse order.
REPAIR INSTRUCTIONS
KAA9S020
KAA9S030
FUEL FILLER DOOR REMOTE
HANDLE AND CABLE
Removal and Installation Procedure
1. Remove the front seat. Refer to Section 9H, Seats.
2. Remove the front floor insulator.
3. Remove the screw with the fuel filler door remote
handle.
4. Remove the quarter trim panel. Refer to Section
9G, Interior Trim.
5. Disconnect the fuel filler door cable.
6. Installation should follow the removal procedure
in the reverse order.
Tightening Torque3.92 - 5.49 Nm
(2.92 - 4.08 lb-ft)
Page 1848 of 2053
SECTION 9T1
REMOTE KEYLESS ENTRY AND ANTI-THEFT
SYSTEM
CAUTION: Disconnect the negative battery cable before removing or installing any electrical unit or when a
tool or equipment could easily come in contact with exposed electrical terminals. Disconnecting this cable
will help prevent personal injury and damage to the vehicle. The ignition must also be in LOCK unless
otherwise noted.
TABLE OF CONTENTS
Description and Operation.................................9T1-2
Remote Keyless Entry and Anti-Theft System.....9T1-2
Components Locator..........................................9T1-3
REKES & STICS................................................9T1-3
Diagnostic Information and Procedure.............9T1-4
Input Memory....................................................9T1-5
Repair Instructions..............................................9T1-6
On-Vehicle Service Unit Repair..............................9T1-6Receiver............................................................9T1-6
Antenna.............................................................9T1-6
Stics..................................................................9T1-6
Schematic and Routing Diagrams.....................9T1-7
STICS - Stics Unit..............................................9T1-7
STICS - Door Contact Switch..............................9T1-8
STICS - Keyless, Key Reminder Switch, Siren,
Chime Bell Buzzer ..........................................9T1-9
Page 1851 of 2053
SSANGYONG MY2002
9T1-4 REMOTE KEYLESS ENTRY AND ANTI-THEFT SYSTEM
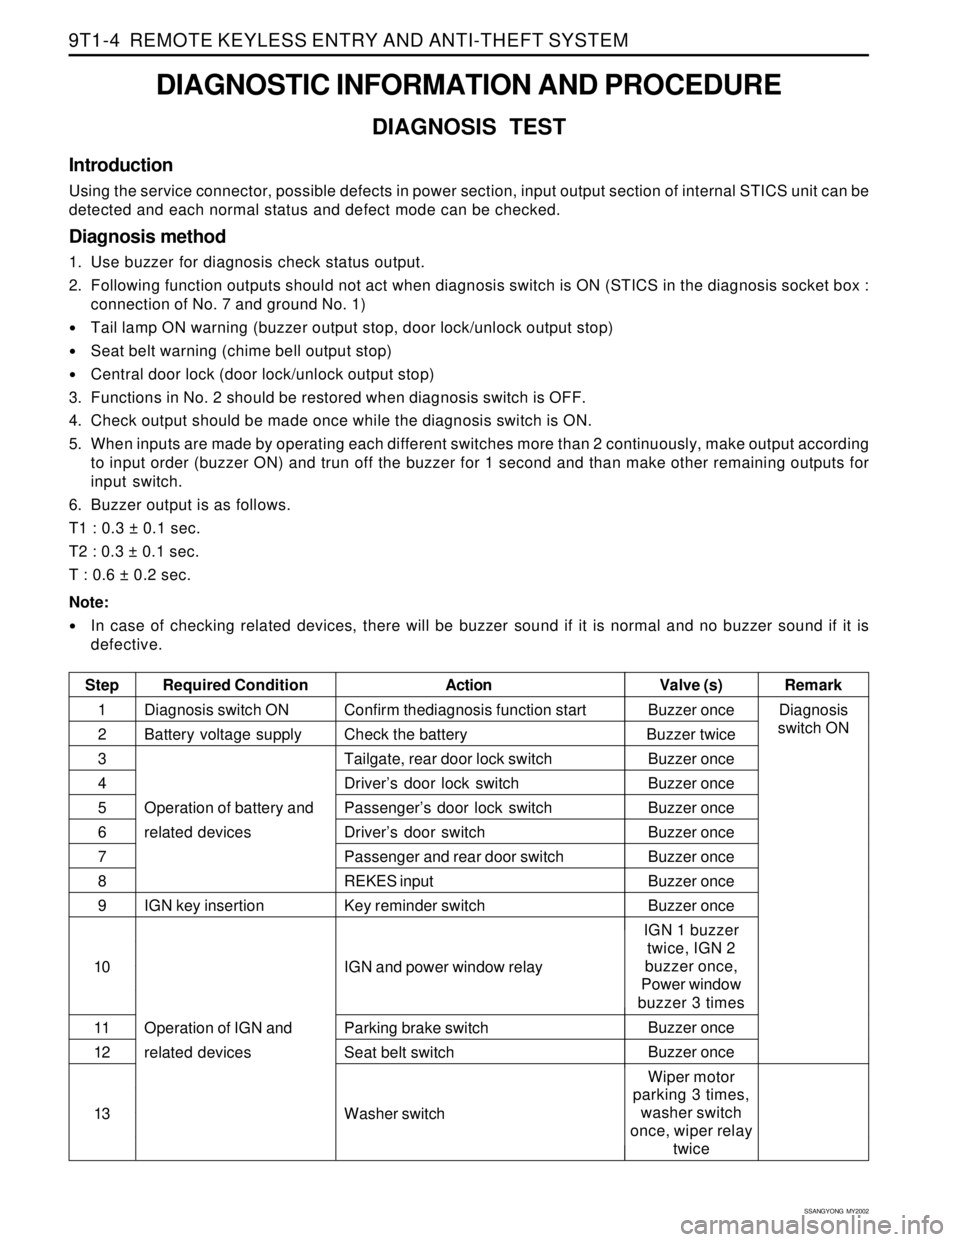
DIAGNOSTIC INFORMATION AND PROCEDURE
DIAGNOSIS TEST
Introduction
Using the service connector, possible defects in power section, input output section of internal STICS unit can be
detected and each normal status and defect mode can be checked.
Diagnosis method
1. Use buzzer for diagnosis check status output.
2. Following function outputs should not act when diagnosis switch is ON (STICS in the diagnosis socket box :
connection of No. 7 and ground No. 1)
Tail lamp ON warning (buzzer output stop, door lock/unlock output stop)
Seat belt warning (chime bell output stop)
Central door lock (door lock/unlock output stop)
3. Functions in No. 2 should be restored when diagnosis switch is OFF.
4. Check output should be made once while the diagnosis switch is ON.
5. When inputs are made by operating each different switches more than 2 continuously, make output according
to input order (buzzer ON) and trun off the buzzer for 1 second and than make other remaining outputs for
input switch.
6. Buzzer output is as follows.
T1 : 0.3 ± 0.1 sec.
T2 : 0.3 ± 0.1 sec.
T : 0.6 ± 0.2 sec.
Note:
In case of checking related devices, there will be buzzer sound if it is normal and no buzzer sound if it is
defective.
Step Required ConditionActionRemark Valve (s)
Diagnosis switch ON
Battery voltage supply
Operation of battery and
related devices
IGN key insertion
Operation of IGN and
related devicesBuzzer once
Buzzer twice
Buzzer once
Buzzer once
Buzzer once
Buzzer once
Buzzer once
Buzzer once
Buzzer once
IGN 1 buzzer
twice, IGN 2
buzzer once,
Power window
buzzer 3 times
Buzzer once
Buzzer once
Wiper motor
parking 3 times,
washer switch
once, wiper relay
twice Confirm thediagnosis function start
Check the battery
Tailgate, rear door lock switch
Driver’s door lock switch
Passenger’s door lock switch
Driver’s door switch
Passenger and rear door switch
REKES input
Key reminder switch
IGN and power window relay
Parking brake switch
Seat belt switch
Washer switch1
2
3
4
5
6
7
8
9
10
11
12
13Diagnosis
switch ON
Page 1852 of 2053

REMOTE KEYLESS ENTRY AND ANTI-THEFT SYSTEM 9T1-5
SSANGYONG MY2002
KAA9T020
KAA9T030
INPUT MEMORY
When the REKES transmitter is lost
1. Connect the battery terminal No. 3 and REKES
terminal No. 4 which are on the diagnosis socket
under the dash board with service lead wire.
2. push the lock or unlock button on the REKES
transmitter.
3. Input memory and close all doors.
4. Check the operation of door locking system by
pushing the lock or unlock button on the REKES
transmitter.
When the transmitter is faulty
1. Connect the battery terminal No. 3 and REKES
terminal No. 4 which are on the diagnosis socket
under the dash board with service lead wire.
2. Set the input switch of the REKES receiver onto
the No. 1 or No. 2 position and push the lock or
unlock button on the REKES transmitter.
3. Set the input switch of the REKES receiver onto
the central position and close all doors.
4. Check the operation of door locking system by
pushing the lock or unlock button on the REKES
transmitter.
Step Required ConditionActionRemark Valve (s)
Wiper motor
parking 3 times,
washer switch
once, wiper relay
twice
Buzzer once
Buzzer once
Buzzer once
Buzzer once Wiper auto switch
ALT ‘L’
Volume variable switch
Defogger switch
Speed sensor signal
Operation of IGN and
related devices
Operation of IGN and
starting and related
devices14
15
16
17
18
KAA9T100