Page 249 of 358

Replacing Brake System Parts
The braking system on a modern vehicle is complex. Its
many parts have to be
of top quality and work well
together if the vehicle is to have really good braking.
Vehicles we design and test have top-quality
GM brake
parts
in them, as your Oldsmobile does when it is new.
When you replace parts of your braking system -- for
example, when your brake linings wear down and you
have to have new ones put
in -- be sure you get new
genuine
GM replacement parts. If you don’t, your
brakes may no longer work properly. For example,
if
someone puts in brake linings that are wrong for your
vehicle,
the balance between your front and rear brakes
can change
-- for the worse. The braking performance
you’ve come to expect can change
in many other ways if
someone puts in the wrong replacement brake parts.
Battery
Every new Oldsmobile has a Delco Freedom@ battery.
You never have to add water to one of these. When it‘s
time for a new battery, we recommend
a Delco Freedom
battery. Get one that has the replacement number shown
on the original battery’s label.
Vehicle Storage
If you’re not going to drive your vehicle for 25 days or
more, take off the black, negative
(-) cable from the
battery. This will help keep your battery
from
running down.
Batteries have acid that can Durn you and gas
that can explode. You can be badly hurt if you
aren’t careful. See “Jump Starting” in the Index
for tips on working around a battery without
getting hurt.
Contact your retailer to learn how to prepare your
vehicle for longer storage periods.
Also, for your audio system, see “Theft-Deterrent
Feature”
in the Index.
ProCarManuals.com
Page 250 of 358
Bulb Replacement
Before you replace any bulbs, be sure that all the lamps
are
off and the engine isn’t running. See “Replacement
Bulbs”
in the Index for the proper type of bulb to use.
Halogen Bulbs
A CAUTION:
Halogen bulbs have pressurized gas inside and
can burst if you drop or scratch the bulb. You
or
others could be injured. Be sure to read and
follow the instructions on the bulb package.
Composite Headlamps
1. Open the hood.
2. Remove the black
protective
caps from the
removal pins at
the top
of the radiator support.
Use
a hex socket to
unscrew the pins.
3. Pull the headlamp lens
assembly out.
4. Unplug the electrical connector.
6-30
ProCarManuals.com
Page 251 of 358
5. Turn the bulb
counterclockwise to
remove it.
6. Put the new bulb into the headlarnp lens assembly
and turn
it clockwise until it is tight.
7. Plug in the electrical connector.
8. Put the headlamp lens assembly back into the
vehicle. Install and tighten the screws.
Front Turn Signal Lamps
1. Remove the headlamp assembly.
2. Reach down and behind the turn signal
lamp assembly.
3. Turn the socket counterclockwise and pull it out.
4. Holding the base of the bulb, pull the bulb straight
out
of the socket.
5. Push the new bulb into the socket until it clicks.
6. Put the socket back into the turn signal lamp assembly
and
turn it clockwise until it locks into place.
6-31
ProCarManuals.com
Page 252 of 358

Center High-Mounted Stoplamp
1. Remove the two screws.
2. Pull the lamp assembly out.
3. Turn the socket counterclockwise and pull it out.
4. Holding the base of the bulb, pull the bulb straight
out
of the socket.
5. Reverse the steps to install a new bulb.
Taillamps
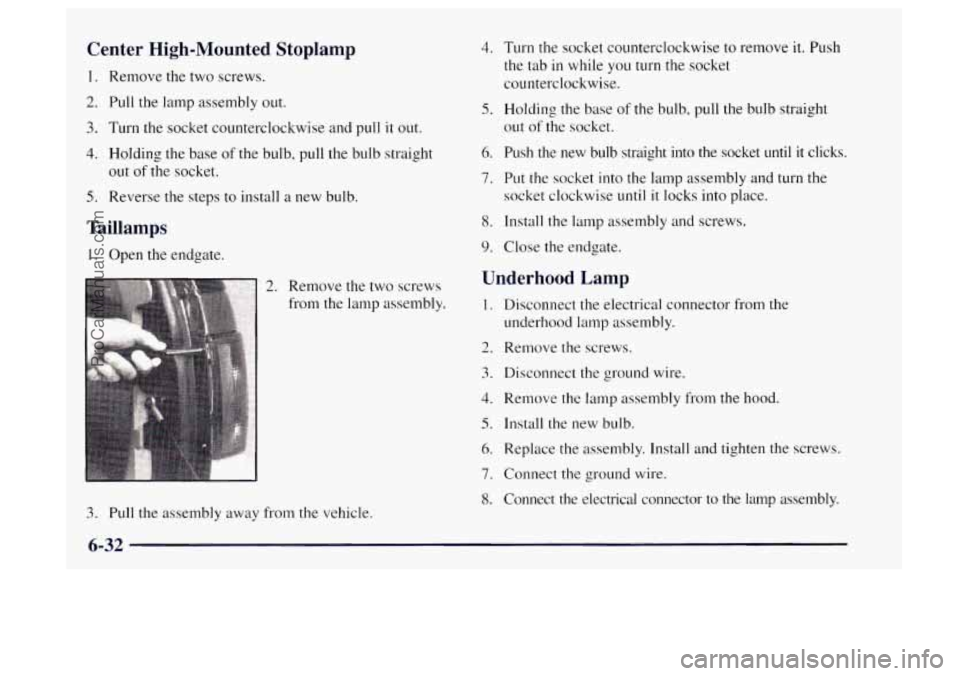
1. Open the endgate.
2. Remove the two screws
from the lamp assembly.
4.
5.
6.
7.
8.
9.
Turn the socket counterclockwise to remove it. Push
the tab
in while you turn the socket
counterclockwise.
Holding the base
of the bulb, pull the bulb straight
out
of the socket.
Push the new bulb straight into the socket until it clicks.
Put the socket into the lamp assembly and turn the
socket clockwise
until it locks into place.
Install the lamp assembly and screws.
Close the endgate.
Underhood Lamp
1. Disconnect the electrical connector from the
underhood lamp assembly.
2. Remove the screws.
3. Disconnect the ground wire.
4. Remove the lamp assembly from the hood.
5. Install the new bulb.
6. Replace the assembly. Install and tighten the screws.
7. Connect the ground wire.
8. Connect the electrical connector to the lamp assembly.
3. Pull the assembly away from the vehicle.
6-32
ProCarManuals.com
Page 253 of 358
Front Reading Lamps
1.
2.
3.
4.
5.
6.
7.
8.
Use a coin or small screwdriver to unscrew the
center
of the overhead console lamp lens while
pressing
in on the lamp assembly.
Remove the lamp assembly from the console.
Remove the bulb assembly from the lamp assembly.
Pull the bulb straight out
of the base.
Put a new bulb into the bulb base.
Install the bulb assembly into the lamp assembly.
Place the lamp assembly into the console, turning
it
to latch it into place.
Install the lens.
Vanity Mirror Lamps
1. Insert the blade of a small screwdriver into the center
slot at the bottom of the lens.
2. Gently pry the screwdriver down in order to lift out
the lens.
3. Pry out the bulb.
4. Press the new bulb into place.
5. Slide the side tabs of the lens under the side of the
vanity assembly frame.
6. Rotate the lens downward.
7. Snap the lens into the frame.
6-33
ProCarManuals.com
Page 254 of 358
Windshield Wiper Blade Replacement
See “Normal Maintenance Replacement Parts” in the
Index for the proper type of replacement blades.
NOTICE:
Use care when removing or installing a blade
assembly. Accidental bumping can cause the arm
to fall back and strike the windshield.
1. To remove the old wiper blades, lift the wiper arm
until it locks into a vertical position.
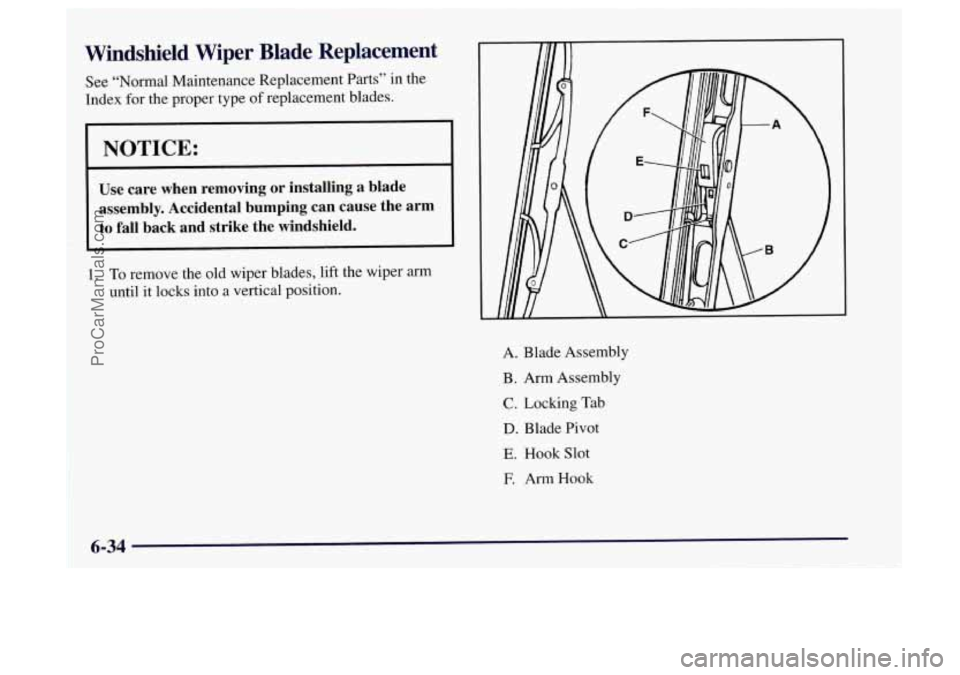
A. Blade Assembly
B. Arm Assembly
C. Locking Tab
D. Blade Pivot
E. Hook Slot
E Arm Hook
6-34
ProCarManuals.com
Page 255 of 358
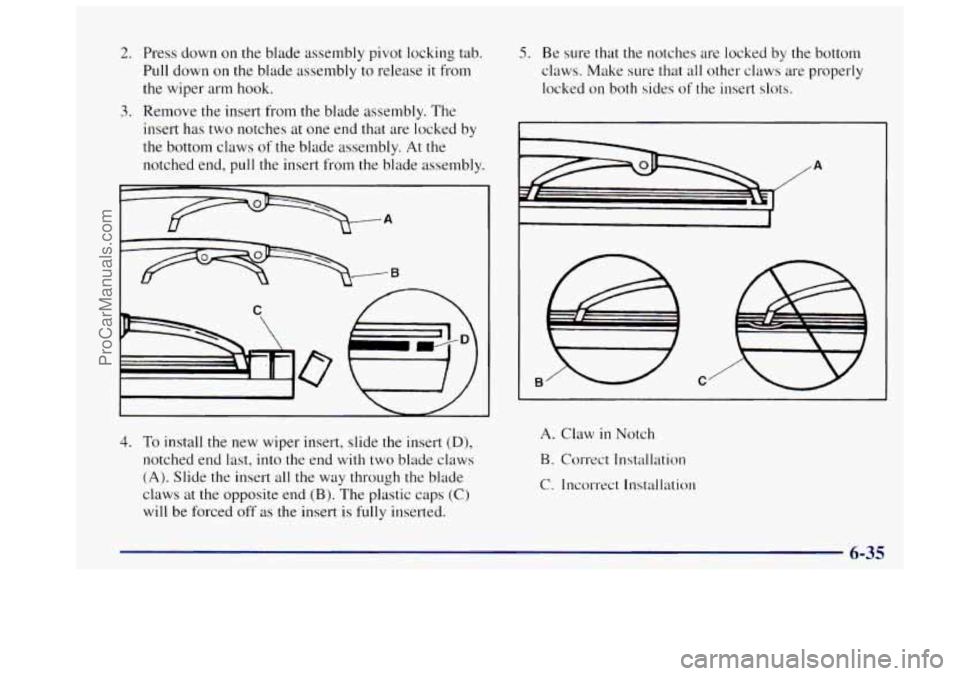
2. Press down on the blade assembly pivot locking tab.
Pull down on the blade assembly to release
it from
the wiper arm hook.
insert has two notches at one end that are locked by
the bottom claws
of the blade assembly. At the
notched end, pull the insert from
the blade assembly.
3. Remove the insert from the blade assembly. The
5. Be sure that the notches are locked by the bottom
claws. Make sure that
all other claws are properly
locked on both sides
of the insert slots.
A
4. To install the new wiper insert, slide the insert (D),
notched end last, into the end with two blade claws
(A). Slide the insert all the way through the blade
claws at the opposite end
(B). The plastic caps (C)
will be forced off as the insert is fully inserted.
A. Claw in Notch
B. Correct Installation
C. Incorrect Installation
6-35
ProCarManuals.com
Page 256 of 358

6. Put the blade assembly pivot in the wiper arm hook.
Pull
up until the pivot locking tab locks in the
hook slot.
7. Carefully lower the wiper arm and blade assembly
onto the windshield.
Backglass Wiper Blade Replacement
See “Windshield Wiper Blade Replacement” in this
section for instructions on how to change the backglass
wiper blade. The backglass wiper blade will not lock
in
a vertical position like the windshield wiper blade, so
care should be used when pulling it away from
the vehicle.
Tires
Your new Oldsmobile comes with high-quality tires
made by
a leading tire manufacturer. If you ever have
questions about your tire warranty and where to obtain
service, see your Oldsmobile Wmanty booklet
for details. Poorly maintained and improperly used tires
are dangerous.
e
0
0
0
Overloading your tires can cause
overheating as a result
of too much friction.
You could have an air-out and
a serious
accident. See “Loading Your Vehicle” in
the Index.
Underinflated tires pose the same danger as
overloaded tires. The resulting accident
could cause serious injury. Check all tires
frequently to maintain the recommended
pressure. Tire pressure should be checked
when your tires are cold.
Overinflated tires are more likely to be
cut, punctured or broken
by a sudden
impact
-- such as when you hit a pothole.
Keep tires at the recommended pressure.
Worn, old tires can cause accidents.
If your
tread is badly worn, or if your tires have
been damaged, replace them.
6-36
ProCarManuals.com