Page 920 of 4133
116 Controls in detailInstrument cluster
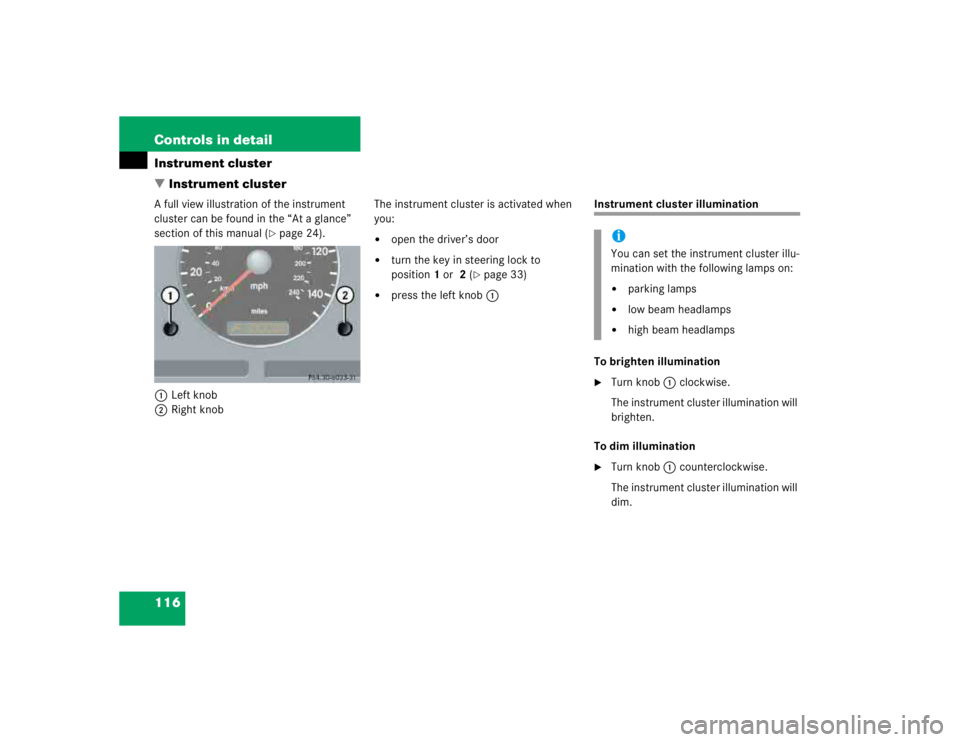
�Instrument clusterA full view illustration of the instrument
cluster can be found in the “At a glance”
section of this manual (
�page 24).
1Left knob
2Right knobThe instrument cluster is activated when
you:
�
open the driver’s door
�
turn the key in steering lock to
position1 or 2 (
�page 33)
�
press the left knob1
Instrument cluster illumination
To brighten illumination�
Turn knob1 clockwise.
The instrument cluster illumination will
brighten.
To dim illumination
�
Turn knob1 counterclockwise.
The instrument cluster illumination will
dim.iYou can set the instrument cluster illu-
mination with the following lamps on:�
parking lamps
�
low beam headlamps
�
high beam headlamps
Page 921 of 4133
. The coolant temperature may
climb to the r")
117 Controls in detail
Instrument cluster
Coolant temperature gauge
Under normal driving conditions, the cool-
ant temperature may rise to 248°F
(120°C). The coolant temperature may
climb to the red marking:�
at high outside temperatures
�
during stop-and-go city traffic
�
when driving on hilly terrain
The engine should not be operated with
the coolant temperature in the red zone.
Doing so may cause serious engine dam-
age which is not covered by the
Mercedes-Benz Limited Warranty.
Display in the speedometer
Changing display�
Press the left knob1 in the instru-
ment cluster (
�page 116).
The display changes between main
odometer and trip odometer.
�
Press the left knob1 twice.
The next scheduled service is displayed
(�page 232).
Warning!
G
Driving when your engine is badly overheat-
ed can cause some fluids which may have
leaked into the engine compartment to
catch fire. You could be seriously burned.
Steam from an overheated engine can cause
serious burns and can occur just by opening
the engine hood. Stay away from the engine
if you see or hear steam coming from it.
Turn off the engine, get out of the vehicle
and do not stand near the vehicle until the
engine has cooled down.
Page 922 of 4133
 re-
peatedly until you see the trip odome-
ter display.
�
Press and hold the left knob1 until
the tr")
118 Controls in detailInstrument clusterResetting trip odometer�
Press the left knob1 (
�page 116) re-
peatedly until you see the trip odome-
ter display.
�
Press and hold the left knob1 until
the trip odometer is reset.
Tachometer
To help protect the engine, the fuel supply
is interrupted if the engine is operated
above its specified limit.
Outside temperature indicator
The outside temperature is displayed in
the instrument cluster (
�page 24).
When moving the vehicle into colder ambi-
ent temperatures (e.g. when leaving your
garage), you will notice a delay before the
lower temperature is displayed.
A delay also occurs when ambient temper-
atures rise. This prevents inaccurate tem-
perature indications caused by heat
radiated from the engine during idling or
slow driving.
Setting the clock
Hour�
Pull out the right knob2 in the instru-
ment cluster (
�page 116) and turn it
counterclockwise.
Minutes
�
Pull out the right knob2 in the instru-
ment cluster (
�page 116) and turn it
clockwise.
Warning!
G
The outside temperature indicator is not de-
signed to serve as an ice-warning device and
is therefore unsuitable for that purpose.
Indicated temperatures just above the freez-
ing point do not guarantee that the road sur-
face is free of ice. The road may still be icy,
especially in wooded areas or on bridges.
iTo set the clock by a single hour or a
few minutes, turn knob2 just a few
degrees in the direction indicated for
hours or minutes.
Page 932 of 4133

128 Controls in detailGood visibility�
Engage reverse gearR.
The passenger-side exterior rear view
mirror moves automatically to the
stored parking position.
The exterior rear view mirror returns to its
stored driving position:
�
ten seconds after you put the gear
selector lever in positionD
�
immediately once your vehicle exceeds
a speed of approx. 6 mph (10 km / h)
�
immediately when you press the
button1 for driver’s side mirrorElectrically folding exterior rear view
mirrors
Folding exterior mirrors in and out
manually*
The exterior rear view mirrors can vibrate if
they are not completely folded out.The buttons are located on the upper cen-
ter console.
1Folds the exterior mirrors in
2Folds the exterior mirrors out
�
Check that the ignition is switched on.
All the lamps in the instrument cluster
come on.
iIf the button1 is pressed, the auto-
matic passenger-side exterior rear view
parking position is deactivated.
!Before driving the vehicle through an
automatic car wash, fold the exterior
mirrors in. Otherwise they may get
damaged.
iWith the front doors closed, the exteri-
or mirrors can still be folded in and out
approximately 30 minutes after the ig-
nition has been turned off.
��
Page 1024 of 4133

220 OperationEngine compartmentThe display
------
flashes in the
speedometer display, if a proper oil level
check cannot be performed.
�
If engine is at normal operating
temperature, wait five minutes before
repeating check procedure.
�
If engine is not yet at normal operating
temperature, wait 30 minutes before
repeating check procedure.
See the “Practical hints” section
(
�page 253) if the low engine oil level
warning lamp in the instrument cluster
flashes.Checking engine oil level with the oil
dipstick
When checking the oil level the vehicle
must
�
be parked on level ground
�
be at normal operating temperature
�
have been stationary for at least five
minutes with the engine turned off
To check the engine oil level with the oil
dipstick, do the following:
�
Open the hood (
�page 217).
�
Pull out oil dipstick1 (
�page 221).
�
Wipe oil dipstick1 clean.
�
Fully insert oil dipstick1 into the
dipstick guide tube.
�
Pull out oil dipstick1 again after
approximately three seconds to obtain
accurate reading.
Oil dipstickThe oil level is correct when it is between
the lower (min) and upper (max) mark of
the oil dipstick.
iPerform the engine oil level check with
the dipstick if it cannot be completed
via the speedometer display
(�page 220).
In this case we recommend that you
have the system checked at a
Mercedes-Benz Light Truck Center.
iThe engine oil level can be checked by
either the oil dipstick or via the
speedometer display in the instrument
cluster (
�page 219). The amount of
engine oil needed is shown more
precisely in the speedometer display.
Page 1025 of 4133
.
More information on engine oil can be
found in the “Technical data” section
(
�page 300)")
221 Operation
Engine compartment
�
If necessary, add engine oil.
For adding engine oil see (
�page 221).
More information on engine oil can be
found in the “Technical data” section
(
�page 300) and (
�page 301).
See the “Practical hints” section
(
�page 253) if the low engine oil level
warning lamp in the instrument cluster
flashes.Adding engine oil
1Oil dipstick
2Filler cap
�
Unscrew filler cap2 from filler neck.
�
Add engine oil as required. Be careful
not to overfill with oil.
Be careful not to spill any oil when adding.
Avoid environmental damage caused by oil
entering the ground or water.
iThe filling quantity between the upper
and lower marks on the oil dipstick is
approximately 2.1 US qt. (2.0 l).
!Only use approved engine oils. For a
listing of approved engine oils, refer to
the Factory Approved Service Products
pamphlet in your vehicle literature port-
folio.
In addition, check the oil filler cap for
important information pertaining to the
engine oil needing to meet a specific
Mercedes-Benz specification
(e.g. MB 229.5). If such information is
printed on the oil filler cap, only use an
engine oil from the list of approved en-
gine oils in the Factory Approved Ser-
vice Products pamphlet that meets the
specification indicated on the oil filler
cap. Using engine oils of other specifi-
cation may cause the FSS to incorrect-
ly determine the next service interval
and will result in engine damage not
covered by the Mercedes-Benz Limited
Warranty.
��
Page 1042 of 4133

238 OperationVehicle careLight alloy wheels
Mercedes-Benz approved Wheel Care
should be used for regular cleaning of the
light alloy wheels.
If possible, clean wheels once a week with
Mercedes-Benz approved Wheel Care, us-
ing a soft bristle brush and a strong spray
of water.
Follow instructions on container.Instrument cluster
Use a gentle dishwashing detergent or
mild detergent for delicate fabrics as a
washing solution. Wipe with a cloth moist-
ened in lukewarm solution. Do not use
scouring agents.
Steering wheel and gear selector lever
Wipe with a damp cloth and dry thoroughly
or clean with Mercedes-Benz approved
Leather Care.
Cup holder
Use a gentle dishwashing detergent or
mild detergent for delicate fabrics as a
washing solution. Wipe with a cloth moist-
ened in lukewarm solution. Do not use
scouring agents.Hard plastic trim items
Pour Mercedes-Benz approved Interior
Care onto soft lint-free cloth and apply
with light pressure.
Headliner and rear window shelf
Clean with soft bristle brush, or use a
dry-shampoo cleaner in case of excessive
dirt.
Seat belts
The webbing must not be treated with
chemical cleaning agents. Use only clear,
lukewarm water and soap. Do not dry the
webbing at temperatures above 176°F
(80°C) or in direct sunlight.
!Fold the windshield wiper arms back
onto the windshield before turning the
key in the steering lock.
Hold on to the wiper when folding the
wiper arm back. If released, the force
of the impact from the tensioning
spring could crack the windshield.iOnly use acid-free cleaning materials.
Acid may cause corrosion or damage
the clear coat.
Warning!
G
Do not bleach or dye seat belts as this may
severely weaken them. In a crash they may
not be able to provide adequate protection.
Page 1046 of 4133

242 Practical hintsWhat to do if …
�What to do if …Lamps in instrument clusterGeneral information:
If a bulb in the instrument cluster fails to
light up during the bulb self-check when turning the key in steering lock to
position2, have it checked and replaced if
necessary.Problem
Possible cause
Suggested solution
-
The yellow ABS warning lamp
comes on while driving.
ABS has detected a malfunction and has
switched off. The BAS, ESP, 4-ETS and EBP
are also switched off.
The brake system is still functioning normally
but without ABS available.
�
Continue driving with added caution.
Wheels may lock during hard braking
reducing steering capability.
�
Have the system checked at an autho-
rized Mercedes-Benz Light Truck Cen-
ter as soon as possible.
Failure to follow these instructions in-
creases the risk of an accident.
The charging voltage has fallen below
10 volts. The ABS has switched off.
When the voltage is above this value
again, the ABS is operational again.�
If necessary, have the generator
(alternator) and the battery checked.