Page 828 of 4133
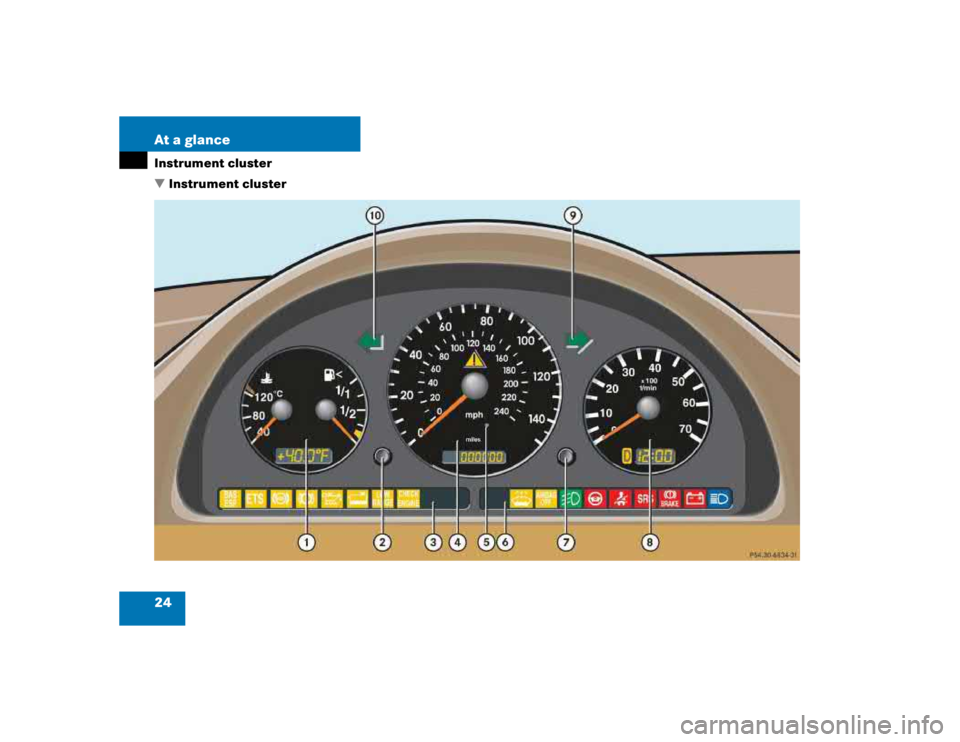
24 At a glanceInstrument cluster
�Instrument cluster
Page 829 of 4133

25 At a glance
Instrument cluster
Item
Page
1
Gauge for
Coolant tempera-
ture
117
Outside tempera-
ture
118
Fuel reserve
warning lamp
252
2
Knob for
Activating instru-
ment cluster
116
Adjusting intensity
of instrument lamps
116
Main odometer
117
Trip odometer
readout / reset
118
Activating Flexible
Service System
(FSS) indicator
232
Item
Page
3
Left indicator lamps
with:¿Brake Assist
System
(BAS) / Electronic
Stability Program
(ESP) malfunction
warning lamp
246
{Electronic Traction
System (4-ETS) mal-
function indicator
lamp
252
-Antilock Brake Sys-
tem (ABS) malfunc-
tion warning lamp
242
2Brake pad wear in-
dicator lamp
254
:Low engine oil level
warning lamp
253
Item
Page
/Low engine coolant
level warning lamp
249
êLow range indicator
lamp
252
?Engine malfunction
indicator lamp
248
4
Speedometer with:v4-ETS (Electronic
Traction
System)/Electronic
Stability Program
(ESP) warning lamp
251
Trip / main
odometer
117
Display for Flexible
Service System
(FSS)
232
Engine oil level indi-
cator
219
Page 830 of 4133
26 At a glanceInstrument cluster
Item
Page
5
Photo sensor
(adjusts the brightness of
the digital displays located
in 1, 4 and 8)
6
Right indicator lamps
with:WLow wind-
shield/headlamp
washer system fluid
level warning lamp
253
7Front passenger air-
bag switched off
243
‡Front fog lamp
switched on
111
Item
Page
_Steering wheel ad-
justment not locked
253
warning lamp
253
1Supplemental Re-
straint System
(SRS) indicator
lamp
255
ÉBrake warning lamp
244
#Charge indicator
lamp
254
AHigh beam head-
lamp indicator
49
Item
Page
7
Knob for setting clock
118
8
Tachometer with:
Display for Selector
lever position
121
Clock
118
9
KRight turn signal
indicator lamp
a
LLeft turn signal
indicator lamp
Page 845 of 4133

41 Getting started
Adjusting
The buttons are on the lower part of the
center console.
1Driver’s side exterior rear view mirror
2Passenger-side exterior rear view
mirror
3Adjustment button
�
Switch on the ignition by turning the
key in the steering lock to position2
(�page 33).
All lamps in the instrument cluster
come on.
�
Press button1 for the left mirror or
button2 for the right mirror.
�
Push adjustment button3 up, down,
left, or right according to the desired
setting.
For more information, see “Electrically
folding exterior rear view mirrors”
(
�page 128).
!For information on how to reposition
the exterior mirror housing when it was
forcibly pushed forward (hit from the
rear) or forcibly pushed rearward (hit
from the front), see “Folding exterior
mirrors in and out manually*”
(�page 128).
iWith the front doors closed, the exteri-
or mirrors can still be adjusted for ap-
proximately 30 minutes after the
ignition has been switched off.iThe memory function* (
�page 105)
lets you save the exterior mirror set-
tings together with the seat and
steering wheel settings.
iAt low outside temperatures, the exte-
rior mirrors will be automatically
heated.
Page 853 of 4133
49 Getting started
Driving
High beam�
Push the combination switch forward.
The high beam indicatorA in the
instrument cluster comes on.
More information can be found in the
“Controls in detail” section (
�page 110).
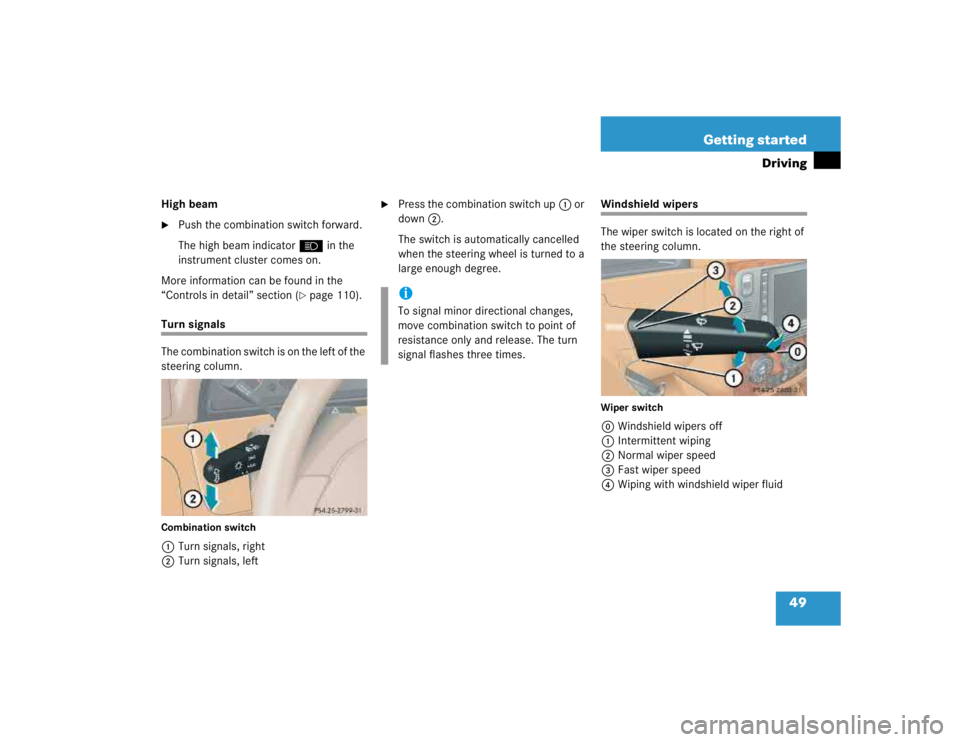
Turn signals
The combination switch is on the left of the
steering column.Combination switch1Turn signals, right
2Turn signals, left
�
Press the combination switch up1 or
down2.
The switch is automatically cancelled
when the steering wheel is turned to a
large enough degree.
Windshield wipers
The wiper switch is located on the right of
the steering column.Wiper switch0Windshield wipers off
1Intermittent wiping
2Normal wiper speed
3Fast wiper speed
4Wiping with windshield wiper fluid
iTo signal minor directional changes,
move combination switch to point of
resistance only and release. The turn
signal flashes three times.
Page 857 of 4133

53 Getting started
Parking and locking
�Parking and locking
You have now completed your first drive.
You have properly stopped and parked
your vehicle. End your drive as follows.
Parking brake
1Parking brake
2Release handle�
Step firmly on parking brake1.
When the engine is running, the indica-
tor lampÉ in the instrument cluster
will be illuminated.
Warning!
G
Wait until the vehicle is stationary before re-
moving the key from the steering lock. The
vehicle cannot be steered when the key is
removed.Warning!
G
With the engine not running, there is no
power assistance for the brake and steering
system. In this case, it is important to keep
in mind that a considerably higher degree of
effort is necessary to brake and steer the
vehicle.
Warning!
G
Do not park this vehicle in areas where com-
bustible materials such as grass, hay or
leaves can come into contact with the hot
exhaust system, as these materials could be
ignited and cause a vehicle fire.
To reduce the risk of personal injury as a re-
sult of vehicle movement, before turning off
the engine and leaving the vehicle always:�
Keep right foot on brake pedal.
�
Firmly depress parking brake pedal.
�
Move the gear selector lever to
positionP.
�
Slowly release brake pedal.
�
When parked on an incline, turn front
wheel towards the road curb.
�
Turn the key to starter switch position0
and remove.
�
Take the key and lock vehicle when leav-
ing.
Page 862 of 4133

58 Safety and SecurityOccupant safety
�Occupant safetyIn this section you will learn the most im-
portant facts about the restraint systems
of the vehicle.
The restraint systems are�
Seat belts
�
Emergency tensioning device
�
Airbags
�
Child seat
�
Child seat recognition
�
Lower anchors and tethers for children
(LATCH)
As independent systems, their protective
effects work in conjunction with each
other.The 1 indicator lamp in the instrument
cluster (
�page 26) comes on for about
four seconds when you turn the key in the
steering lock to position2. It goes out
when you start the engine. This shows that
the restraint systems are operational.
If the lamp does not come on at all or if it
fails to extinguish after approximately four
seconds or if it comes on thereafter, a mal-
function in the system has been detected.
More information can be found in the
“Practical hints” section (
�page 255).
iFor information on infants and children
traveling with you in the vehicle and
restraint systems for infants and chil-
dren, see “Children in the vehicle”
(�page 67).
Warning!
G
In the event that the 1malfunction indi-
cator lamp comes on during driving or does
not come at all, the SRS may not be opera-
tional.
For your safety, we strongly recommend
that you visit an authorized Mercedes-Benz
Light Truck Center immediately to have the
system checked; otherwise the SRS may not
be activated when needed in an accident,
which could result in serious or fatal injury,
or it might deploy unexpectedly and unnec-
essarily which could also result in injury.
Improper work on the restraint systems, in-
cluding incorrect installation and removal,
can lead to possible injury through an unin-
tended activation of the SRS.
In addition, through improper work there is
a risk of rendering the SRS inoperative or
causing unintended airbag deployment.
Work on the SRS must therefore only be per-
formed by qualified technicians. Contact
your authorized Mercedes-Benz Light Truck
Center.
Page 874 of 4133

70 Safety and SecurityOccupant safetyBabySmart
TM
airbag deactivation
system
Special BabySmart
TM1
compatible child
seats, designed for use with the
Mercedes-Benz system and available at
any authorized Mercedes-Benz Light Truck
Center, are required for use with the
BabySmart
TM airbag deactivation system.
With the special seat properly installed,
the passenger front airbag will not deploy.
The 7indicator lamp located in the in-
strument cluster will be illuminated, ex-
cept with the key removed or in steering
lock position0 (
�page 33).Self-test BabySmart
TM
without special
child seat installed
After turning the key in the steering lock to
position1 or2, the 7indicator lamp lo-
cated in the instrument cluster comes on
for approximately six seconds, extin-
guishes, then flashes once.
If the indicator lamp should not come on or
is continuously lit, the system is not func-
tioning. You must see an authorized
Mercedes-Benz Light Truck Center before
seating any child on the front passenger
seat.
More information can be found in the
“Practical hints” section (�page 243).
1BabySmart
TMis a trademark of Siemens
Automotive Corp.
iThe system does not deactivate the
door mounted side impact airbag, the
window curtain airbags and the emer-
gency tensioning device.
Warning!
G
The BabySmart
TM airbag deactivation sys-
tem will ONLY work with a special child seat
designed to operate with it. It will not work
with child seats which are not BabySmart
TM
compatible.
Never place anything between seat cushion
and child seat (e.g. pillow), since it reduces
the effectiveness of the deactivation sys-
tem. The bottom of the child seat must
make full contact with the passenger seat
cushion. An incorrectly mounted child seat
could cause injuries to the child in case of an
accident, instead of protecting the child.
Follow the manufacturer’s instructions for
installation of special child seats.
When using a BabySmart
TM compatible
child seat on the front passenger seat, the
passenger front airbag will not deploy only if
the 7indicator lamp remains illumi-
nated.

6
Right indicator lamps
with:WLow wind-
shield/headlamp
washer syst")