Page 985 of 4133
181 Controls in detail
Useful features
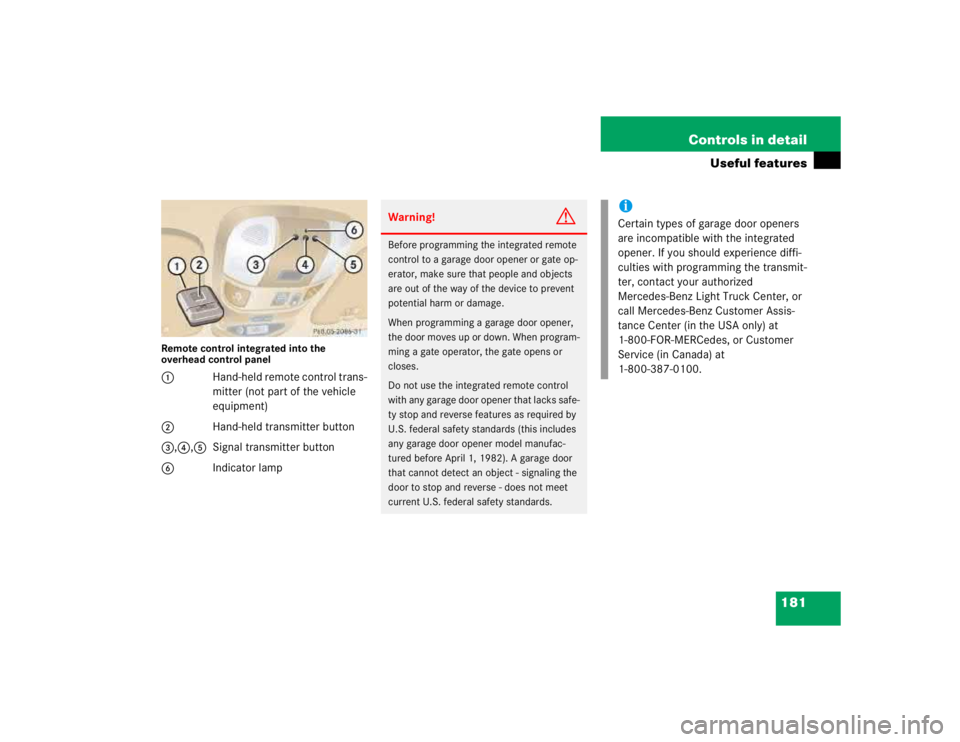
Remote control integrated into the
overhead control panel1Hand-held remote control trans-
mitter (not part of the vehicle
equipment)
2Hand-held transmitter button
3,4,5 Signal transmitter button
6Indicator lamp
Warning!
G
Before programming the integrated remote
control to a garage door opener or gate op-
erator, make sure that people and objects
are out of the way of the device to prevent
potential harm or damage.
When programming a garage door opener,
the door moves up or down. When program-
ming a gate operator, the gate opens or
closes.
Do not use the integrated remote control
with any garage door opener that lacks safe-
ty stop and reverse features as required by
U.S. federal safety standards (this includes
any garage door opener model manufac-
tured before April 1, 1982). A garage door
that cannot detect an object - signaling the
door to stop and reverse - does not meet
current U.S. federal safety standards.
iCertain types of garage door openers
are incompatible with the integrated
opener. If you should experience diffi-
culties with programming the transmit-
ter, contact your authorized
Mercedes-Benz Light Truck Center, or
call Mercedes-Benz Customer Assis-
tance Center (in the USA only) at
1-800-FOR-MERCedes, or Customer
Service (in Canada) at
1-800-387-0100.
Page 986 of 4133
182 Controls in detailUseful features
Programming or reprogramming the in-
tegrated remote control
Step 1:�
Switch on ignition.
Step 2:
�
If you have previously programmed an
integrated signal transmitter button
and wish to retain its programming,
proceed to step 3. Otherwise, press
and hold the two outer signal transmit-
ter buttons3 and5 and release
them only when the indicator light be-
gins to flash after approximately 20
seconds (do not hold the button for
longer than 30 seconds). This proce-
dure erases any previous settings for
all three channels and initializes the
memory. If you later wish to program a
second and / or third hand-held trans-
mitter to the remaining two signal
transmitter buttons, do not repeat this
step and begin directly with step 3.Step 3:
�
Hold the end of the hand-held remote
control transmitter1 of the device
you wish to train approximately 2 to
5 in (5 to12 cm) away from the surface
of the integrated remote control locat-
ed on the interior rear view mirror,
keeping the indicator lamp6 in view.
Step 4:
�
Using both hands, simultaneously
press the hand-held transmitter
button2 and the desired integrated
signal transmitter button (3, 4
or5). Do not release the buttons until
completing step 5.
The indicator lamp6 on the integrat-
ed remote control will flash, first slowly
and then rapidly.
iFor operation in the USA only:
This device complies with Part 15 of
the FCC Rules. Operation is subject to
the following two conditions:
(1) This device may not cause harmful
interference, and
(2) this device must accept any inter-
ference received, including interfer-
ence that may cause undesired
operation.
Any unauthorized modification to this
device could void the user’s authority
to operate the equipment.
Page 989 of 4133
185 Controls in detail
Useful features
Step 4:�
Continue to press and hold the inte-
grated signal transmitter button (3,
4 or5) while you press and re-press
(“cycle”) your hand-held remote con-
trol transmitter1 every two seconds
until the frequency signal has been
learned. Upon successful training, the
indicator lamp6 will flash slowly and
then rapidly after several seconds.
�
Proceed with programming step 5 and
step 6 to complete.
Operation of remote control
�
Switch on ignition.
�
Select and press the appropriate inte-
grated signal transmitter button (3,
4or5 to activate the remote con-
trolled device.
The integrated remote control trans-
mitter continues to send the signal as
long as the button is pressed – up to
20 seconds.Erasing the remote control memory
�
Switch on ignition.
�
Simultaneously hold down the signal
transmitter buttons3 and5, for ap-
proximately 20 seconds, or until the in-
dicator lamp6 f la shes ra pid ly. Do not
hold for longer than 30 seconds.
The codes of all three channels are
erased.Reprogramming a single integrated
signal transmitter button
To program a device using a signal trans-
mitter button previously trained, follow
these steps:
�
Press and hold the desired signal trans-
mitter button (3, 4 or5). Do not re-
lease the button.
�
The indicator lamp will begin to flash af-
ter 20 seconds. Without releasing the
integrated signal transmitter button,
proceed with programming starting
with step 3.
iIf you sell your vehicle, erase the codes
of all three channels.
Page 1018 of 4133
214 OperationAt the gas station
�At the gas stationRefueling
The fuel filler flap is located on the
left-hand side of the vehicle towards the
rear. Locking / unlocking the vehicle with
the remote control automatically
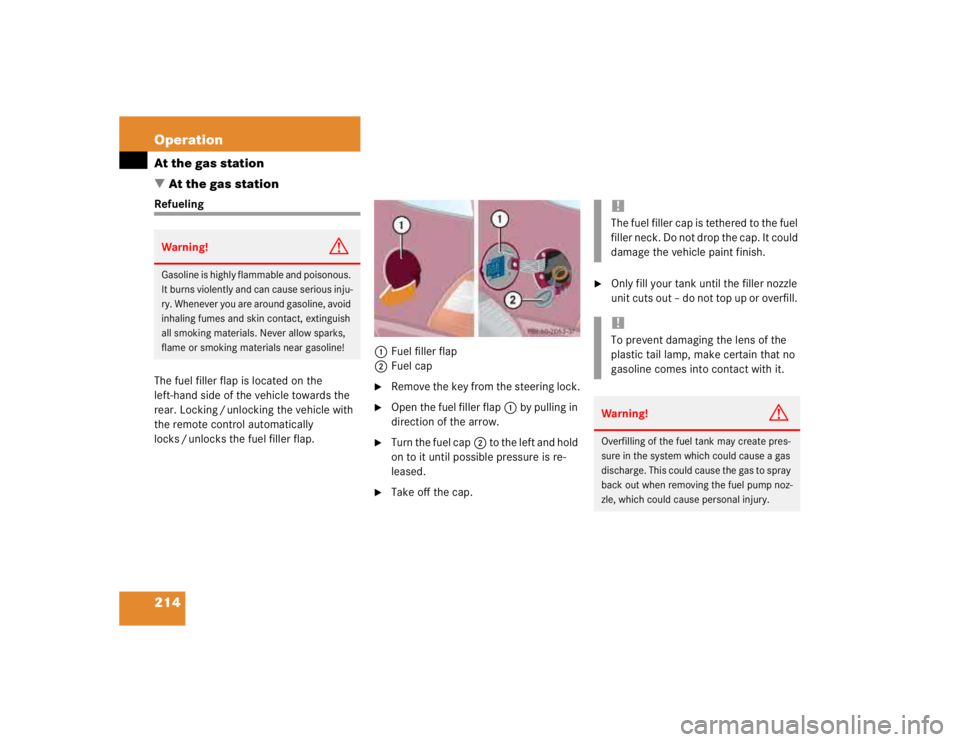
locks / unlocks the fuel filler flap.1Fuel filler flap
2Fuel cap
�
Remove the key from the steering lock.
�
Open the fuel filler flap1 by pulling in
direction of the arrow.
�
Turn the fuel cap2 to the left and hold
on to it until possible pressure is re-
leased.
�
Take off the cap.
�
Only fill your tank until the filler nozzle
unit cuts out – do not top up or overfill.
Warning!
G
Gasoline is highly flammable and poisonous.
It burns violently and can cause serious inju-
ry. Whenever you are around gasoline, avoid
inhaling fumes and skin contact, extinguish
all smoking materials. Never allow sparks,
flame or smoking materials near gasoline!
!The fuel filler cap is tethered to the fuel
filler neck. Do not drop the cap. It could
damage the vehicle paint finish.!To prevent damaging the lens of the
plastic tail lamp, make certain that no
gasoline comes into contact with it.Warning!
G
Overfilling of the fuel tank may create pres-
sure in the system which could cause a gas
discharge. This could cause the gas to spray
back out when removing the fuel pump noz-
zle, which could cause personal injury.
Page 1065 of 4133
261 Practical hints
Unlocking / locking in an emergency
�Unlocking / locking in an emergency
Unlocking the vehicle
Unlocking the driver’s door
If you are unable to unlock the driver’s
door using the remote control, open the
door using the key.
1Release button�
Press release button1 on the remote
control.
The key folds out.2Unlocking
3Locking
�
Remove the protective cap from the
door lock.
�
Unlock the door with the mechanical
key. To do so, push the mechanical key
in the lock until it stops and turn it to
the left.
iUnlocking and opening the driver’s
door with the mechanical key will trig-
ger the anti-theft alarm system. To can-
cel the alarm, do one of the following:�
Press buttonŒ or‹ on the
remote control.
�
Insert the key in the steering lock.
Page 1066 of 4133
262 Practical hintsUnlocking / locking in an emergencyLocking the vehicle
If you are unable to lock the vehicle with
the remote control, lock it with the me-
chanical key as follows:�
Close the passenger doors and the lift-
gate.
�
Press the upper part of the central
locking button in the cockpit
(�page 93).
�
Check to see whether the locking
knobs on the passenger doors are still
visible. If necessary push them down
manually.
�
Lock the liftgate if necessary from in-
side (
�page 91).
�
Lock the driver’s door with the me-
chanical key.Changing batteries in the remote
control
If the batteries in the remote control are
discharged, the vehicle can no longer be
locked or unlocked. It is recommended to
have the batteries replaced at an autho-
rized Mercedes-Benz Light Truck Center.
Batteries contain materials that can harm
the environment if disposed of improperly.
Recycling of batteries is the preferred
method of disposal. Many states require
sellers of batteries to accept old batteries
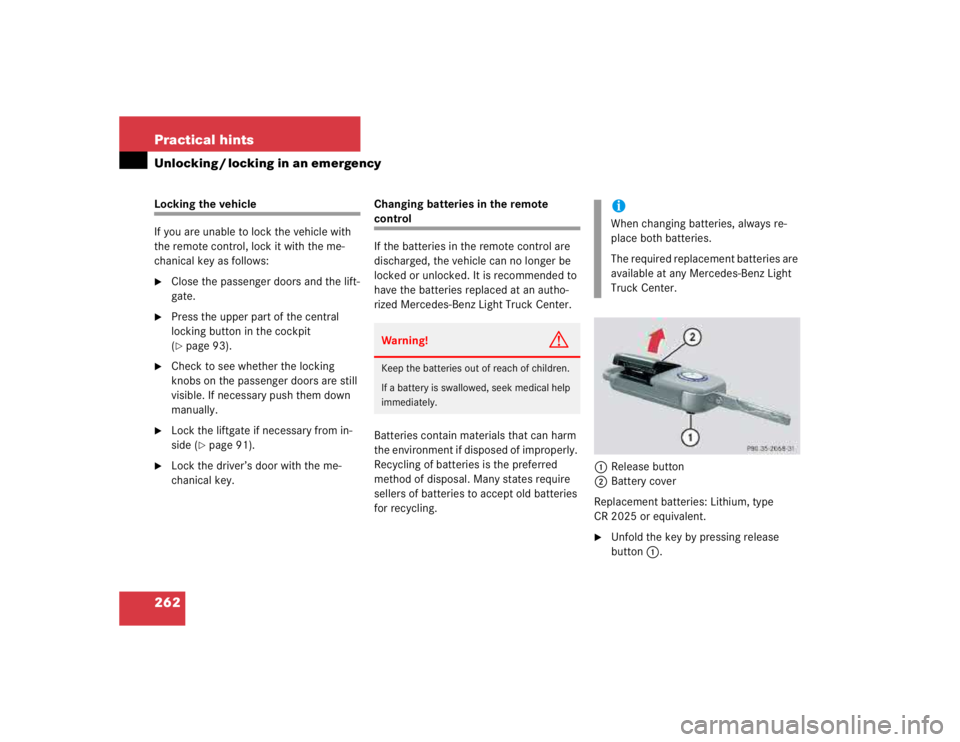
for recycling.1Release button
2Battery cover
Replacement batteries: Lithium, type
CR 2025 or equivalent.
�
Unfold the key by pressing release
button1.
Warning!
G
Keep the batteries out of reach of children.
If a battery is swallowed, seek medical help
immediately.
iWhen changing batteries, always re-
place both batteries.
The required replacement batteries are
available at any Mercedes-Benz Light
Truck Center.
Page 1067 of 4133
263 Practical hints
Unlocking / locking in an emergency
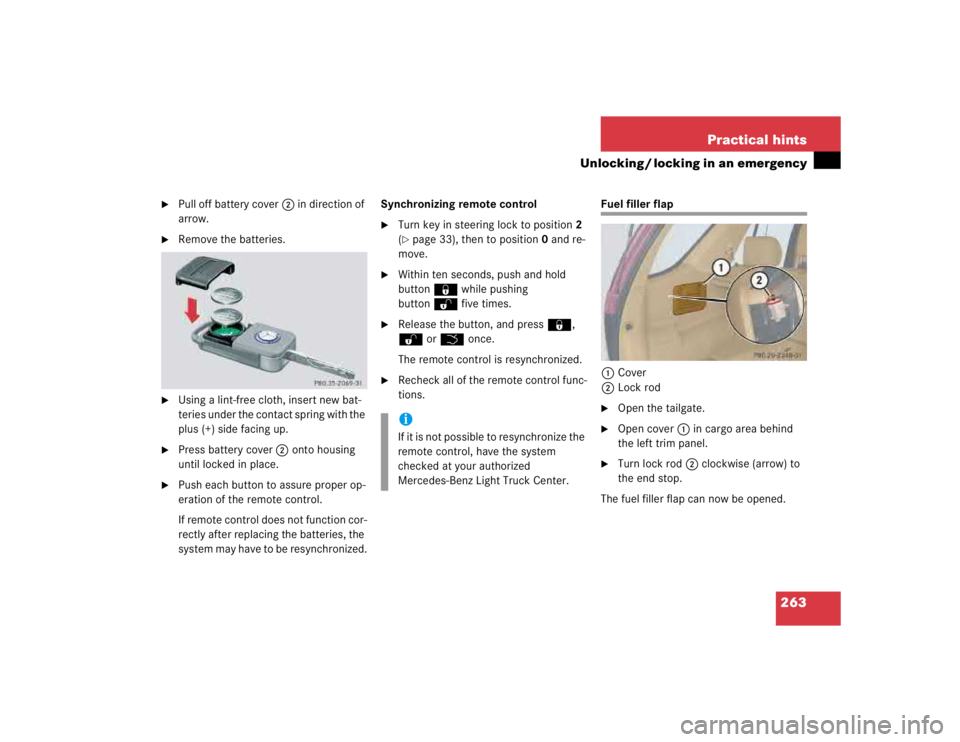
�
Pull off battery cover2 in direction of
arrow.
�
Remove the batteries.
�
Using a lint-free cloth, insert new bat-
teries under the contact spring with the
plus (+) side facing up.
�
Press battery cover2 onto housing
until locked in place.
�
Push each button to assure proper op-
eration of the remote control.
If remote control does not function cor-
rectly after replacing the batteries, the
system may have to be resynchronized.Synchronizing remote control
�
Turn key in steering lock to position2
(�page 33), then to position0 and re-
move.
�
Within ten seconds, push and hold
button‹ while pushing
buttonΠfive times.
�
Release the button, and press‹,
Œ orŠ once.
The remote control is resynchronized.
�
Recheck all of the remote control func-
tions.
Fuel filler flap
1Cover
2Lock rod�
Open the tailgate.
�
Open cover1 in cargo area behind
the left trim panel.
�
Turn lock rod2 clockwise (arrow) to
the end stop.
The fuel filler flap can now be opened.
iI f i t i s n o t p o s s i b l e t o r e s y n c h r o n i z e t h e
remote control, have the system
checked at your authorized
Mercedes-Benz Light Truck Center.
Page 1123 of 4133

319 Index
Rear passenger compartment 141
Rear window defroster 133
Residual heat utilization 140
Residual ventilation 140
Switching off 137
Switching on 137
Automatic headlamp mode 108
Automatic interior lighting control
Activating 113
Deactivating 113
Automatic locking when driving 93
Automatic transmission 119
Accelerator position 123
Emergency operation (Limp Home
Mode) 124
Gear ranges 121
Gear selector lever position 122
Gear shifting malfunctions 124
Kickdown 123
Manual shifting 120
One-touch gearshifting 120Selector lever position 119
Towing a trailer 124
Transmission fluid 222
B
BabySmart
TM
Airbag deactivation system 70
Compatible child seats 70, 311
Self-test 70
BabySmart
TM airbag deactivation
system 311
Backrest tilt 35
Backup lamps 267, 270
Bulbs 267
BAS 78, 311
Malfunction indicator lamp 245, 246,
247
Warning lamp 245, 246, 247
Batteries, remote control
Changing 262
Batteries, vehicle 223
Battery discharged
Jump starting 281Battery indicator lamp
Indicator lamp 254
Battery, vehicle 223, 278
Charging 279
Disconnecting 279
Reconnecting 279
Reinstalling 279
Removing 279
Bi-Xenon headlamps* 311
Blocking
Rear door window operation 73
Brake assist system (BAS) 311
Brake fluid 302
Brake lamp bulbs 267
Brake lamp, high mounted 267
Brake pad wear
Indicator lamp 254
Brakes 194
Warning lamp 244
Break-in period 192