1997 MERCEDES-BENZ ML500 seat adjustment
[x] Cancel search: seat adjustmentPage 3 of 4133

Fig. 1: Locating Restraint System Components (E Class Shown; Others Are Similar)
Courtesy of MERCEDES-BENZ OF NORTH AMERICA
Both SRS and ETR are electronically activated by a single control unit if a moderately severe to severe frontal
collision occurs. There are 2 thresholds which must be exceeded to trigger an ETR action, air bag deployment,
or both. If a moderately severe frontal collision occurs exceeding first triggering threshold where protection
from safety belt is sufficient, only Emergency Tensioning Retractor (ETR) is activated if safety belt is buckled.
If a moderately severe frontal collision occurs exceeding first triggering threshold where protection from safety
belt is sufficient, but safety belt is not buckled, air bag is deployed and EAR is not activated.
If a severe frontal collision occurs exceeding second triggering threshold where protection from safety belt is
insufficient, air bag is deployed. EAR is activated if safety belt is buckled. If safety belt is not buckled, ETR is
not activated when second triggering threshold is reached. Passenger air bag will deploy even if passenger seat
is not occupied when a triggering threshold is exceeded. If during a severe frontal collision the power supply is
interrupted, the driver and passenger air bag can still be deployed, but ETR cannot be activated.
The side air bag on the driver-side deploys whenever the driver-side air bag module is deployed and when there
is a substantial side impact crash. The air bag on the passenger-side will activate only when a sensor (Occupied
Seat Recognition Sensor) in the passenger seat sends a signal to the control module that the passenger-side seat
is occupied. During a collision, the side air bag will then deploy.
SERVICING
SRS AIR BAG label on driver-side door latch post indicates SRS replacement date for driver and passenger air
bag units. All SRS components must be thoroughly inspected, including wiring harness. Before component
replacement, check for SRS fault codes by performing system operation check. See SYSTEM OPERATION
CHECK . SRS service life is 10 years from manufactured date, or 10 years from SRS replacement date after
accident related repairs are completed.
POST-COLLISION INSPECTION
When a vehicle has been involved in a collision, certain components of the passive restraint system must be
inspected or replaced. See PASSIVE RESTRAINT SYSTEM INSPECTION article in the GENERAL
INFORMATION section for post-collision inspection information.
ADJUSTMENTS
If fixing screws were not used during clockspring removal or clockspring was rotated during removal, turn
clockspring clockwise until resistance is detectable. Turn clockspring counterclockwise 2-2.5 turns until fixing
screws can be unscrewed holding clockspring in this position.
DISPOSAL PROCEDURES
WARNING:An undeployed air bag module or ETR should never be disposed of
without first being deployed. See SCRAPPED VEHICLE
. If deployment is
not possible, contact vehicle manufacturer for further instructions.
1998 Mercedes-Benz ML320
AIR BAG RESTRAINT SYSTEM 1998 AIR BAG RESTRAINT SYSTEMS Mercedes-Benz
me
Saturday, October 02, 2010 3:33:13 PMPage 3 © 2006 Mitchell Repair Information Company, LLC.
Page 70 of 4133
20 Instruments and controls
Te ch n ica l
data Instruments
and controlsOperation DrivingInstrument
cluster displayPractical hints Car care Index
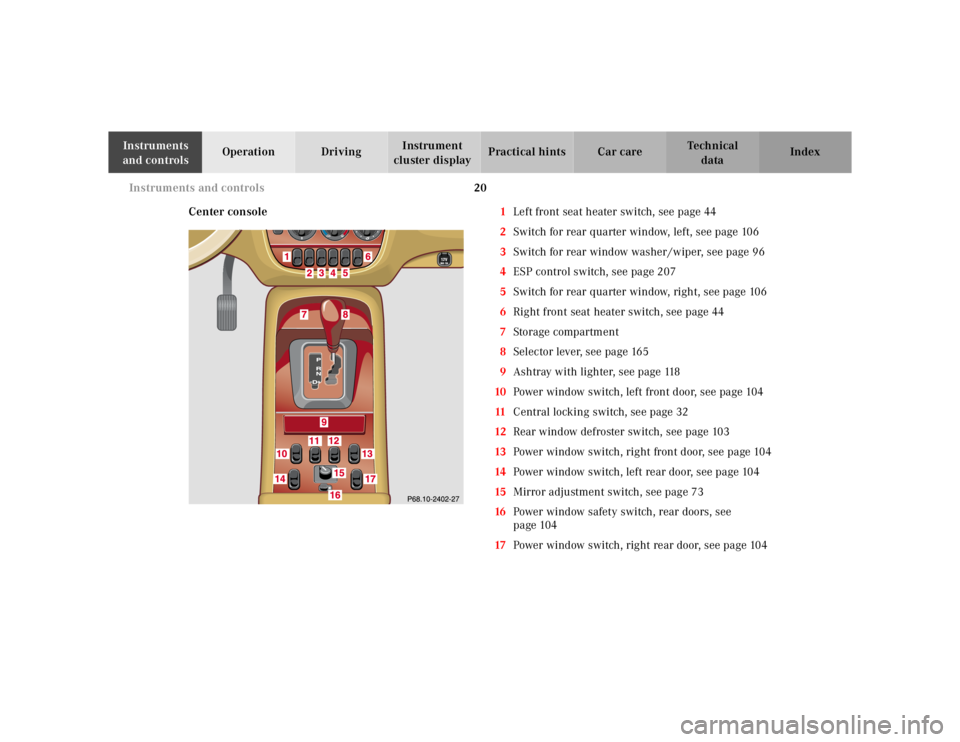
Center console1Left front seat heater switch, see page 44
2Switch for rear quarter window, left, see page 106
3Switch for rear window washer /wiper, see page 96
4ESP control switch, see page 207
5Switch for rear quarter window, right, see page 106
6Right front seat heater switch, see page 44
7Storage compartment
8Selector lever, see page 165
9Ashtray with lighter, see page 118
10Power window switch, left front door, see page 104
11Central locking switch, see page 32
12Rear window defroster switch, see page 103
13Power window switch, right front door, see page 104
14Power window switch, left rear door, see page 104
15Mirror adjustment switch, see page 73
16Power window safety switch, rear doors, see
page 104
17Power window switch, right rear door, see page 104
Page 88 of 4133
38 Seats
Te ch n ica l
data Instruments
and controlsOperationDrivingInstrument
cluster displayPractical hints Car care Index
Important!
Prior to operating the vehicle, the driver should adjust
the seat height for proper vision as well as fore / aft
placement and backrest angle to insure adequate
control, reach, operation, and comfort. The head
restraint should also be adjusted for proper height. See
also airbag section on page 56 for proper seat
positioning.
In addition, also adjust the steering wheel to ensure
adequate control, reach, operation, and comfort.
Both the inside and outside rear view mirrors should be
adjusted for adequate rearward vision.
Fasten seat belts. Infants and small children should be
seated in a properly secured restraint system that
complies with U.S. Federal Motor Vehicle Safety
Standard 213 and Canadian Motor Vehicle Safety
Standard 213.
All seat, head restraint, steering wheel, and rear view
mirror adjustments as well as fastening of seat belts
should be done before the vehicle is put into motion.
Wa r n i n g !
Children 12 years old and under must never ride in
the front seat, except in a Mercedes-Benz
authorized BabySmart
TM compatible child seat,
which operates with the BabySmart
TM system
installed in the vehicle to deactivate the passenger
side front airbag when it is properly installed.
Otherwise they will be struck by the airbag when it
inflates in a crash. If this happens, serious or fatal
injury can result.
According to accident statistics, children are safer
when properly restrained in the rear seating
positions than in the front seating positions.
Infants and small children must ride in the back
seats and be seated in an appropriate infant or
child restraint system, which is properly secured
with the vehicle’s seat belt, fully in accordance
with the child seat manufacturer’s instructions.A child’s risk of serious or fatal injuries is
significantly increased if the child restraints are
not properly secured in the vehicle and the child is
not properly secured in the child restraint.
Page 89 of 4133
39 Seats
Te ch n ica l
data Instruments
and controlsOperationDrivingInstrument
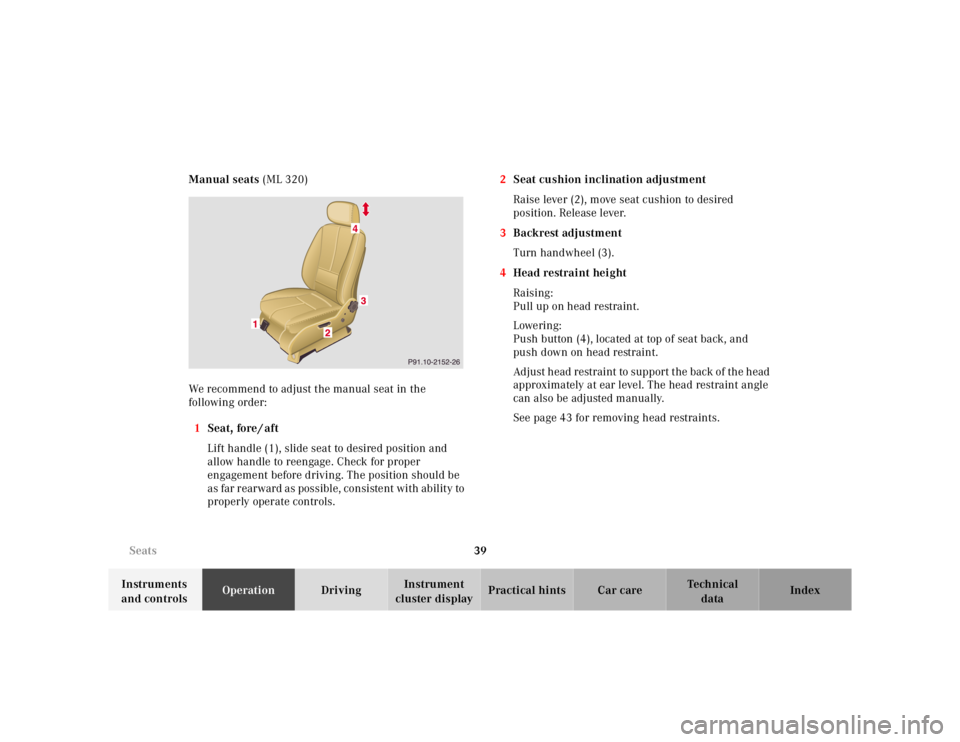
cluster displayPractical hints Car care Index Manual seats (ML 320)
We recommend to adjust the manual seat in the
following order:
1Seat, fore / aft
Lift handle (1), slide seat to desired position and
allow handle to reengage. Check for proper
engagement before driving. The position should be
as far rearward as possible, consistent with ability to
properly operate controls.2Seat cushion inclination adjustment
Raise lever (2), move seat cushion to desired
position. Release lever.
3Backrest adjustment
Turn handwheel (3).
4Head restraint height
Raising:
Pull up on head restraint.
Lowering:
Push button (4), located at top of seat back, and
push down on head restraint.
Adjust head restraint to support the back of the head
approximately at ear level. The head restraint angle
can also be adjusted manually.
See page 43 for removing head restraints.
Page 90 of 4133
40 Seats
Te ch n ica l
data Instruments
and controlsOperationDrivingInstrument
cluster displayPractical hints Car care Index
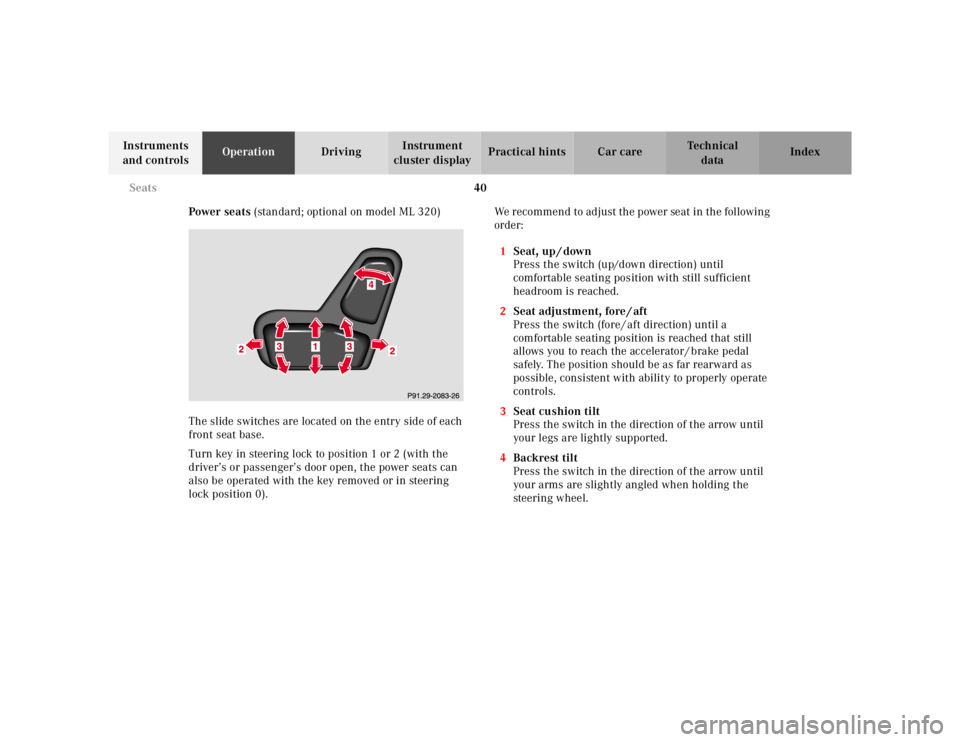
Power seats (standard; optional on model ML 320)
The slide switches are located on the entry side of each
front seat base.
Turn key in steering lock to position 1 or 2 (with the
driver’s or passenger’s door open, the power seats can
also be operated with the key removed or in steering
lock position 0).We recommend to adjust the power seat in the following
order:
1Seat, up / down
Press the switch (up/down direction) until
comfortable seating position with still sufficient
headroom is reached.
2Seat adjustment, fore / aft
Press the switch (fore / aft direction) until a
comfortable seating position is reached that still
allows you to reach the accelerator / brake pedal
safely. The position should be as far rearward as
possible, consistent with ability to properly operate
controls.
3Seat cushion tilt
Press the switch in the direction of the arrow until
your legs are lightly supported.
4Backrest tilt
Press the switch in the direction of the arrow until
your arms are slightly angled when holding the
steering wheel.
Page 91 of 4133
41 Seats
Te ch n ica l
data Instruments
and controlsOperationDrivingInstrument
cluster displayPractical hints Car care Index Only minor personal adjustments, as described below,
should then be required.
For exterior rear view mirrors, see page 73;
inside rear view mirror, see page 71;
steering wheel adjustment, see page 70.
Note:
See page 42 for instructions on storing and recalling the
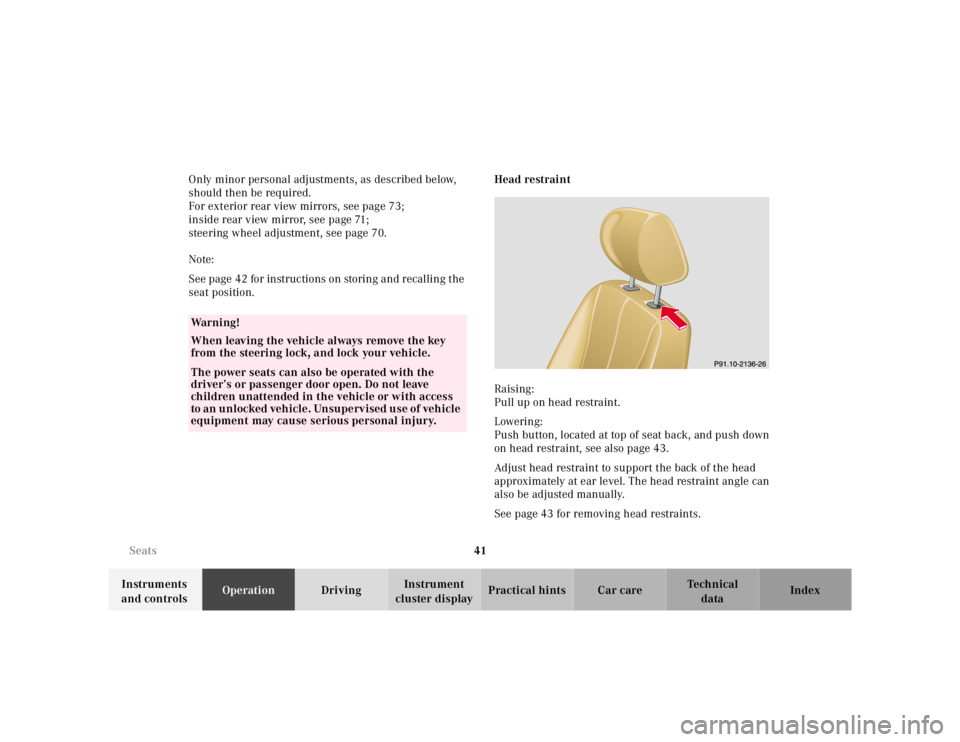
seat position.Head restraint
Raising:
Pull up on head restraint.
Lowering:
Push button, located at top of seat back, and push down
on head restraint, see also page 43.
Adjust head restraint to support the back of the head
approximately at ear level. The head restraint angle can
also be adjusted manually.
See page 43 for removing head restraints.
Wa r n i n g !
When leaving the vehicle always remove the key
from the steering lock, and lock your vehicle.The power seats can also be operated with the
driver’s or passenger door open. Do not leave
children unattended in the vehicle or with access
to an unlocked vehicle. Unsupervised use of vehicle
equipment may cause serious personal injury.
Page 99 of 4133
49 Restraint systems
Te ch n ica l
data Instruments
and controlsOperationDrivingInstrument
cluster displayPractical hints Car care Index Tighten the lap portion to a snug fit by pulling shoulder
portion up.
The shoulder portion of the seat belt must be pulled
snug and checked for snugness immediately after
engaging it.
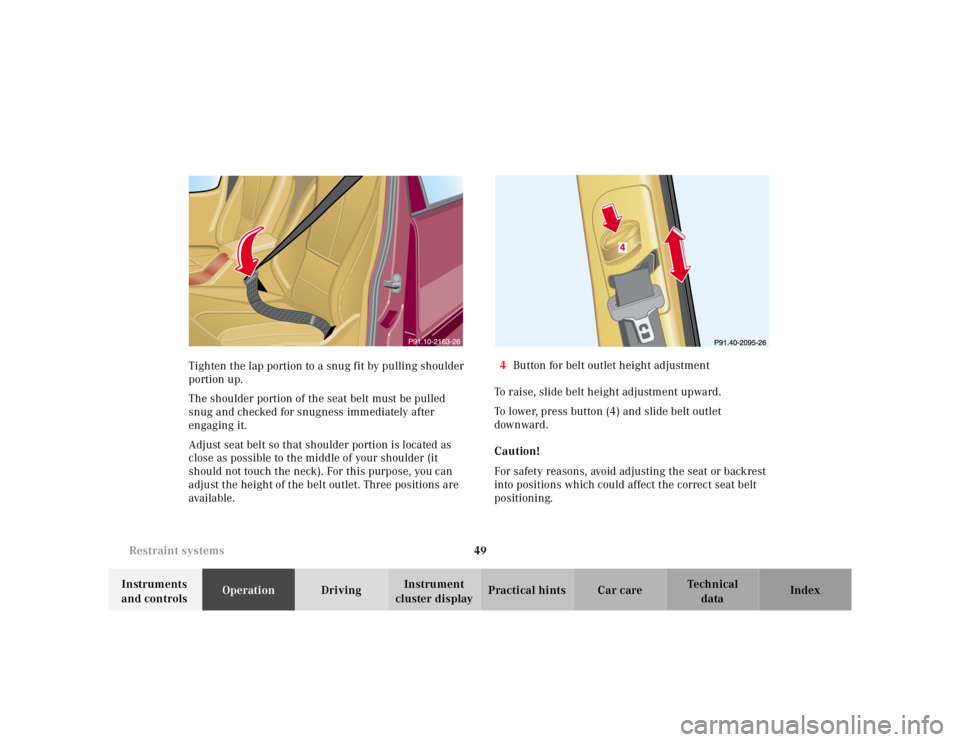
Adjust seat belt so that shoulder portion is located as
close as possible to the middle of your shoulder (it
should not touch the neck). For this purpose, you can
adjust the height of the belt outlet. Three positions are
available.4Button for belt outlet height adjustment
To raise, slide belt height adjustment upward.
To lower, press button (4) and slide belt outlet
downward.
Caution!
For safety reasons, avoid adjusting the seat or backrest
into positions which could affect the correct seat belt
positioning.
Page 111 of 4133
61 Restraint systems
Te ch n ica l
data Instruments
and controlsOperationDrivingInstrument
cluster displayPractical hints Car care Index
• Sit properly belted in an upright position with
your back against the backrest.• Adjust the driver’s seat as far as possible
rearward, still permitting proper operation of
vehicle controls. The distance from the center
of the driver’s breastbone to the center of the
airbag cover on the steering wheel must be at
least ten inches (25 cm) or more. You should be
able to accomplish this by a combination of
adjustments to the seat and steering wheel. If
you have any problems, please see your
authorized Mercedes-Benz Light Truck Center.• Do not lean with your head or chest close to the
steering wheel or dashboard.• Keep hands on the outside of steering wheel
rim. Placing hands and arms inside the rim
can increase the risk and potential severity of
hand / arm injury when the driver front airbag
inflates.• Adjust the front passenger seat as far as
possible rearward from the dashboard when
the seat is occupied.
• Occupants, especially children, should never
lean their heads in the area of the door where
the side airbag inflates. This could result in
serious injuries or death should the airbag be
triggered. Always sit upright, properly use the
seatbelts and appropriate size infant or child
restraint system.• Children 12 years old and under must never
ride in the front seat, except in a
Mercedes-Benz authorized BabySmart
TM
compatible child seat, which operates with the
BabySmart
TM system installed in the vehicle to
deactivate the passenger side front airbag
when it is properly installed. Otherwise they
will be struck by the airbag when it inflates in
a crash. If this happens, serious or fatal injury
can result.
Failure to follow these instructions can result in
severe or fatal injuries to you or other occupants.