1997 MERCEDES-BENZ ML430 ignition
[x] Cancel search: ignitionPage 3818 of 4133
2
Withdraw ignition key
3
Unclip cap (1) from outer paneling (3)
4
Unscrew bolt (2) from belt end fitting (4)
*BA91.40-P-1001-01D
Torx bit set
*000589011000
5
Pull belt end fitting (4) out of front seat
6
Remove paneling on B-pillar
AR68.30-P-4700GH
7
Unscrew bolt (5) of belt height adjuster from
B-pillar
*BA91.40-P-1004-01D
8
Disconnect connector from passenger ETR
[GUS] ignition squib (R12/2)
9
Unscrew bolt (6) from automatic belt retractor
(7)
*BA91.40-P-1008-01D
Torx bit set
*000589011000
10
Detach automatic belt retractor (7)
The automatic belt retractor must not be
disassembled.
Never use oil or grease to eliminate noises.
Automatic belt retractors that have been
opened are no longer under warranty!
11
Check seat belt for signs of damage
e
Check seat belts for damage
AP91.40-P-9150GH
12
Install in the reverse order
Installation:
Pay attention to different
version (left/ right) of emergency tensioning
retractors and satisfactory seating in the
locking device.
13
Read fault memory and erase
14Carry out diagnosis
see Diagnosis Manual.
Seat belts/emergency tensioning retractors
Number
Designation
Model 163 up to
08/99
Model 163 as of
09/99
BA91.40-P-1001-01D
Screw on belt end fitting
Nm
3535
BA91.40-P-1004-01D
Bolt to belt height adjuster
Nm
2525
BA91.40-P-1008-01DScrew on front automatic belt reel
Nm
30 (+10/-0.15)30 (+10/-0.15)
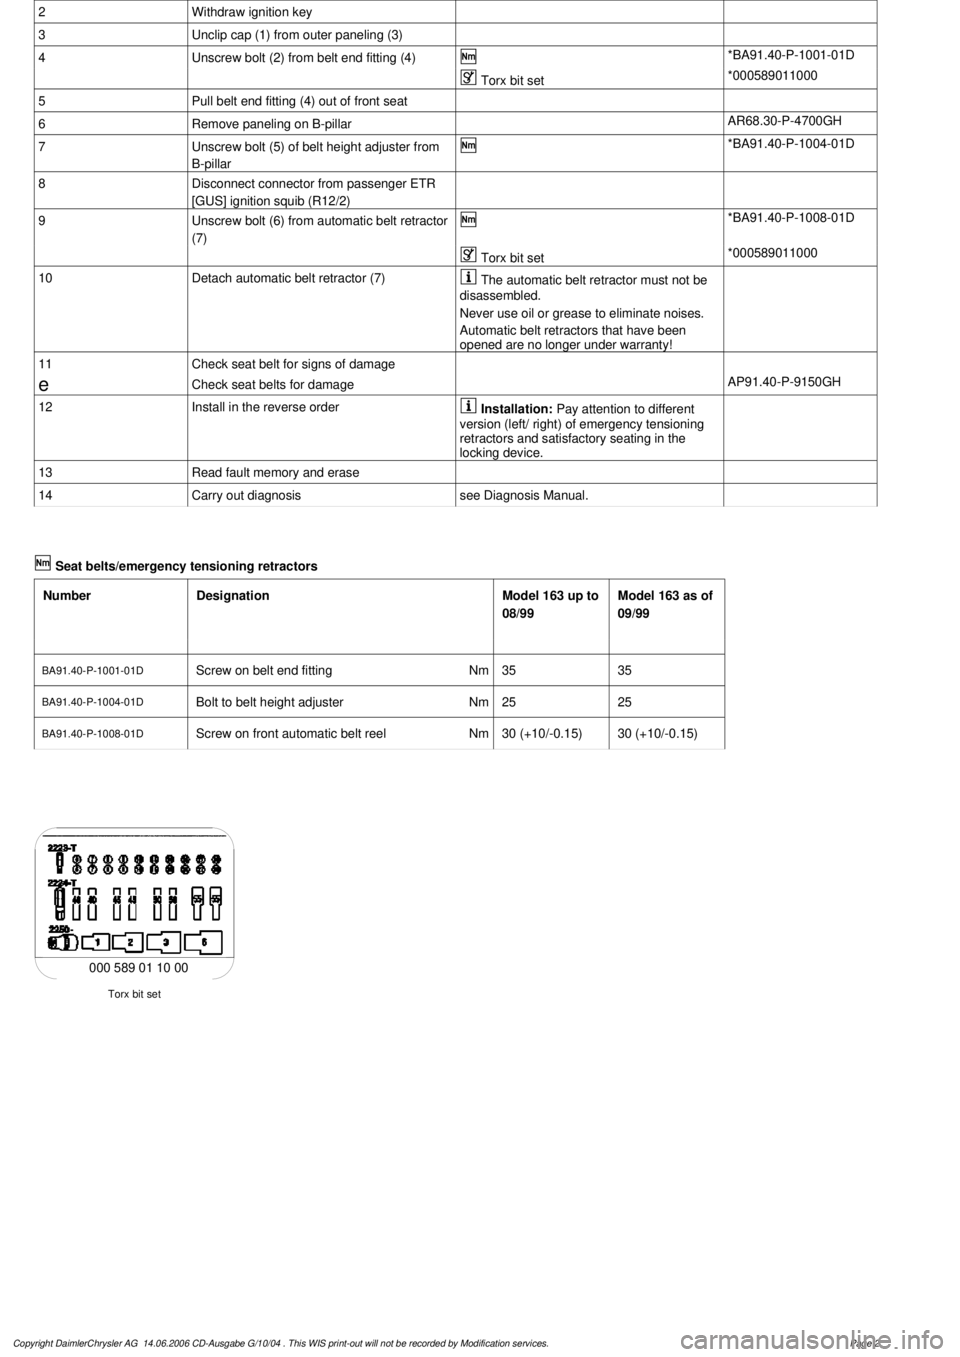
Torx bit set
000 589 01 10 00
Copyright DaimlerChrysler AG 14.06.2006 CD-Ausgabe G/10/04 . This WIS print-out will not be recorde
d by Modification services.
Page 2
Page 3819 of 4133
AR91.40-P-0681GI
Remove/install rear seat belts
16.4.99
MODEL
163.136 /154 /172 as of 1.9.99,
163.113 /128 /157 /174 /175
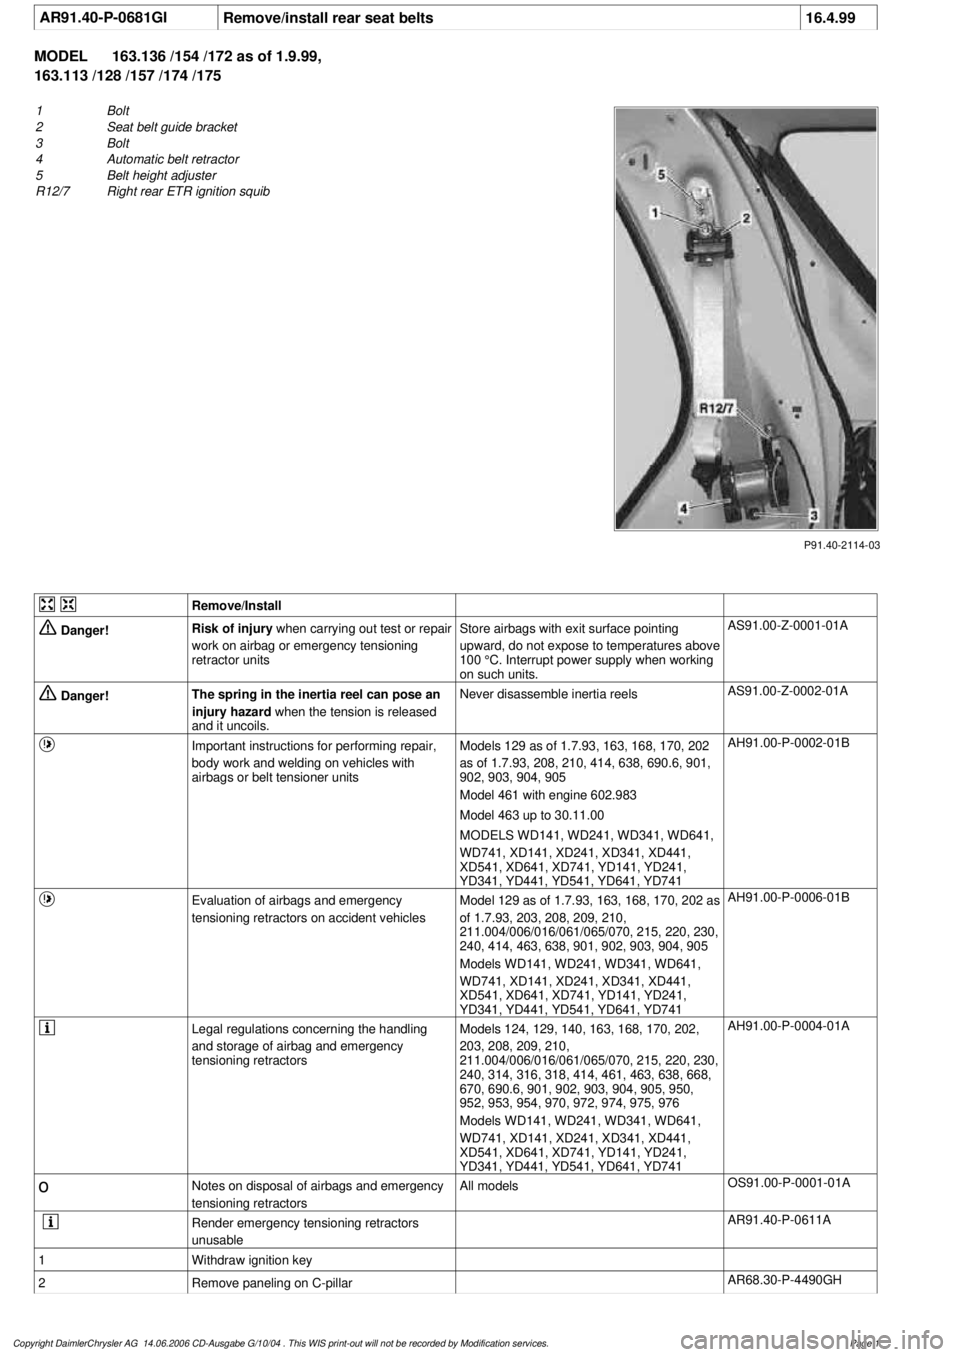
1
Bolt
2
Seat belt guide bracket
3
Bolt
4
Automatic belt retractor
5
Belt height adjuster
R12/7
Right rear ETR ignition squib
P91.40-2114-03
Remove/Install
Danger!
Risk of injury
when carrying out test or repair
work on airbag or emergency tensioning
retractor units
Store airbags with exit surface pointing
upward, do not expose to temperatures above
100 °C. Interrupt power supply when working
on such units.
AS91.00-Z-0001-01A
Danger!
The spring in the inertia reel can pose an
injury hazard
when the tension is released
and it uncoils.
Never disassemble inertia reels
AS91.00-Z-0002-01A
Important instructions for performing repair,
body work and welding on vehicles with
airbags or belt tensioner units
Models 129 as of 1.7.93, 163, 168, 170, 202
as of 1.7.93, 208, 210, 414, 638, 690.6, 901,
902, 903, 904, 905
Model 461 with engine 602.983
Model 463 up to 30.11.00
MODELS WD141, WD241, WD341, WD641,
WD741, XD141, XD241, XD341, XD441,
XD541, XD641, XD741, YD141, YD241,
YD341, YD441, YD541, YD641, YD741
AH91.00-P-0002-01B
Evaluation of airbags and emergency
tensioning retractors on accident vehicles
Model 129 as of 1.7.93, 163, 168, 170, 202 as
of 1.7.93, 203, 208, 209, 210,
211.004/006/016/061/065/070, 215, 220, 230,
240, 414, 463, 638, 901, 902, 903, 904, 905
Models WD141, WD241, WD341, WD641,
WD741, XD141, XD241, XD341, XD441,
XD541, XD641, XD741, YD141, YD241,
YD341, YD441, YD541, YD641, YD741
AH91.00-P-0006-01B
Legal regulations concerning the handling
and storage of airbag and emergency
tensioning retractors
Models 124, 129, 140, 163, 168, 170, 202,
203, 208, 209, 210,
211.004/006/016/061/065/070, 215, 220, 230,
240, 314, 316, 318, 414, 461, 463, 638, 668,
670, 690.6, 901, 902, 903, 904, 905, 950,
952, 953, 954, 970, 972, 974, 975, 976
Models WD141, WD241, WD341, WD641,
WD741, XD141, XD241, XD341, XD441,
XD541, XD641, XD741, YD141, YD241,
YD341, YD441, YD541, YD641, YD741
AH91.00-P-0004-01A
o
Notes on disposal of airbags and emergency
tensioning retractors
All models
OS91.00-P-0001-01A
Render emergency tensioning retractors
unusable
AR91.40-P-0611A
1
Withdraw ignition key
2
Remove paneling on C-pillar
AR68.30-P-4490GH
Copyright DaimlerChrysler AG 14.06.2006 CD-Ausgabe G/10/04 . This WIS print-out will not be recorde
d by Modification services.
Page 1
Page 3820 of 4133
![MERCEDES-BENZ ML430 1997 Complete Repair Manual 3
Unscrew bolt (1) from seat belt guide bracket
(2)
If necessary, remove belt height adjuster
(5).
*BA91.40-P-1002-01D
4
Disconnect connector from right rear ETR
[GUS] ignition squib (R12/7 MERCEDES-BENZ ML430 1997 Complete Repair Manual 3
Unscrew bolt (1) from seat belt guide bracket
(2)
If necessary, remove belt height adjuster
(5).
*BA91.40-P-1002-01D
4
Disconnect connector from right rear ETR
[GUS] ignition squib (R12/7](/manual-img/4/57307/w960_57307-3819.png)
3
Unscrew bolt (1) from seat belt guide bracket
(2)
If necessary, remove belt height adjuster
(5).
*BA91.40-P-1002-01D
4
Disconnect connector from right rear ETR
[GUS] ignition squib (R12/7)
5
Unscrew bolt (3) from automatic belt retractor
(4)
*BA91.40-P-1003-01D
6
Detach automatic belt retractor (4)
The automatic belt retractor must not be
disassembled.
Never use oil or grease to eliminate noises.
7
Check seat belts for damage
e
Check seat belts for damage
AP91.40-P-9150GH
8
Install in the reverse order
Installation:
Pay attention to different
version (left/ right) of emergency tensioning
retractors and satisfactory seating in the
locking device.
9
Read fault memory and erase
10Carry out diagnosis
see Diagnosis Manual.
Seat belts/emergency tensioning retractors
Number
Designation
Model 163 up to
08/99
Model 163 as of
09/99
BA91.40-P-1002-01D
Screw in rear upper belt guide fitting
Nm
3030
BA91.40-P-1003-01D
Bolt to rear inertia reel
Nm
3030
Copyright DaimlerChrysler AG 14.06.2006 CD-Ausgabe G/10/04 . This WIS print-out will not be recorde
d by Modification services.
Page 2
Page 3821 of 4133
AR91.40-P-1516GJ
Remove/install rear seat belt buckle
12.1.00
MODEL
163.136 /154 /172 as of 1.9.99,
163.113 /128 /157 /174 /175
60% outer rear seat
P91.40-2174-06
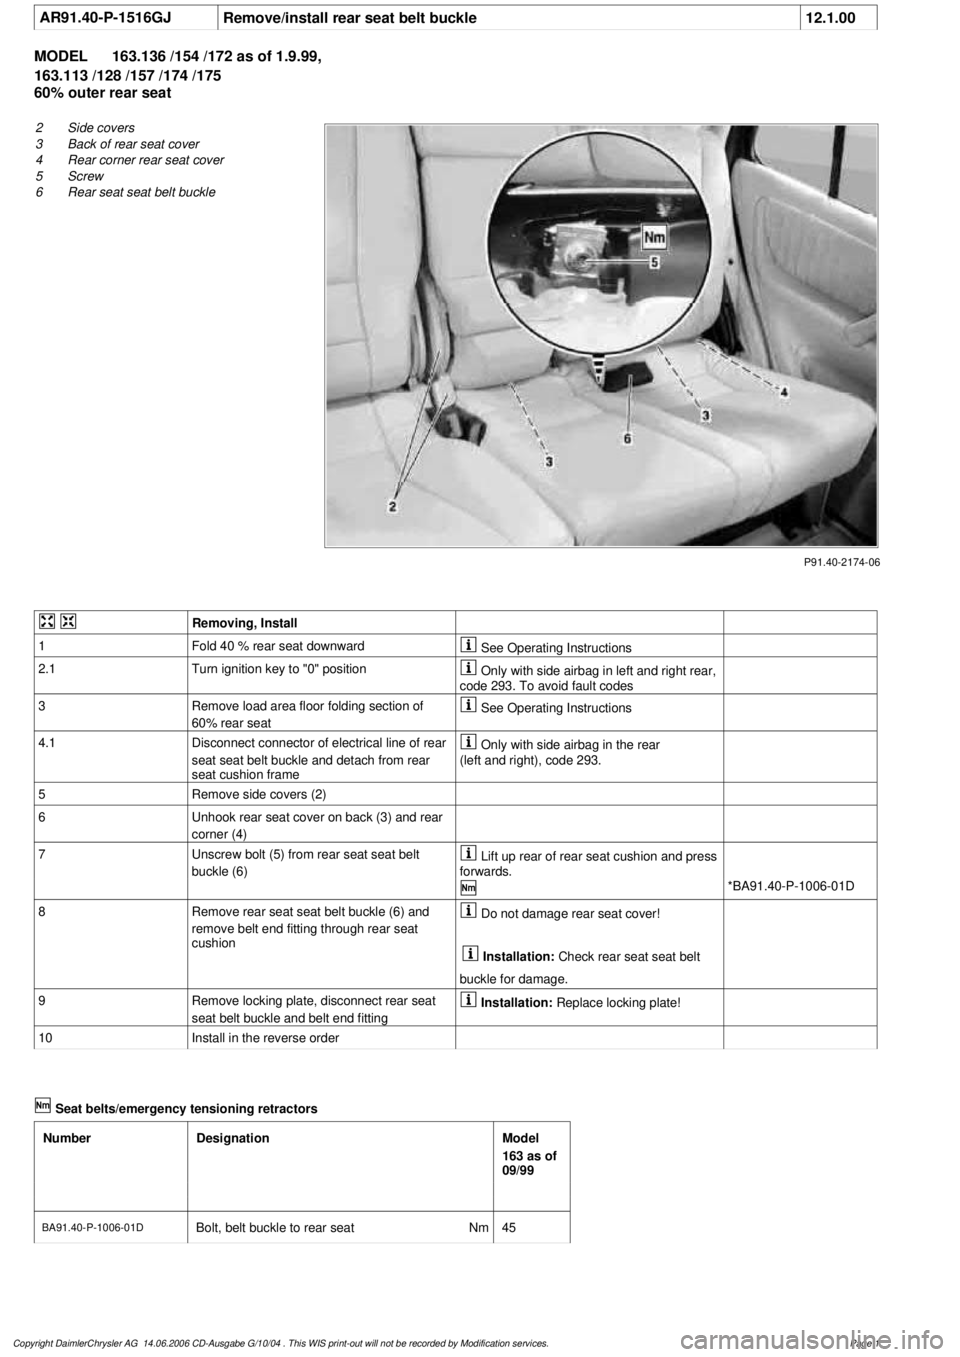
2
Side covers
3
Back of rear seat cover
4
Rear corner rear seat cover
5
Screw
6
Rear seat seat belt buckle
Removing, Install
1
Fold 40 % rear seat downward
See Operating Instructions
2.1
Turn ignition key to "0" position
Only with side airbag in left and right rear,
code 293. To avoid fault codes
3
Remove load area floor folding section of
60% rear seat
See Operating Instructions
4.1
Disconnect connector of electrical line of rear
seat seat belt buckle and detach from rear
seat cushion frame
Only with side airbag in the rear
(left and right), code 293.
5
Remove side covers (2)
6
Unhook rear seat cover on back (3) and rear
corner (4)
7
Unscrew bolt (5) from rear seat seat belt
buckle (6)
Lift up rear of rear seat cushion and press
forwards.
*BA91.40-P-1006-01D
8
Remove rear seat seat belt buckle (6) and
remove belt end fitting through rear seat
cushion
Do not damage rear seat cover!
Installation:
Check rear seat seat belt
buckle for damage.
9
Remove locking plate, disconnect rear seat
seat belt buckle and belt end fitting
Installation:
Replace locking plate!
10
Install in the reverse order
Seat belts/emergency tensioning retractors
Number
Designation
Model
163 as of
09/99
BA91.40-P-1006-01D
Bolt, belt buckle to rear seat
Nm
45
Copyright DaimlerChrysler AG 14.06.2006 CD-Ausgabe G/10/04 . This WIS print-out will not be recorde
d by Modification services.
Page 1
Page 3824 of 4133
AR91.40-P-1516GK
Remove/install rear seat belt buckle
26.9.02
MODEL
163.136 /154 /172 as of 1.9.99,
163.113 /128 /157 /175 with CODE (293) Left and right rear side airbag
40% rear seat
MODEL
163.174
40% Rear seat
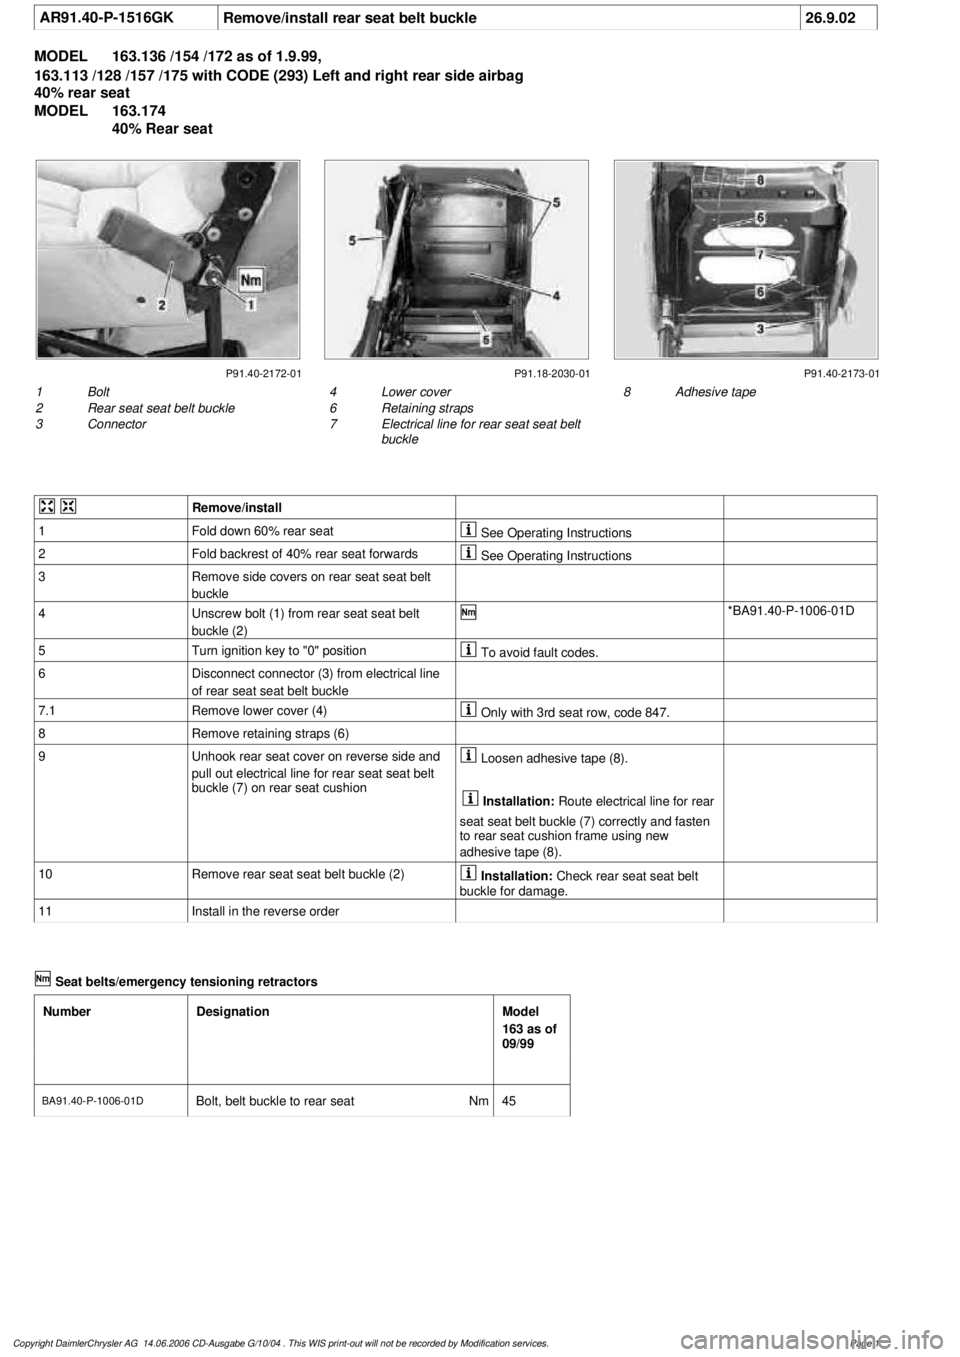
P91.40-2172-01 P91.18-2030-01 P91.40-2173-01
1
Bolt
2
Rear seat seat belt buckle
3
Connector
8
Adhesive tape
4
Lower cover
6
Retaining straps
7
Electrical line for rear seat seat belt
buckle
Remove/install
1
Fold down 60% rear seat
See Operating Instructions
2
Fold backrest of 40% rear seat forwards
See Operating Instructions
3
Remove side covers on rear seat seat belt
buckle
4
Unscrew bolt (1) from rear seat seat belt
buckle (2)
*BA91.40-P-1006-01D
5
Turn ignition key to "0" position
To avoid fault codes.
6
Disconnect connector (3) from electrical line
of rear seat seat belt buckle
7.1
Remove lower cover (4)
Only with 3rd seat row, code 847.
8
Remove retaining straps (6)
9
Unhook rear seat cover on reverse side and
pull out electrical line for rear seat seat belt
buckle (7) on rear seat cushion
Loosen adhesive tape (8).
Installation:
Route electrical line for rear
seat seat belt buckle (7) correctly and fasten
to rear seat cushion frame using new
adhesive tape (8).
10
Remove rear seat seat belt buckle (2)
Installation:
Check rear seat seat belt
buckle for damage.
11
Install in the reverse order
Seat belts/emergency tensioning retractors
Number
Designation
Model
163 as of
09/99
BA91.40-P-1006-01D
Bolt, belt buckle to rear seat
Nm
45
Copyright DaimlerChrysler AG 14.06.2006 CD-Ausgabe G/10/04 . This WIS print-out will not be recorde
d by Modification services.
Page 1
Page 3825 of 4133
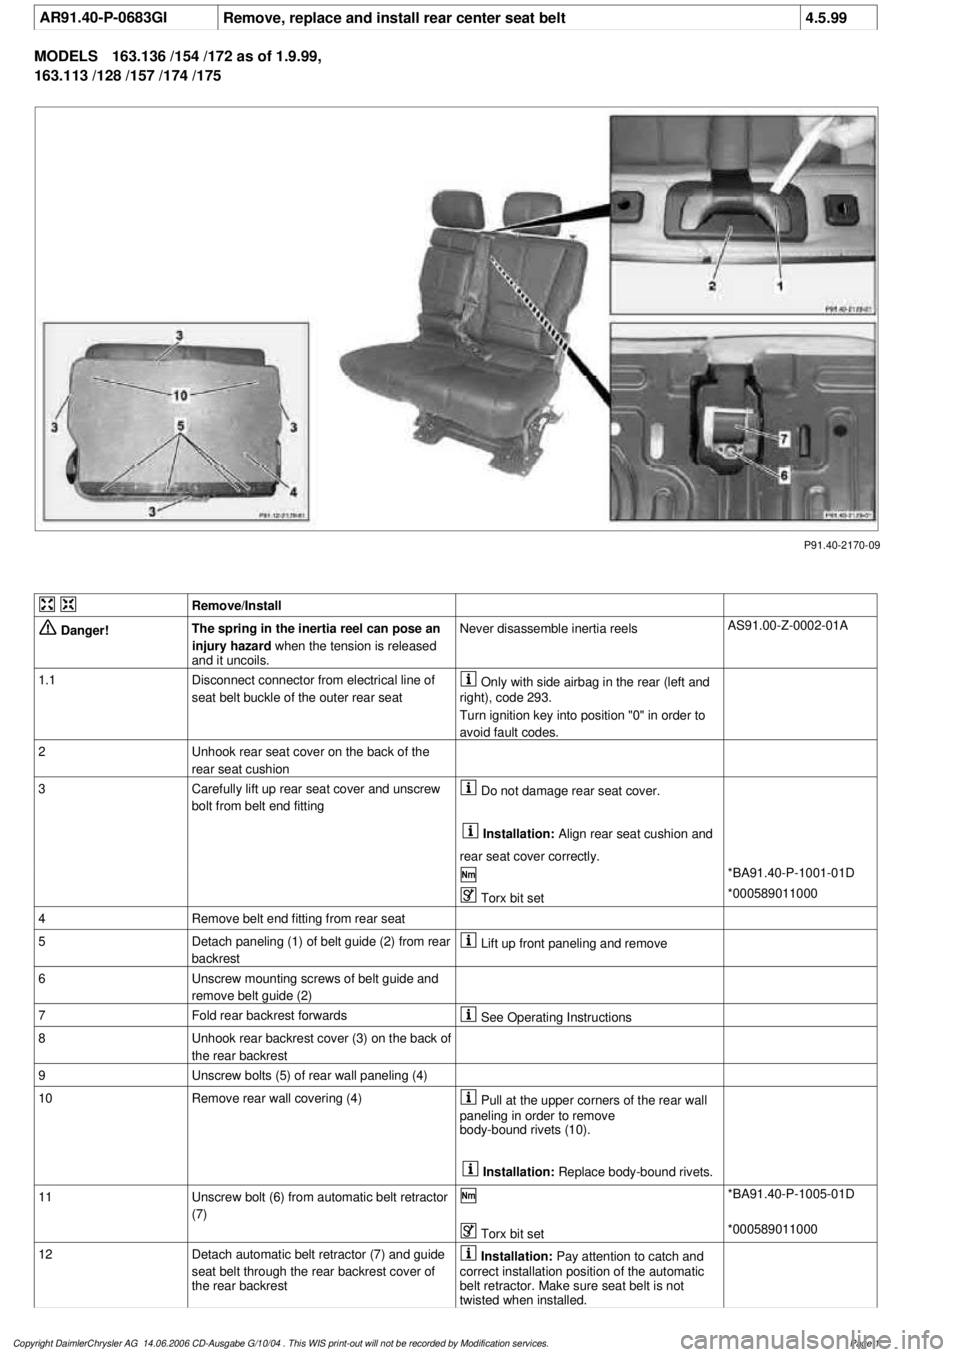
AR91.40-P-0683GI
Remove, replace and install rear center seat belt
4.5.99
MODELS
163.136 /154 /172 as of 1.9.99,
163.113 /128 /157 /174 /175
P91.40-2170-09
Remove/Install
Danger!
The spring in the inertia reel can pose an
injury hazard
when the tension is released
and it uncoils.
Never disassemble inertia reels
AS91.00-Z-0002-01A
1.1
Disconnect connector from electrical line of
seat belt buckle of the outer rear seat
Only with side airbag in the rear (left and
right), code 293.
Turn ignition key into position "0" in order to
avoid fault codes.
2
Unhook rear seat cover on the back of the
rear seat cushion
3
Carefully lift up rear seat cover and unscrew
bolt from belt end fitting
Do not damage rear seat cover.
Installation:
Align rear seat cushion and
rear seat cover correctly.
*BA91.40-P-1001-01D
Torx bit set
*000589011000
4
Remove belt end fitting from rear seat
5
Detach paneling (1) of belt guide (2) from rear
backrest
Lift up front paneling and remove
6
Unscrew mounting screws of belt guide and
remove belt guide (2)
7
Fold rear backrest forwards
See Operating Instructions
8
Unhook rear backrest cover (3) on the back of
the rear backrest
9
Unscrew bolts (5) of rear wall paneling (4)
10
Remove rear wall covering (4)
Pull at the upper corners of the rear wall
paneling in order to remove
body-bound rivets (10).
Installation:
Replace body-bound rivets.
11
Unscrew bolt (6) from automatic belt retractor
(7)
*BA91.40-P-1005-01D
Torx bit set
*000589011000
12
Detach automatic belt retractor (7) and guide
seat belt through the rear backrest cover of
the rear backrest
Installation:
Pay attention to catch and
correct installation position of the automatic
belt retractor. Make sure seat belt is not
twisted when installed.
Copyright DaimlerChrysler AG 14.06.2006 CD-Ausgabe G/10/04 . This WIS print-out will not be recorde
d by Modification services.
Page 1
Page 3832 of 4133

SI47.10-P-0004A
Service Information: Procedure when tank is filled with incorrect fuel
19.12.00
MODEL
202 with ENGINE 611
MODEL
203 with ENGINE 611, 612, 646
MODEL
210 with ENGINE 611, 612, 613
MODEL
220 with ENGINE 613, 628, 648
MODEL
163 with ENGINE 612, 628
MODEL
168 with ENGINE 668
MODEL
209 with ENGINE 612
MODEL
211 with ENGINE 628, 646, 647, 648
MODEL
463 with ENGINE 612, 628
Modification notes
26.7.04
Engines have been added and procedure has been updated
Incorrect refueling of diesel-power vehicles with a common rail
injection system. Please be aware that if the customer fills the fuel
tank with the wrong type of fuel, this is the customer's fault and
cannot be submitted as a warranty claim.
If the diesel-powered vehicle with a common rail injection system has
been refueled with gasoline, follow the steps below:
1.
If the engine was not started after fuel tank is filled with the wrong
type of fuel, then emptying the fuel tank and cleaning the fuel low-
pressure lines should be enough to solve the problem.
2.
If the engine was started after fuel tank was filled with wrong type
of fuel:
On engines 611, 612, 613, 668:
-
On the rail, open the low pressure connection of the high
pressure pump return (plastic connection in area of pressure
regulator valve) and check connecting point in rail for chips.
On engine 646, 647, 648, 628:
-
Disconnect Y-distributor unit (return line HDP/Rail) at the output
and, with ignition ON, collect the fuel in a clean container. Check
fuel for metal shavings.
If the high pressure pump is not damaged and there are no metal
shavings in the injection system:
-
As in step 1, empty fuel as per the guidelines and clean the fuel
low-pressure lines. In addition to this, remove/install/replace the
high-pressure pump and fuel filter.
If metal shavings are found in the fuel
system or the high pressure pump drive is
damaged:
#
b
Engine runs rough, surges or does not start
ENGINE 611 in MODEL 203, 202, 210
ENGINE 612 in MODEL 163, 203, 210, 209
ENGINE 613 in MODEL 210, 220
ENGINE 628 in MODEL 163, 220, 211
ENGINE 646 in MODEL 203, 211
ENGINE 647 in MODEL 211
ENGINE 648 in MODEL 220, 211
ENGINE 668 in MODEL 168
ENGINE 612, 628 in MODEL 463
AF07.00-P-9000B
Copyright DaimlerChrysler AG 28.05.2006 CD-Ausgabe G/10/04 . This WIS print-out will not be recorde
d by Modification services.
Page 1
Page 3834 of 4133

463
All
-----
1)
Recognition: existing "airbag Off" warning light in center
console.
2)
With HHT functions menu point 5 Coding Reboard child seat. If
only the passenger side airbag is de-activated, then program
menu point Vehicle equipment.
3)
Depending on model and version, unplug one or two
connectors at the passenger side airbag and insert the
corresponding replacement resistors.
4)
Without ACSR, with seat belt force limiter.
Immobilizing passenger side airbag certificate
Model 124, 126, 129, 140, 163 up to VIN
145263, 170, 202, 210
Have customer sign certificate after
immobilization
OF91.60-P-1000-01A
Cancel immobilization
D
To re-activate the passenger side airbag remove the ignition
resistor at the cable.
D
Fit together connector at passenger side airbag.
D
Fit together connector at passenger side ETR (on models fitted
with seat belt force limiter).
D
Use HHT or STAR Diagnosis tool (DAS) to re-program
passenger side airbag and passenger side ETR in the SRS
control module to "YES".
D
Remove sticker on passenger side airbag and render invalid in
Owner's Manual.
D
Complete re-activation on certificate after immobilization.
D
If re-activated, delete de-activation in vehicle documents.
Parts ordering notes
Part no.
Designation
Quantity
140 868 00 50
Ignition resistor (replacement resistor)
as required
140 817 15 20
Sticker (without seat belt force limiter)
2
210 817 20 20
Sticker (with seat belt force limiter)
2
Copyright DaimlerChrysler AG 14.06.2006 CD-Ausgabe G/10/04 . This WIS print-out will not be recorde
d by Modification services.
Page 2