Page 1745 of 4133
Remove/install
headlamp unitMODEL
163.113/128 /136 /154 /157 /172 /174 /175AR82.10-P-
4730GH
Remove/install
side wall taillampMODEL 163AR82.10-P-
4920GH
Remove/install
fog lampMODEL 163.113/128 /136 /154 /157 /172 /175
with CODE (U49) Styling package
MODEL 163.174AR82.10-P-
5103GH
Remove/install
fog lampMODELS 163.113/154 #A as of 289565,
163.113 /154 #X as of 754620, 163.128 /157 /175AR82.10-P-
5103GI
Removing and
installing license
plate lampsMODEL 163AR82.10-P-
5161GH
Removing and
installing center
high-mounted
stop lampMODEL 163AR82.10-P-
5375GH
Remove/install
telescoping
nozzle for
headlamp
cleaning systemMODELS 163.113/128 /154 /157 /172 /175 with
CODE (600a) Headlamp cleaning system
MODEL 163.174AR82.15-P-
6100GH
Removing and
installing front
dome lampMODEL 163AR82.20-P-
0110GH
Remove/install
rear dome lampMODEL
163.113/128 /136 /154 /157 /172 /174 /175AR82.20-P-
0113GH
Remove/install
front overhead
control panelMODEL
163.113/128 /136 /154 /157 /172 /174 /175AR82.20-P-
1100GH
Removing and
installing wiper
armMODEL
163.113/128 /136 /154 /157 /172 /174 /175AR82.30-P-
6100GH
Remove/install
wiper systemMODEL
163.113/128 /136 /154 /157 /172 /174 /175AR82.30-P-
6400GH
Removing and
installing wiper
motorMODEL 163AR82.30-P-
6800GH
Removing and
installing rear
window wiper
motorMODEL 163AR82.30-P-
6900GH
Removing and
installing tailgate
wiper armMODEL 163AR82.30-P-
6910GH
Remove/install MODELS 163.113/128 /154 /157 /172 /174 /175 AR82.30-P-
2001 Mercedes-Benz ML320
1998-2005 ACCESSORIES & BODY, CAB Electrical System - Body - 163 Chassis
me
Saturday, October 02, 2010 3:30:08 PMPage 250 © 2006 Mitchell Repair Information Company, LLC.
Page 1747 of 4133
REMOVING AND INSTALLING BULBS OF HEADLAMP UNIT - AR82.10-P-1201GH
MODEL 163.113 /136 /154 /172 /174 up to 31.8.01
rear doors
Remove, install
AM/FM amplifierMODEL 163AR82.62-P-
8347GH
Replace fiber
optical cable
(D2B) between
radio and sound
amplifier (after
testing)MODEL 163...AR82.62-P-
8350GH
Remove/install
CD player with
changerMODEL 163 with CODE (819) 6-disc CD
changerAR82.64-P-
7507GH
Fiber optical
cable (D2B)
replace complete
(after testing)MODEL 163...AR82.70-P-
0005GH
Fiber optical
cable (D2B)
replace complete
(after testing)MODEL 163...AR82.70-P-
0005GI
Fiber optical
cable (D2B)
replace complete
(after testing)MODEL 163...AR82.70-P-
0005GJ
Remove/install
antenna splitterMODEL 163.113/136 /154 /157 /172 /174AR82.70-P-
8953GH
Remove/install
electronic
compassMODEL 163...AR82.85-P-
7371GH
Remove/install
control module
for E-Call
emergency call
systemMODEL 163...AR82.95-P-
0008GH
Replace fiber
optical cable
(D2B) between
the radio and E-
call control
module/CTEL
[TEL] interface
(after testing)MODEL 163...AR82.95-P-
0015GH
2001 Mercedes-Benz ML320
1998-2005 ACCESSORIES & BODY, CAB Electrical System - Body - 163 Chassis
me
Saturday, October 02, 2010 3:30:08 PMPage 252 © 2006 Mitchell Repair Information Company, LLC.
Page 1748 of 4133
Fig. 153: Identifying Headlamp Unit Bulbs Components
REMOVE/INSTALL FOG LAMP BULB - AR82.10-P-1825GH
Remove/install
1Open hood and raise to
vertical positionUp to 31.08.99AR88.40-P-1000GH
As of 01.09.99AR88.40-P-1000GI
2Release cover (1) by
pressing on catch lever (3,
direction of arrow) and
remove
3Remove cover (2)
4Disconnect electrical
connectors (4) for bulbs
5Open retaining clips (5)
for bulbs
6Remove bulbs (E1e1,
E1e2, E1e4) Do not touch bulbs
with bare fingers, use
grease-free, soft cloth.
Installation: Ensure
bulb is correctly installed.
7Install in the reverse order
8Perform function check
2001 Mercedes-Benz ML320
1998-2005 ACCESSORIES & BODY, CAB Electrical System - Body - 163 Chassis
me
Saturday, October 02, 2010 3:30:08 PMPage 253 © 2006 Mitchell Repair Information Company, LLC.
Page 1751 of 4133
MODELS 163.154 /172 /113 with CODE (612b) Xenon headlamp unit
MODELS 163.174/175/128/157
Fig. 157: Identifying Headlight Beam Adjustment Control Module
Remove/Install
1Remove cover below
instrument panel (left) AR68.10-P-1500GH
2Disconnect connector
from headlamp range
adjustment control module
(N71)
3Unscrew headlamp range
adjustment control module
from mount of extended
activity module (EAM) 2 nuts.
4Remove headlamp range
adjustment control module
(N71)
5Install in the reverse order
6Adjust headlamp into zero
position using STAR
DIAGNOSIS
2001 Mercedes-Benz ML320
1998-2005 ACCESSORIES & BODY, CAB Electrical System - Body - 163 Chassis
me
Saturday, October 02, 2010 3:30:08 PMPage 256 © 2006 Mitchell Repair Information Company, LLC.
Page 1752 of 4133
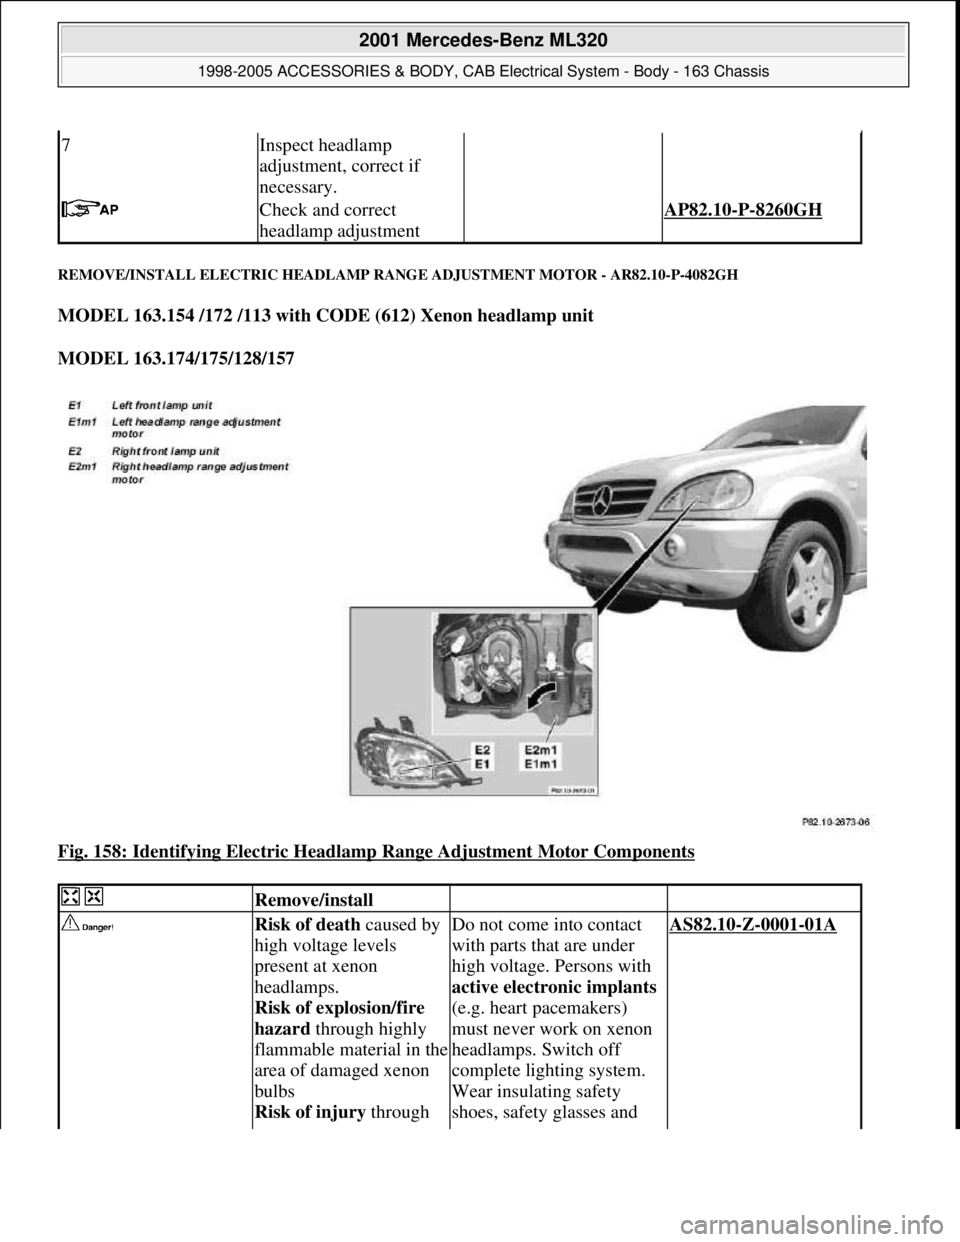
REMOVE/INSTALL ELECTRIC HEADLAMP RANGE ADJUSTMENT MOTOR - AR82.10-P-4082GH
MODEL 163.154 /172 /113 with CODE (612) Xenon headlamp unit
MODEL 163.174/175/128/157
Fig. 158: Identifying Electric Headlamp Range Adjustment Motor Components
7Inspect headlamp
adjustment, correct if
necessary.
Check and correct
headlamp adjustment AP82.10-P-8260GH
Remove/install
Risk of death caused by
high voltage levels
present at xenon
headlamps.
Risk of explosion/fire
hazard through highly
flammable material in the
area of damaged xenon
bulbs
Risk of injury through Do not come into contact
with parts that are under
high voltage. Persons with
active electronic implants
(e.g. heart pacemakers)
must never work on xenon
headlamps. Switch off
complete lighting system.
Wear insulating safety
shoes, safety glasses and AS82.10-Z-0001-01A
2001 Mercedes-Benz ML320
1998-2005 ACCESSORIES & BODY, CAB Electrical System - Body - 163 Chassis
me
Saturday, October 02, 2010 3:30:09 PMPage 257 © 2006 Mitchell Repair Information Company, LLC.
Page 1753 of 4133
REMOVE/INSTALL XENON HEADLAMP CONTROL UNIT - AR82.10-P-4632GH
MODEL 163.113 #X up to 754619, 163.113 /154 #A up to 289564, 163.172 with CODE (612) Xenon
UV light, hot
components on xenon
headlamps and glass
splinters when xenon
bulbs burst
Risk of poisoning
through inhalation of
mercury vapor and
swallowing of or skin
contact with toxic salts
and mercury compoundsprotective gloves. Remove
highly inflammable
materials from the hazard
area. Ensure that the
workplace is sufficiently
ventilated.
1Remove left front lamp
unit (E1) or right front
lamp unit (E2) AR82.10-P-4730GH
2Remove cover from rear
of lamp unit
3Turn left headlamp range
adjustment motor
(E1m1) or right
headlamp range
adjustment motor
(E2m1) to right and
remove from left front
lamp unit (E1) or right
front lamp unit (E2) Left side: 1/4 clockwise
rotation. Right side: 1/4
counterclockwise rotation.
4Unhook adjusting
support and remove left
headlamp range
adjustment motor
(E1m1) or right
headlamp range
adjustment (E2m1)
5Install in the reverse
order
6Set headlamps to zero
position using STAR
DIAGNOSIS
7Inspect headlamp
adjustment, correct if
necessary.
Check and correct
headlamp adjustment AP82.10-P-8260GH
2001 Mercedes-Benz ML320
1998-2005 ACCESSORIES & BODY, CAB Electrical System - Body - 163 Chassis
me
Saturday, October 02, 2010 3:30:09 PMPage 258 © 2006 Mitchell Repair Information Company, LLC.
Page 1754 of 4133
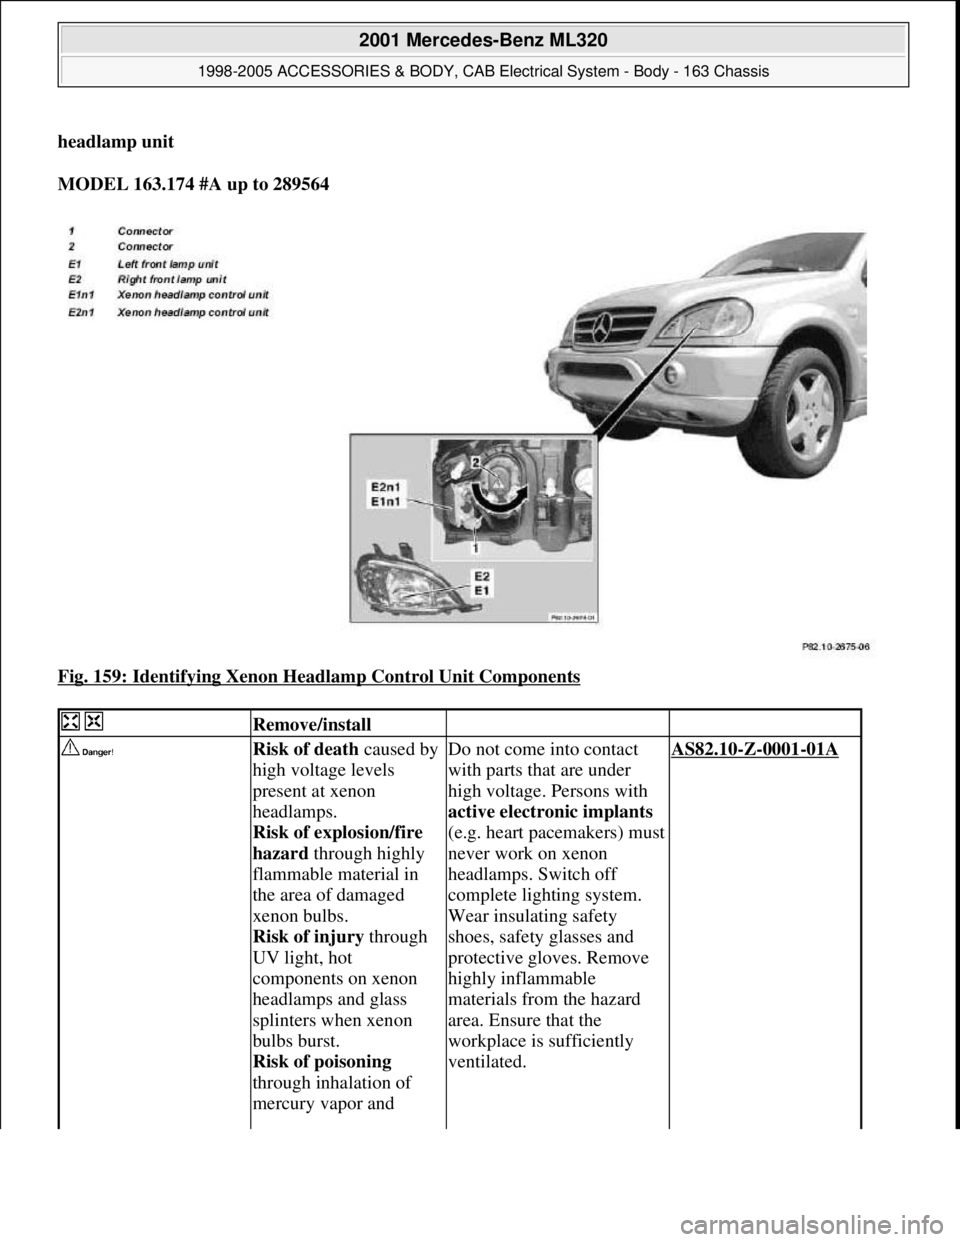
headlamp unit
MODEL 163.174 #A up to 289564
Fig. 159: Identifying Xenon Headlamp Control Unit Components
Remove/install
Risk of death caused by
high voltage levels
present at xenon
headlamps.
Risk of explosion/fire
hazard through highly
flammable material in
the area of damaged
xenon bulbs.
Risk of injury through
UV light, hot
components on xenon
headlamps and glass
splinters when xenon
bulbs burst.
Risk of poisoning
through inhalation of
mercury vapor and Do not come into contact
with parts that are under
high voltage. Persons with
active electronic implants
(e.g. heart pacemakers) must
never work on xenon
headlamps. Switch off
complete lighting system.
Wear insulating safety
shoes, safety glasses and
protective gloves. Remove
highly inflammable
materials from the hazard
area. Ensure that the
workplace is sufficiently
ventilated.AS82.10-Z-0001-01A
2001 Mercedes-Benz ML320
1998-2005 ACCESSORIES & BODY, CAB Electrical System - Body - 163 Chassis
me
Saturday, October 02, 2010 3:30:09 PMPage 259 © 2006 Mitchell Repair Information Company, LLC.
Page 1755 of 4133
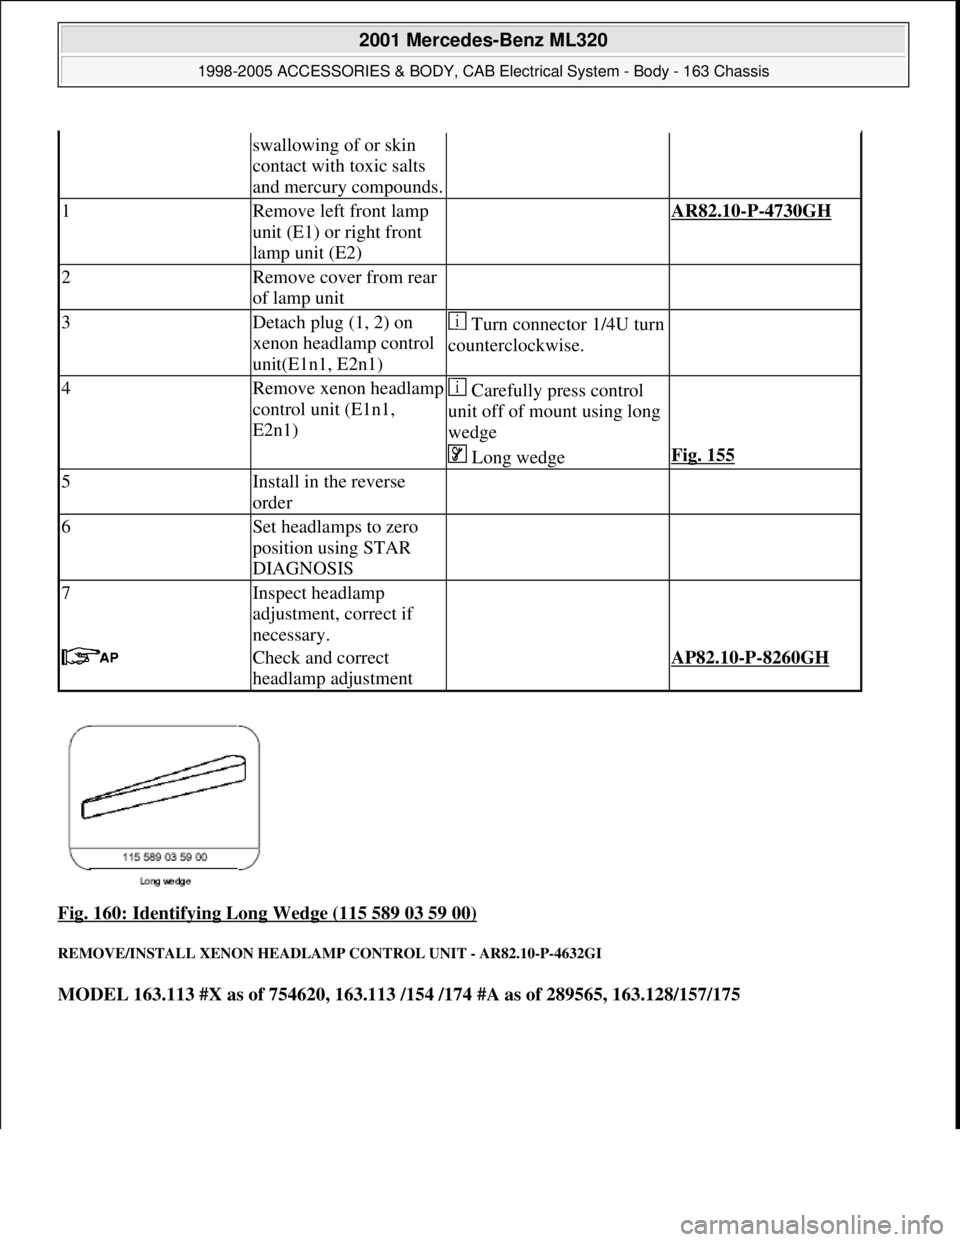
Fig. 160: Identifying Long Wedge (115 589 03 59 00)
REMOVE/INSTALL XENON HEADLAMP CONTROL UNIT - AR82.10-P-4632GI
MODEL 163.113 #X as of 754620, 163.113 /154 /174 #A as of 289565, 163.128/157/175
swallowing of or skin
contact with toxic salts
and mercury compounds.
1Remove left front lamp
unit (E1) or right front
lamp unit (E2) AR82.10-P-4730GH
2Remove cover from rear
of lamp unit
3Detach plug (1, 2) on
xenon headlamp control
unit(E1n1, E2n1)Turn connector 1/4U turn
counterclockwise.
4Remove xenon headlamp
control unit (E1n1,
E2n1) Carefully press control
unit off of mount using long
wedge
Long wedgeFig. 155
5Install in the reverse
order
6Set headlamps to zero
position using STAR
DIAGNOSIS
7Inspect headlamp
adjustment, correct if
necessary.
Check and correct
headlamp adjustment AP82.10-P-8260GH
2001 Mercedes-Benz ML320
1998-2005 ACCESSORIES & BODY, CAB Electrical System - Body - 163 Chassis
me
Saturday, October 02, 2010 3:30:09 PMPage 260 © 2006 Mitchell Repair Information Company, LLC.