Page 1070 of 4133
266 Practical hintsReplacing bulbs
�Replacing bulbsSafe vehicle operation depends on proper
exterior lighting and signaling. It is there-
fore essential that all bulbs and lamp as-
semblies are in good working order at all
times.
Correct headlamp adjustment is extremely
important. Have headlamps checked and
readjusted at regular intervals and when a
bulb has been replaced. See your autho-
rized Mercedes-Benz Light Truck Center
for headlamp adjustment.
Bulbs Front lamps
iIf the headlamps are fogged up on the
inside as a result of high humidity, driv-
ing the vehicle a distance should clear
out the fogging.
Lamp
Type
1
Fog lamp
H8 (35 W)
2
High beam
H7 (55 W)
3
Low beam
H7 (55 W)
Xenon* D2S-35 W
4
Turn signal,
parking, stand-
ing and side
marker lamp
1157 NA
(32 / 3 cp bulb)
5
Additional turn
signal
LED
Page 1072 of 4133
268 Practical hintsReplacing bulbsReplacing bulbs for front lamps
Replacing low beam bulbs
1Low beam halogen or Bi-Xenon* head-
lamp cover with locking tab2Electrical connector
Bi-Xenon* headlampHalogen headlamp
�
Switch off the lights.
�
Open the hood (
�page 217).
�
Push down tab at top end of cover1
and remove.
�
Pull electrical connector2 off.
�
Unclip the retainer springs and take out
the bulb.
�
Insert the new bulb so that the base lo-
cates in the recess on the holder.
�
Clip the retainer springs.
�
Plug the connector2 onto the bulb.
�
Align headlamp cover and click into
place.
Warning!
G
Do not remove the cover
1
for the
Bi-Xenon headlamp. Because of high voltage
in xenon lamps, it is dangerous to replace
the bulb or repair the lamp and its compo-
nents. We recommend that you have such
work done by a qualified technician.
Page 1073 of 4133
269 Practical hints
Replacing bulbs
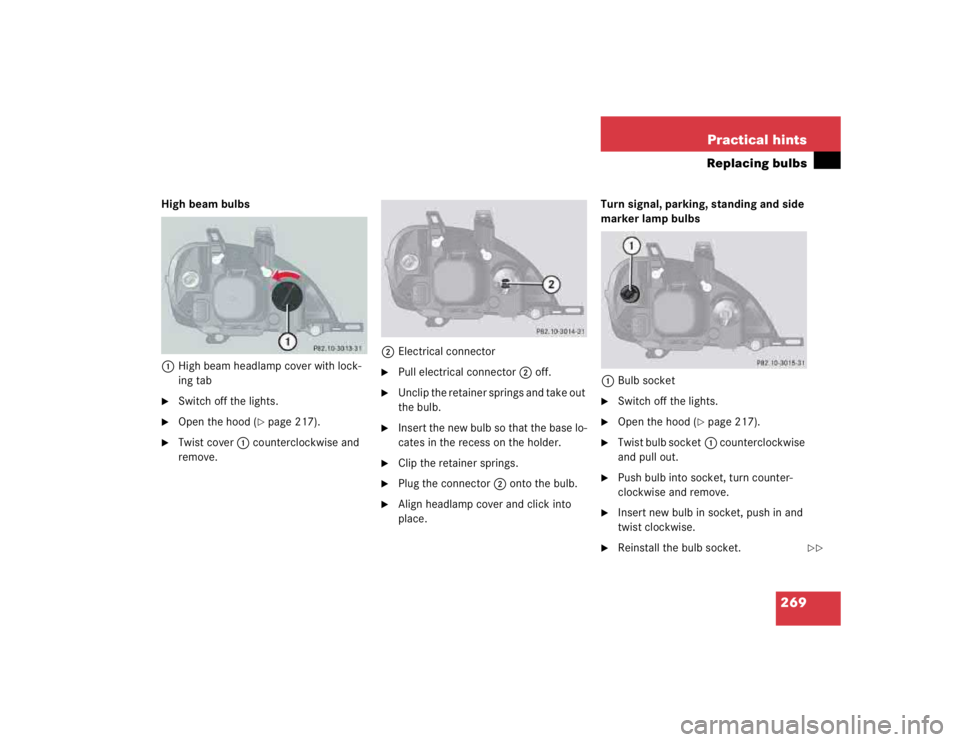
High beam bulbs
1High beam headlamp cover with lock-
ing tab�
Switch off the lights.
�
Open the hood (
�page 217).
�
Twist cover1 counterclockwise and
remove.2Electrical connector
�
Pull electrical connector2 off.
�
Unclip the retainer springs and take out
the bulb.
�
Insert the new bulb so that the base lo-
cates in the recess on the holder.
�
Clip the retainer springs.
�
Plug the connector2 onto the bulb.
�
Align headlamp cover and click into
place.Turn signal, parking, standing and side
marker lamp bulbs
1Bulb socket
�
Switch off the lights.
�
Open the hood (
�page 217).
�
Twist bulb socket1 counterclockwise
and pull out.
�
Push bulb into socket, turn counter-
clockwise and remove.
�
Insert new bulb in socket, push in and
twist clockwise.
�
Reinstall the bulb socket.
��
Page 1074 of 4133
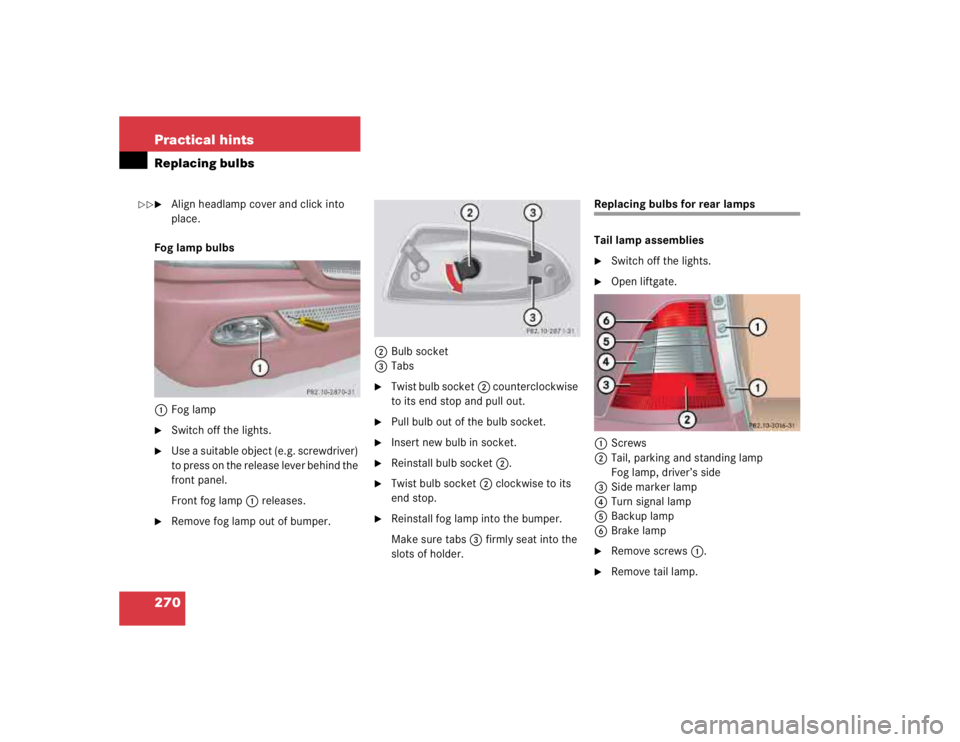
270 Practical hintsReplacing bulbs�
Align headlamp cover and click into
place.
Fog lamp bulbs
1Fog lamp
�
Switch off the lights.
�
Use a suitable object (e.g. screwdriver)
to press on the release lever behind the
front panel.
Front fog lamp1 releases.
�
Remove fog lamp out of bumper.2Bulb socket
3Tabs
�
Twist bulb socket2 counterclockwise
to its end stop and pull out.
�
Pull bulb out of the bulb socket.
�
Insert new bulb in socket.
�
Reinstall bulb socket2.
�
Twist bulb socket2 clockwise to its
end stop.
�
Reinstall fog lamp into the bumper.
Make sure tabs3 firmly seat into the
slots of holder.
Replacing bulbs for rear lamps
Tail lamp assemblies�
Switch off the lights.
�
Open liftgate.
1Screws
2Tail, parking and standing lamp
Fog lamp, driver’s side
3Side marker lamp
4Turn signal lamp
5Backup lamp
6Brake lamp
�
Remove screws1.
�
Remove tail lamp.
��
Page 1076 of 4133

272 Practical hintsReplacing bulbs�
Insert reflector from the left so that it
engages on the right.
�
Position tabs of cover in slots and rein-
stall cover until properly seated.
Adjusting headlamp aim
VVertical centerline
HHeadlamp mounting high, measured
from the centerCorrect headlamp adjustment is extremely
important. To check and readjust a head-
lamp, follow the steps described:
�
Park the vehicle on a level surface
25 feet (7.6 m) from a vertical test
screen or wall.
�
Switch the headlamps on
(�page 110).
If the beam does not show a beam pattern
as indicated in the figure left, then follow
the steps below:
�
Open hood (
�page 217).
2Headlamp vertical adjustment screw
3Headlamp vertical adjustment screw
�
Always turn adjustment screws2
and3 simultaneously for vertical ad-
justment until the headlamp is adjust-
ed as shown1. Turn clockwise for
upward movement and counterclock-
wise for downward movement.
Graduations:
screw2: 0.50° pitch
screw3: 0.67° pitch
The left and right headlamps must be ad-
justed individually.
iHigh beam adjustments simultaneous-
ly aim the low beam.
Vehicle should have a normal trunk
load.
iIf it is not possible to obtain a proper
headlamp adjustment, have the system
checked at your authorized
Mercedes-Benz Light Truck Center.
��
Page 1105 of 4133
301 Technical data
Fuels, coolants, lubricants etc.
Model
Capacity
Fuels, coolants, lubricants etc.
Cooling system
approx. 12.7 US qt (12.0 l)
MB Anticorrosion / Antifreeze
Fuel tank
ML 350, ML 500
22.0 US gal (83.0 l)
Premium unleaded gasoline:
Posted Octane 91 (Avg. of 96 RON / 86 MON
including a reserve of
approx. 3.2 US gal (12.0 l)
Air conditioning system
R-134a refrigerant and special PAG lubricant
oil (never R-12)
Windshield washer and
headlamp cleaning
system*
8.0 US qt (7.6 l)
MB Windshield Washer Concentrate
1
1Use MB Windshield Washer Concentrate “S” and water for temperatures above freezing or MB Windshield Washer Concentrate “S” and commercially available pre-
mixed windshield washer solvent / antifreeze for temperatures below freezing. Follow suggested mixing ratios (�page 307).
Page 1111 of 4133

307 Technical data
Fuels, coolants, lubricants etc.
Windshield washer system and headlamp cleaning system*
Both the windshield washer and headlamp
cleaning system* are supplied from the
windshield washer fluid reservoir.
The windshield and headlamp washer fluid
reservoir has a capacity of approx.
8.0 US qt (7.6 l).�
Refill the reservoir with MB Windshield
Washer Concentrate “S” and water (or
concentrate and commercially avail-
able premixed windshield washer
solvent / antifreeze, depending on am-
bient temperatures).Windshield and headlamp washer fluid
mixing ratio
For temperatures above freezing, use
MB Windshield Washer Concentrate “S”
and water:�
1 part “S” to 100 parts water
[40 ml “S” to 1 gallon (4 liters) water].
For temperatures below freezing, use
MB Windshield Washer Concentrate “S”
and commercially available premixed
windshield washer solvent / antifreeze:
�
1part “S” to 100parts solvent
[40 ml “S” to 1 gallon (4 liters) solvent].
Warning!
G
Washer solvent / antifreeze is highly flam-
mable. Do not spill washer
solvent / antifreeze on hot engine parts, be-
cause it may ignite and burn. You could be
seriously burned.
Page 1115 of 4133

Prevents the wheels from locking up
during braking so that the vehicle can
continue to be steered.
BabySmart
TM airbag deactivation
system
This sy")
311 Technical terms
ABS
(A
ntilock B
rake S
ystem)
Prevents the wheels from locking up
during braking so that the vehicle can
continue to be steered.
BabySmart
TM airbag deactivation
system
This system detects if a special system
compatible child restraint seat is in-
stalled on the front passenger seat. The
system will automatically deactivate
the passenger front airbag when such a
seat is properly installed (indicator
lamp7 in the instrument cluster
lights up). See your authorized
Mercedes-Benz Light Truck Center for
availability.
BabySmartTM compatible child seats
Special restraint system for children.
The sensor system for the passenger
seat prevents deployment of the pas-
senger front airbag if a BabySmart
TM
compatible child seat is installed.BAS
(B
rake A
ssist S
ystem)
System for potentially reducing braking
distances in emergency braking situa-
tions. The system is activated when it
senses an emergency based on how
fast the brake is applied.
Bi-Xenon headlamps*
Headlamps which use an electric arc as
the light source and produce a more in-
tense light than filament headlamps.
Bi-Xenon headlamps produce low
beam and high beam.
CAC
(C
ustomer A
ssistance C
enter)
Mercedes-Benz customer service cen-
ter, which can help you with any ques-
tions about your vehicle and provide
assistance in the event of a break-
down.CAN system
(C
ontroller A
rea N
etwork)
Data bus network serving to control ve-
hicle functions such as door locking or
windshield wiping.
Cockpit
All instruments, switches, buttons and
indicator / warning lamps in the pas-
senger compartment needed for vehi-
cle operation and monitoring.
Cruise control
Driving convenience system for auto-
matically maintaining the vehicle speed
set by the driver.
Engine number
The number set by the manufacturer
and placed on the cylinder block to
uniquely identify each engine pro-
duced.


MB Anticorrosion / Antifreeze
Fuel tank
ML 350, ML 500
22")