Page 827 of 4133
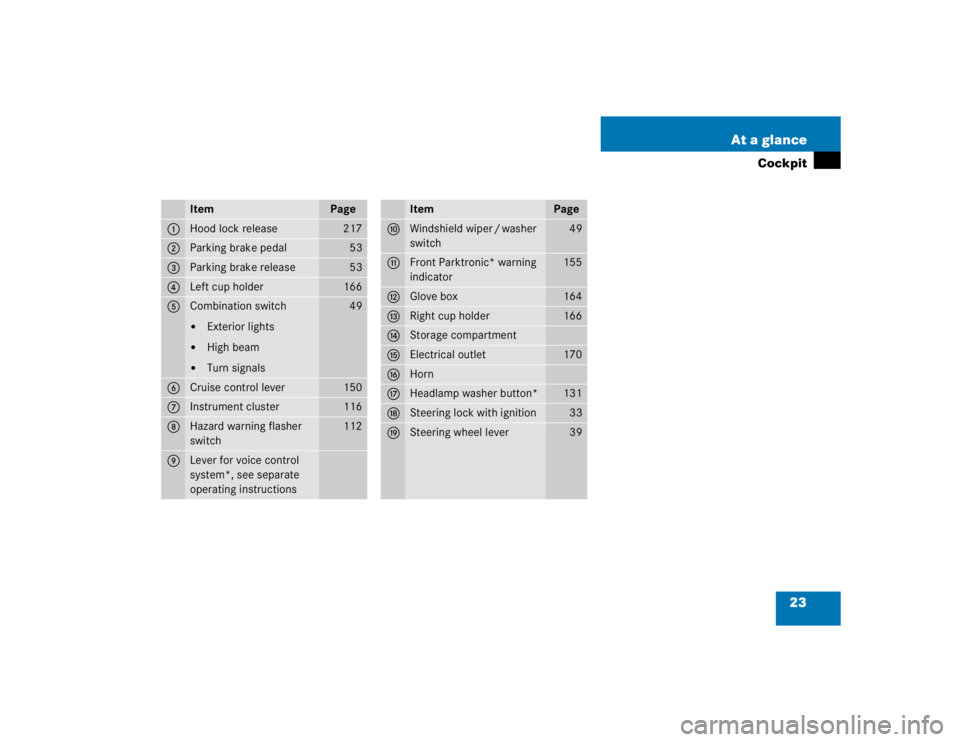
23 At a glance
Cockpit
Item
Page
1
Hood lock release
217
2
Parking brake pedal
53
3
Parking brake release
53
4
Left cup holder
166
5
Combination switch�
Exterior lights
�
High beam
�
Turn signals
49
6
Cruise control lever
150
7
Instrument cluster
116
8
Hazard warning flasher
switch
112
9
Lever for voice control
system*, see separate
operating instructions
Item
Page
a
Windshield wiper / washer
switch
49
b
Front Parktronic* warning
indicator
155
c
Glove box
164
d
Right cup holder
166
e
Storage compartment
f
Electrical outlet
170
g
Horn
h
Headlamp washer button*
131
j
Steering lock with ignition
33
k
Steering wheel lever
39
Page 830 of 4133
26 At a glanceInstrument cluster
Item
Page
5
Photo sensor
(adjusts the brightness of
the digital displays located
in 1, 4 and 8)
6
Right indicator lamps
with:WLow wind-
shield/headlamp
washer system fluid
level warning lamp
253
7Front passenger air-
bag switched off
243
‡Front fog lamp
switched on
111
Item
Page
_Steering wheel ad-
justment not locked
253
warning lamp
253
1Supplemental Re-
straint System
(SRS) indicator
lamp
255
ÉBrake warning lamp
244
#Charge indicator
lamp
254
AHigh beam head-
lamp indicator
49
Item
Page
7
Knob for setting clock
118
8
Tachometer with:
Display for Selector
lever position
121
Clock
118
9
KRight turn signal
indicator lamp
a
LLeft turn signal
indicator lamp
Page 852 of 4133

48 Getting startedDrivingAfter a cold start, the automatic transmis-
sion shifts at a higher engine revolution.
This allows the catalytic converter to reach
its operating temperature earlier.
More information can be found in the “Op-
eration” section (
�page 191).
For information on off-road driving, see
“Driving instructions” (
�page 200).
Switching on headlamps
The combination switch is located on the
left of the steering column.Combination switch1 Off
2Low beam headlamps on
3High beam lamps on�
Turn the switch toõ.
Low beam headlamps on.
!If you hear a warning signal when driv-
ing off, you have forgotten to release
the parking brake.
Release the parking brake.Warning!
G
It is dangerous to shift the gear selector
lever out ofP orN if the engine speed is
higher than idle speed. If your foot is not
firmly on the brake pedal, the vehicle could
accelerate quickly forward or in reverse. You
could lose control of the vehicle and hit
someone or something. Only shift into gear
when the engine is idling normally and when
your right foot is firmly on the brake pedal.
Warning!
G
On slippery road surfaces, never downshift
in order to obtain braking action. This could
result in drive wheel slip and reduced vehi-
cle control. Your vehicle’s ABS will not pre-
vent this type of loss of control.!Place the gear selector lever in
positionR only when the vehicle is
stopped in order to avoid damaging the
transmission.!Do not run cold engine at high engine
speeds. Running a cold engine at high
engine speeds may shorten the service
life of the engine.
Page 858 of 4133
.
More information can be found in the
“Controls in detail” section (
�page 107).
Turning")
54 Getting startedParking and locking
Switching off headlamps�
Turn the combination switch to1
(�page 48).
More information can be found in the
“Controls in detail” section (
�page 107).
Turning off engine�
Place the gear selector lever in
positionP.
�
Turn the key in the steering lock
(�page 33) to position0 and remove
it.
The immobilizer is activated.
�
Move the steering wheel slightly to al-
low the locking mechanism to engage.
Warning!
G
When leaving the vehicle, always remove the
key from the steering lock and lock the vehi-
cle. Do not leave children unattended in the
vehicle, or with access to an unlocked vehi-
cle. Children could release the parking
brake and / or move the gear selector lever
from positionP, either of which could result
in an accident and / or serious personal
injury.
Warning!
G
Getting out of your vehicle with the gear
selector lever not fully engaged in positionP
is dangerous. Also, when parked on an in-
cline, positionP alone may not prevent your
vehicle from moving, possibly hitting people
or objects.
Always set the parking brake in addition to
shifting to positionP (
�page 53).
When parked on an incline, also turn front
wheel towards the road curb.
iAlways set the parking brake in addi-
tion to shifting to positionP.
On steep slopes, turn the front wheels
towards the road curb.iThe key can only be removed from the
steering lock with the gear selector le-
ver in positionP.
Page 911 of 4133
107 Controls in detail
Lighting
�Lighting
For notes on how to switch on the head-
lamps (
�page 48) and use the turn signals
(
�page 49), see the “Getting started” sec-
tion.
Combination switch
The combination switch is on the left of the
steering column.
1High beam
2High beam flasherMOff
UAutomatic headlamp mode
CParking lamps, license plate lamps
and instrument panel lamps
Canada only: With the engine run-
ning, the low beam headlamps
additionally switched on.
õLow beam or high beam headlamps
ƒLeft or right standing lamps
(symbol on underside of switch)
iIf you drive in countries where vehicles
drive on the other side of the road than
the country where the vehicle is regis-
tered, you must have the headlamps
modified for symmetrical low beams.
Relevant information can be obtained
at your authorized Mercedes-Benz
Light Truck Center.
Page 912 of 4133
.
Automat")
108 Controls in detailLightingManual headlamp mode
The low beam headlamps and parking
lamps can be switched on and off with the
combination switch. For combination
switch, see (
�page 107).
Automatic headlamp mode
The parking lamps, low beam headlamps
and license plate lamps switch on and off
automatically depending on the brightness
of the ambient light.
�
Turn the combination switch toU.iIf you remove the key and open the
driver’s door while the parking lamps or
low beam headlamps are switched on,
then a warning sounds.
Warning!
G
If the combination switch is set toU,�
the headlamps may switch off unexpect-
edly when the system senses bright am-
bient light, for example light from
oncoming traffic.
�
the headlamps will not be automatically
switched on under foggy conditions.
To minimize risk to you and to others, acti-
vate headlamps by turning combination
switch toõ when driving or when traffic
and / or ambient lighting conditions require
you to do so.
In low ambient lighting conditions, only
switch from positionU toõ with the
vehicle at a standstill. Switching fromU
toõ will briefly switch off the head-
lamps. Doing so while driving in low ambient
lighting conditions may result in an acci-
dent.
The automatic headlamp feature is only an
aid to the driver. The driver is responsible for
the operation of the vehicle's lights at all
times.iIf the automatic headlamp mode is ac-
tivated, the fog lamps can also be
switched on (
�page 111). The low
beam headlamp and parking lamps are
activated simultaneously.
Page 913 of 4133

109 Controls in detail
Lighting
Daytime running lamp mode
Canada only:�
Turn combination switch to
positionM orU.
When the engine is running, the low beam
headlamps are automatically switched on.
In low ambient light conditions, the parking
lamps will also switch on.
When you shift from a driving position to
positionN orP, the low beam switches off
(three minutes delay).
For nighttime driving you should turn the
combination switch to positionõ to
permit activation of the high beam head-
lamps.Night security illumination
When you turn off the engine and the last
door has been closed, the following lamps
will remain lit:
�
Parking lamps
�
Tail lamps
�
License plate lamps
�
Front fog lamps
The combination switch must be set to
positionU (
�page 107).Deactivating night security illumination
temporarily
�
Before leaving the vehicle, turn the key
in the steering lock to position0
(�page 33) then turn it to position2
and back to0.
The night security illumination is deac-
tivated. It will reactivate as soon as you
start the engine.
Setting illumination time
1Switch for fog lamps
iThe high beam flasher is always avail-
able.
iYou can reactivate this function within
ten minutes by opening a door or the
liftgate.
If you do not open a door or the liftgate
after turning off the engine, the lamps
will automatically switch off after
60 seconds.
Page 915 of 4133

111 Controls in detail
Lighting
Fog lamps
The switch is located on the upper center
console.1Front fog lamps
2Indicator lamp
3Front fog lamps and rear fog lamp
Switching front fog lamps on and off
�
Make sure the low beam headlamps
are switched on.
�
Press upper part1 of switch.
The green indicator lamp‡ in the
instrument cluster comes on.
�
Press upper part1 of switch again.
The green indicator lamp‡ in the
instrument cluster goes out.Switching front fog lamps and rear fog
lamps on and off
�
Make sure the low beam headlamps
are switched on.
�
Press lower part3 of switch.
The green indicator lamp‡ in the
instrument cluster comes on in addi-
tion to the yellow indicator lamp2 in
the switch.
�
Press lower part3 of switch again.
The green indicator lamp‡ in the
instrument cluster and the yellow indi-
cator lamp2 in the switch go out.
Switching rear fog lamp on and off
�
Press upper part1 of switch.
The yellow indicator lamp2 in the
switch goes out.
�
Press upper part1 of switch.
The green indicator lamp‡ in the
instrument cluster goes out.
Warning!
G
In low ambient lighting or foggy conditions,
only switch from positionU toB with
the vehicle at a standstill. Switching
fromU toB will briefly switch off the
headlamps. Doing so while driving in low
ambient lighting conditions may result in an
accident.iThe fog lamps can be switched on with
combination switch in positionõ
orU. Consult your state Motor Reg-
ulations regarding allowable lamp oper-
ation.

6
Right indicator lamps
with:WLow wind-
shield/headlamp
washer syst")
