Page 920 of 4133
116 Controls in detailInstrument cluster
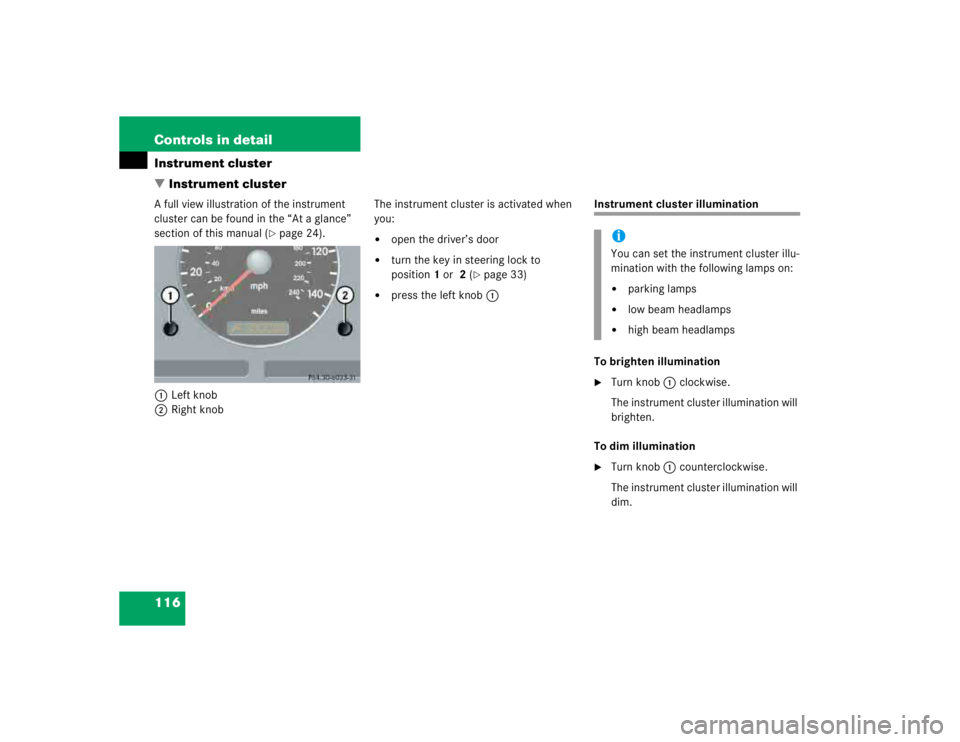
�Instrument clusterA full view illustration of the instrument
cluster can be found in the “At a glance”
section of this manual (
�page 24).
1Left knob
2Right knobThe instrument cluster is activated when
you:
�
open the driver’s door
�
turn the key in steering lock to
position1 or 2 (
�page 33)
�
press the left knob1
Instrument cluster illumination
To brighten illumination�
Turn knob1 clockwise.
The instrument cluster illumination will
brighten.
To dim illumination
�
Turn knob1 counterclockwise.
The instrument cluster illumination will
dim.iYou can set the instrument cluster illu-
mination with the following lamps on:�
parking lamps
�
low beam headlamps
�
high beam headlamps
Page 930 of 4133
 and for setting the rear view
mirrors (
�page 40) is found in the
“Getting started” section")
126 Controls in detailGood visibility
�Good visibilityInformation on the windshield wipers
(�page 49) and for setting the rear view
mirrors (
�page 40) is found in the
“Getting started” section.
Rear view mirror
Interior rear view mirror, antiglare
position
1Lever�
Tilt the mirror to the antiglare night po-
sition by moving lever1 towards the
windshield.
The interior rear view mirror is dimmed.Automatic antiglare rear view mirror*
The reflection brightness of the exterior
rear view mirror on the driver’s side and
the interior rear view mirror will respond
automatically to glare when:
�
the automatic antiglare function is acti-
vated (
�page 127)
�
the ignition is switched on
�
incoming light from headlamps falls on
the sensor in the interior rear view
mirror
The rear view mirror will not react if
�
reverse gear is engaged
�
the interior light is turned on
Warning!
G
The automatic antiglare function does not
react if incoming light is not aimed directly
at sensors in the inside rear view mirror.
The interior rear view mirror and the exterior
rear view mirror on the driver’s side do not
react, for example, if the cargo area is fully
loaded.
Glare can endanger you and others.Warning!
G
In the case of an accident, liquid electrolyte
may escape the mirror housing if the mirror
glass breaks.
Electrolyte has an irritating effect. Do not al-
low the liquid to come into contact with
eyes, skin, clothing, or the respiratory sys-
tem. In case it does, immediately flush af-
fected area with water, and seek medical
help if necessary.
Page 935 of 4133
131 Controls in detail
Good visibility
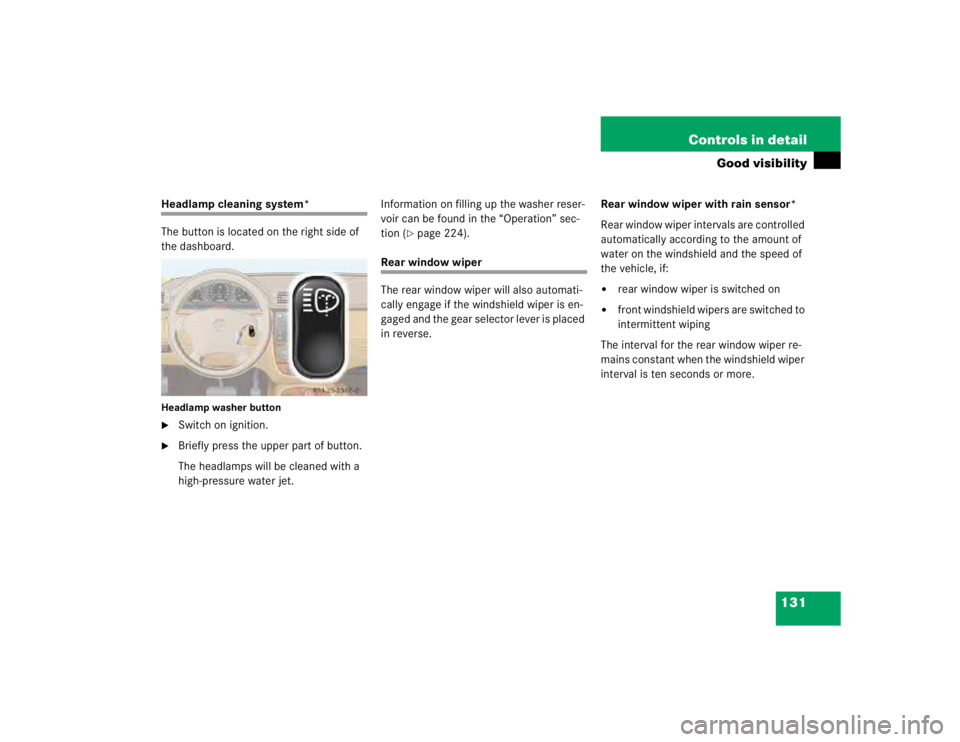
Headlamp cleaning system*
The button is located on the right side of
the dashboard.Headlamp washer button�
Switch on ignition.
�
Briefly press the upper part of button.
The headlamps will be cleaned with a
high-pressure water jet.Information on filling up the washer reser-
voir can be found in the “Operation” sec-
tion (
�page 224).
Rear window wiper
The rear window wiper will also automati-
cally engage if the windshield wiper is en-
gaged and the gear selector lever is placed
in reverse.Rear window wiper with rain sensor*
Rear window wiper intervals are controlled
automatically according to the amount of
water on the windshield and the speed of
the vehicle, if:
�
rear window wiper is switched on
�
front windshield wipers are switched to
intermittent wiping
The interval for the rear window wiper re-
mains constant when the windshield wiper
interval is ten seconds or more.
Page 1019 of 4133

215 Operation
At the gas station
�
Replace the fuel cap by turning it to the
right.
You will hear when the fuel cap is tight-
ened.
�
Close the fuel filler flap.
Check regularly and before a long trip�
Open the hood (
�page 217)
1Engine oil level
2Coolant level
For normal replenishing, use water (po-
table water quality). More information
on the coolant level can be found in the
“Operation” section (
�page 222).
3Brake fluid
4Windshield washer system and
headlamp cleaning system*
More information on filling the reser-
voir can be found in the “Operation”
section (
�page 224).
iUse only premium unleaded gasoline
with a minimum Posted Octane Rating
of 91 (average of 96 RON / 86 MON).
Information on gasoline quality can
normally be found on the fuel pump.
More information on gasoline can be
found in the Factory Approved Service
Products pamphlet.
iLeaving the engine running and the fuel
cap open can cause the yellow fuel
tank reserve warning lamp to flash and
the? lamp to illuminate.
See also “Practical hints” section
(�page 248).
Page 1022 of 4133
.
The hood will lock audibly.
�
Check to make sure the hood is fully
closed.
If you can raise t")
218 OperationEngine compartment
Closing�
Let the hood drop from a height of ap-
proximately 1 ft (30 cm).
The hood will lock audibly.
�
Check to make sure the hood is fully
closed.
If you can raise the hood at a point
above the headlamps, then it is not
properly closed. Open it again and let it
drop with somewhat greater force.
Engine oil
The amount of oil your engine needs will
depend on a number of factors, including
driving style. Higher oil consumption can
occur when�
the vehicle is new
�
the vehicle is driven frequently at
higher engine speeds
Engine oil consumption checks should only
be made after the vehicle break-in period.
Warning!
G
If you see flames or smoke coming from the
engine compartment, or if the coolant tem-
perature gauge indicates that the engine is
overheated, do not open the hood. Move
away from vehicle and do not open the hood
until the engine has cooled. If necessary,
call the fire department.Warning!
G
The engine is equipped with a transistorized
ignition system. Because of the high voltage
it is dangerous to touch any components (ig-
nition coils, spark plug sockets, diagnostic
socket) of the ignition system�
with the engine running
�
while starting the engine
�
if ignition is “on” and the engine is
turned manually
Warning!
G
Be careful that you do not close the hood on
anyone.!Do not push the hood closed manually,
as this could damage it.
iDo not use any special lubricant addi-
tives, as these may damage the drive
assemblies. Using special additives not
approved by Mercedes-Benz will
restrict your warranty entitlement.
More information on this subject is
available at any Mercedes-Benz Light
Truck Center.
��
Page 1028 of 4133

224 OperationEngine compartmentBatteries contain materials that can harm
the environment if disposed of improperly.
Recycling of batteries is the preferred
method of disposal. Many states require
sellers of batteries to accept old batteries
for recycling.Windshield washer system and
headlamp cleaning system*
The windshield washer reservoir is located
in the engine compartment.
1Cap
Fluid for the windshield washer system and
the headlamp cleaning system* is supplied
from the windshield washer reservoir. It
has a capacity of 8.0 US qt (7.6 l).
During all seasons, add MB Windshield
Washer Concentrate “S” to water. Premix
the windshield washer fluid in a suitable
container.
�
Use the tab to pull cap1 upwards
(arrow).
�
Refill the reservoir with MB Windshield
Washer Concentrate “S” and water (or
commercially available premixed wind-
shield washer solvent / antifreeze, de-
pending on ambient temperatures).
Always use washer solvent / antifreeze
where temperatures may fall below
freezing point. Failure to do so could re-
sult in damage to the washer
system / reservoir.
E
Wear eye protection.
C
Keep children away.
F
Follow the instructions in this
Operator's Manual.
!Only use washer fluid which is suitable
for plastic lenses. Improper washer
fluid can damage the plastic lenses of
the headlamps.
Page 1034 of 4133

230 OperationWinter driving
�Winter drivingBefore the onset of winter, have your vehi-
cle winterized at an authorized
Mercedes-Benz Light Truck Center. This
service includes:�
Check of anticorrosion and antifreeze
concentration.
�
Addition of cleaning concentrate to the
water of the windshield and headlamp
cleaning system. Add MB Concentrate
“S” to a premixed windshield washer
solvent / antifreeze which is formulated
for temperatures below freezing point
(�page 307).
�
Battery test. Battery capacity drops
with decreasing ambient temperature.
A well charged battery helps to ensure
that the engine can be started even at
low ambient temperatures.
�
Tire change. Mercedes-Benz recom-
mends M+S rated radial-ply tires with a
minimum tread depth of approximately 1/6in (4 mm) on all four wheels for the
winter season.
Winter tires
Always use winter tires at temperatures
below 45°F (7°C) and whenever wintry
road conditions prevail. Use of winter tires
is the only way to achieve the maximum ef-
fectiveness of the ABS, ESP, 4-ETS, and
EBP in winter operation.
For safe handling, ensure that all winter
tires mounted are of the same make and
have the same tread design.Always observe the speed rating of the
winter tires installed on your vehicle. If the
maximum speed for which your tires are
rated is below the speed rating of your ve-
hicle, you must place a notice to this effect
where it will be seen by the driver. Such no-
tices are available at your tire dealer or any
authorized Mercedes-Benz Light Truck
Center.Warning!
G
Winter tires with a tread depth under
1/6in
(4 mm) must be replaced. They are no long-
er suitable for winter operation.
Warning!
G
If you use your spare tire when winter tires
are fitted on the other wheels, be aware that
the difference in tire characteristics may
very well impair turning stability and that
overall driving stability may be reduced.
Adapt your driving style accordingly.
Have the spare tire replaced with a winter
tire at the nearest authorized
Mercedes-Benz Light Truck Center.
Page 1040 of 4133

236 OperationVehicle careEngine cleaning
Prior to cleaning the engine compartment
make sure to protect electrical compo-
nents and connectors from the intrusion of
water and cleaning agents.
Corrosion protection, such as MB Anticor-
rosion Wax, should be applied to the en-
gine compartment after every engine
cleaning. Before applying, all control link-
age bushings and joints should be lubricat-
ed. The poly-V-belt and all pulleys should
be protected from any wax.
Vehicle washing
Do not use hot water or wash your vehicle
in direct sunlight. Use only a mild car wash
detergent, such as Mercedes-Benz
approved Car Shampoo.Thoroughly spray the vehicle with a dif-
fused jet of water. Direct only a very weak
spray towards the ventilation intake. Use
plenty of water and rinse the sponge and
chamois frequently.
Rinse with clear water and thoroughly dry
with a chamois. Do not allow cleaning
agents to dry on the finish.
Due to the width of the vehicle, fold in out-
side mirrors prior to running the vehicle
through an automatic car wash to prevent
damage to the mirrors.
In the winter, thoroughly remove all traces
of road salt as soon as possible.
When washing the underbody, do not for-
get to clean the inner sides of the wheels.Ornamental moldings
For regular cleaning and care of very dirty
chrome-plated parts, use a chrome clean-
er.
Headlamps, tail lamps, side markers,
turn signal lenses
Use a mild car wash detergent, such as
Mercedes-Benz approved Car Shampoo,
with plenty of water.
To prevent scratches, never apply strong
force and use only a soft, non-scratchy
cloth when cleaning the lenses. Do not at-
tempt to wipe dirty lenses with a dry cloth
or sponge.