1997 MERCEDES-BENZ ML320 brake
[x] Cancel search: brakePage 2061 of 4133
AP40.10-P-4051Z
Check tires for damage and cracks
MODEL
123, 124, 126, 129, 140, 163, 168, 170, 171, 201, 202, 203, 208, 209, 210, 211, 215, 220, 230, 240, 414
P40.10-0002-01
P40.10-0001-01
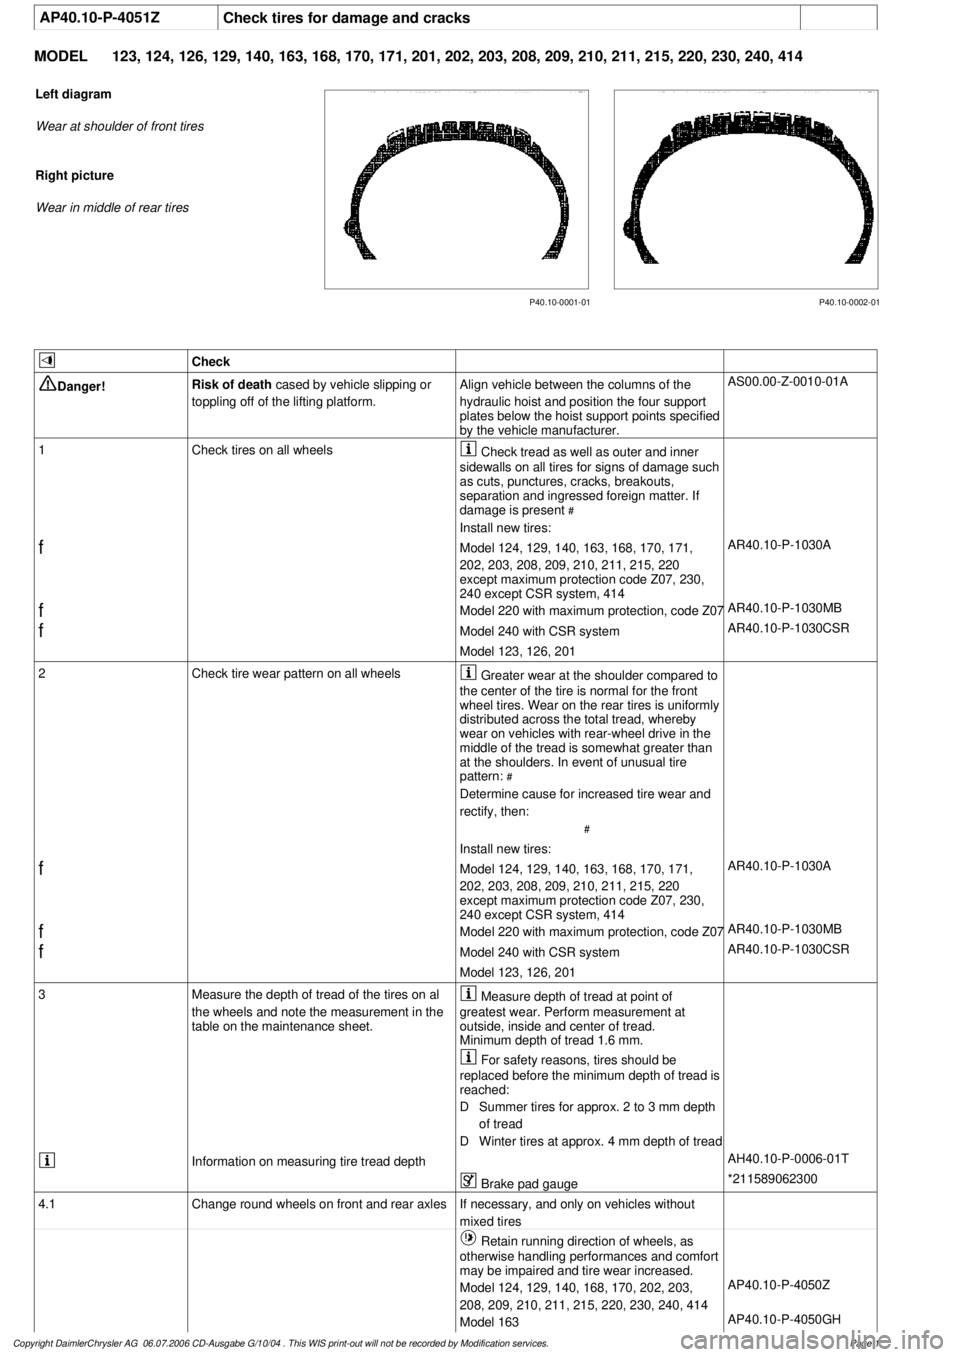
Left diagram
Wear at shoulder of front tires
Right picture
Wear in middle of rear tires
Check
Danger!
Risk of death
cased by vehicle slipping or
toppling off of the lifting platform.
Align vehicle between the columns of the
hydraulic hoist and position the four support
plates below the hoist support points specified
by the vehicle manufacturer.
AS00.00-Z-0010-01A
1
Check tires on all wheels
Check tread as well as outer and inner
sidewalls on all tires for signs of damage such
as cuts, punctures, cracks, breakouts,
separation and ingressed foreign matter. If
damage is present
#
Install new tires:
f
Model 124, 129, 140, 163, 168, 170, 171,
202, 203, 208, 209, 210, 211, 215, 220
except maximum protection code Z07, 230,
240 except CSR system, 414
AR40.10-P-1030A
f
Model 220 with maximum protection, code Z07
AR40.10-P-1030MB
f
Model 240 with CSR system
AR40.10-P-1030CSR
Model 123, 126, 201
2
Check tire wear pattern on all wheels
Greater wear at the shoulder compared to
the center of the tire is normal for the front
wheel tires. Wear on the rear tires is uniformly
distributed across the total tread, whereby
wear on vehicles with rear-wheel drive in the
middle of the tread is somewhat greater than
at the shoulders. In event of unusual tire
pattern:
#
Determine cause for increased tire wear and
rectify, then:
#
Install new tires:
f
Model 124, 129, 140, 163, 168, 170, 171,
202, 203, 208, 209, 210, 211, 215, 220
except maximum protection code Z07, 230,
240 except CSR system, 414
AR40.10-P-1030A
f
Model 220 with maximum protection, code Z07
AR40.10-P-1030MB
f
Model 240 with CSR system
AR40.10-P-1030CSR
Model 123, 126, 201
3
Measure the depth of tread of the tires on al
the wheels and note the measurement in the
table on the maintenance sheet.
Measure depth of tread at point of
greatest wear. Perform measurement at
outside, inside and center of tread.
Minimum depth of tread 1.6 mm.
For safety reasons, tires should be
replaced before the minimum depth of tread is
reached:
D
Summer tires for approx. 2 to 3 mm depth
of tread
D
Winter tires at approx. 4 mm depth of tread
Information on measuring tire tread depth
AH40.10-P-0006-01T
Brake pad gauge
*211589062300
4.1
Change round wheels on front and rear axles
If necessary, and only on vehicles without
mixed tires
Retain running direction of wheels, as
otherwise handling performances and comfort
may be impaired and tire wear increased.
Model 124, 129, 140, 168, 170, 202, 203,
208, 209, 210, 211, 215, 220, 230, 240, 414
AP40.10-P-4050Z
Model 163
AP40.10-P-4050GH
Copyright DaimlerChrysler AG 06.07.2006 CD-Ausgabe G/10/04 . This WIS print-out will not be recorde
d by Modification services.
Page 1
Page 2062 of 4133
Model 171
AP40.10-P-4050V
Model 123, 126, 201
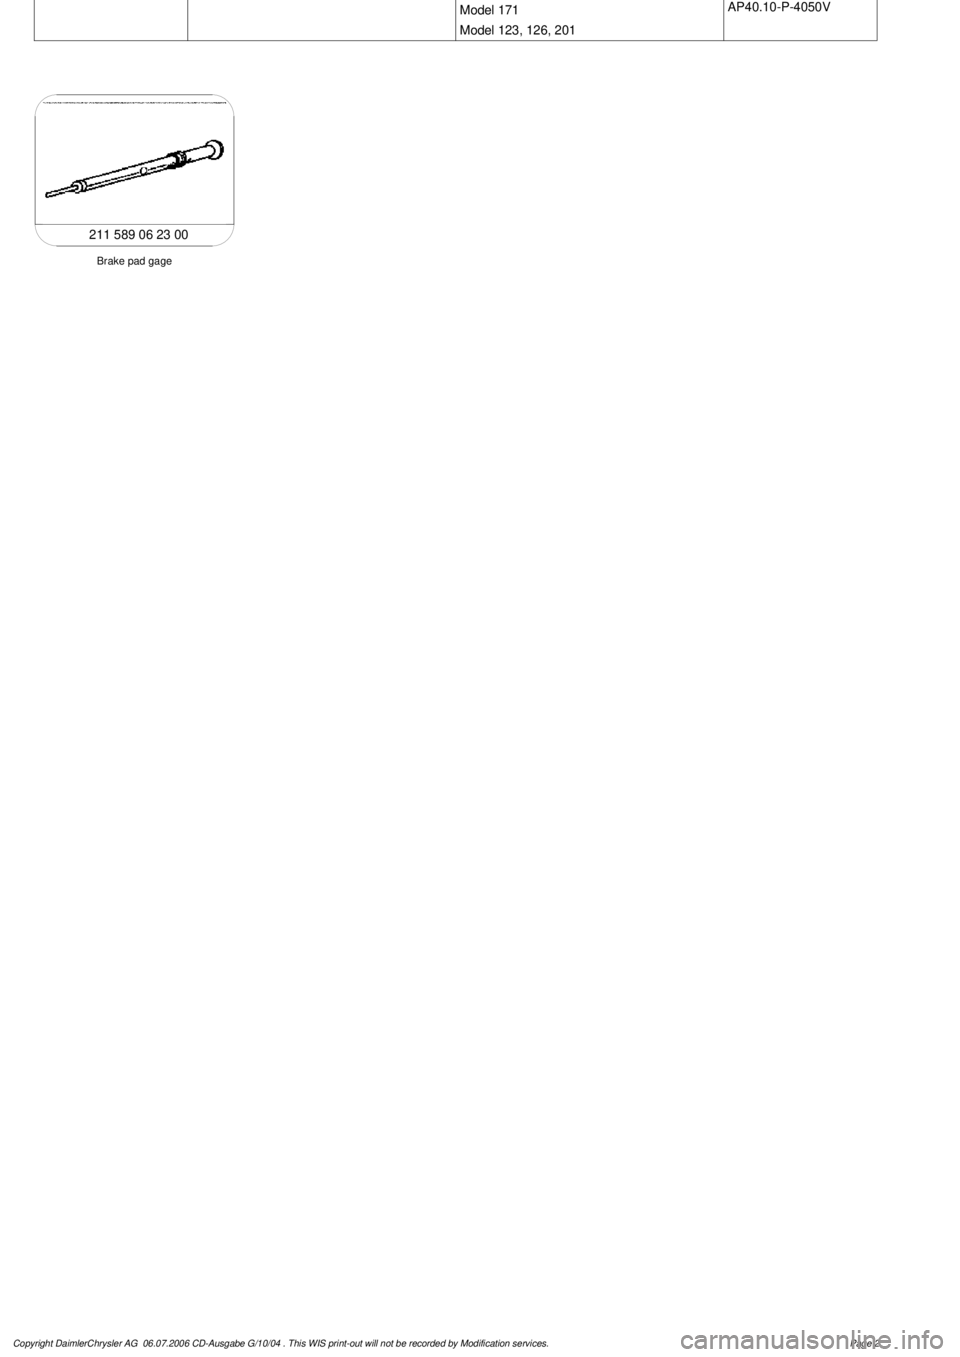
Brake pad gage
211 589 06 23 00
Copyright DaimlerChrysler AG 06.07.2006 CD-Ausgabe G/10/04 . This WIS print-out will not be recorde
d by Modification services.
Page 2
Page 2102 of 4133
BT27.60-P-0003-01A
Deletion of lever for shift lock cable ignition
lock at transmission
k
TRANSMISSION
722.700 ## as of 0129631 as of 24.1.01,
722.701 ## as of 0132072 as of 8.2.01
P27.60-0421-01
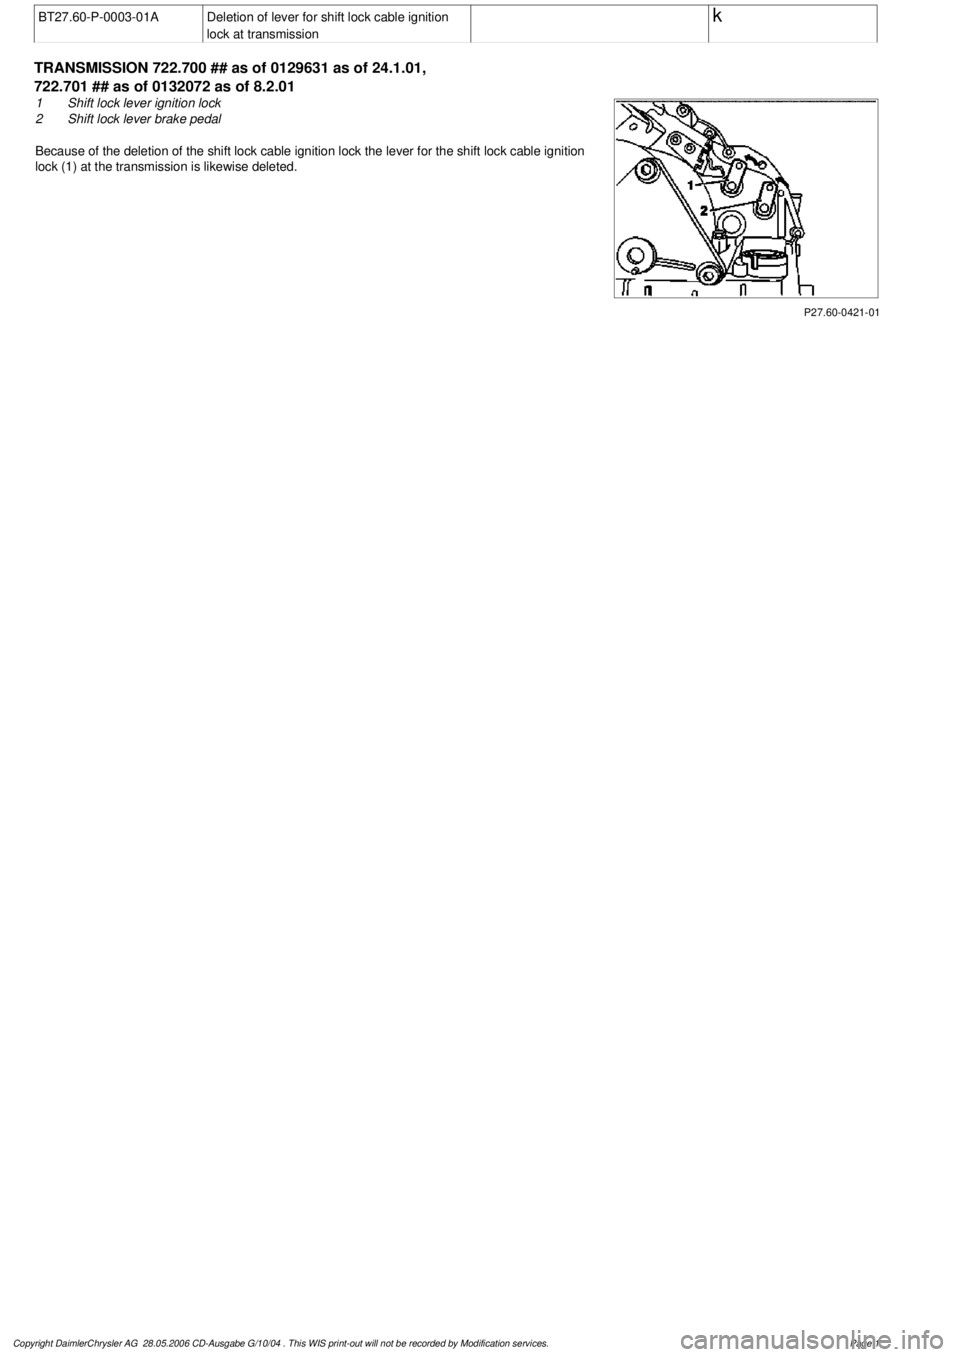
1
Shift lock lever ignition lock
2
Shift lock lever brake pedal
Because of the deletion of the shift lock cable ignition lock the lever for the shift lock cable ign
ition
lock (1) at the transmission is likewise deleted.
Copyright DaimlerChrysler AG 28.05.2006 CD-Ausgabe G/10/04 . This WIS print-out will not be recorde
d by Modification services.
Page 1
Page 2103 of 4133
BT27.60-P-0001-02A
Deletion shift lock cable ignition lock to
transmission
k
TRANSMISSION
722.7 in MODEL WDB168.### ## as of 548031 as of 10.1.01
P27.60-2187-06
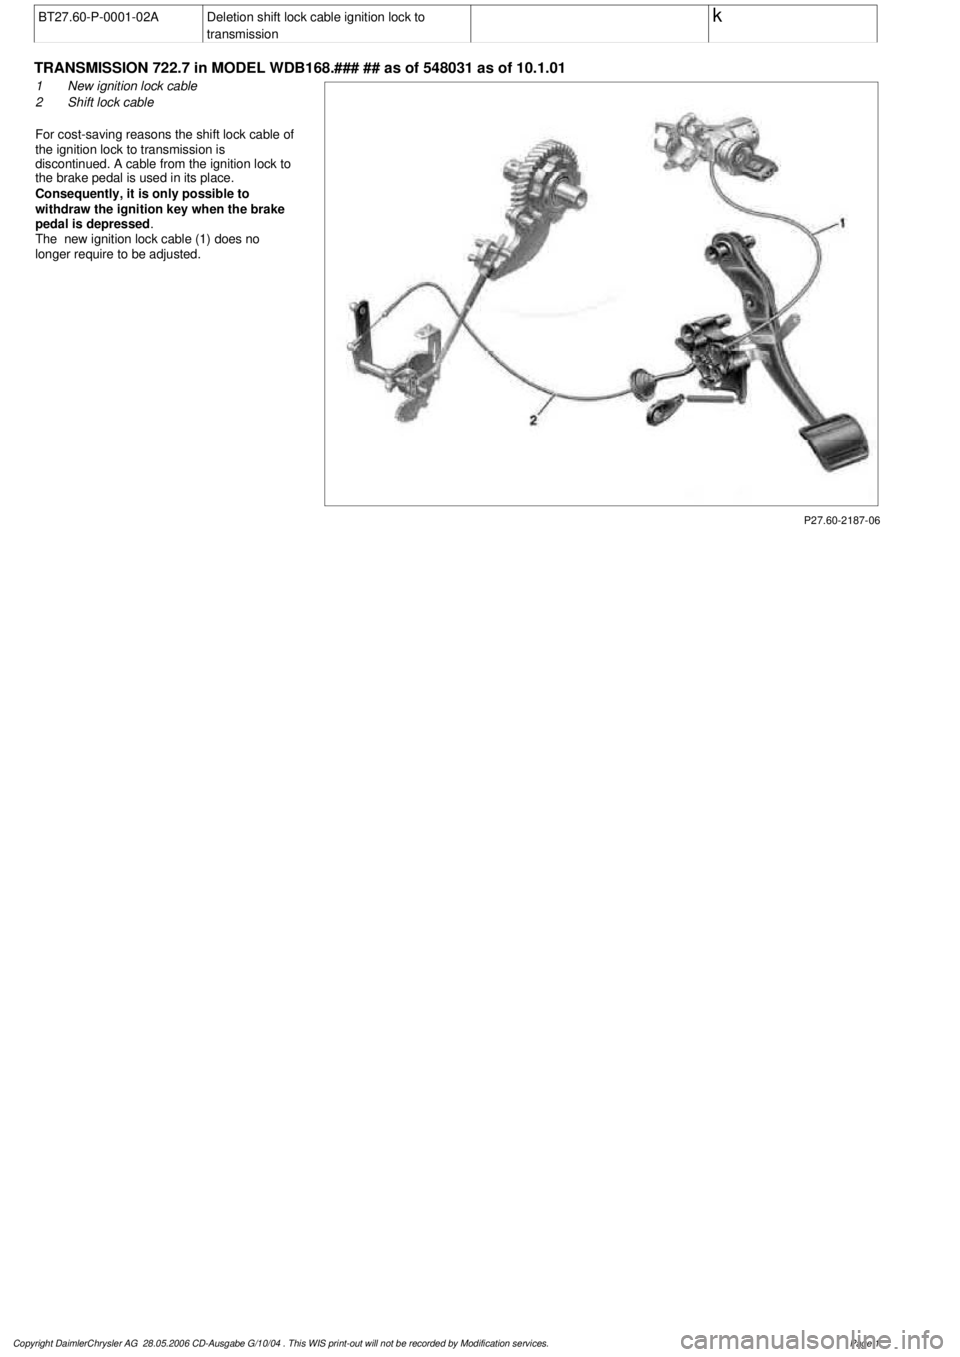
1
New ignition lock cable
2
Shift lock cable
For cost-saving reasons the shift lock cable of
the ignition lock to transmission is
discontinued. A cable from the ignition lock to
the brake pedal is used in its place.
Consequently, it is only possible to
withdraw the ignition key when the brake
pedal is depressed
.
The new ignition lock cable (1) does no
longer require to be adjusted.
Copyright DaimlerChrysler AG 28.05.2006 CD-Ausgabe G/10/04 . This WIS print-out will not be recorde
d by Modification services.
Page 1
Page 2106 of 4133

AD54.30-P-3000-03A
Display instruments/multi-function display
function check IC
Display
instruments
The display instruments must indicate according to operating
conditions.
Phototransistor (models 202, 208, 210)
Point a beam of light at the phototransistor with a pocket lamp, the
display illumination of the LCD displays (outside temperature, trip
odometer, total mileage recorder and electronic clock) must get
brighter.
Instrument cluster with multi-function display
If there are malfunctions (e.g. brake linings worn, coolant level too
low, exterior lamp failure etc.) or system faults (anti-lock brake
system faulty, supplemental restraint system faulty) the warning
display with warning information is inserted in place of outside
temperature, odometer, total mileage recorder and electronic clock.
The warning information is displayed in yellow or red depending on
the fault and a warning tone also sounds.
Copyright DaimlerChrysler AG 05.06.2006 CD-Ausgabe G/10/04 . This WIS print-out will not be recorde
d by Modification services.
Page 1
Page 2144 of 4133
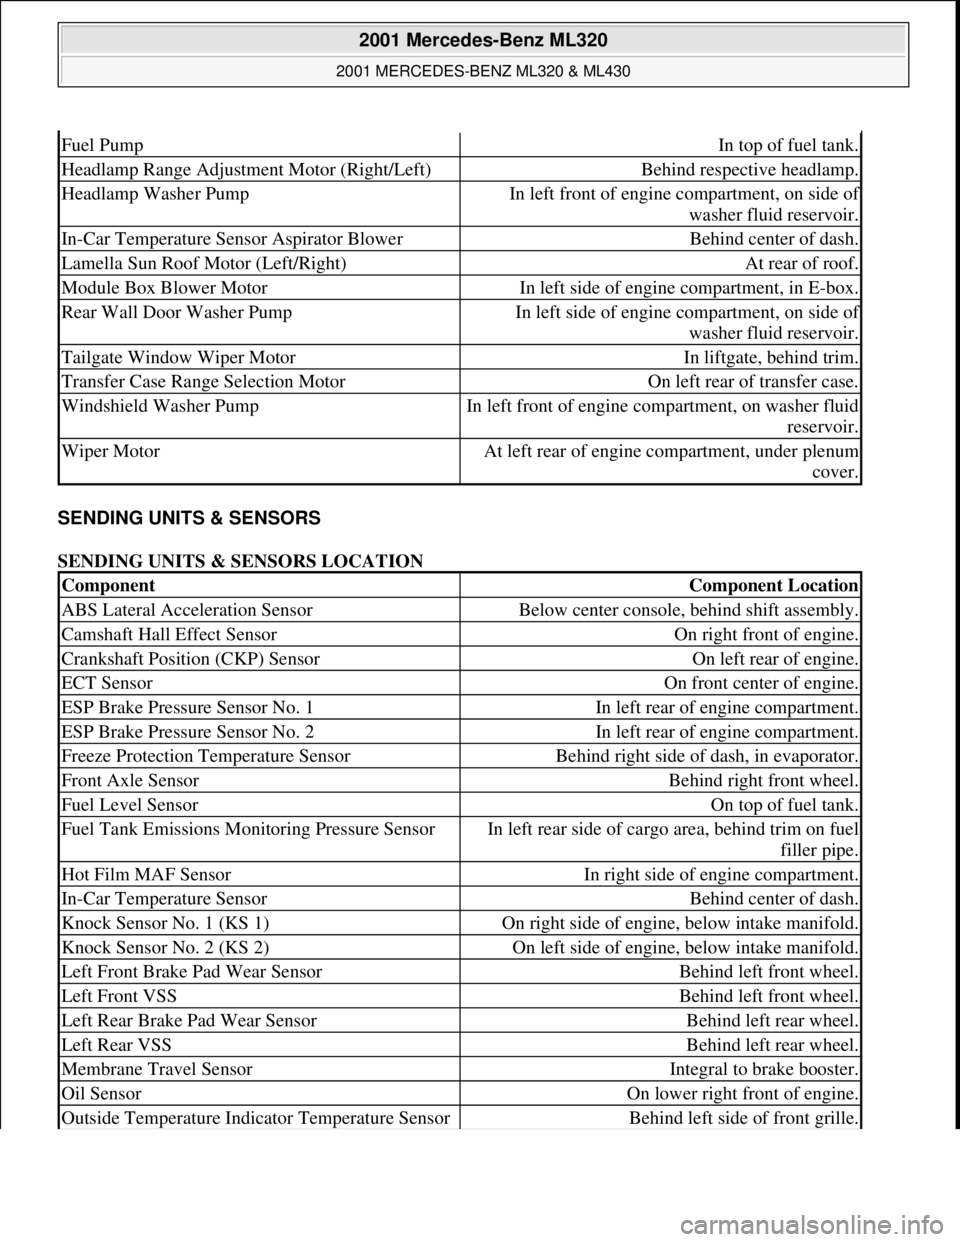
SENDING UNITS & SENSORS
SENDING UNITS & SENSORS LOCATION
Fuel PumpIn top of fuel tank.
Headlamp Range Adjustment Motor (Right/Left)Behind respective headlamp.
Headlamp Washer PumpIn left front of engine compartment, on side of
washer fluid reservoir.
In-Car Temperature Sensor Aspirator BlowerBehind center of dash.
Lamella Sun Roof Motor (Left/Right)At rear of roof.
Module Box Blower MotorIn left side of engine compartment, in E-box.
Rear Wall Door Washer PumpIn left side of engine compartment, on side of
washer fluid reservoir.
Tailgate Window Wiper MotorIn liftgate, behind trim.
Transfer Case Range Selection MotorOn left rear of transfer case.
Windshield Washer PumpIn left front of engine compartment, on washer fluid
reservoir.
Wiper MotorAt left rear of engine compartment, under plenum
cover.
ComponentComponent Location
ABS Lateral Acceleration SensorBelow center console, behind shift assembly.
Camshaft Hall Effect SensorOn right front of engine.
Crankshaft Position (CKP) SensorOn left rear of engine.
ECT SensorOn front center of engine.
ESP Brake Pressure Sensor No. 1In left rear of engine compartment.
ESP Brake Pressure Sensor No. 2In left rear of engine compartment.
Freeze Protection Temperature SensorBehind right side of dash, in evaporator.
Front Axle SensorBehind right front wheel.
Fuel Level SensorOn top of fuel tank.
Fuel Tank Emissions Monitoring Pressure SensorIn left rear side of cargo area, behind trim on fuel
filler pipe.
Hot Film MAF SensorIn right side of engine compartment.
In-Car Temperature SensorBehind center of dash.
Knock Sensor No. 1 (KS 1)On right side of engine, below intake manifold.
Knock Sensor No. 2 (KS 2)On left side of engine, below intake manifold.
Left Front Brake Pad Wear SensorBehind left front wheel.
Left Front VSSBehind left front wheel.
Left Rear Brake Pad Wear SensorBehind left rear wheel.
Left Rear VSSBehind left rear wheel.
Membrane Travel SensorIntegral to brake booster.
Oil SensorOn lower right front of engine.
Outside Temperature Indicator Temperature SensorBehind left side of front grille.
2001 Mercedes-Benz ML320
2001 MERCEDES-BENZ ML320 & ML430
me
Saturday, October 02, 2010 3:21:17 PMPage 4 © 2006 Mitchell Repair Information Company, LLC.
Page 2145 of 4133
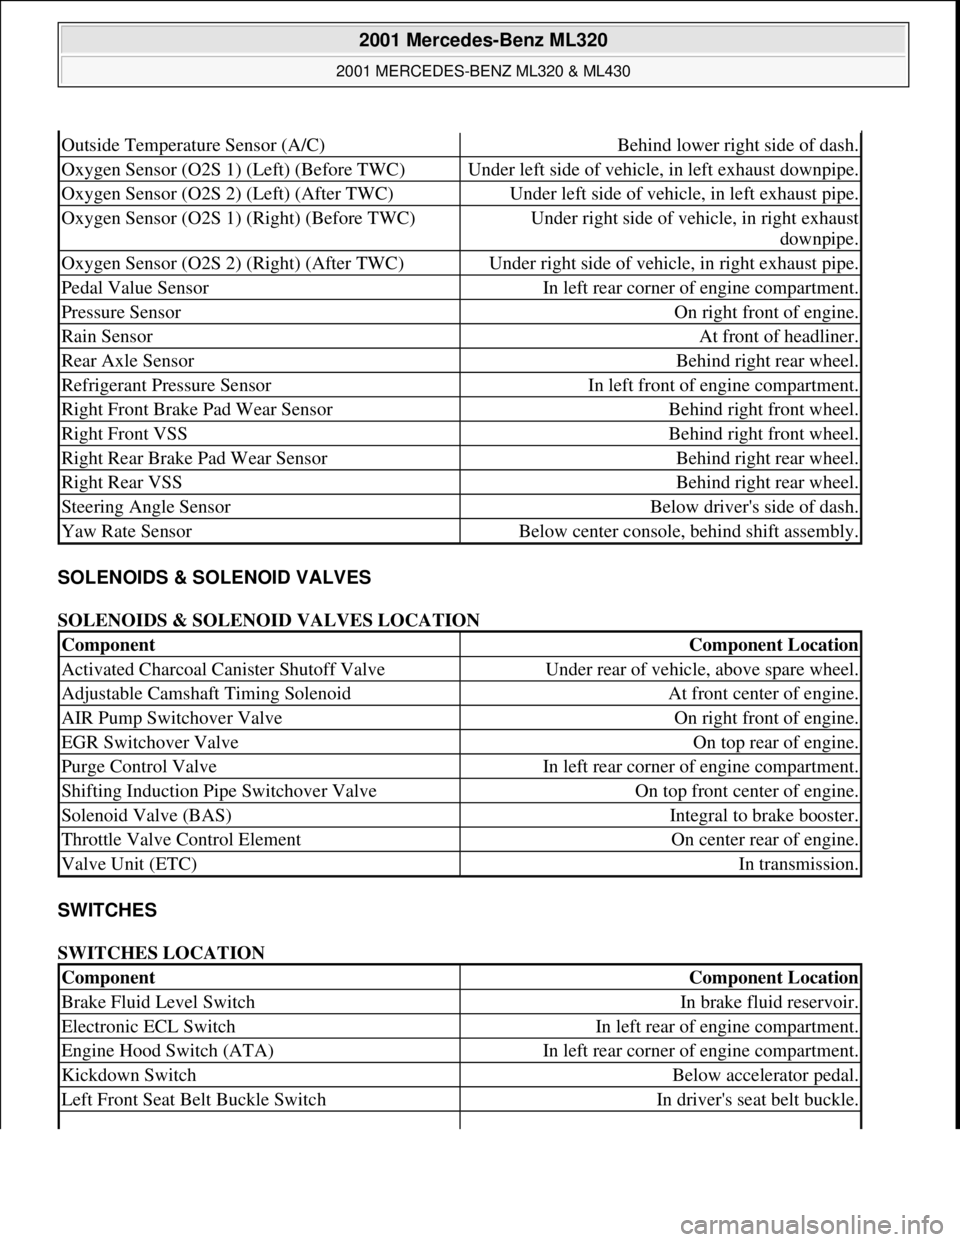
SOLENOIDS & SOLENOID VALVES
SOLENOIDS & SOLENOID VALVES LOCATION
SWITCHES
SWITCHES LOCATION
Outside Temperature Sensor (A/C)Behind lower right side of dash.
Oxygen Sensor (O2S 1) (Left) (Before TWC)Under left side of vehicle, in left exhaust downpipe.
Oxygen Sensor (O2S 2) (Left) (After TWC)Under left side of vehicle, in left exhaust pipe.
Oxygen Sensor (O2S 1) (Right) (Before TWC)Under right side of vehicle, in right exhaust
downpipe.
Oxygen Sensor (O2S 2) (Right) (After TWC)Under right side of vehicle, in right exhaust pipe.
Pedal Value SensorIn left rear corner of engine compartment.
Pressure SensorOn right front of engine.
Rain SensorAt front of headliner.
Rear Axle SensorBehind right rear wheel.
Refrigerant Pressure SensorIn left front of engine compartment.
Right Front Brake Pad Wear SensorBehind right front wheel.
Right Front VSSBehind right front wheel.
Right Rear Brake Pad Wear SensorBehind right rear wheel.
Right Rear VSSBehind right rear wheel.
Steering Angle SensorBelow driver's side of dash.
Yaw Rate SensorBelow center console, behind shift assembly.
ComponentComponent Location
Activated Charcoal Canister Shutoff ValveUnder rear of vehicle, above spare wheel.
Adjustable Camshaft Timing SolenoidAt front center of engine.
AIR Pump Switchover ValveOn right front of engine.
EGR Switchover ValveOn top rear of engine.
Purge Control ValveIn left rear corner of engine compartment.
Shifting Induction Pipe Switchover ValveOn top front center of engine.
Solenoid Valve (BAS)Integral to brake booster.
Throttle Valve Control ElementOn center rear of engine.
Valve Unit (ETC)In transmission.
ComponentComponent Location
Brake Fluid Level SwitchIn brake fluid reservoir.
Electronic ECL SwitchIn left rear of engine compartment.
Engine Hood Switch (ATA)In left rear corner of engine compartment.
Kickdown SwitchBelow accelerator pedal.
Left Front Seat Belt Buckle SwitchIn driver's seat belt buckle.
2001 Mercedes-Benz ML320
2001 MERCEDES-BENZ ML320 & ML430
me
Saturday, October 02, 2010 3:21:17 PMPage 5 © 2006 Mitchell Repair Information Company, LLC.
Page 2146 of 4133
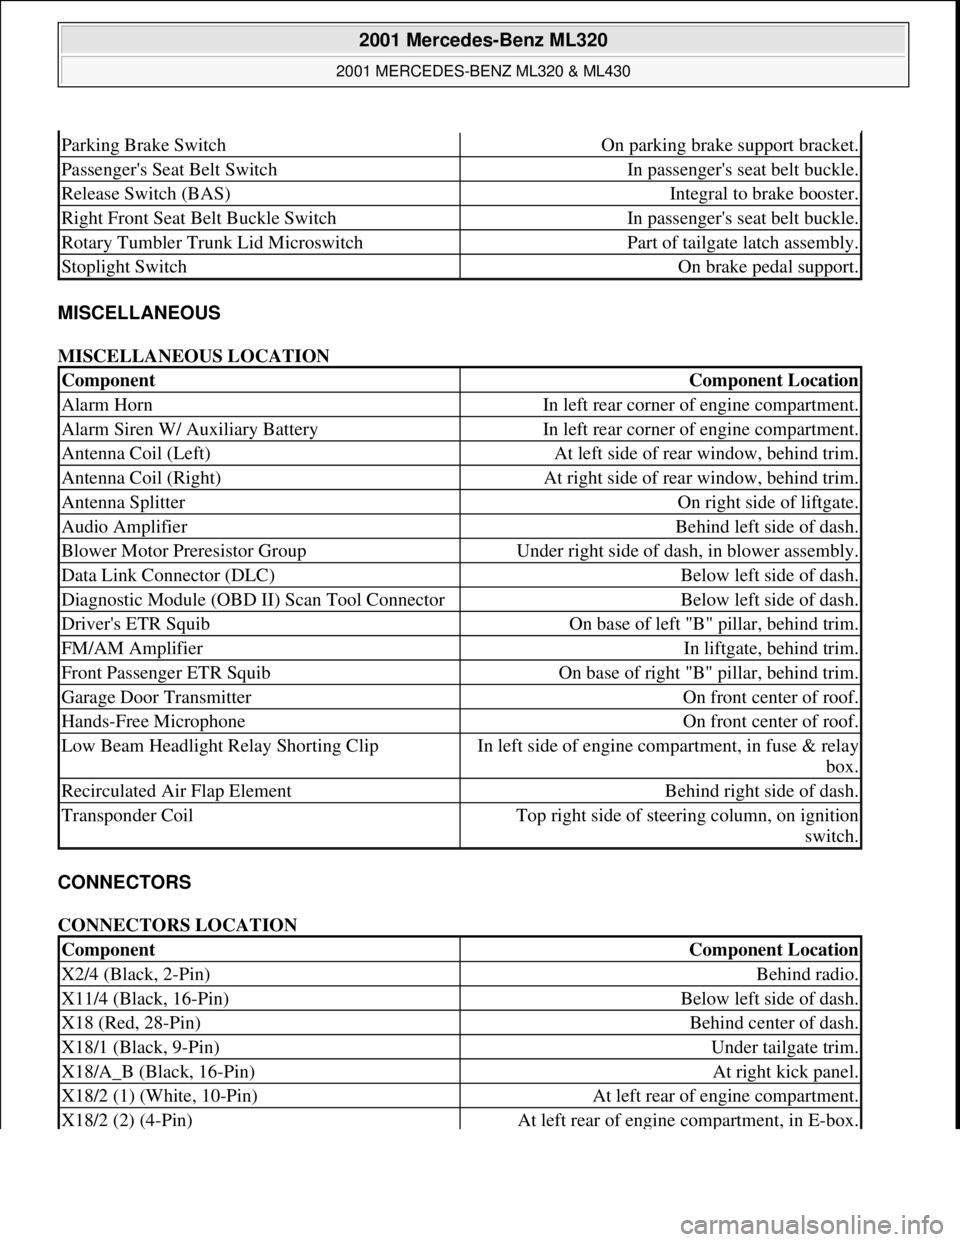
MISCELLANEOUS
MISCELLANEOUS LOCATION
CONNECTORS
CONNECTORS LOCATION
Parking Brake SwitchOn parking brake support bracket.
Passenger's Seat Belt SwitchIn passenger's seat belt buckle.
Release Switch (BAS)Integral to brake booster.
Right Front Seat Belt Buckle SwitchIn passenger's seat belt buckle.
Rotary Tumbler Trunk Lid MicroswitchPart of tailgate latch assembly.
Stoplight SwitchOn brake pedal support.
ComponentComponent Location
Alarm HornIn left rear corner of engine compartment.
Alarm Siren W/ Auxiliary BatteryIn left rear corner of engine compartment.
Antenna Coil (Left)At left side of rear window, behind trim.
Antenna Coil (Right)At right side of rear window, behind trim.
Antenna SplitterOn right side of liftgate.
Audio AmplifierBehind left side of dash.
Blower Motor Preresistor GroupUnder right side of dash, in blower assembly.
Data Link Connector (DLC)Below left side of dash.
Diagnostic Module (OBD II) Scan Tool ConnectorBelow left side of dash.
Driver's ETR SquibOn base of left "B" pillar, behind trim.
FM/AM AmplifierIn liftgate, behind trim.
Front Passenger ETR SquibOn base of right "B" pillar, behind trim.
Garage Door TransmitterOn front center of roof.
Hands-Free MicrophoneOn front center of roof.
Low Beam Headlight Relay Shorting ClipIn left side of engine compartment, in fuse & relay
box.
Recirculated Air Flap ElementBehind right side of dash.
Transponder CoilTop right side of steering column, on ignition
switch.
ComponentComponent Location
X2/4 (Black, 2-Pin)Behind radio.
X11/4 (Black, 16-Pin)Below left side of dash.
X18 (Red, 28-Pin)Behind center of dash.
X18/1 (Black, 9-Pin)Under tailgate trim.
X18/A_B (Black, 16-Pin)At right kick panel.
X18/2 (1) (White, 10-Pin)At left rear of engine compartment.
X18/2 (2) (4-Pin)At left rear of engine compartment, in E-box.
2001 Mercedes-Benz ML320
2001 MERCEDES-BENZ ML320 & ML430
me
Saturday, October 02, 2010 3:21:17 PMPage 6 © 2006 Mitchell Repair Information Company, LLC.