Page 3933 of 4133
Fig. 25: Identifying Rear Spring Strut Components
Remove/Install
Notes on self-locking nuts
and boltsAll modelsAH00.00-N-0001-01A
1Remove rear wheels
Remove/install wheels,
rotate if necessary AP40.10-P-4050GH
2.1Remove spare wheel Except with spare
wheel holder/spare wheel,
code 849 and model
163.174 (vehicle with
auxiliary fuel tank).
3.1Remove spare wheel
holder Except with spare
wheel holder/spare wheel,
code 849 and model
163.174 (vehicle with
auxiliary fuel tank).
Pull out locking pin.
Remove spare wheel
bracket from side rail.
4.1Remove wheel housing
lining On model 163.174
(vehicle with auxiliary
fuel tank).
5Pull off cover (75p) Installation: Pay
attention to correct
2001 Mercedes-Benz ML320
1998-2005 SUSPENSION Suspension - 163 Chassis
me
Saturday, October 02, 2010 3:37:36 PMPage 25 © 2006 Mitchell Repair Information Company, LLC.
Page 3945 of 4133
AP40.10-P-4054R
TIREFIT puncture sealing compound - check expiry date
11.6.01
MODEL
163, 168, 170
MODEL
171, 203, 209, 230, 240, 414 except CODE (669) Spare tire on steel rim
MODEL
209, 211.004 /006 /016 /023 /026 /028 /042 /043 /061 /065 /070 /080 /082 /083 /206 /216 /223 /226 /2 42 /243 /261
/265 /270 /280 /282 /283 /606 /616
except CODE (679) Spare tire in structural wheel design
except CODE (690) Compact spare tire as emergency wheel
MODEL
211.076/ 276
P40.10-2522-06
Model 170, 171, 203, 209, 230
Shown on model 230
1
Date of manufacture
2
Expiration date
3
Trunk floor paneling
P40.10-2530-05
Model 168
1
Date of manufacture
2
Expiration date
3
Trunk floor paneling
P40.10-2643-04
MODEL 211.0
1
Date of manufacture
2
Expiration date
3
Trunk floor paneling
Copyright DaimlerChrysler AG 06.07.2006 CD-Ausgabe G/10/04 . This WIS print-out will not be recorde
d by Modification services.
Page 1
Page 3989 of 4133

AR40.15-P-0080A
Remove/install wheel sensor
1.4.99
MODELS
210.074 /274 with CODE (475) Tire pressure indicator
MODELS
211 with CODE (475) Tire pressure indicator
MODELS
215 with CODE (475) Tire pressure indicator
MODELS
220 with CODE (475) Tire pressure indicator
MODELS
230 with CODE (475) Tire pressure indicator
MODELS
240 with CODE (475) Tire pressure indicator
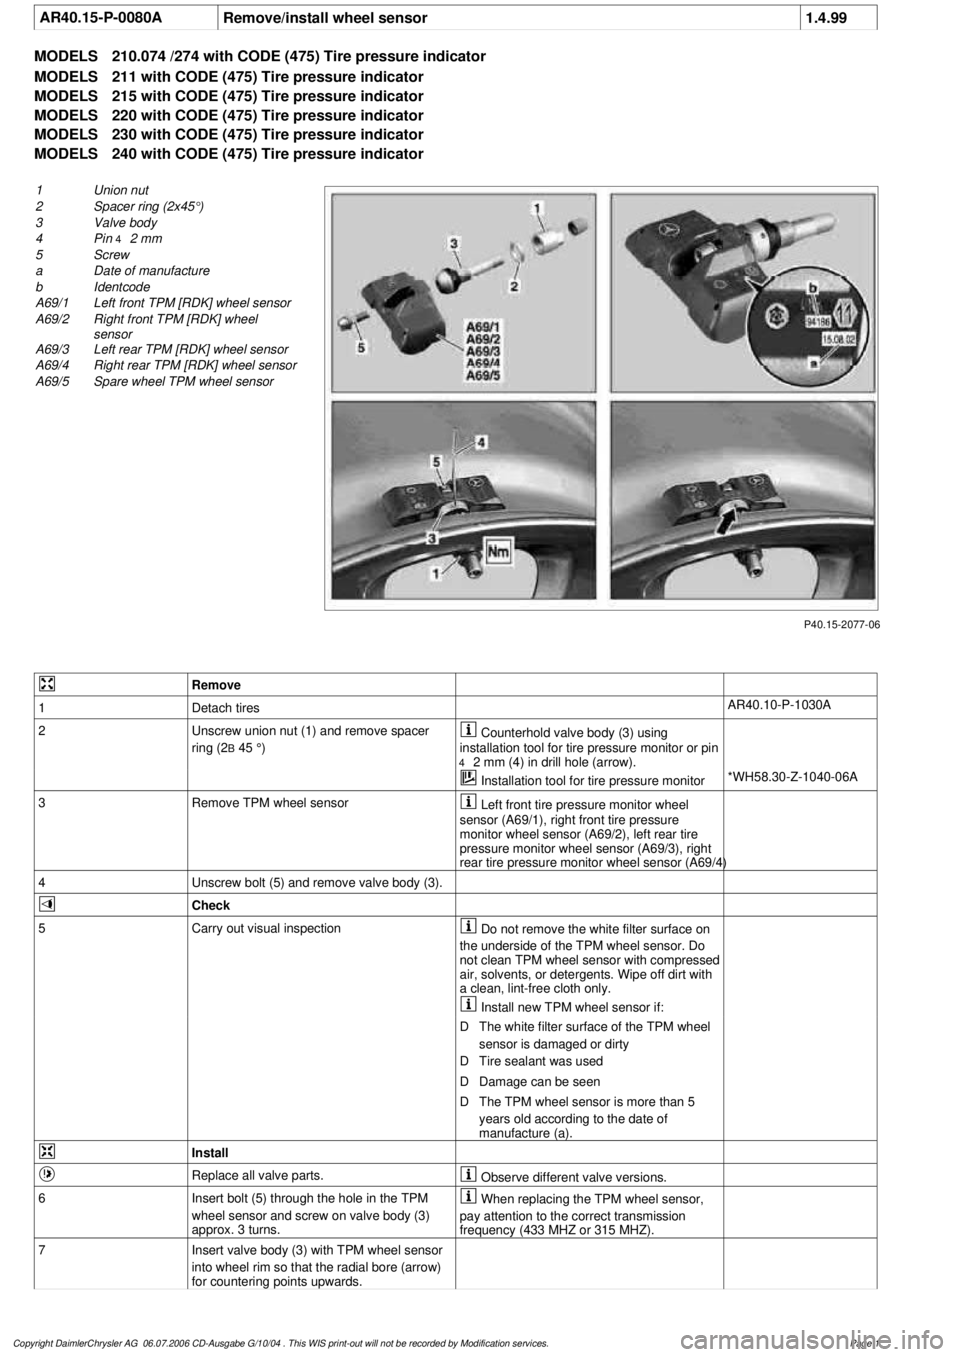
P40.15-2077-06
1
Union nut
2
Spacer ring (2x45°)
3
Valve body
4
Pin
4
2 mm
5
Screw
a
Date of manufacture
b
Identcode
A69/1
Left front TPM [RDK] wheel sensor
A69/2
Right front TPM [RDK] wheel
sensor
A69/3
Left rear TPM [RDK] wheel sensor
A69/4
Right rear TPM [RDK] wheel sensor
A69/5
Spare wheel TPM wheel sensor
Remove
1
Detach tires
AR40.10-P-1030A
2
Unscrew union nut (1) and remove spacer
ring (2
B
45 °)
Counterhold valve body (3) using
installation tool for tire pressure monitor or pin
4
2 mm (4) in drill hole (arrow).
Installation tool for tire pressure monitor
*WH58.30-Z-1040-06A
3
Remove TPM wheel sensor
Left front tire pressure monitor wheel
sensor (A69/1), right front tire pressure
monitor wheel sensor (A69/2), left rear tire
pressure monitor wheel sensor (A69/3), right
rear tire pressure monitor wheel sensor (A69/4)
4
Unscrew bolt (5) and remove valve body (3).
Check
5
Carry out visual inspection
Do not remove the white filter surface on
the underside of the TPM wheel sensor. Do
not clean TPM wheel sensor with compressed
air, solvents, or detergents. Wipe off dirt with
a clean, lint-free cloth only.
Install new TPM wheel sensor if:
D
The white filter surface of the TPM wheel
sensor is damaged or dirty
D
Tire sealant was used
D
Damage can be seen
D
The TPM wheel sensor is more than 5
years old according to the date of
manufacture (a).
Install
Replace all valve parts.
Observe different valve versions.
6
Insert bolt (5) through the hole in the TPM
wheel sensor and screw on valve body (3)
approx. 3 turns.
When replacing the TPM wheel sensor,
pay attention to the correct transmission
frequency (433 MHZ or 315 MHZ).
7
Insert valve body (3) with TPM wheel sensor
into wheel rim so that the radial bore (arrow)
for countering points upwards.
Copyright DaimlerChrysler AG 06.07.2006 CD-Ausgabe G/10/04 . This WIS print-out will not be recorde
d by Modification services.
Page 1
Page 3994 of 4133

AP40.10-P-4050GH
Remove/install wheels, rotate if necessary
15.7.97
MODEL
163
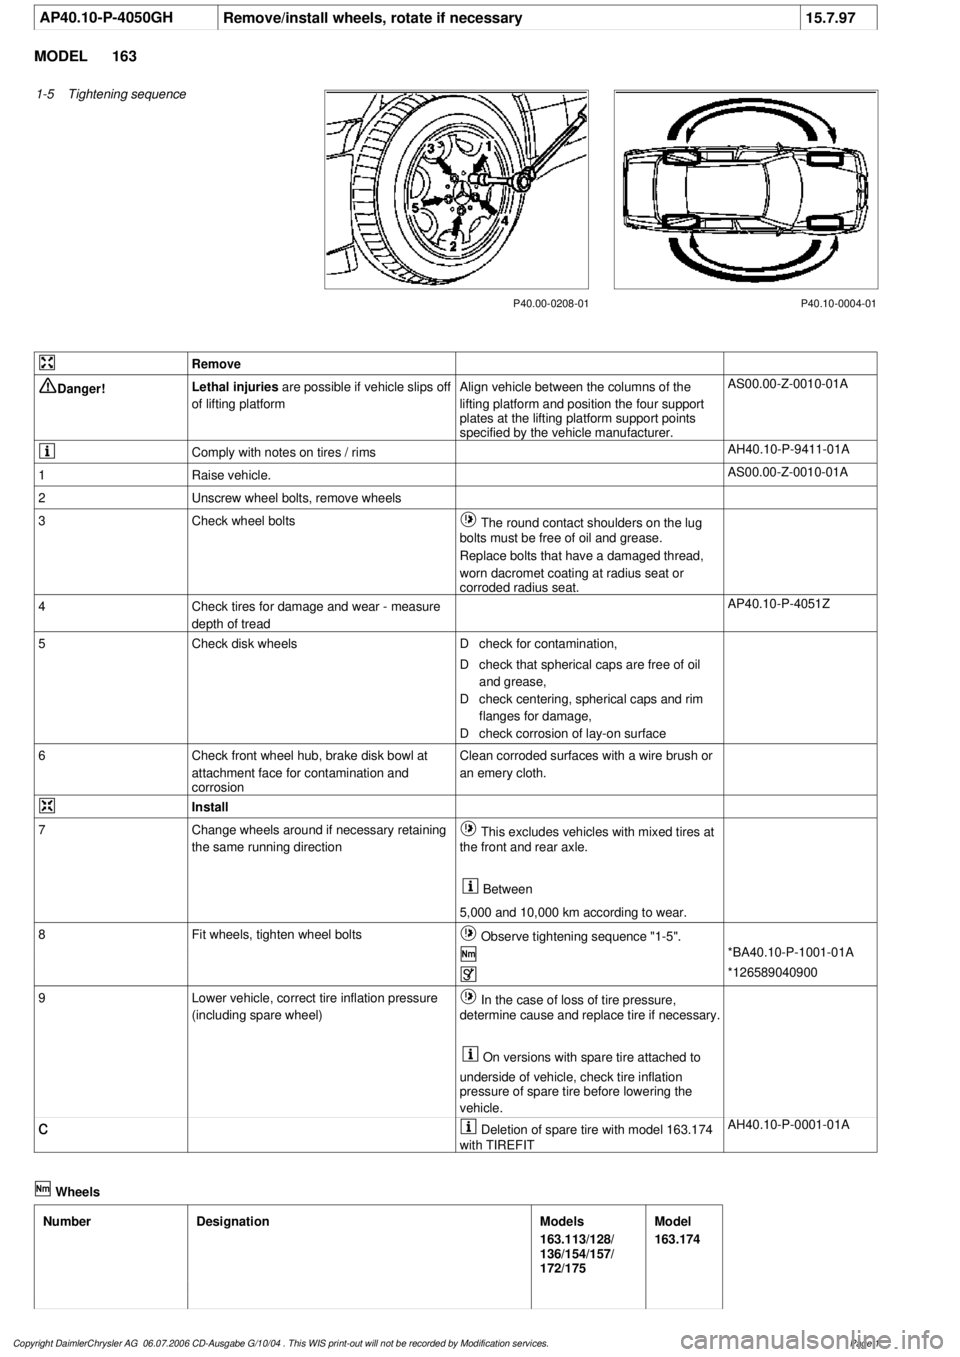
1-5
Tightening sequence
P40.10-0004-01
P40.00-0208-01
Remove
Danger!
Lethal injuries
are possible if vehicle slips off
of lifting platform
Align vehicle between the columns of the
lifting platform and position the four support
plates
at the lifting platform support points
specified by the vehicle manufacturer.
AS00.00-Z-0010-01A
Comply with notes on tires / rims
AH40.10-P-9411-01A
1
Raise vehicle.
AS00.00-Z-0010-01A
2
Unscrew wheel bolts, remove wheels
3
Check wheel bolts
The round contact shoulders on the lug
bolts must be free of oil and grease.
Replace bolts that have a damaged thread,
worn dacromet coating at radius seat or
corroded radius seat.
4
Check tires for damage and wear - measure
depth of tread
AP40.10-P-4051Z
5
Check disk wheels
D
check for contamination,
D
check that spherical caps are free of oil
and grease,
D
check centering, spherical caps and rim
flanges for damage,
D
check corrosion of lay-on surface
6
Check front wheel hub, brake disk bowl at
attachment face for contamination and
corrosion
Clean corroded surfaces with a wire brush or
an emery cloth.
Install
7
Change wheels around if necessary retaining
the same running direction
This excludes vehicles with mixed tires at
the front and rear axle.
Between
5,000 and 10,000 km according to wear.
8
Fit wheels, tighten wheel bolts
Observe tightening sequence "1-5".
*BA40.10-P-1001-01A
*126589040900
9
Lower vehicle, correct tire inflation pressure
(including spare wheel)
In the case of loss of tire pressure,
determine cause and replace tire if necessary.
On versions with spare tire attached to
underside of vehicle, check tire inflation
pressure of spare tire before lowering the
vehicle.
c
Deletion of spare tire with model 163.174
with TIREFIT
AH40.10-P-0001-01A
Wheels
Number
Designation
Models
163.113/128/
136/154/157/
172/175
Model
163.174
Copyright DaimlerChrysler AG 06.07.2006 CD-Ausgabe G/10/04 . This WIS print-out will not be recorde
d by Modification services.
Page 1