Page 1031 of 4133

227 Operation
Tires and wheels
Life of tire
The service life of a tire is dependent upon
varying factors including but not limited to:�
Driving style
�
Tire pressure
�
Distance driven
Direction of rotation
Unidirectional tires offer added advantag-
es, such as better hydroplaning perfor-
mance. To benefit, however, you must
ensure that the tires rotate in the direction
specified.
An arrow on the sidewall indicates the in-
tended direction of rotation of the tire.
Checking tire inflation pressure
Correct the tire pressure only when tires
are cold.
Regularly check your tire pressure at inter-
vals of no more than 14 days.
If the tires are warm, you should only cor-
rect the tire pressure if it is too low for cur-
rent operating conditions.
A table on the fuel filler flap lists the spec-
ified tire inflation pressures for warm and
cold tires as well as for various operating
conditions.
!When the wheels are heavily soiled,
e.g. after driving through mud, clean
the inside of the wheels with a jet of
water.Warning!
G
Tires and spare tire should be replaced after
six years, regardless of the remaining tread.
!Keep unmounted tires in a cool, dry
place with as little exposure to light as
possible. Protect tires from contact
with oil, grease and gasoline.
Warning!
G
If the tire pressure drops repeatedly:�
Check the tires for punctures from for-
eign objects.
�
Check to see whether air is leaking from
the valves or from around the rim.
Page 1032 of 4133
 per 18°F (10°C) of air
temperature change. Keep this in mind
when checking tire pressure where the
temperatu")
228 OperationTires and wheelsTire pressure changes by approximately
1.5 psi (0.1 bar) per 18°F (10°C) of air
temperature change. Keep this in mind
when checking tire pressure where the
temperature is different from the outside
temperature.
Tire temperature and tire pressure are also
increased while driving, depending on the
driving speed and the tire load.Check the spare tire periodically for condi-
tion and inflation. Spare tire will age and
b e c o m e w o r n o v e r t i m e e v e n i f n e v e r u s e d ,
and thus should be inspected and replaced
when necessary.
Rotating wheels
The wheels can be rotated every 3000 to
6000 miles (5 000 to 10 000 km) or soon-
er if necessary, according to the degree of
tire wear. The same direction of tire rota-
tion must be retained.
Rotate the wheels before the characteris-
tic tire wear pattern becomes visible
(shoulder wear on front wheels and tread
center wear on rear wheels).
Thoroughly clean the inner side of the
wheels after each rotation. Check and en-
sure proper tire inflation pressure.
iThe pressures listed for light loads are
minimum values offering high driving
comfort.
Increased inflation pressures listed for
heavier loads may also be used for light
loads. These higher pressures produce
favorable handling characteristics. The
ride of the vehicle, however, will be
somewhat harder. Never exceed the
max. values or inflate tires below the
min. values listed in the fuel filler flap.
Warning!
G
Follow recommended inflation pressures.
Do not overinflate tires. Overinflated tires
can result in sudden deflation (blowout) be-
cause they are more likely to become punc-
tured or damaged by road debris, potholes,
etc.
Do not underinflate tires. Underinflated tires
wear unevenly, adversely affect handling
and fuel economy, and are more likely to fail
from being overheated.
Do not overload the tires by exceeding the
Gross Vehicle Weight Rating (GVWR) and
the Gross Axle Weight Rating (GAWR) as
indicated on the certification label on the
driver’s door pillar. Overloading the tires can
overheat them, possibly causing a blowout.
Warning!
G
Rotate front and rear wheels only if they are
of the same size,
Page 1034 of 4133

230 OperationWinter driving
�Winter drivingBefore the onset of winter, have your vehi-
cle winterized at an authorized
Mercedes-Benz Light Truck Center. This
service includes:�
Check of anticorrosion and antifreeze
concentration.
�
Addition of cleaning concentrate to the
water of the windshield and headlamp
cleaning system. Add MB Concentrate
“S” to a premixed windshield washer
solvent / antifreeze which is formulated
for temperatures below freezing point
(�page 307).
�
Battery test. Battery capacity drops
with decreasing ambient temperature.
A well charged battery helps to ensure
that the engine can be started even at
low ambient temperatures.
�
Tire change. Mercedes-Benz recom-
mends M+S rated radial-ply tires with a
minimum tread depth of approximately 1/6in (4 mm) on all four wheels for the
winter season.
Winter tires
Always use winter tires at temperatures
below 45°F (7°C) and whenever wintry
road conditions prevail. Use of winter tires
is the only way to achieve the maximum ef-
fectiveness of the ABS, ESP, 4-ETS, and
EBP in winter operation.
For safe handling, ensure that all winter
tires mounted are of the same make and
have the same tread design.Always observe the speed rating of the
winter tires installed on your vehicle. If the
maximum speed for which your tires are
rated is below the speed rating of your ve-
hicle, you must place a notice to this effect
where it will be seen by the driver. Such no-
tices are available at your tire dealer or any
authorized Mercedes-Benz Light Truck
Center.Warning!
G
Winter tires with a tread depth under
1/6in
(4 mm) must be replaced. They are no long-
er suitable for winter operation.
Warning!
G
If you use your spare tire when winter tires
are fitted on the other wheels, be aware that
the difference in tire characteristics may
very well impair turning stability and that
overall driving stability may be reduced.
Adapt your driving style accordingly.
Have the spare tire replaced with a winter
tire at the nearest authorized
Mercedes-Benz Light Truck Center.
Page 1063 of 4133

Use the spare wheel only temporarily,
while observing the following restrictions:�
Do not exceed vehicle speed of
50 mph (80")
259 Practical hints
Where will I find ...?
Spare wheel (space-saver tire)
Use the spare wheel only temporarily,
while observing the following restrictions:�
Do not exceed vehicle speed of
50 mph (80 km / h).
�
Drive to the nearest repair facility to
have the flat tire repaired or replaced
as appropriate.
�
Do not operate vehicle with more than
one spare wheel mounted.Removing spare wheel
The spare wheel is located behind the rear
bumper.
1Cover
�
Hold left and right side of cover1 and
pull away from bumper.2Screw
3Spare wheel carrier
4Lever
�
Turn screw2 counterclockwise using
the wrench (
�page 258).
Screw2 remains in spare wheel
carrier3.
�
Lift spare wheel carrier slightly and
push lever4 to the right using screw-
driver (
�page 257).
�
Swing spare wheel carrier3 down and
pull it out from under the bumper.
Warning!
G
The dimensions of the spare wheel are dif-
ferent from those of the road wheels. As a
result, the vehicle handling characteristics
change when driving with a mounted spare
wheel.iPlease comply with the instructions for
“Mounting the spare wheel”
(�page 274).
Warning!
G
Exercise care when removing or installing
spare wheel to prevent personal injury.
��
Page 1064 of 4133
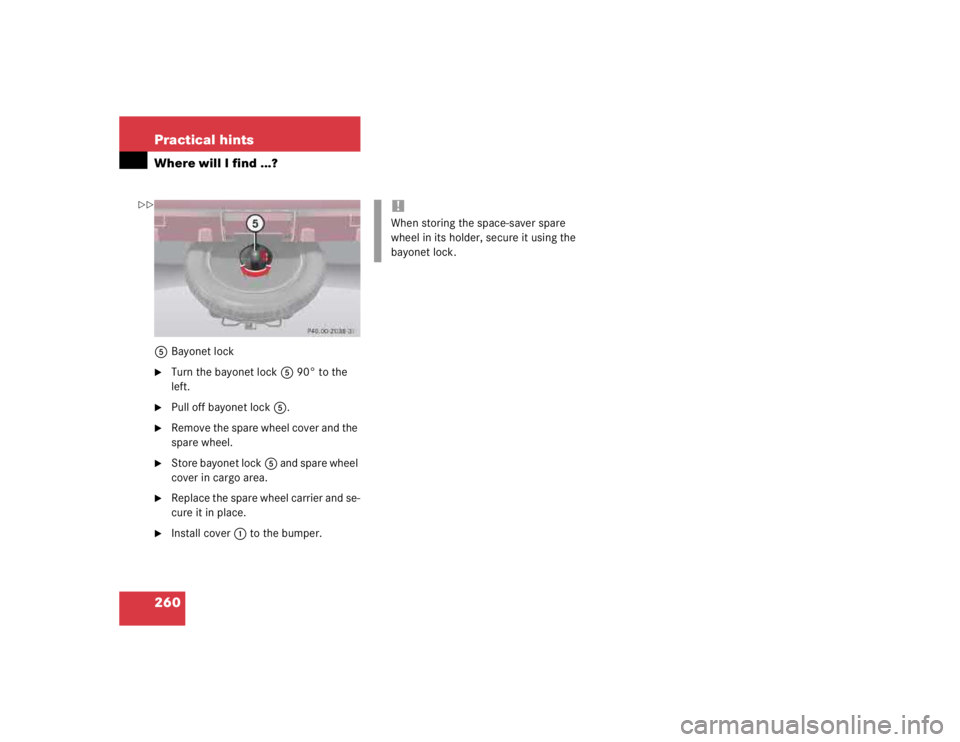
260 Practical hintsWhere will I find ...?5Bayonet lock�
Turn the bayonet lock5 90° to the
left.
�
Pull off bayonet lock5.
�
Remove the spare wheel cover and the
spare wheel.
�
Store bayonet lock5 and spare wheel
cover in cargo area.
�
Replace the spare wheel carrier and se-
cure it in place.
�
Install cover1 to the bumper.
!When storing the space-saver spare
wheel in its holder, secure it using the
bayonet lock.
��
Page 1078 of 4133

274 Practical hintsFlat tire
�Flat tireMounting the spare wheel Preparing the vehicle
�
Park the vehicle as far as possible from
moving traffic on a hard surface.
�
Turn on the hazard warning flashers.
�
Engage the steering wheel lock in the
straight ahead position and set the
parking brake.
�
Move the gear selector lever toP.
�
Have any passenger exit the vehicle at
a safe distance from the roadway.
�
Take the spare wheel out of its carrier
(�page 259).Lifting the vehicle
�
Prevent the vehicle from rolling away
by blocking wheels with wheel chocks
(not included) or other sizable objects.
When changing wheel on a level surface:
�
Place one chock in front of and one be-
hind the wheel that is diagonally oppo-
site to the wheel being changed.
When changing wheel on a hill:
�
Place chocks on the downhill side
blocking both wheels of the other axle.
�
Take the two-piece wheel wrench and
the jack out of the rear compartment
area (
�page 257). Assemble wheel
wrench.
Warning!
G
The dimensions of the spare wheel are dif-
ferent from those of the road wheels. As a
result, the vehicle handling characteristics
change when driving with a mounted spare
wheel. Adapt your driving style accordingly.
The spare wheel is for temporary use only.
When driving with spare wheel mounted, en-
sure proper tire pressure and do not exceed
vehicle speed of 50 mph (80 km / h).
Drive to the nearest Mercedes-Benz Light
Truck Center as soon as possible to have the
spare wheel replaced with a regular road
wheel.
Never operate the vehicle with more than
one spare wheel mounted.
Page 1080 of 4133

276 Practical hintsFlat tireRemoving the wheel�
Unscrew and remove all wheel bolts.
�
Remove the remaining bolts.
�
Grip the wheel from the sides and re-
move it.
Mounting the new wheel
�
Clean contact surfaces of wheel and
wheel hub.
�
Install spare wheel on wheel hub.
�
Insert wheel bolts and tighten them
slightly.Lowering the vehicle
�
Lower vehicle by turning crank coun-
terclockwise until vehicle is resting ful-
ly on its own weight.
�
Remove the jack.
!Do not place wheel bolts in sand or dirt.
This could result in damage to the bolt
and wheel hub threads.!To avoid paint damage, place wheel flat
against hub and hold it there while in-
stalling first wheel bolt.
Warning!
G
Always replace wheel bolts that are dam-
aged or rusted.
Never apply oil or grease to wheel bolts.
Damaged wheel hub threads should be re-
paired immediately. Do not continue to drive
under these circumstances! Contact an au-
thorized Mercedes-Benz Light Truck Center
or call Roadside Assistance.
Incorrect wheel bolts or improperly tight-
ened wheel bolts can cause the wheel to
come off. This could cause an accident.
Make sure to use the correct wheel bolts.
Warning!
G
Use only genuine equipment
Mercedes-Benz wheel bolts. Other wheel
bolts may come loose.
Do not tighten the wheel bolts when the ve-
hicle is raised. Otherwise the vehicle could
tip over.
Page 1081 of 4133
277 Practical hints
Flat tire
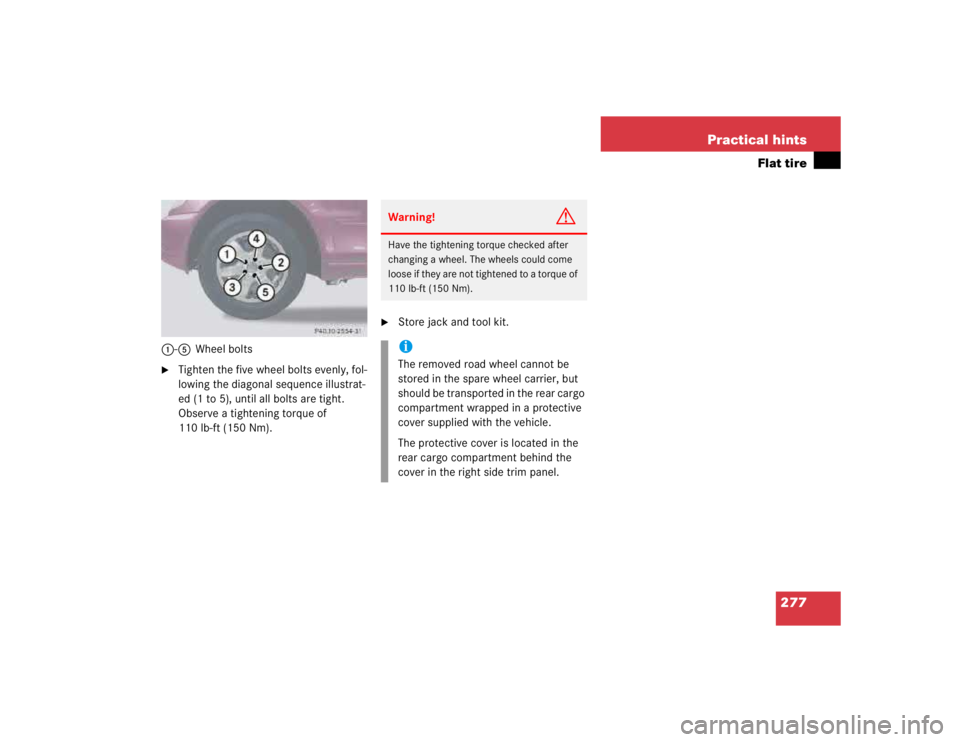
1-5Wheel bolts�
Tighten the five wheel bolts evenly, fol-
lowing the diagonal sequence illustrat-
ed (1 to 5), until all bolts are tight.
Observe a tightening torque of
110 lb-ft (150 Nm).
�
Store jack and tool kit.Warning!
G
Have the tightening torque checked after
changing a wheel. The wheels could come
loose if they are not tightened to a torque of
110 lb-ft (150 Nm).iThe removed road wheel cannot be
stored in the spare wheel carrier, but
should be transported in the rear cargo
compartment wrapped in a protective
cover supplied with the vehicle.
The protective cover is located in the
rear cargo compartment behind the
cover in the right side trim panel.