1997 ISUZU TFS SERIES lock
[x] Cancel search: lockPage 36 of 1600

4B-40 REAR AXLE
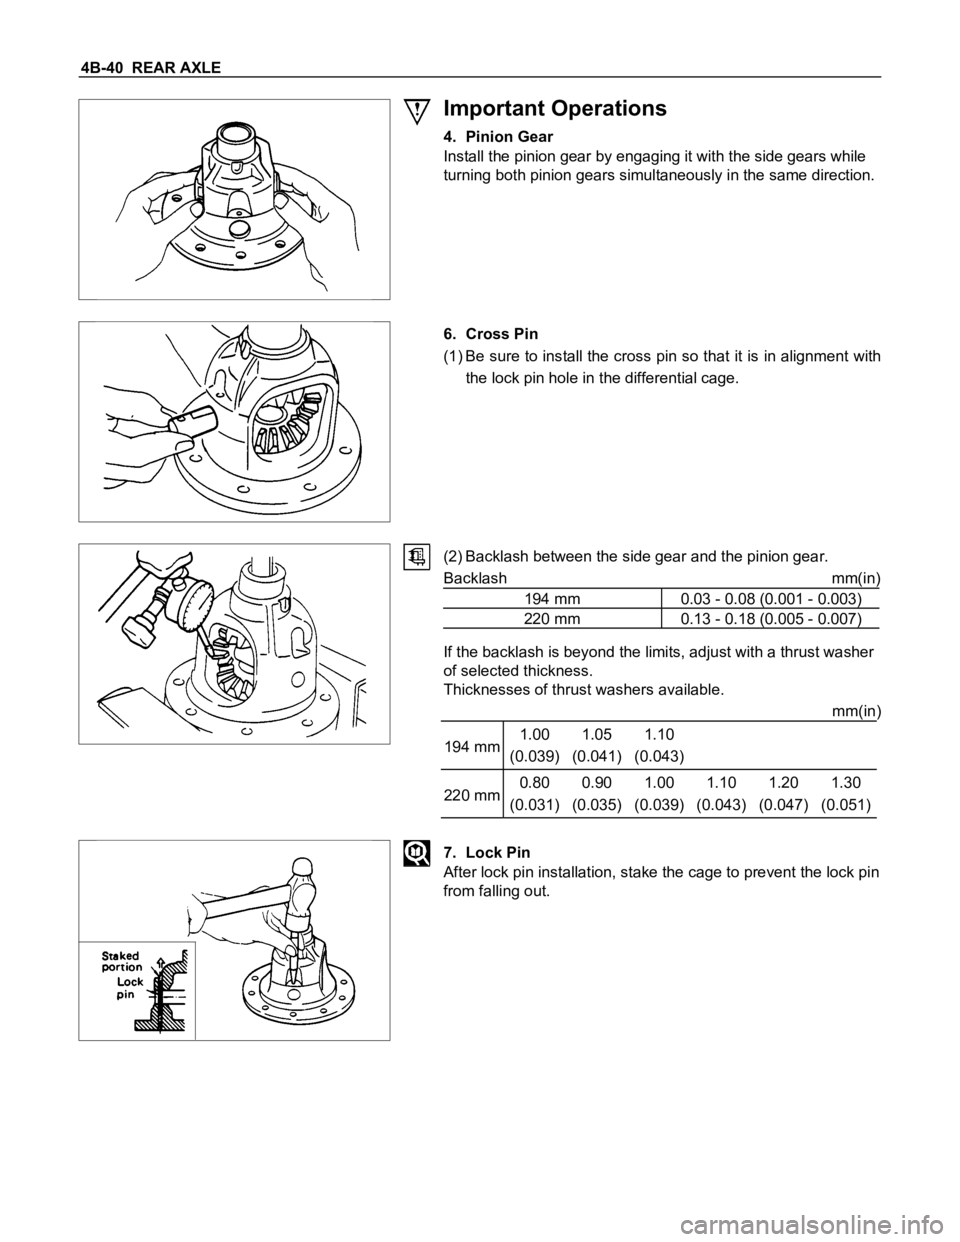
Important Operations
4. Pinion Gear
Install the pinion gear by engaging it with the side gears while
turning both pinion gears simultaneously in the same direction.
6. Cross Pin
(1) Be sure to install the cross pin so that it is in alignment with
the lock pin hole in the differential cage.
(2) Backlash between the side gear and the pinion gear.
Backlash mm(in)
194 mm 0.03 - 0.08 (0.001 - 0.003)
220 mm 0.13 - 0.18 (0.005 - 0.007)
If the backlash is beyond the limits, adjust with a thrust washer
of selected thickness.
Thicknesses of thrust washers available.
mm(in)
194 mm1.00
(0.039)1.05
(0.041)1.10
(0.043)
220 mm0.80
(0.031)0.90
(0.035)1.00
(0.039)1.10
(0.043)1.20
(0.047)1.30
(0.051)
7. Lock Pin
After lock pin installation, stake the cage to prevent the lock pin
from falling out.
Page 40 of 1600

4B-44 REAR AXLE
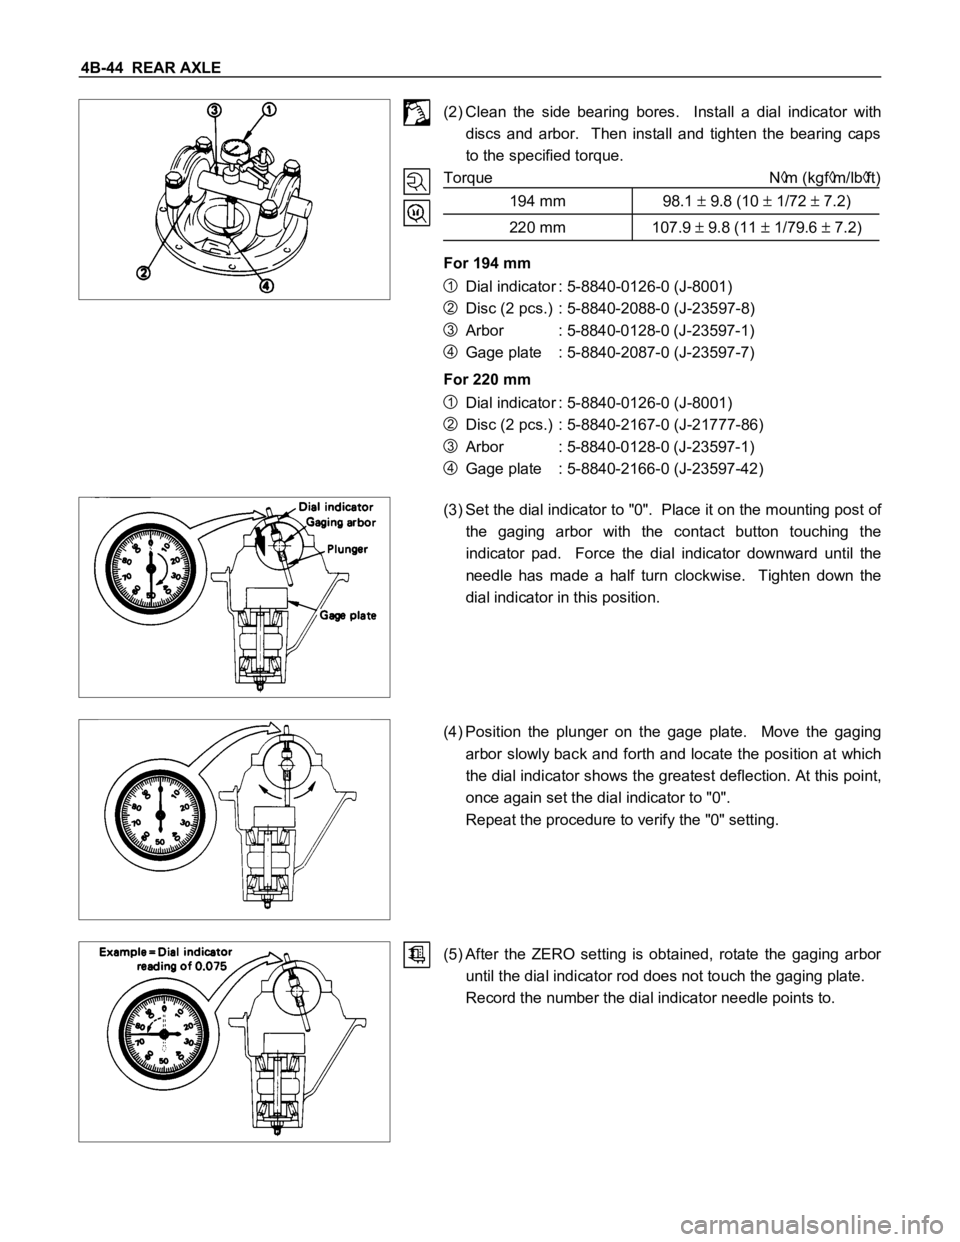
(2) Clean the side bearing bores. Install a dial indicator with
discs and arbor. Then install and tighten the bearing caps
to the specified torque.
Torque N
m (kgfm/lbft)
194 mm 98.1
9.8 (10 1/72 7.2)
220 mm 107.9 9.8 (11 1/79.6 7.2)
For 194 mm
1Dial indicator : 5-8840-0126-0 (J-8001)
2Disc (2 pcs.) : 5-8840-2088-0 (J-23597-8)
3Arbor : 5-8840-0128-0 (J-23597-1)
4Gage plate : 5-8840-2087-0 (J-23597-7)
For 220 mm
1Dial indicator : 5-8840-0126-0 (J-8001)
2Disc (2 pcs.) : 5-8840-2167-0 (J-21777-86)
3Arbor : 5-8840-0128-0 (J-23597-1)
4Gage plate : 5-8840-2166-0 (J-23597-42)
(3) Set the dial indicator to "0". Place it on the mounting post of
the gaging arbor with the contact button touching the
indicator pad. Force the dial indicator downward until the
needle has made a half turn clockwise. Tighten down the
dial indicator in this position.
(4) Position the plunger on the gage plate. Move the gaging
arbor slowly back and forth and locate the position at which
the dial indicator shows the greatest deflection. At this point,
once again set the dial indicator to "0".
Repeat the procedure to verify the "0" setting.
(5) After the ZERO setting is obtained, rotate the gaging arbor
until the dial indicator rod does not touch the gaging plate.
Record the number the dial indicator needle points to.
Page 55 of 1600

REAR AXLE 4B-59
3. OIL LEAKAGE
1) Differential Carrier Leakage
Checkpoint Trouble Cause Countermeasure
Correct the oil levelToo much gear oil NG
Reapply the liquid gasket
and/or tighten the lock nut to
the specified torque
Reapply the liquid gasket
Tighten the bolts to the
specified torque
Replace the oil seal
Ring gear thrust boltLoose lock nut and/or liquid
Liquid gasket seal bed
Loose bolts
Oil sealW orn or defective oil seal
Differential carrier
Clean the air breatherAir breatherClogged air breather
NG NG NG NG NG
OK OK OK
OK
Gear oil level
Page 61 of 1600

REAR AXLE 4B-65
ITEM NO. ILLUSTRATION PART NO. PART NAME
RAL-56
5-8840-0015-0
(J-22912-01) Separator (for 194mm)
RAL-57
5-8840-2197-0
(J-37452) Separator (for 220mm)
RAL-54
5-8840-2010-0
(J-36563)Side gear holder
(194mm L.S.D only)
RAL-59
5-8840-2011-0
(J-36564)Side gear expander
(194mm L.S.D only)
RAL-55
5-8840-2012-0
(J-36565)Side gear rotor
(194mm L.S.D only)
RAL-70
5-8840-2013-0
(J-36566)Diff. Cage lock bar
(194mm L.S.D only)
RAL-12
9-8522-1141-0
(J-24256)Outer bearing outer race
installer (for 194mm)
RAL-13
5-8840-2164-0
(J-37262)Outer bearing outer race
installer (for 220mm)
RAL-14
9-8522-1274-0
(J-24252)Outer bearing outer race
installer (for 194mm)
Page 64 of 1600

FRONT WHEEL DRIVE 4C1-1
SECTION 4C1
FRONT WHEEL DRIVE
TABLE OF CONTENTS
PAGE
Main Data and Specifications ...................................<0011001100110011001100110011001100110011001100110011001100110011001100110011001100110011001100110011001100110011001100110011001100110011001100110011001100110011001100110011001100110011001100110011001100
1100110011[ 4C1- 3
Special Parts Fixing Nuts and Bolts ............................................................................. 4C1- 4
Recommended Liquid Gasket ....................................................................................... 4C1- 7
Recommended Thread Locking Agents ....................................................................... 4C1- 7
Servicing<0011001100110011001100110011001100110011001100110011001100110011001100110011001100110011001100110011001100110011001100110011001100110011001100110011001100110011001100110011001100110011001100110011001100
11001100110011[<0011001100110011001100110011001100110011001100110011001100110011001100110011001100110011001100110011001100110011001100110011001100110011001100110011001100110011001100110011001100110011001100110011001100
11001100110011001100110011001100110011001100110011[..... 4C1- 8
General Description........................................................................................................ 4C1-9
Front Drive Axle Assembly............................................................................................ 4C1-12
Removal and Installation .......................................<0011001100110011001100110011001100110011001100110011001100110011001100110011001100110011001100110011001100110011001100110011001100110011001100110011001100110011001100110011001100110011001100110011001100
110011[ 4C1-12
Disassembly <0011001100110011001100110011001100110011001100110011001100110011001100110011001100110011001100110011001100110011001100110011001100110011001100110011001100110011001100110011001100110011001100110011001100
110011[<0011001100110011001100110011001100110011001100110011001100110011001100110011001100110011001100110011001100110011001100110011001100110011001100110011001100110011001100110011001100110011001100110011001100
1100110011001100110011001100110011[ 4C1-15
Inspection and Repair................................................................................................ 4C1-18
Reassembly <0011001100110011001100110011001100110011001100110011001100110011001100110011001100110011001100110011001100110011001100110011001100110011001100110011001100110011001100110011001100110011001100110011001100
1100110011[<0011001100110011001100110011001100110011001100110011001100110011001100110011001100110011001100110011001100110011001100110011001100110011001100110011001100110011001100110011001100110011001100110011001100
1100110011001100110011001100110011[ 4C1-19
Differential ....................................................................................................................... 4C1-22
Disassembly <0011001100110011001100110011001100110011001100110011001100110011001100110011001100110011001100110011001100110011001100110011001100110011001100110011001100110011001100110011001100110011001100110011001100
110011[<0011001100110011001100110011001100110011001100110011001100110011001100110011001100110011001100110011001100110011001100110011001100110011001100110011001100110011001100110011001100110011001100110011001100
1100110011001100110011001100110011[ 4C1-22
Major Components ............................................................................................... 4C1-22
Minor Components............................................................................................... 4C1-25
Inspection and Repair................................................................................................ 4C1-27
Reassembly <0011001100110011001100110011001100110011001100110011001100110011001100110011001100110011001100110011001100110011001100110011001100110011001100110011001100110011001100110011001100110011001100110011001100
1100110011[<0011001100110011001100110011001100110011001100110011001100110011001100110011001100110011001100110011001100110011001100110011001100110011001100110011001100110011001100110011001100110011001100110011001100
1100110011001100110011001100110011[ 4C1-29
Minor Components............................................................................................... 4C1-29
Major Components ............................................................................................... 4C1-31
Front Hub and Disc (4
2 Model) .................................................................................... 4C1-41
Disassembly <0011001100110011001100110011001100110011001100110011001100110011001100110011001100110011001100110011001100110011001100110011001100110011001100110011001100110011001100110011001100110011001100110011001100
110011[<0011001100110011001100110011001100110011001100110011001100110011001100110011001100110011001100110011001100110011001100110011001100110011001100110011001100110011001100110011001100110011001100110011001100
1100110011001100110011001100110011[ 4C1-41
Inspection and Repair................................................................................................ 4C1-44
Reassembly <0011001100110011001100110011001100110011001100110011001100110011001100110011001100110011001100110011001100110011001100110011001100110011001100110011001100110011001100110011001100110011001100110011001100
1100110011[<0011001100110011001100110011001100110011001100110011001100110011001100110011001100110011001100110011001100110011001100110011001100110011001100110011001100110011001100110011001100110011001100110011001100
1100110011001100110011001100110011[ 4C1-45
Front Hub and Disc (4
4 Model) .................................................................................... 4C1-48
Disassembly <0011001100110011001100110011001100110011001100110011001100110011001100110011001100110011001100110011001100110011001100110011001100110011001100110011001100110011001100110011001100110011001100110011001100
110011[<0011001100110011001100110011001100110011001100110011001100110011001100110011001100110011001100110011001100110011001100110011001100110011001100110011001100110011001100110011001100110011001100110011001100
1100110011001100110011001100110011[ 4C1-48
Inspection and Repair................................................................................................ 4C1-50
Reassembly <0011001100110011001100110011001100110011001100110011001100110011001100110011001100110011001100110011001100110011001100110011001100110011001100110011001100110011001100110011001100110011001100110011001100
1100110011[<0011001100110011001100110011001100110011001100110011001100110011001100110011001100110011001100110011001100110011001100110011001100110011001100110011001100110011001100110011001100110011001100110011001100
1100110011001100110011001100110011[ 4C1-51
Front Hub and Disc (Automatic Locking Hub) ............................................................. 4C1-54
INDEX
Page 65 of 1600

4C1-2 FRONT WHEEL DRIVE
PAGE
Disassembly <0011001100110011001100110011001100110011001100110011001100110011001100110011001100110011001100110011001100110011001100110011001100110011001100110011001100110011001100110011001100110011001100110011001100
110011[<0011001100110011001100110011001100110011001100110011001100110011001100110011001100110011001100110011001100110011001100110011001100110011001100110011001100110011001100110011001100110011001100110011001100
1100110011001100110011001100110011[ 4C1-54
Inspection and Repair................................................................................................ 4C1-57
Reassembly <0011001100110011001100110011001100110011001100110011001100110011001100110011001100110011001100110011001100110011001100110011001100110011001100110011001100110011001100110011001100110011001100110011001100
1100110011[<0011001100110011001100110011001100110011001100110011001100110011001100110011001100110011001100110011001100110011001100110011001100110011001100110011001100110011001100110011001100110011001100110011001100
1100110011001100110011001100110011[ 4C1-59
Front Hub and Disc (Manual Locking Hub) .................................................................. 4C1-66
Disassembly <0011001100110011001100110011001100110011001100110011001100110011001100110011001100110011001100110011001100110011001100110011001100110011001100110011001100110011001100110011001100110011001100110011001100
110011[<0011001100110011001100110011001100110011001100110011001100110011001100110011001100110011001100110011001100110011001100110011001100110011001100110011001100110011001100110011001100110011001100110011001100
1100110011001100110011001100110011[ 4C1-66
Inspection and Repair................................................................................................ 4C1-68
Reassembly <0011001100110011001100110011001100110011001100110011001100110011001100110011001100110011001100110011001100110011001100110011001100110011001100110011001100110011001100110011001100110011001100110011001100
1100110011[<0011001100110011001100110011001100110011001100110011001100110011001100110011001100110011001100110011001100110011001100110011001100110011001100110011001100110011001100110011001100110011001100110011001100
1100110011001100110011001100110011[ 4C1-69
Front Propeller Shaft ...................................................................................................... 4C1-74
Removal and Installation .......................................<0011001100110011001100110011001100110011001100110011001100110011001100110011001100110011001100110011001100110011001100110011001100110011001100110011001100110011001100110011001100110011001100110011001100
110011[ 4C1-74
Disassembly <0011001100110011001100110011001100110011001100110011001100110011001100110011001100110011001100110011001100110011001100110011001100110011001100110011001100110011001100110011001100110011001100110011001100
110011[<0011001100110011001100110011001100110011001100110011001100110011001100110011001100110011001100110011001100110011001100110011001100110011001100110011001100110011001100110011001100110011001100110011001100
1100110011001100110011001100110011[ 4C1-76
Inspection and Repair................................................................................................ 4C1-77
Reassembly <0011001100110011001100110011001100110011001100110011001100110011001100110011001100110011001100110011001100110011001100110011001100110011001100110011001100110011001100110011001100110011001100110011001100
1100110011[<0011001100110011001100110011001100110011001100110011001100110011001100110011001100110011001100110011001100110011001100110011001100110011001100110011001100110011001100110011001100110011001100110011001100
1100110011001100110011001100110011[ 4C1-78
Troubleshooting ............................................................................................................. 4C1-80
Page 66 of 1600

FRONT WHEEL DRIVE 4C1-3
MAIN DATA AND SPECIFICATIONS
FRONT AXLE AND DIFFERENTIAL
Ring gear size mm(in) 167 (6.6) 194 (7.6)
Axle tube
Type It consists of the duce, a cast iron housing and the Axle tube.
Gear type Hypoid
Gear ratio (to 1)
HEC.2.0L engine - -
HEC.2.2L engine 4.555 4.777
Differential type Two pinion
Oil capacity liter 1.0 1.4
(US/UK gal.) (0.26/0.22) (0.4/0.33)
Axle shaft type Constant velocity joint (Birfield joint type and double offset joint).
Hub locking type Automatic locking and Manual locking free wheel hubs.
FRONT PROPELLER SHAFT
Transmission type MSG MUA
Outside diameter mm(in) 40 (1.57) 40 (1.57)
Inside diameter mm(in) 33 (1.30) 32 (1.26)
Length mm(in) 505 (19.88) 471 (18.54)
(between two spiders center)
Page 70 of 1600

FRONT WHEEL DRIVE 4C1-7
RECOMMENDED LIQUID GASKET
Type Brand Name Manufacture Remarks
RTV*
Silicon BaseThreeBond 1207B
ThreeBond 1207C
ThreeBond 1215Three Bond
Three Bond
Three BondFor Engine Repairs
For Axle Case
Repairs, T/M
Water Base ThreeBond 1141E Three Bond For Engine Repairs
SolventThreeBond 1104
BelcoBond 4
BelcoBond 401
BelcoBond 402Three bond
Isuzu
Isuzu
IsuzuFor Engine Repairs
AnerobicLOCTITE 515
LOCTITE 518Loctite
LoctiteAll
* RTV : Room Temperature Vulcanizer
Note :
1. It is very important that the liquid gaskets listed above or their exact equivalent be used on the vehicle.
2. Be careful to use the specified amount of liquid gasket.
Follow the manufacture's instructions at all times.
3. Be absolutely sure to remove all lubricants and moisture from the connecting surfaces before applying
the liquid gasket.
The connecting surfaces must be perfectly dry.
4. LOCTITE 515 and LOCTITE 518 harden upon contact with a metal surface.
Do not apply LOCTITE 515 or LOCTITE 518 between two metal surfaces having a clearance of greater
than 0.25 mm (0.01 in). Poor adhesion will result.
RECOMMENDED THREAD LOCKING AGENTS
LOCTITE Type LOCTITE Color Application Steps
LOCTITE 242 Blue1. Completely remove all lubricant and moisture from the bolts and
the female threaded surfaces of the parts to be joined.
The surfaces must be perfectly dry.
LOCTITE 262 Red2. Apply LOCTITE to the bolts.
LOCTITE 270 Green
LOCTITE 271 Red3. Tighten the bolts to the specified torque.
4. Wait at least on hour before continuing the installation procedure.