Page 40 of 1600

4B-44 REAR AXLE
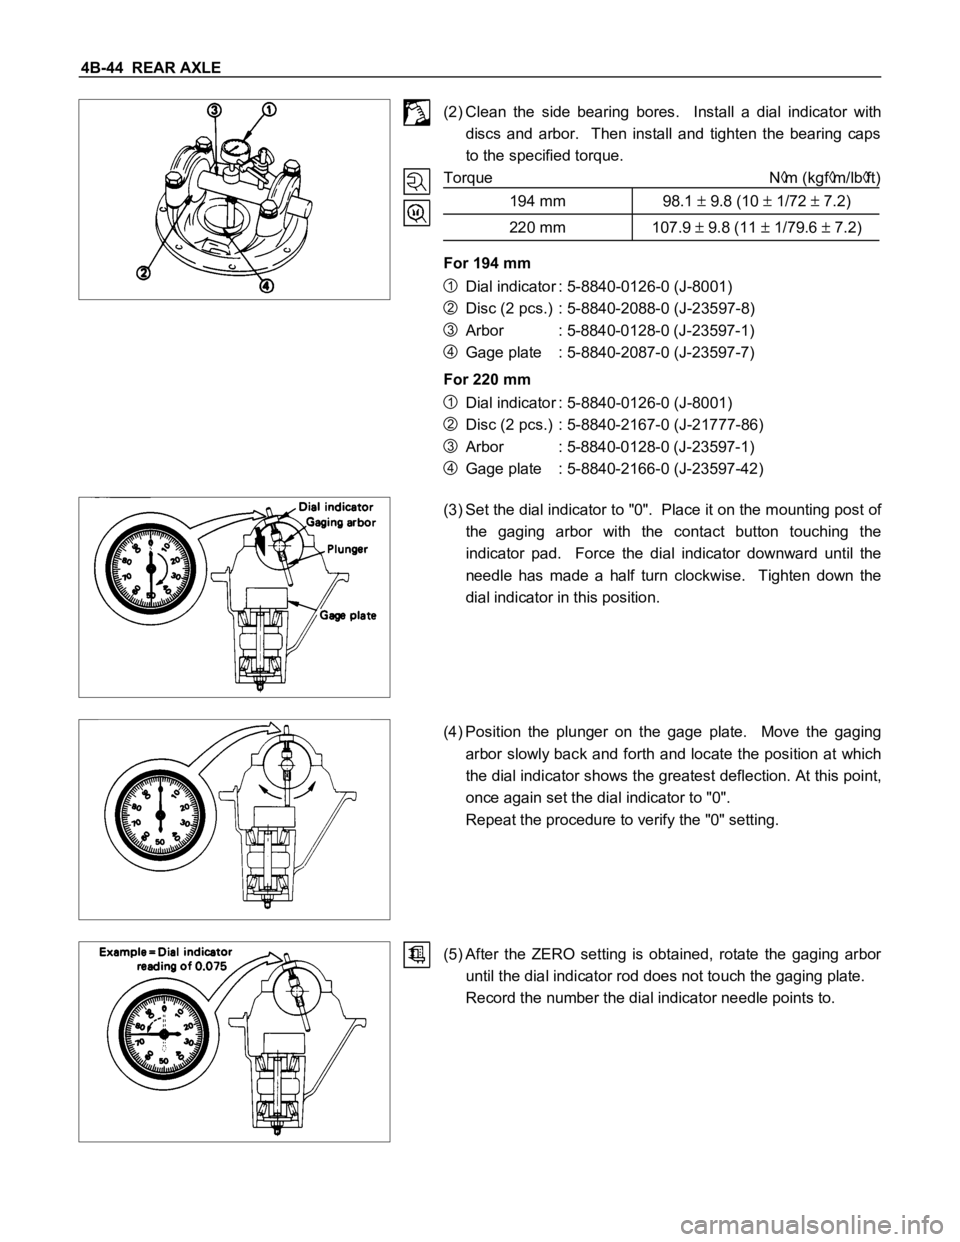
(2) Clean the side bearing bores. Install a dial indicator with
discs and arbor. Then install and tighten the bearing caps
to the specified torque.
Torque N
m (kgfm/lbft)
194 mm 98.1
9.8 (10 1/72 7.2)
220 mm 107.9 9.8 (11 1/79.6 7.2)
For 194 mm
1Dial indicator : 5-8840-0126-0 (J-8001)
2Disc (2 pcs.) : 5-8840-2088-0 (J-23597-8)
3Arbor : 5-8840-0128-0 (J-23597-1)
4Gage plate : 5-8840-2087-0 (J-23597-7)
For 220 mm
1Dial indicator : 5-8840-0126-0 (J-8001)
2Disc (2 pcs.) : 5-8840-2167-0 (J-21777-86)
3Arbor : 5-8840-0128-0 (J-23597-1)
4Gage plate : 5-8840-2166-0 (J-23597-42)
(3) Set the dial indicator to "0". Place it on the mounting post of
the gaging arbor with the contact button touching the
indicator pad. Force the dial indicator downward until the
needle has made a half turn clockwise. Tighten down the
dial indicator in this position.
(4) Position the plunger on the gage plate. Move the gaging
arbor slowly back and forth and locate the position at which
the dial indicator shows the greatest deflection. At this point,
once again set the dial indicator to "0".
Repeat the procedure to verify the "0" setting.
(5) After the ZERO setting is obtained, rotate the gaging arbor
until the dial indicator rod does not touch the gaging plate.
Record the number the dial indicator needle points to.
Page 97 of 1600

4C1-34 FRONT WHEEL DRIVE
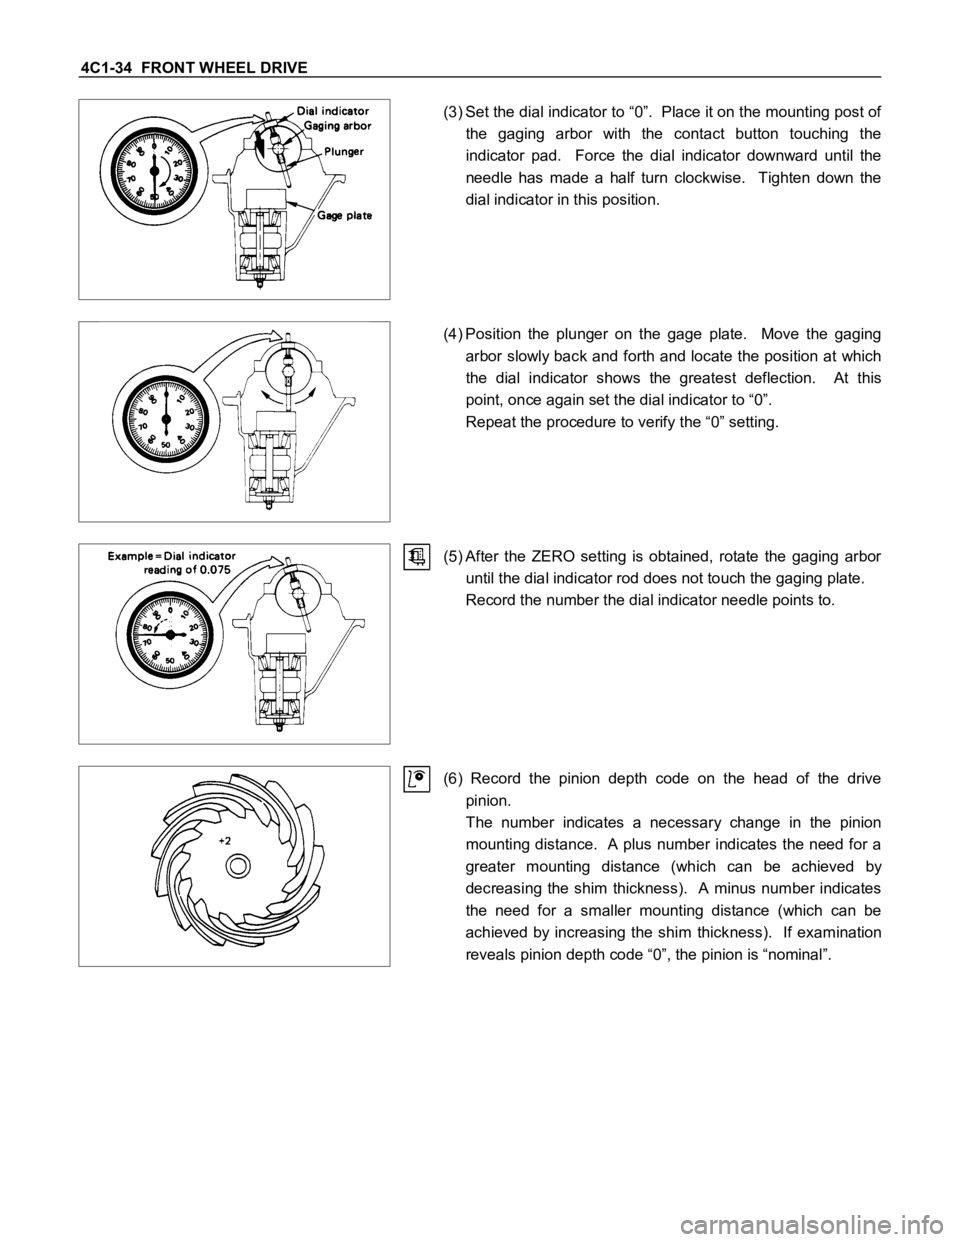
(3) Set the dial indicator to “0”. Place it on the mounting post of
the gaging arbor with the contact button touching the
indicator pad. Force the dial indicator downward until the
needle has made a half turn clockwise. Tighten down the
dial indicator in this position.
(4) Position the plunger on the gage plate. Move the gaging
arbor slowly back and forth and locate the position at which
the dial indicator shows the greatest deflection. At this
point, once again set the dial indicator to “0”.
Repeat the procedure to verify the “0” setting.
(5) After the ZERO setting is obtained, rotate the gaging arbor
until the dial indicator rod does not touch the gaging plate.
Record the number the dial indicator needle points to.
(6) Record the pinion depth code on the head of the drive
pinion.
The number indicates a necessary change in the pinion
mounting distance. A plus number indicates the need for a
greater mounting distance (which can be achieved by
decreasing the shim thickness). A minus number indicates
the need for a smaller mounting distance (which can be
achieved by increasing the shim thickness). If examination
reveals pinion depth code “0”, the pinion is “nominal”.
Page 130 of 1600
FRONT WHEEL DRIVE 4C1-67
Important Operations
1. Bolt
Before removal, shift transfer lever into “2H” position and set
free wheeling hub knob into “FREE” position.
6. Hub Nut
Wrench : 5-8840-2117-0
(J-36827)
Refer to Section 5 “Brake” for disc brake
caliper removal procedure.7. Hub and Disc Assembly
Before disassembly, remove the disc brake caliper assembly
and hang it on the frame with wires.
11.Clutch Assembly
While pushing follower knob, turn clutch assembly clockwise
and then remove clutch assembly from knob.
16.Retaining Spring
Remove retaining spring from clutch assembly by turning it
counterclockwise.
Page 133 of 1600
4C1-70 FRONT WHEEL DRIVE
Important Operations
1. Spacer
Apply grease to both faces of spacer.
4. Inner Assembly
Apply grease wheel bearing to inside face of ring.
g(oz)
Amount of grease 3 (0.10)
8. Knob
(1) Apply grease W heel bearing to outer circumference of knob
and inner circumference of cover.
(2) Align detent ball to either groove of cover.
9. Snap Ring
Turn the smoother face to knob side.
10.Retaining Spring
Align the end of spring to the end of cut portion of clutch spring
groove.
11.Follower
Install follower to clutch so that follower nail will come closer to
the bent portion of retaining spring by aligning follower stopper
nail to outer teeth of clutch. Then, hook retaining spring onto
upper portion of hanger nails of follower.
12.Compression Spring
Turn the smaller diameter side to follower.
13.Clutch Assembly
Align follower nail to handle groove, and then assemble clutch
with knob by pushing and turning clutch counterclockwise to
knob.
Page 565 of 1600

CLUTCH 7C-25
3. Check that the driven plate moves smoothly on the
transmission top gear shaft spline.
Minor ridges on the top gear shaft spline may be removed
with an oil stone.
Driven Plate Warpage
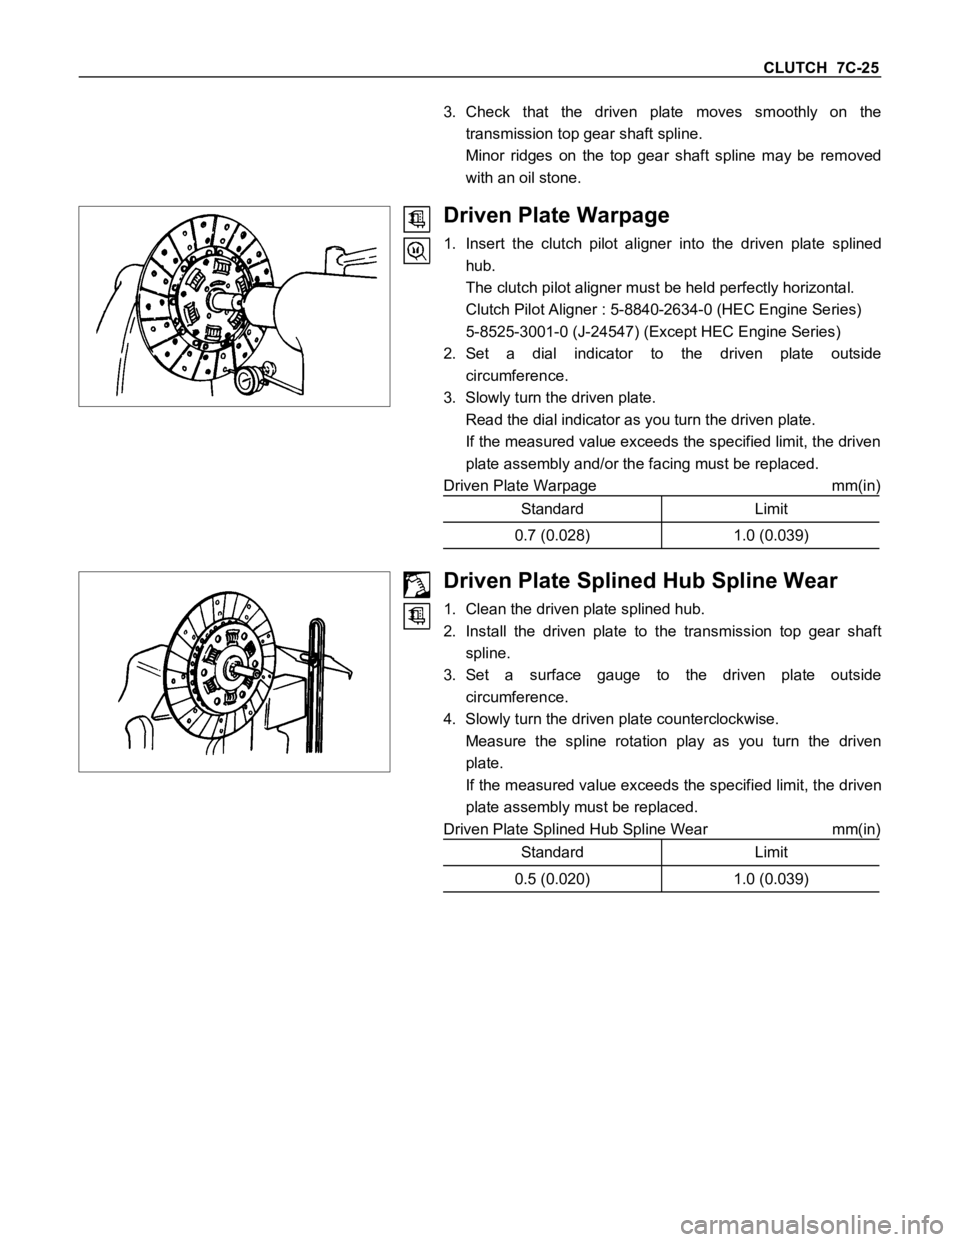
1. Insert the clutch pilot aligner into the driven plate splined
hub.
The clutch pilot aligner must be held perfectly horizontal.
Clutch Pilot Aligner : 5-8840-2634-0 (HEC Engine Series)
5-8525-3001-0 (J-24547) (Except HEC Engine Series)
2. Set a dial indicator to the driven plate outside
circumference.
3. Slowly turn the driven plate.
Read the dial indicator as you turn the driven plate.
If the measured value exceeds the specified limit, the driven
plate assembly and/or the facing must be replaced.
Driven Plate Warpage mm(in)
Standard Limit
0.7 (0.028) 1.0 (0.039)
Driven Plate Splined Hub Spline Wear
1. Clean the driven plate splined hub.
2. Install the driven plate to the transmission top gear shaft
spline.
3. Set a surface gauge to the driven plate outside
circumference.
4. Slowly turn the driven plate counterclockwise.
Measure the spline rotation play as you turn the driven
plate.
If the measured value exceeds the specified limit, the driven
plate assembly must be replaced.
Driven Plate Splined Hub Spline Wear mm(in)
Standard Limit
0.5 (0.020) 1.0 (0.039)