Page 74 of 1600
FRONT WHEEL DRIVE 4C1-11
LOCKING HUB
AUTOMATIC TYPE MANUAL TYPE
FRONT PROPELLER SHAFT
Page 88 of 1600
FRONT WHEEL DRIVE 4C1-25
MINOR COMPONENTS
Disassembly Steps
1. Bolt
2. Ring gear
3. Lock pin
4. Cross pin5. Pinion gear
6. Side gear
7. Thrust washer
8. Differential cage
Page 89 of 1600
4C1-26 FRONT WHEEL DRIVE
Important Operations
3. Lock Pin
Break staking on the lock pin using a 5 mm (0.20 in.) diameter
drill.
4. Cross Pin
Remove the cross pin using a soft metal rod and a hammer.
Page 92 of 1600
FRONT WHEEL DRIVE 4C1-29
REASSEMBLY
MINOR COMPONENTS
Reassembly Steps
1. Differential cage
2. Thrust washer
3. Side gear
4. Pinion gear
5. Cross pin
6. Lock pin
7. Ring gear
8. Bolt
Important Operations
4. Pinion Gear
Install the pinion gear by engaging it with the side gears while
turning both pinion gears simultaneously in the same direction.
Page 93 of 1600
4C1-30 FRONT WHEEL DRIVE
5. Cross Pin
(1) Be sure to install the cross pin so that it is in alignment with
the lock pin hole in the differential cage.
(2) Adjust the backlash between the side gear and the pinion
gear.
mm(in)
Backlash 0.03 - 0.08 (0.001 - 0.003)
Thickness of thrust washers available
mm(in)
167 mm 1.05, 1.15, 1.25 (0.041, 0.043, 0.049)
194 mm 1.00, 1.05, 1.10 (0.039, 0.041, 0.043)
6. Lock Pin
After lock pin installation, stake the cage to prevent discharge
of the lock pin.
7. Ring Gear
When installing the ring gear, apply LOCTITE 271 or equivalent
to the threaded hole and bolt.
8. Bolt
Tighten the bolts in diagonal sequence as illustrated.
Bolt Torque N
m (kgfm/lbft)
167 mm 78.5
9.8 (8 1/57.9 7.2)
194 mm 107.9 9.8 (11 1/79.6 7.2)
Note :
Discard used bolts and install new ones.
For 167 mm
Note that all bolts have a left hand thread.
Page 97 of 1600

4C1-34 FRONT WHEEL DRIVE
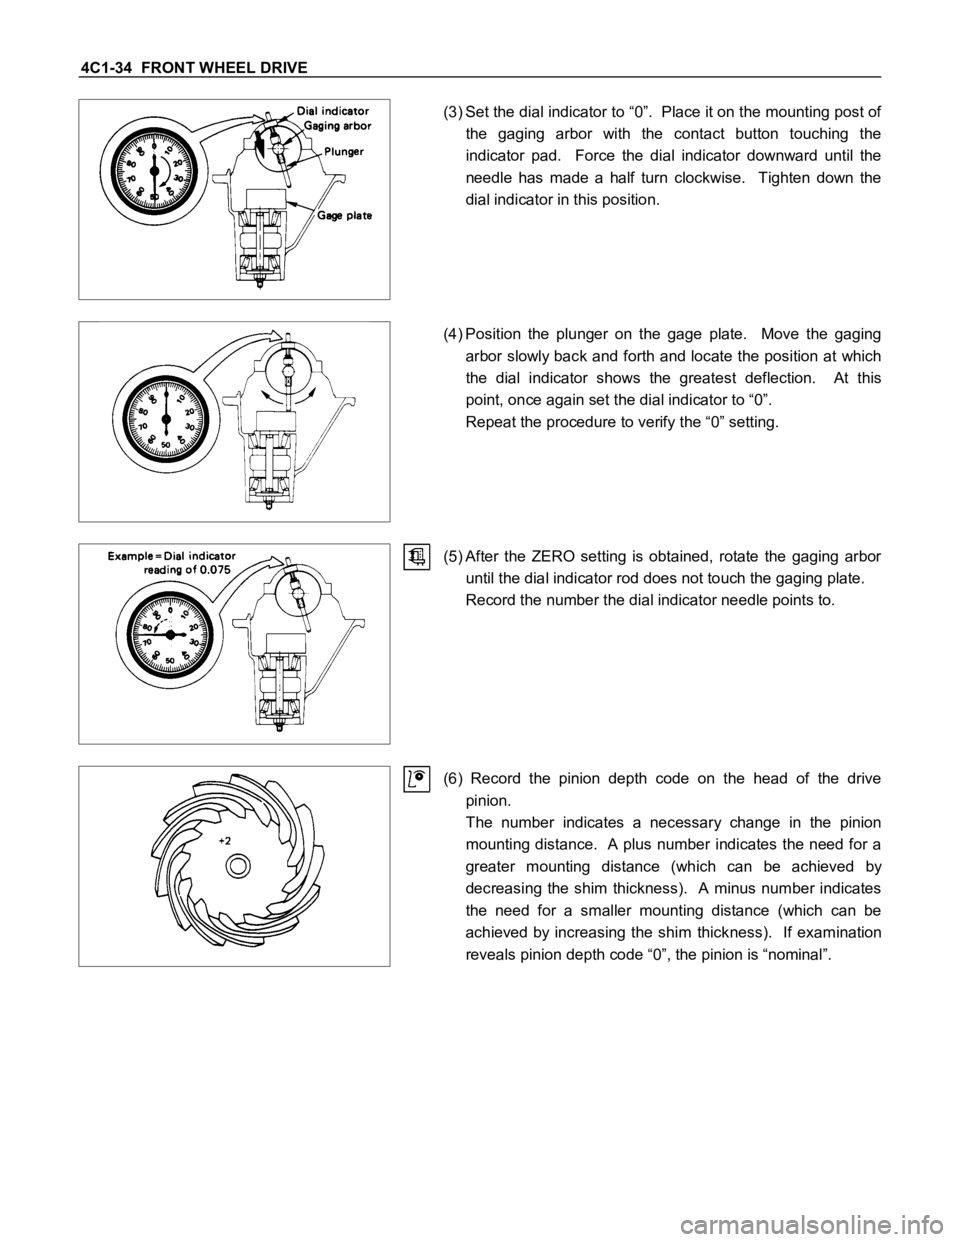
(3) Set the dial indicator to “0”. Place it on the mounting post of
the gaging arbor with the contact button touching the
indicator pad. Force the dial indicator downward until the
needle has made a half turn clockwise. Tighten down the
dial indicator in this position.
(4) Position the plunger on the gage plate. Move the gaging
arbor slowly back and forth and locate the position at which
the dial indicator shows the greatest deflection. At this
point, once again set the dial indicator to “0”.
Repeat the procedure to verify the “0” setting.
(5) After the ZERO setting is obtained, rotate the gaging arbor
until the dial indicator rod does not touch the gaging plate.
Record the number the dial indicator needle points to.
(6) Record the pinion depth code on the head of the drive
pinion.
The number indicates a necessary change in the pinion
mounting distance. A plus number indicates the need for a
greater mounting distance (which can be achieved by
decreasing the shim thickness). A minus number indicates
the need for a smaller mounting distance (which can be
achieved by increasing the shim thickness). If examination
reveals pinion depth code “0”, the pinion is “nominal”.
Page 104 of 1600
FRONT WHEEL DRIVE 4C1-41
FRONT HUB AND DISC (42 model)
DISASSEMBLY
Refer to SECTION 3E “WHEEL AND TIRE” for wheel removal procedure.
Disassembly Steps
1. Bolt
2. Brake caliper
3. Hub cap
4. Split pin
5. Nut retainer
6. Hub nut
7. Lock washer8. Outer bearing
9. Hub and disc assembly
10. Oil seal
11. Inner bearing and outer race
12. Bolt
13. Wheel pin
Page 108 of 1600
FRONT WHEEL DRIVE 4C1-45
REASSEMBLY
Refer to SECTION 3E “WHEEL AND TIRE” for wheel removal procedure.
Reassembly Steps
1. Wheel pin
2. Bolt
3. Inner bearing and outer race
4. Oil seal
5. Hub and disc assembly
6. Outer bearing
7. Lock washer
8. Hub nut
9. Nut retainer
10. Split pin
11. Hub cap
12. Brake caliper
13. Bolt