Page 718 of 1202

14. REMOVE FRONT EXHAUST PIPE
(a) Disconnect the oxygen sensor.
(b) Remove the 2 bolts, spring")
Q06552
Q08461
AB
C
CC
A
Q06446
Q08159
- MANUAL TRANSAXLEMANUAL TRANSAXLE UNIT
MX-5
1996 TERCEL (RM440U)
14. REMOVE FRONT EXHAUST PIPE
(a) Disconnect the oxygen sensor.
(b) Remove the 2 bolts, springs and gasket.
Torque: 62 N´m (630 kgf´cm, 46 ft´lbf)
(c) Remove the bolt, clamp and gasket.
Torque: 19 N´m (190 kgf´cm, 14 ft´lbf)
(d) Disconnect the 2 rings and remove the exhaust front pipe.
15. REMOVE STARTER
Disconnect the connector and wire and remove the starter.
16. DISCONNECT SPEEDOMETER CABLE
17. REMOVE ENGINE REAR MOUNTING INSULATOR
Remove the 6 bolts and insulator.
Torque:
Bolt A: 78 N´m (800 kgf´cm, 58 ft´lbf)
Bolt B: 64 N´m (650 kgf´cm, 47 ft´lbf)
Bolt C: 90 N´m (920 kgf´cm, 67 ft´lbf)
18. DISCONNECT ENGINE LEFT MOUNTING BRACKET
FROM ENGINE LEFT MOUNTING INSULATOR
Remove the 2 bolts.
Torque: 48 N´m (490 kgf´cm, 36 ft´lbf)
19. JACK UP TRANSAXLE SLIGHTLY
Using a transmission jack, support the transaxle.
20. REMOVE TRANSAXLE LOWER SIDE MOUNTING
BOLT
Remove the 4 bolts.
Torque:
14 mm head: 46 N´m (470 kgf´cm, 34 ft´lbf)
10 mm head: 7.4 N´m (75 kgf´cm, 65 in.´lbf)
21. REMOVE TRANSAXLE
Lower the engine left side and remove the transaxle from the
engine.
HINT:
�Align the input shaft with the clutch disc and install the
transaxle to the engine.
�Install and torque the 7 bolts.
Torque:
Upper side mounting bolts: (See step 7)
Lower side mounting bolts: (See step 20)
Page 778 of 1202
AX08M-03
Q07634
RH Drive Shaft
� Snap
RingSpeedometer
Cable
Rear Engine
Mounting InsulatorAir Cleaner
Assembly
� Snap RingTie Rod End
LH Drive Shaft
Nut Cap Plug for Governor Pressure Test
Oxygen Sensor
Front Exhaust Pipe Torque Converter
Clutch
Clip
Control Cable
� Gasket
Compression Spring
Engine Under Cover� Cotter Pin Starter
� Gasket
Clamp x 6
Plug for Line
Pressure Test
� Non-reusable partx 5
Converter
Cover
- AUTOMATIC TRANSAXLE (A132L)AUTOMATIC TRANSAXLE UNIT
AX-25
777 Author�: Date�:
1996 TERCEL (RM440U)
AUTOMATIC TRANSAXLE UNIT
COMPONENTS
Page 779 of 1202
AUTOMATIC TRANSAXLE UNIT
1996 TERCEL (RM440U)
REMOVAL
1. REMOVE BATTERY
2. REMOVE AIR CLEANER ASSEMBLY
3. REMOVE THROTTLE CABL")
AX08N-03
Q06547
Q06548
Q07635
Q08079
AX-26
- AUTOMATIC TRANSAXLE (A132L)AUTOMATIC TRANSAXLE UNIT
1996 TERCEL (RM440U)
REMOVAL
1. REMOVE BATTERY
2. REMOVE AIR CLEANER ASSEMBLY
3. REMOVE THROTTLE CABLE
4. REMOVE UPPER SIDE MOUNTING BOLTS
Torque: 64 N´m (650 kgf´cm, 47 ft´lbf)
5. REMOVE STARTER
(a) Disconnect the cable and connector.
(b) Remove the starter with the 2 bolts.
Torque: 39 N´m (400 kgf´cm, 29 ft´lbf)
6. REMOVE GROUND CABLES AND BRACKET
7. INSTALL ENGINE SUPPORT FIXTURE
8. RAISE VEHICLE
9. REMOVE ENGINE UNDER COVER
10. REMOVE LH AND RH DRIVE SHAFTS
(See page SA-18)
11. DISCONNECT SPEEDOMETER CABLE
12. DISCONNECT CONTROL CABLE
(a) Remove the clip from the control cable.
(b) Disconnect the control cable from the lever.
Torque: 12 N´m (120 kgf´cm, 9 ft´lbf)
13. DISCONNECT PARK/NEUTRAL POSITION SWITCH
CONNECTOR
14. DISCONNECT OIL COOLER HOSE FROM PIPE
15. REMOVE FRONT EXHAUST PIPE
(a) Disconnect the oxygen sensor.
Torque: 44 N´m (450 kgf´cm, 32 ft´lbf)
(b) Remove the bolts and springs from the exhaust manifold
and front exhaust pipe.
Torque: 62 N´m (630 kgf´cm, 46 ft´lbf)
(c) Remove the clamp.
Torque: 19 N´m (190 kgf´cm, 14 ft´lbf)
Page 812 of 1202
AX086-04
Q07636
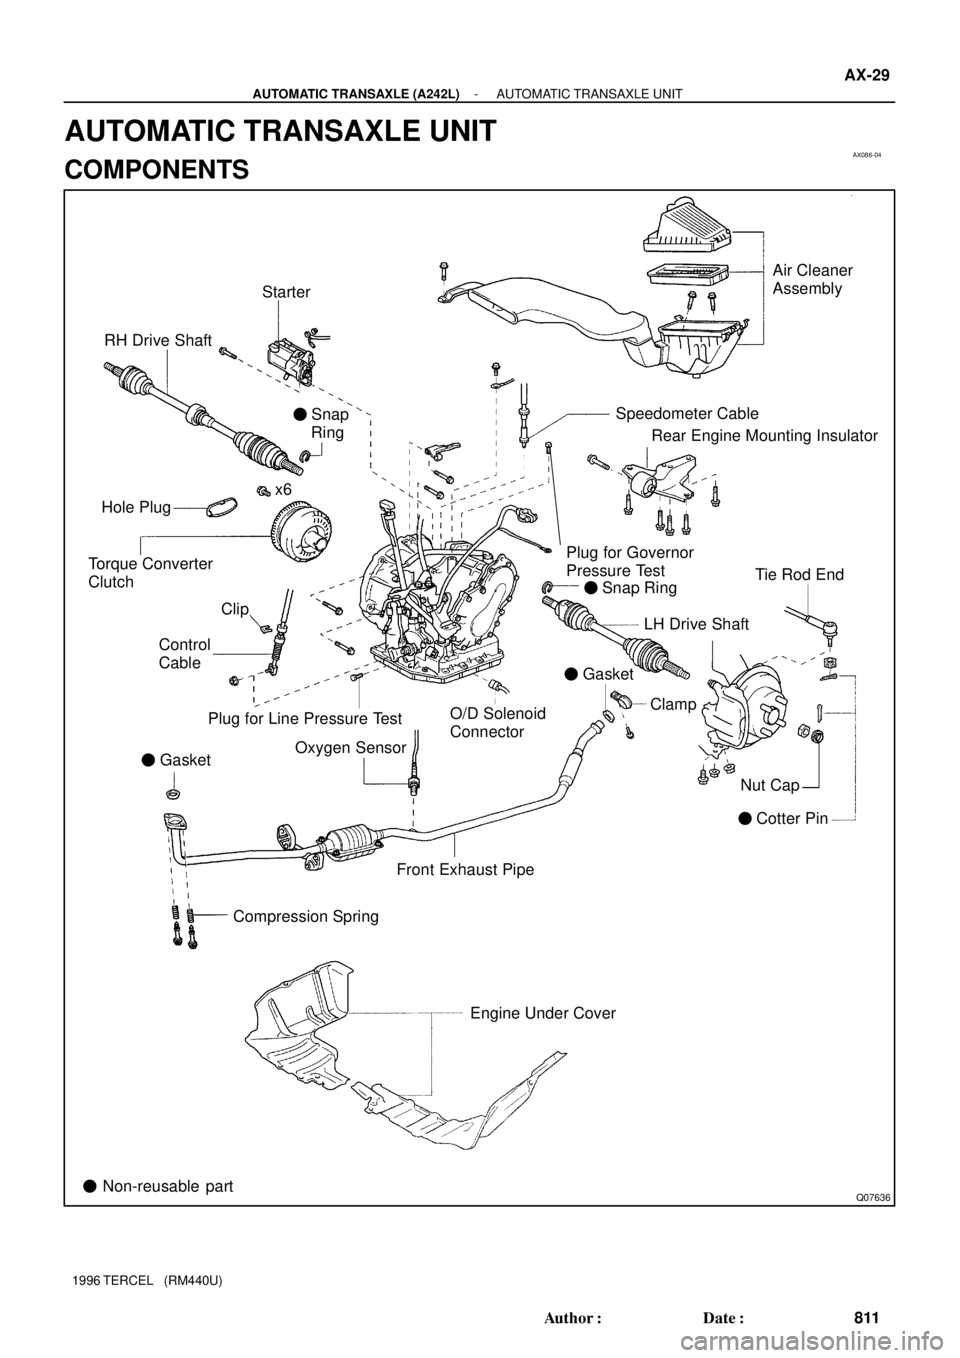
RH Drive ShaftStarterAir Cleaner
Assembly
Speedometer Cable
Rear Engine Mounting Insulator
Plug for Governor
Pressure Test
Tie Rod End
� Snap Ring
LH Drive Shaft
� Gasket
Clamp
Nut Cap
� Cotter Pin O/D Solenoid
Connector � Snap
Ring
x6
Hole Plug
Torque Converter
Clutch
Clip
Control
Cable
Plug for Line Pressure Test
Oxygen Sensor
� Gasket
Front Exhaust Pipe
Compression Spring
Engine Under Cover
� Non-reusable part
- AUTOMATIC TRANSAXLE (A242L)AUTOMATIC TRANSAXLE UNIT
AX-29
811 Author�: Date�:
1996 TERCEL (RM440U)
AUTOMATIC TRANSAXLE UNIT
COMPONENTS
Page 814 of 1202
AUTOMATIC TRANSAXLE UNIT
AX-31
1996 TERCEL (RM440U)
16. REMOVE FRONT EXHAUST PIPE
(a) Disconnect the oxygen sensor.
Torque: 44 N´m (450")
Q08079
Q08081
Q07892
Q08080A
BA
- AUTOMATIC TRANSAXLE (A242L)AUTOMATIC TRANSAXLE UNIT
AX-31
1996 TERCEL (RM440U)
16. REMOVE FRONT EXHAUST PIPE
(a) Disconnect the oxygen sensor.
Torque: 44 N´m (450 kgf´cm, 32 ft´lbf)
(b) Remove the bolts and springs from the exhaust manifold
and front exhaust pipe.
Torque: 62 N´m (630 kgf´cm, 46 ft´lbf)
(c) Remove the clamp.
Torque: 19 N´m (190 kgf´cm, 14 ft´lbf)
(d) Remove the front exhaust pipe and gaskets.
HINT:
Replace the used gaskets with new ones.
17. REMOVE TORQUE CONVERTER CLUTCH MOUNT-
ING BOLTS
(a) Remove the converter cover.
(b) Turn the crankshaft to gain access and remove the 6 bolts
with holding the crankshaft pulley set bolt a wrench.
Torque: 27 N´m (280 kgf´cm, 20 ft´lbf)
18. SUPPORT TRANSAXLE WITH A TRANSMISSION
JACK
19. DISCONNECT LH ENGINE MOUNTING BRACKET
Remove the 2 mounting bolts.
Torque: 49 N´m (490 kgf´cm, 36 ft´lbf)
20. REMOVE ENGINE REAR MOUNTING
(a) Remove the rear mounting insulator through bolt.
Torque: 65 N´m (650 kgf´cm, 48 ft´lbf)
(b) Remove the 5 bolts and rear mounting insulator.
Torque:
Bolt A: 80 N´m (800 kgf´cm, 59 in´lbf)
Bolt B: 92 N´m (920 kgf´cm, 69 ft´lbf)
Page 827 of 1202

REMOVAL
1. REMOVE FRONT WHEEL
Torque: 103 N´m (1,050 kgf´cm, 76 ft´lbf)
2. w/ ABS
REMOVE BOLT AND ABS")
SA114-03
R11682
F03986
F03987
SA-10
- SUSPENSION AND AXLEFRONT AXLE HUB
1996 TERCEL (RM440U)
REMOVAL
1. REMOVE FRONT WHEEL
Torque: 103 N´m (1,050 kgf´cm, 76 ft´lbf)
2. w/ ABS
REMOVE BOLT AND ABS SPEED SENSOR
Torque: 7.8 N´m (80 kgf´cm, 69 in.´lbf)
3. REMOVE FRONT BRAKE CALIPER AND DISC
(a) Remove the 2 bolts and brake caliper from the steering
knuckle.
Torque: 88 N´m (900 kgf´cm, 65 in.´lbf)
(b) Support the brake caliper securely.
(c) Remove the disc.
4. CHECK BACKLASH IN BEARING SHAFT DIRECTION
Using a dial indicator, check the backlash near the center of the
axle hub, and check the backlash in the bearing shaft direction.
Maximum: 0.05 mm (0.0020 in.)
If the backlash exceeds the maximum, replace the bearing.
5. CHECK AXLE HUB DEVIATION
Using a dial indicator, check the deviation at the surface of the
axle hub outside the hub bolt.
Maximum: 0.05 mm (0.0020 in.)
If the deviation exceeds the maximum, replace the axle hub.
6. REMOVE DRIVE SHAFT LOCK NUT
(a) Install the brake disc and caliper.
(b) Remove the cotter pin and lock cap.
(c) With applying the brakes, remove the nut.
Torque: 216 N´m (2,200 kgf´cm, 159 ft´lbf)
(d) Remove the brake caliper and disc.
7. LOOSEN 2 NUTS ON LOWER SIDE OF SHOCK AB-
SORBER
Torque: 245 N´m (2,500 kgf´cm, 181 ft´lbf)
HINT:
�Do not remove the 2 bolts.
�Coat the nut's thread with engine oil.
Page 832 of 1202
SA117-02
- SUSPENSION AND AXLEFRONT AXLE HUB
SA-15
1996 TERCEL (RM440U)
INSTALLATION
Installation is in the reverse order of removal (See page SA-10).
HINT:
After installation, check ABS speed sensor signal (See page DI-1 11 and SA-4).
Page 835 of 1202

REMOVAL
NOTICE:
�The hub bearing could be damaged if it is subjected
to the vehicle weight, such as when")
SA128-02
FA1535
SST
F03986
SA-18
- SUSPENSION AND AXLEFRONT DRIVE SHAFT
1996 TERCEL (RM440U)
REMOVAL
NOTICE:
�The hub bearing could be damaged if it is subjected
to the vehicle weight, such as when moving the ve-
hicle with the drive shaft removed. Therefore, if it is
absolutely necessary to place the vehicle weight on
the hub bearing, first support it with SST.
SST 09608-16042 (09608-02021, 09608-02041)
�w/ ABS:
After disconnecting the drive shaft from the axle hub,
work carefully so as not to damage the sensor rotor
serrations on the drive shaft.
1. REMOVE FRONT WHEEL
Torque: 103 N´m (1,050 kgf´cm, 76 ft´lbf)
2. M/T:
REMOVE LH ENGINE UNDER COVER
3. DRAIN TRANSAXLE OIL (M/T) OR ATF (A/T)
4. w/ ABS:
REMOVE BOLT AND ABS SPEED SENSOR
Torque: 7.8 N´m (80 kgf´cm, 69 in.´lbf)
5. REMOVE DRIVE SHAFT LOCK NUT
(a) Remove the cotter pin and lock cap.
(b) While applying the brakes, remove the nut.
Torque: 216 N´m (2,200 kgf´cm, 159 ft´lbf)
6. DISCONNECT TIE ROD END FROM STEERING
KNUCKLE (See page SA-10)
7. DISCONNECT LOWER BALL JOINT FROM LOWER
SUSPENSION ARM (See page SA-10)
8. DISCONNECT DRIVE SHAFT FROM AXLE HUB
NOTICE:
Be careful not to damage the drive shaft boot and inner oil
seal.


INSTALLATION
Installation is in the reverse order of removal (See page SA-10).
HINT:
After installation, check ABS speed sens")