Page 739 of 1354
S01326
− ENGINE MECHANICALENGINE UNIT
EM−73
1996 RAV4 (RM447U)
(f) Lower the engine out of the vehicle slowly and carefully,
and raise the vehicle.
HINT:
Make sure the engine is clear of all wiring, hoses and cables.
(g) Place the engine and transaxle assembly onto the stand.
33. 2WD:
REMOVE DRIVE SHAFT BEARING BRACKET
34. SEPARATE ENGINE AND TRANSAXLE
(M/T (2WD): See page MX−3)
(M/T (4WD): See page MX−9)
(A/T/A241E (2WD): See page AX−15)
(A/T/A540H (2WD): See page AX−19)
35. M/T only:
REMOVE CLUTCH COVER AND DISC
Page 740 of 1354
EM0EX−03
S01296
S01431
S01350
EM−74
− ENGINE MECHANICALENGINE UNIT
1996 RAV4 (RM447U)
INSTALLATION
1. M/T only:
INSTALL CLUTCH DISC AND COVER (See page
CL−18)
2. ASSEMBLE ENGINE AND TRANSAXLE
(M/T (2WD): See page MX−7)
(M/T (4WD): See page MX−11)
(A/T/A241E (2WD): See page AX−19)
(A/T/A540H (2WD): See page AX−21)
3. 2WD:
INSTALL DRIVE SHAFT BEARING BRACKET
Torque: 64 N·m (650 kgf·cm, 47 ft·lbf)
4. INSTALL ENGINE AND TRANSAXLE ASSEMBLY IN
VEHICLE
(a) Attach the engine sling device to the engine hangers.
(b) Slowly lower the vehicle, and raise the engine into the en-
gine compartment.
(c) Keep the engine level, and align RH and LH mountings
with the body mountings.
(d) Attach the RH engine mounting bracket to the mounting
insulator, and temporarily install the bolt and 2 nuts.
(e) Attach the LH engine mounting bracket to the mounting
insulator, and install the 2 nuts and 2 bolts.
Torque: 64 N·m (650 kgf·cm, 47 ft·lbf)
Page 744 of 1354

S01797
M/T
A/T
S01785
A/T Only
S01351
M/T Only
Back−up Light
Connector EM−78
− ENGINE MECHANICALENGINE UNIT
1996 RAV4 (RM447U)
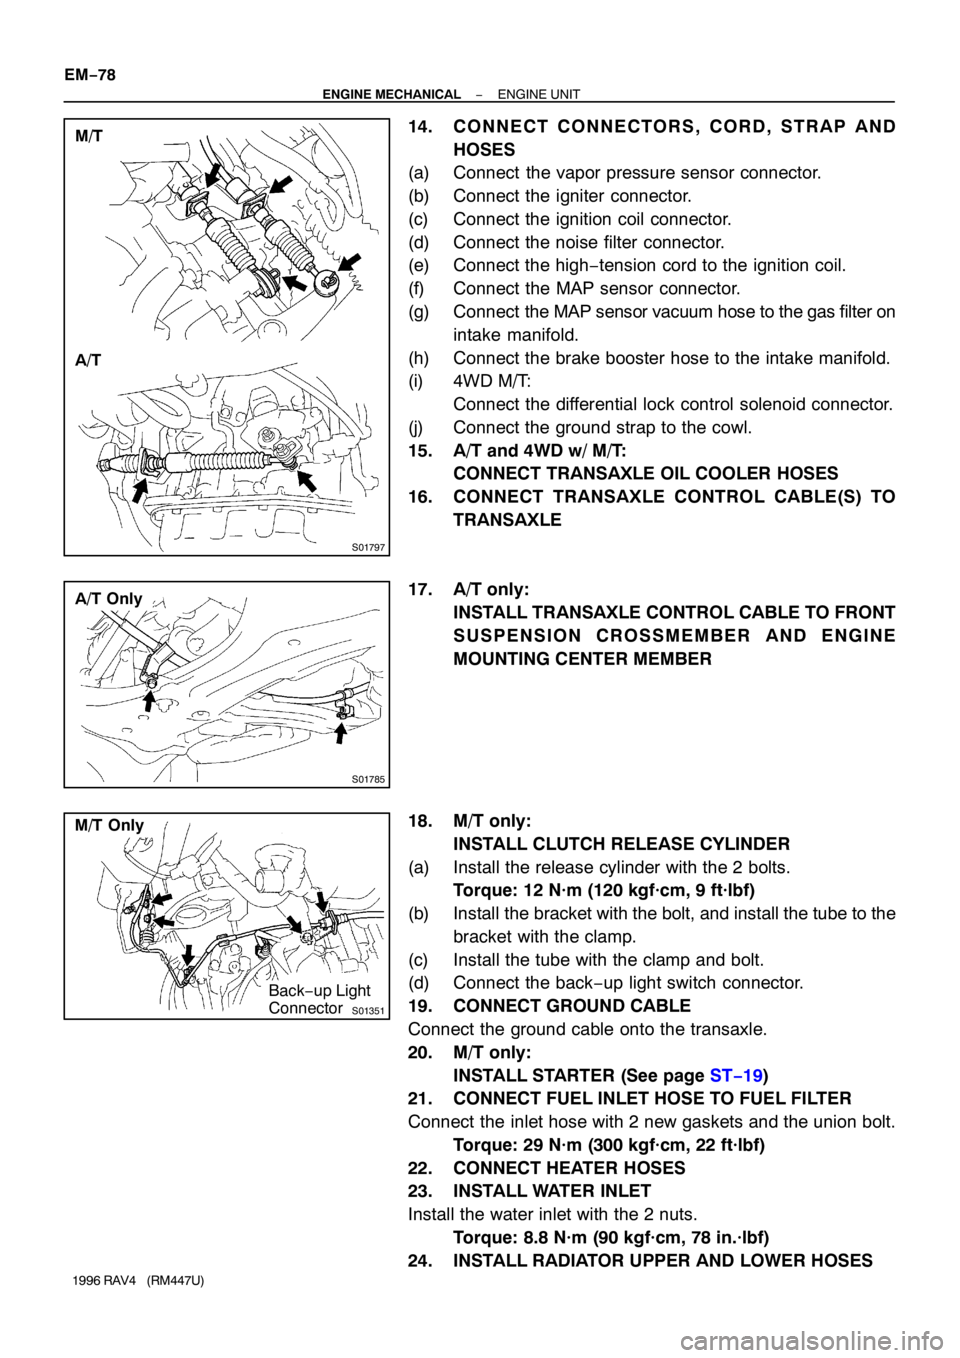
14. CONNECT CONNECTORS, CORD, STRAP AND
HOSES
(a) Connect the vapor pressure sensor connector.
(b) Connect the igniter connector.
(c) Connect the ignition coil connector.
(d) Connect the noise filter connector.
(e) Connect the high−tension cord to the ignition coil.
(f) Connect the MAP sensor connector.
(g) Connect the MAP sensor vacuum hose to the gas filter on
intake manifold.
(h) Connect the brake booster hose to the intake manifold.
(i) 4WD M/T:
Connect the differential lock control solenoid connector.
(j) Connect the ground strap to the cowl.
15. A/T and 4WD w/ M/T:
CONNECT TRANSAXLE OIL COOLER HOSES
16. CONNECT TRANSAXLE CONTROL CABLE(S) TO
TRANSAXLE
17. A/T only:
INSTALL TRANSAXLE CONTROL CABLE TO FRONT
SUSPENSION CROSSMEMBER AND ENGINE
MOUNTING CENTER MEMBER
18. M/T only:
INSTALL CLUTCH RELEASE CYLINDER
(a) Install the release cylinder with the 2 bolts.
Torque: 12 N·m (120 kgf·cm, 9 ft·lbf)
(b) Install the bracket with the bolt, and install the tube to the
bracket with the clamp.
(c) Install the tube with the clamp and bolt.
(d) Connect the back−up light switch connector.
19. CONNECT GROUND CABLE
Connect the ground cable onto the transaxle.
20. M/T only:
INSTALL STARTER (See page ST−19)
21. CONNECT FUEL INLET HOSE TO FUEL FILTER
Connect the inlet hose with 2 new gaskets and the union bolt.
Torque: 29 N·m (300 kgf·cm, 22 ft·lbf)
22. CONNECT HEATER HOSES
23. INSTALL WATER INLET
Install the water inlet with the 2 nuts.
Torque: 8.8 N·m (90 kgf·cm, 78 in.·lbf)
24. INSTALL RADIATOR UPPER AND LOWER HOSES
Page 745 of 1354
S01374
Cover
Connector
− ENGINE MECHANICALENGINE UNIT
EM−79
1996 RAV4 (RM447U)
25. INSTALL GENERATOR (See page CH−19)
26. INSTALL CHARCOAL CANISTER
27. CONNECT ENGINE WIRE TO RELAY BOX NO. 2
(a) Connect the engine wire to the relay block No.2 with the
2 nuts.
(b) Connect the connector.
(c) Install the upper cover.
(d) Connect the relay block No. 2 to the body with the 2 bolts.
28. INSTALL ACCELERATOR CABLE TO THROTTLE
BODY, CABLE BRACKET AND CLAMPS
29. INSTALL AIR CLEANER CASE AND CAP
30. INSTALL BATTERY
31. FILL WITH TRANSAXLE OIL
32. FILL WITH ENGINE OIL
33. FILL WITH ENGINE COOLANT
34. START ENGINE AND CHECK FOR LEAKS
35. PERFORM ENGINE ADJUSTMENT
36. CHECK FRONT WHEEL ALIGNMENT
37. INSTALL ENGINE UNDER COVERS
38. INSTALL ENGINE HOOD
39. ROAD TEST VEHICLE
Check for abnormal noises, shock slippage, correct shift points
and smooth operation.
40. RECHECK ENGINE COOLANT AND OIL LEVELS
Page 785 of 1354
15
ABBREVIATIONS D
ABBREVIATIONS
The following abbreviations are used in this manual.
ABS = Anti-Lock Brake System
A/C = Air Conditioning
A/T = Automatic Transaxle
COMB. = Combination
DIFF. = Differential
ECU = Electronic Control Unit
EGR = Exhaust Gas Recirculation
EVAP = Evaporative Emission
J/B = Junction Block
LH = Left-Hand
M/T = Manual Transaxle
O/D = Overdrive
R/B = Relay Block
RH = Right-Hand
SFI = Sequential Multiport Fuel Injection
SRS = Supplemental Restraint System
SW = Switch
TEMP. = Temperature
VSV = Vacuum Switching Valve
w/ = With
w/o = Without
2WD = Two Wheel Drive
4WD = Four Wheel Drive
* The titles given inside the components are the names of the terminals (terminal codes) and are not
treated as being abbreviations.
Page 996 of 1354

MX01Z−08
− MANUAL TRANSAXLETROUBLESHOOTING
MX−1
1996 RAV4 (RM447U)
TROUBLESHOOTING
PROBLEM SYMPTOMS TABLE
Use the table below to help you find the cause of the problem. The numbers indicate the priority of the likely
cause of the problem. Check each part in order. If necessary, replace these parts.
SymptomSuspect AreaSee page
Noise
14.Oil (Level low) 2WD
4WD
15. Oil (Wrong) 2WD
4WD
16.Gear (Worn or damaged)
17.Bearing (Worn or damaged)MX−3
MX−9
MX−3
MX−9
MX−12
MX−79
MX−12
MX−79
Oil leakage
1. Oil (Level too high) 2WD
4WD
2. Gasket (Damaged)
3. Oil seal (Worn or damaged)
4. O−Ring (Worn or damaged)MX−3
MX−9
MX−12
MX−79
MX−12
MX−79
MX−12
MX−78
MX−79
Hard to shift or will not shift
1. Control cable (Faulty)
2. Synchronizer ring (Worn or damaged)
3. Shift key spring (Damaged)MX−77
MX−12
MX−29
MX−36
MX−12
MX−29
MX−36
Jumps out of gear
1. Locking ball spring (Damaged)
2. Shift fork (Worn)
3. Gear (Worn or damaged)
4. Bearing (Worn or damaged)MX−12
MX−12
MX−79
MX−12
MX−79
MX−12
MX−79
Tight corner braking1. Differential, Center differential (Faulty)MX−58
MX−72
Page 997 of 1354

MX05N−02
Q10400
Air Intake Connector
Engine Coolant
Reservoir Tank Clutch Release Cylinder
and Line
Vehicle Speed
Sensor Connector
Back−Up Light Switch
Connector
Control Cable
Clip
Ground Cable
Transaxle Case Protector
Tie Rod End RH Drive Shaft
Stiffener PlateNo.2 Rear
End Plate
� Snap Ring
� Cotter Pin LH Drive
Shaft
PS Gear Assembly
Engine Mounting
Center Member
RH Engine
Under Cover
LH Engine Under CoverFront Suspension Crossmember
Assembly with Stabilizer BarClipAir Cleaner Case
Assembly
with Air Hose
Snap Ring
Engine
Wire
Clamp
� Cotter Pin
Lock Cap Starter
N·m (kgf·cm, ft·lbf): Specified torque
� Non−reusable part�
� �
4.9 (50, 43 in.·lbf)
12 (120, 9)
29 (300, 22)
35 (360, 26)32 (330, 24)46 (470, 34)
64 (650, 47)
35 (360, 26)
64 (650, 47)
12 (120, 9)
64 (650, 47)
25 (250, 18)
25 (250, 18)
9.0 (95, 78 in.·lbf)
37 (380, 27)
39 (400, 29)
9.0 (95, 78 in.·lbf)
29 (300, 22)
37 (380, 27)49 (500, 36)
113 (1,150, 83)
137 (1,400, 101)
206 (2,100, 152)
216 (2,200, 159)
113 (1,150, 83)
64 (650, 47)
48 (490, 35)
80 (820, 59)
115 (1,170, 85)
127 (1,300, 94)
�62 (630, 46)
Front Exhaust Pipe
� GasketClip
Washer
MX−2
− MANUAL TRANSAXLEMANUAL TRANSAXLE UNIT (2WD)
1996 RAV4 (RM447U)
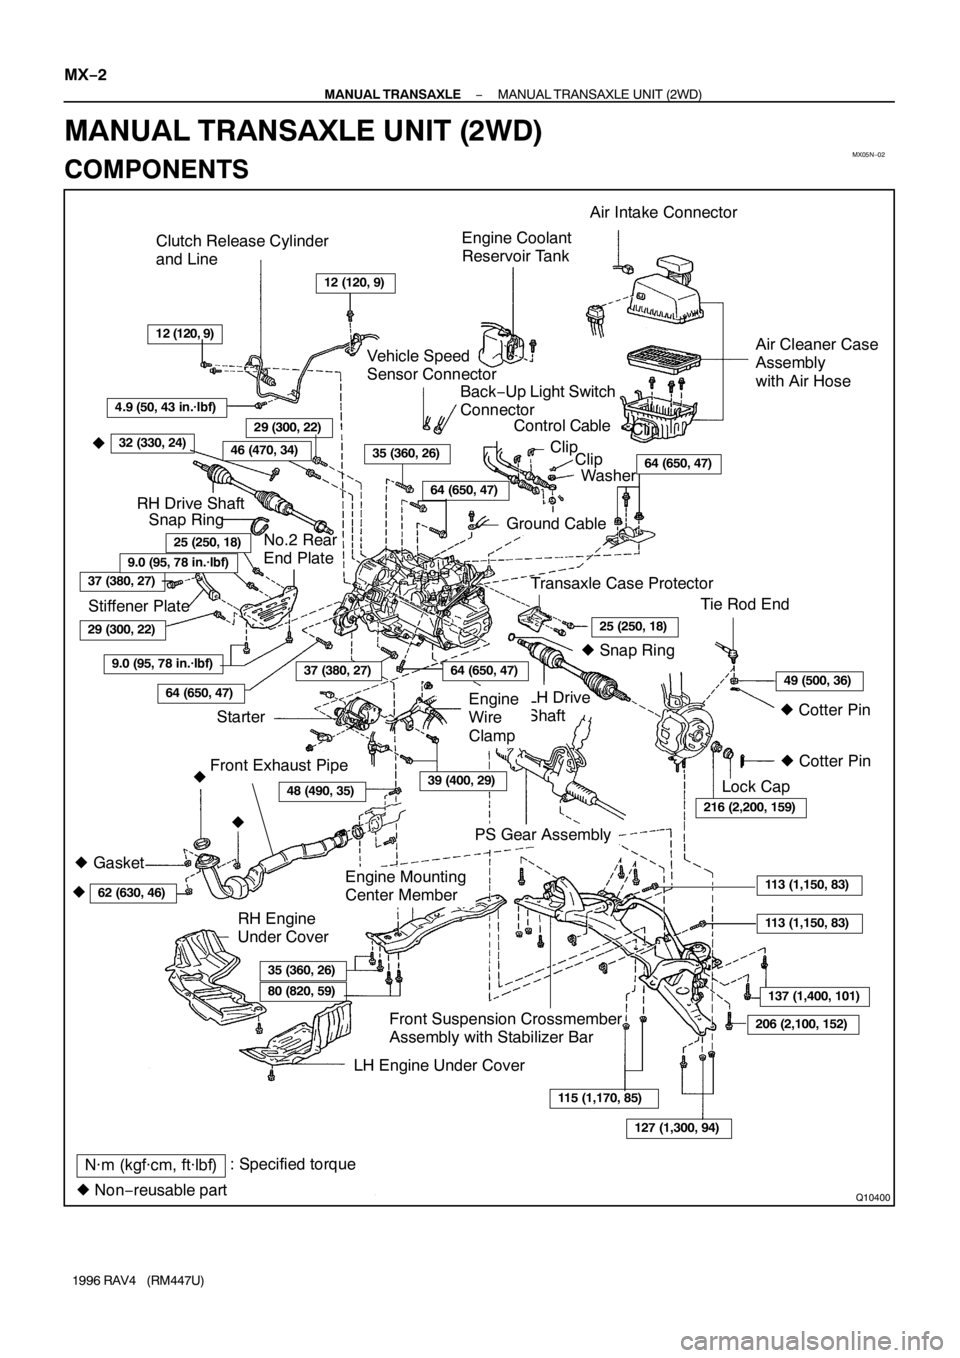
MANUAL TRANSAXLE UNIT (2WD)
COMPONENTS
Page 998 of 1354

MX05O−02
Q08747
Q08748
A
B
Q08749
Q08750
A B
A
− MANUAL TRANSAXLEMANUAL TRANSAXLE UNIT (2WD)
MX−3
1996 RAV4 (RM447U)
REMOVAL
1. REMOVE AIR CLEANER CASE ASSEMBLY WITH AIR
HOSE
2. REMOVE ENGINE COOLANT RESERVOIR TANK
3. REMOVE ENGINE WIRE CLAMP SET NUT
4. REMOVE STARTER
(a) Disconnect the connector and wire from the starter.
(b) Remove the 2 bolts and starter.
Torque: 39 N·m (400 kgf·cm, 29 ft·lbf)
5. DISCONNECT CLUTCH RELEASE CYLINDER AND
LINE
(a) Remove the 2 set bolts of the clutch line bracket.
Torque:
Bolt A: 12 N·m (120 kgf·cm, 9 ft·lbf)
Bolt B: 4.9 N·m (50 kgf·cm, 43 in.·lbf)
(b) Remove the 2 bolts, release cylinder and line.
Torque: 12 N·m (120 kgf·cm, 9 ft·lbf)
6. DISCONNECT GROUND CABLE
Remove the set bolt of the ground cable from the transaxle.
7. DISCONNECT VEHICLE SPEED SENSOR AND
BACK−UP LIGHT SWITCH CONNECTORS
8. DISCONNECT CONTROL CABLE
(a) Remove the 2 clips and washers.
(b) Remove the 2 clips from the cables.
9. REMOVE 4 TRANSAXLE UPPER SIDE MOUNTING
BOLTS
Torque:
Bolt A: 64 N·m (650 kgf·cm, 47 ft·lbf)
Bolt B: 35 N·m (360 kgf·cm, 26 ft·lbf)