Page 870 of 1399
−
ENGINE MECHANICAL CYLINDER BLOCK
EM−85
1996 LAND CRUISER (RM451U)
14. REMOVE CONNECTING ROD CAPS AND CHECK OIL
CLEARANCE
(a) Check the matchmarks on the connecting rod cap and
connecting rod to ensure correct reassembly.
(b) Remove the connecting rod cap nuts.
(c) Using a plastic− faced hammer, lightly tap the connecting
rod bolts and lift off the connecting rod cap.
HINT:
Keep the lower bearing inserted with the connecting rod cap.
(d) Cover the connecting rod bolts with a short piece of hose to protect the crankshaft from damage.
(e) Clean the crank pin and bearing.
(f) Check the crank pin and bearing for pitting and scratches.
If the crank pin or bearing is damaged, replace the bearings. If
necessary, grind or replace the crankshaft.
(g) Lay a strip of Plastigage across the crank pin.
Brought to you by BirfMark
Brought to you by BirfMark
Version 1.11 - 03/16/2010
Page 871 of 1399

EXAMPLE: Connecting rod ”3” + Crankshaft ”1”= Total number 4 (Use bearing ”4”)
Number marked
Connecting rod
Crankshaft
Use bearing 123
2
2 22
3
3 3
3 3
4445 56
111
EM−86
−
ENGINE MECHANICAL CYLINDER BLOCK
1996 LAND CRUISER (RM451U)
(h) Install the connecting rod cap with the 2 nuts (See page EM−103 ).
NOTICE:
Do not turn the crankshaft.
(i) Remove the 2 nuts and connecting rod cap (See proce-
dure (b) and (c) above).
(j) Measure the Plastigage at its widest point. Standard oil clearance:
STD0.032 − 0.050 mm (0.0013 − 0.0020 in.)
U/S 0.250.033 − 0.073 mm (0.0013 − 0.0029 in.)
Maximum oil clearance: 0.10 mm (0.0039 in.)
If the oil clearance is greater than maximum, replace the bear-
ings. If necessary, grind or replace the crankshaft.
HINT:
If using a standard bearing, replace with one having the same
number. If the number of the bearing cannot be determined, se-
lect the correct bearing by adding together the numbers im-
printed on the connecting rod and crankshaft, then selecting
the bearing with the same number as the total. There are 5 sizes
of standard bearings, marked ”2”, ”3”, ”4”, ”5” and ”6” according-
ly.
Reference
Connecting rod big end inside diameter:
Mark ”1”60.526 − 60.532 mm (2.3829 − 2.3831 in.)
Mark ”2”60.532 − 60.538 mm (2.3831 − 2.3834 in.)
Mark ”3”60.538 − 60.544 mm (2.3834 − 2.3836 in.)
Crankshaft crank pin diameter:
Mark ”1”56.994 − 57.000 mm (2.2439 − 2.2441 in.)
Mark ”2”56.988 − 56.994 mm (2.2436 − 2.2439 in.)
Mark ”3”56.982 − 56.988 mm (2.2434 − 2.2436 in.)
Brought to you by BirfMark
Brought to you by BirfMark
Version 1.11 - 03/16/2010
Page 872 of 1399

P04620
−
ENGINE MECHANICAL CYLINDER BLOCK
EM−87
1996 LAND CRUISER (RM451U)
Standard sized bearing center wall thickness:
Mark ”2”1.744 − 1.747 mm (0.0687 − 0.0688 in.)
Mark ”3”1.747 − 1.750 mm (0.0688 − 0.0689 in.)
Mark ”4”1.750 − 1.753 mm (0.0689 − 0.0690 in.)
Mark ”5”1.753 − 1.756 mm (0.0690 − 0.0691 in.)
Mark ”6”1.756 − 1.759 mm (0.0691 − 0.0693 in.)
(k) Completely remove the Plastigage.
15. R E M O V E P I S TO N A N D C O N N E C T I N G R O D A S-
SEMBLIES
(a) Using a ridge reamer, remove the all carbon from the top of the cylinder.
(b) Push the piston, connecting rod assembly and upper bearing through the top of the cylinder block.
HINT:
�Keep the bearings, connecting rod and cap together.
�Arrange the piston and connecting rod assemblies in cor-
rect order.
16. CHECK CRANKSHAFT THRUST CLEARANCE
Using a dial indicator, measure the thrust clearance while prying
the crankshaft back and forth with a screwdriver. Standard thrust clearance:
0.020 − 0.220 mm (0.0008 − 0.0087 in.)
Maximum thrust clearance: 0.30 mm (0.0118 in.)
If the thrust clearance is greater than maximum, replace the
thrust washers as a set. Thrust washer thickness:
STD2.440 − 2.490 mm (0.0961 − 0.0980 in.)
O/S 0.1252.503 − 2.553 mm (0.0985 − 0.1005 in.)
O/S 0.2502.565 − 2.615 mm (0.1010 − 0.1030 in.)
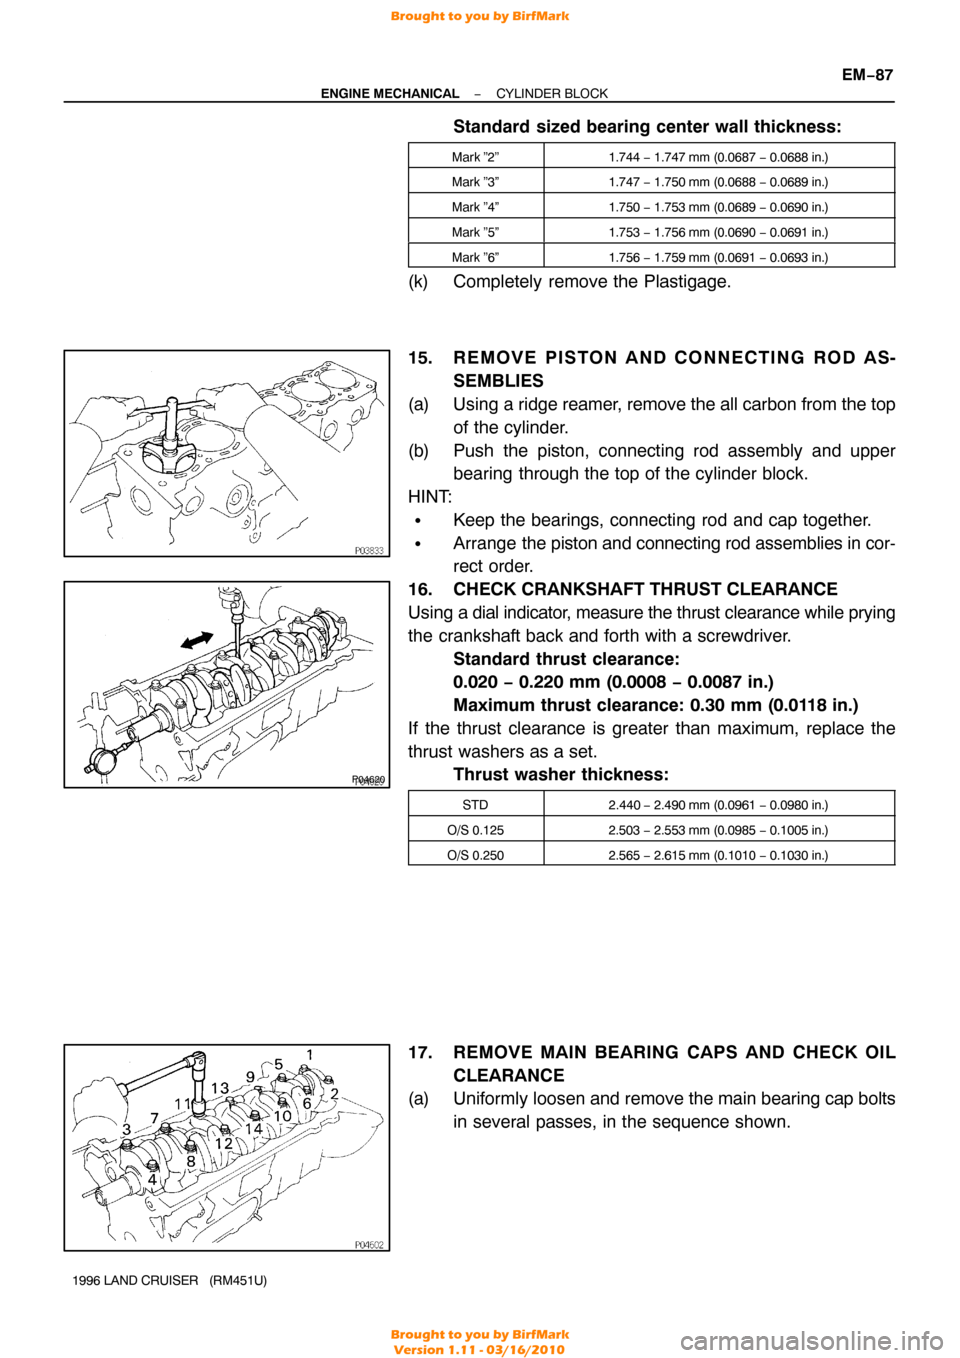
17. REMOVE MAIN BEARING CAPS AND CHECK OIL
CLEARANCE
(a) Uniformly loosen and remove the main bearing cap bolts
in several passes, in the sequence shown.
Brought to you by BirfMark
Brought to you by BirfMark
Version 1.11 - 03/16/2010
Page 873 of 1399

EM−88
−
ENGINE MECHANICAL CYLINDER BLOCK
1996 LAND CRUISER (RM451U)
(b) Using the removed main bearing cap bolts, pry the main
bearing cap back and forth, and remove the main bearing
caps, lower bearings and (No.4 main bearing cap only)
lower thrust washers.
HINT:
�Keep the lower bearing and main bearing cap together.
�Arrange the main bearing caps and lower thrust washers
in correct order.
(c) Lift out the crankshaft.
HINT:
Keep the upper bearing and upper thrust washers together with
the cylinder block.
(d) Clean each main journal and bearing.
(e) Check each main journal and bearing for pitting and
scratches.
If the journal or bearing is damaged, replace the bearings. If
necessary, grind or replace the crankshaft.
(f) Place the crankshaft on the cylinder block.
(g) Lay a strip of Plastigage across each journal.
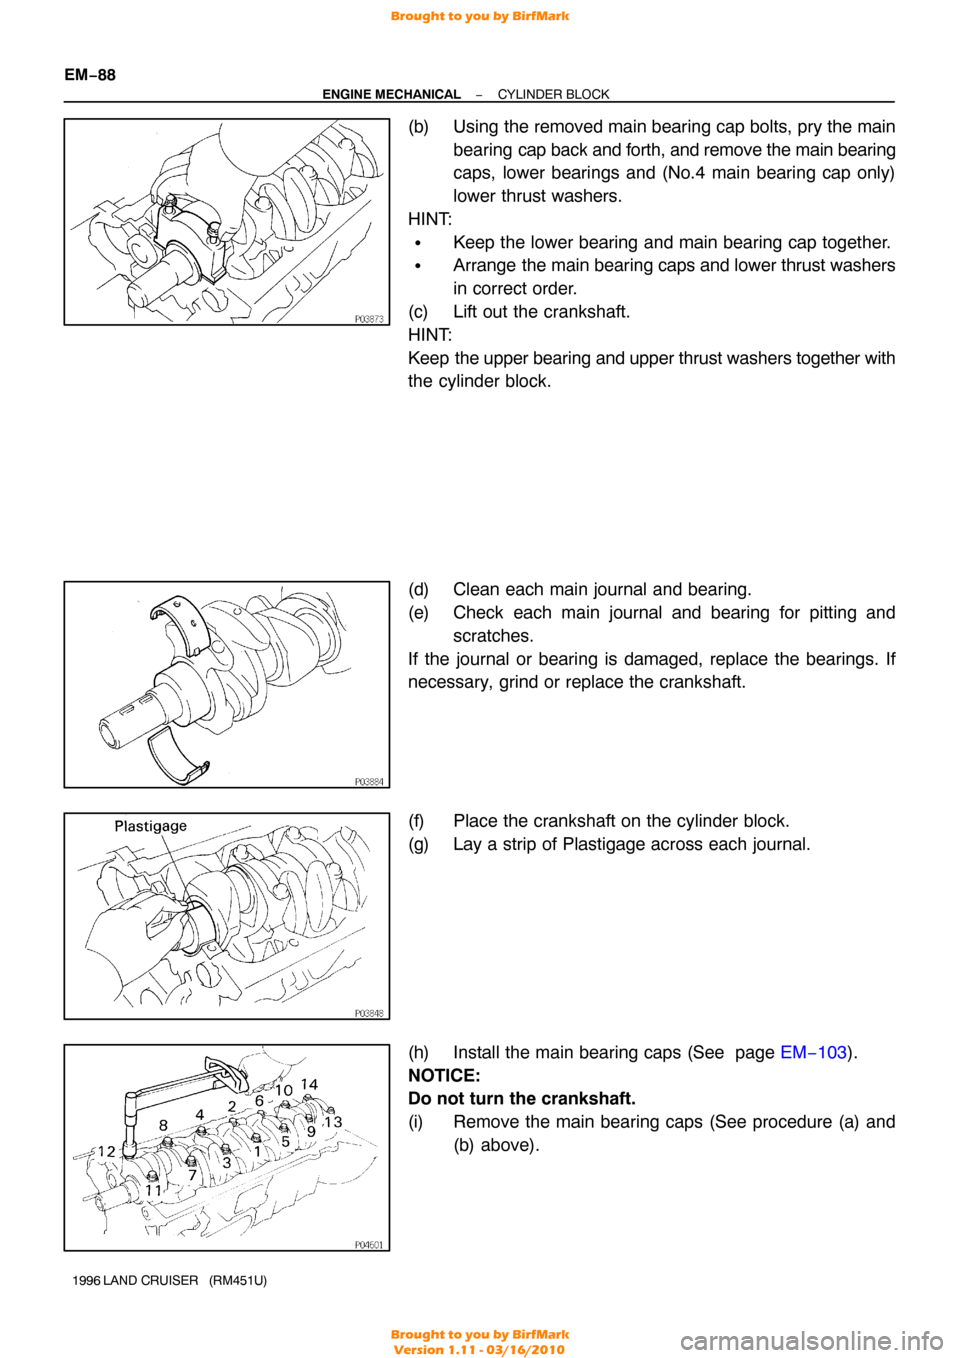
(h) Install the main bearing caps (See page EM−103).
NOTICE:
Do not turn the crankshaft.
(i) Remove the main bearing caps (See procedure (a) and (b) above).
Brought to you by BirfMark
Brought to you by BirfMark
Version 1.11 - 03/16/2010
Page 874 of 1399

EXAMPLE: Cylinder block ”2” + Crankshaft ”1”= Total number 3 (Use bearing ”3”)
Number marked
Cylinder block
Crankshaft
Use bearing 123
2
2 22
3
3 3
3 3
4445 56
111
−
ENGINE MECHANICAL CYLINDER BLOCK
EM−89
1996 LAND CRUISER (RM451U)
(j) Measure the Plastigage at its widest point.
Standard clearance:
STD0.042 − 0.060 mm (0.0017 − 0.0024 in.)
U/S 0.250.041 − 0.081 mm (0.0016 − 0.0032 in.)
Maximum clearance: 0.10 mm (0.0039 in.)
If the oil clearance is greater than maximum, replace the bear-
ings. If necessary, grind or replace the crankshaft.
HINT:
If using a standard bearing, replace with one having the same
number. If the number of the bearing cannot be determined, se-
lect the correct bearing by adding together the numbers im-
printed on the cylinder block and crankshaft, then selecting the
bearing with the same number as the total. There are 5 sizes
of standard bearings, marked ”2”, ”3”, ”4”, ”5” and ”6”\
accorking-
ly.
Reference
Cylinder block main journal bore diameter:
Mark ”1”74.026 − 74.032 mm (2.9144 − 2.9146 in.)
Mark ”2”74.032 − 74.038 mm (2.9146 − 2.9149 in.)
Mark ”3”74.038 − 74.044 mm (2.9149 − 2.9151 in.)
Crankshaft main journal diameter:
Mark ”1”68.994 − 69.000 mm (2.7163 − 2.7165 in.)
Mark ”2”68.988 − 68.994 mm (2.7161 − 2.7163 in.)
Mark ”3”68.982 − 68.988 mm (2.7158 − 2.7161 in.)
Standard bearing center wall thickness:
Mark ”2”2.489 − 2.492 mm (0.0980 − 0.0981 in.)
Mark ”2”2.492 − 2.495 mm (0.0981 − 0.0982 in.)
Mark ”3”2.495 − 2.498 mm (0.0982 − 0.0983 in.)
Mark ”4”2.498 − 2.501 mm (0.0983 − 0.0985 in.)
Mark ”5”2.501 − 2.504 mm (0.0985 − 0.0986 in.)
(k) Completely remove the Plastigage.
18. REMOVE CRANKSHAFT
(a) Lift out the crankshaft.
(b) Remove the upper main bearings and upper thrust wash-
ers from the cylinder block.
HINT:
Arrange the main bearings and thrust washers in correct order.
Brought to you by BirfMark
Brought to you by BirfMark
Version 1.11 - 03/16/2010
Page 875 of 1399
P04628
EM−90
−
ENGINE MECHANICAL CYLINDER BLOCK
1996 LAND CRUISER (RM451U)
19. REMOVE CHECK VALVES AND OIL NOZZLES
Remove the 6 check valves and oil nozzles.
20. REMOVE CYLINDER BLOCK ORIFICE
21. CHECK FIT BETWEEN PISTON AND PISTON PIN
Try to move the piston back and forth on the piston pin.
If any movement is felt, replace the piston and pin as a set.
22. REMOVE PISTON RINGS
(a) Using a piston ring expander, remove the 2 compression
rings.
(b) Remove the 2 side rails and oil ring by hand.
HINT:
Arrange the rings in correct order only.
Brought to you by BirfMark
Brought to you by BirfMark
Version 1.11 - 03/16/2010
Page 876 of 1399
P03870
−
ENGINE MECHANICAL CYLINDER BLOCK
EM−91
1996 LAND CRUISER (RM451U)
23. DISCONNECT CONNECTING ROD FROM PISTON
(a) Using a small screwdriver, pry out the 2 snap rings.
(b) Gradually heat the piston to 80 − 90°C (176 − 194° F).
(c) Using plastic −faced hammer and brass bar, lightly tap out
the piston pin and remove the connecting rod.
HINT:
�The piston and pin are a matched set.
�Arrange the pistons, pins, rings, connecting rods and
bearings in correct order.
Brought to you by BirfMark
Brought to you by BirfMark
Version 1.11 - 03/16/2010
Page 877 of 1399

EM1EH−02
EM−92
−
ENGINE MECHANICAL CYLINDER BLOCK
1996 LAND CRUISER (RM451U)
INSPECTION
1. CLEAN CYLINDER BLOCK
(a) Using a gasket scraper, remove all the gasket material from the top surface of the cylinder block.
(b) Using a soft brush and solvent, thoroughly clean the cylin-
der block.
2. INSPECT CYLINDER BLOCK
(a) Inspect for flatness. Using a precision straight edge and feeler gauge, mea-
sure the surfaces contacting the cylinder head gasket for
warpage.
Maximum warpage: 0.05 mm (0.0020 in.)
If warpage is greater than maximum, replace the cylinder block.
(b) Visually check the cylinder for vertical scratches.
If deep scratches are present, rebore all the 6 cylinders. If nec-
essary, replace the cylinder block.
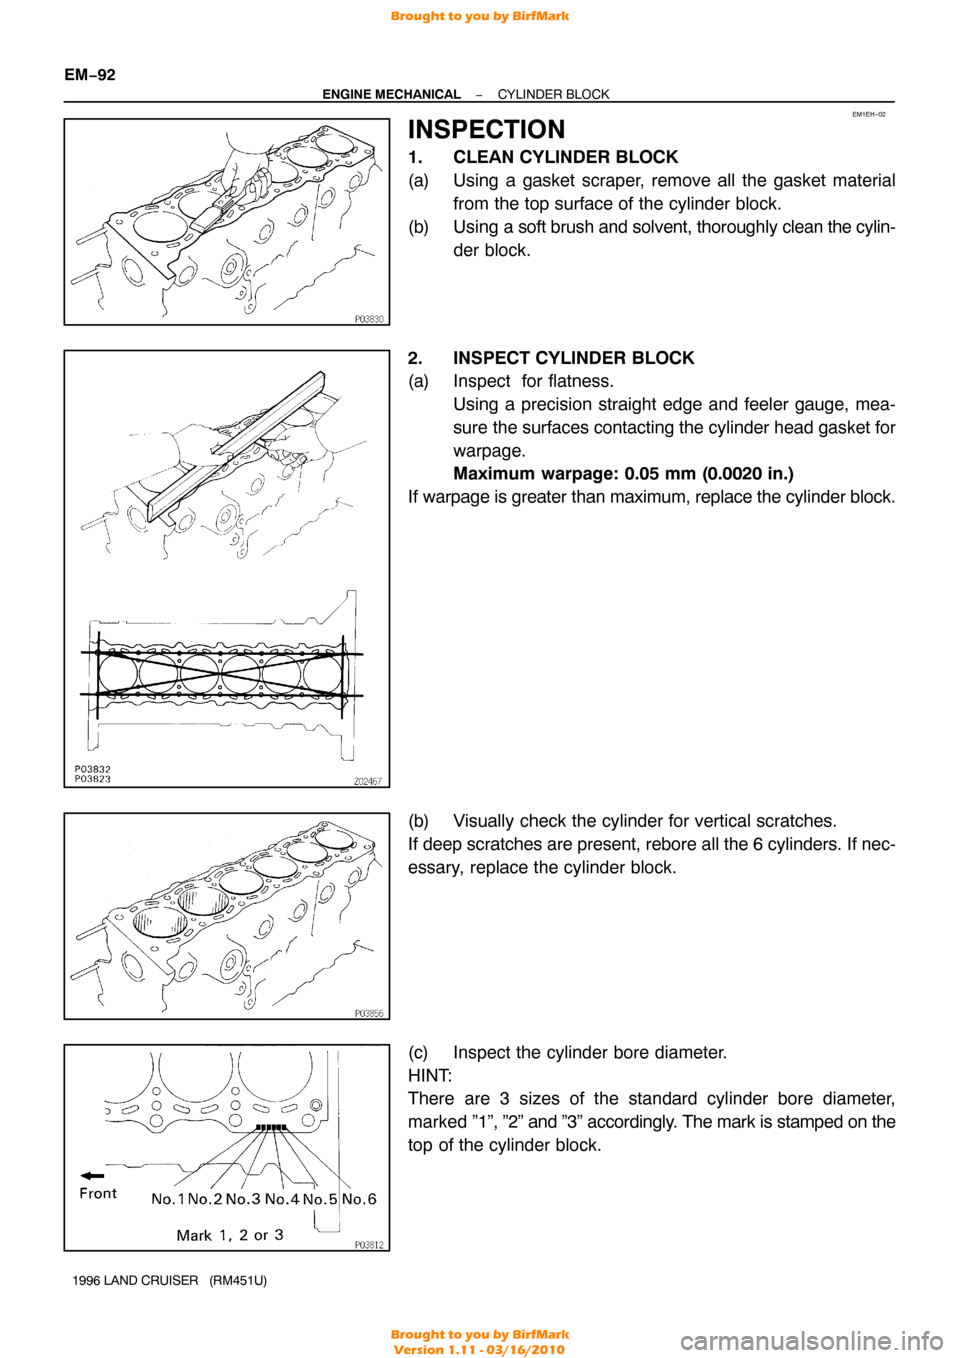
(c) Inspect the cylinder bore diameter.
HINT:
There are 3 sizes of the standard cylinder bore diameter,
marked ”1”, ”2” and ”3” accordingly. The mark is stamped on the
top of the cylinder block.
Brought to you by BirfMark
Brought to you by BirfMark
Version 1.11 - 03/16/2010