Page 896 of 1399
.
Replace the distributor housing assembly.
Check wiring between ECM, ignition co")
IG0IB−02
SPARK TEST
TRY ANOTHER IGNITERNO
OK
OK
OK
OK
OK
BAD
BAD
BAD
BAD
BAD
BADConnect securely.
Replace the cord(s).
Replace the distributor housing assembly.
Check wiring between ECM, ignition coil and
igniter, and then try another ECM.
CHECK CONNECTION OF IGNITION COIL, IGNITER AND
DISTRIBUTOR CONNECTOR
CHECK RESISTANCE OF HIGH−
TENSION CORD
(See step 8)
Maximum resistance: 25 k Ω per cord
CHECK RESISTANCE OF IGNITION COIL (See step 24)
Resistance: Cold Hot
Primary 0.36 − 0.55 Ω 0.45 − 0.65 Ω
Secondary 9.0 − 15.4 kΩ 11.4 − 18.1 kΩ
CHECK AIR GAP OF DISTRIBUTOR (See step 31)
Air gap: 0.2 − 0.4 mm (0.008 −0.016 in.)
OK
CHECK RESISTANCE OF SIGNAL GENERATOR
(PICKUP COIL) (See step 32)
Resistance: Cold Hot
G1 and G− 185 − 275 Ω 240 − 325 Ω
G2 and G− 185 − 275 Ω 240 − 325 Ω
NE and G − 185 − 275 Ω 240 − 325 Ω
CHECK IGT SIGNAL FROM ECM
(See page DI−93 ) Check
wiring between ignition switch to ignition
coil and igniter.
Replace the ignition coil.
Replace the distributor housing assembly.
BAD
OK
CHECK
POWER SUPPLY TO IGNITION COIL AND IGNITER
1. Turn ignition switch to ON.
2. Check that there is battery voltage at ignition coil positive (+)
terminal.
−
IGNITION IGNITION SYSTEM
IG−1
735
Author�: Date�:
1996 LAND CRUISER (RM451U)
IGNITION SYSTEM
ON−VEHICLE INSPECTION
1. CHECK THAT SPARK OCCURS
(a) Disconnect the high −tension cords (from the ignition coil)
from the distributor cap.
(b) Hold the end approx. 12.5 mm (0.50 in.) from the body ground.
(c) Check if spark occurs while engine is being cranked.
HINT:
To prevent gasoline from being injected from injectors during
this test, crank the engine for no more than 1 − 2 seconds at a
time.
If the spark does not occur, do the test as follows:
Brought to you by BirfMark
Brought to you by BirfMark
Version 1.11 - 03/16/2010
Page 897 of 1399
P22687
P08512
IG−2
−
IGNITION IGNITION SYSTEM
736
Author�: Date�:
1996 LAND CRUISER (RM451U)
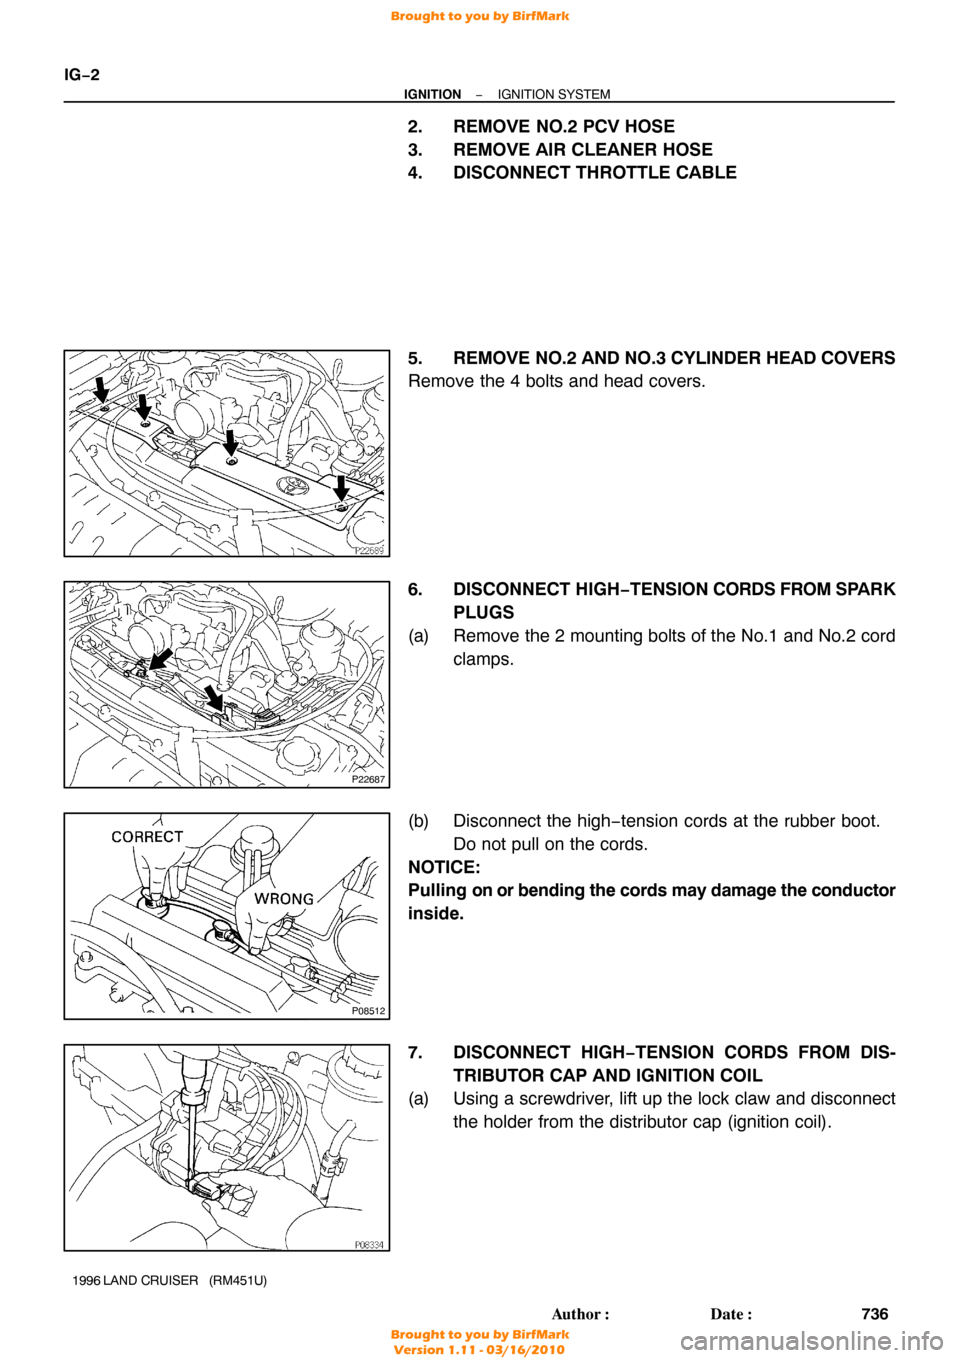
2. REMOVE NO.2 PCV HOSE
3. REMOVE AIR CLEANER HOSE
4. DISCONNECT THROTTLE CABLE
5. REMOVE NO.2 AND NO.3 CYLINDER HEAD COVERS
Remove the 4 bolts and head covers.
6. DISCONNECT HIGH −TENSION CORDS FROM SPARK
PLUGS
(a) Remove the 2 mounting bolts of the No.1 and No.2 cord clamps.
(b) Disconnect the high −tension cords at the rubber boot.
Do not pull on the cords.
NOTICE:
Pulling on or bending the cords may damage the conductor
inside.
7. DISCONNECT HIGH−TENSION CORDS FROM DIS- TRIBUTOR CAP AND IGNITION COIL
(a) Using a screwdriver, lift up the lock claw and disconnect
the holder from the distributor cap (ignition coil).
Brought to you by BirfMark
Brought to you by BirfMark
Version 1.11 - 03/16/2010
Page 898 of 1399
−
IGNITION IGNITION SYSTEM
IG−3
737
Author�: Date�:
1996 LAND CRUISER (RM451U)
(b) Disconnect the high−tension cord at the grommet.
Do not pull on the cord.
NOTICE:
Pulling on or bending the cords may damage the conductor
inside.Do not wipe any of the oil from the grommet after the
high −tension cord is disconnected.
8. INSPECT HIGH−TENSION CORD RESISTANCE
Using an ohmmeter, measure the resistance. Maximum resistance: 25 k Ω per cord
If the resistance is greater than maximum, check the terminals.
If necessary, replace the high −tension cord.
9. RECONNECT HIGH− TENSION CORDS TO DISTRIBU-
TOR CAP AND IGNITION COIL
(a) Assemble the holder and grommet.
HINT:
Connect the high− tension cords to the distributor cap as shown
in the illustration.
(b) Align the spline of the distributor (ignition coil) with the spline of the holder, and push in the cord.
Brought to you by BirfMark
Brought to you by BirfMark
Version 1.11 - 03/16/2010
Page 901 of 1399

19. ADJUST ELECTRODE GAP
Carefully bend the outer electrode to obtain the correct elec-
trode gap.
Correct")
P03792
IG−6
−
IGNITION IGNITION SYSTEM
740
Author�: Date�:
1996 LAND CRUISER (RM451U)
19. ADJUST ELECTRODE GAP
Carefully bend the outer electrode to obtain the correct elec-
trode gap.
Correct electrode gap: 0.8 mm (0.031 in.)
20. INSTALL SPARK PLUGS
Using a 16 mm plug wrench, install the spark plug. Torque: 20 N·m (200 kgf·cm, 14 ft·lbf)
21. RECONNECT HIGH −TENSION CORDS TO SPARK
PLUGS
NOTICE:
”Cold” and ”Hot” in the following sentences express the
temperature of the coils themselves. ”Cold” is from −10° C
(14 °F) to 50° C (122°F) and ”Hot” is from 50 °C (122° F) to
100 °C (212 °F).
22. DISCONNECT IGNITION COIL CONNECTOR
23. DISCONNECT HIGH−TENSION CORD
24. INSPECT PRIMARY COIL RESISTANCE
Using an ohmmeter, measure the resistance between the posi-
tive (+) and negative (−) terminals. Primary coil resistance:
Cold: 0.36 − 0.55 Ω
Hot: 0.45 − 0.65 Ω
If the resistance is not as specified, replace the ignition coil.
25. INSPECT SECONDARY COIL RESISTANCE
Using an ohmmeter, measure the resistance between the posi-
tive (+) and high −tension terminals.
Secondary coil resistance:
Cold: 9.0 − 15.4 kΩ
Hot: 11.4 − 18.1 kΩ
If the resistance is not as specified, replace the ignition coil.
26. RECONNECT HIGH−TENSION CORD
27. RECONNECT IGNITION COIL CONNECTOR
Brought to you by BirfMark
Brought to you by BirfMark
Version 1.11 - 03/16/2010
Page 902 of 1399

NOTICE:
”Cold” and ”Hot” in the following sentences express the
temperature of the coils themselves. ”Co")
−
IGNITION IGNITION SYSTEM
IG−7
741
Author�: Date�:
1996 LAND CRUISER (RM451U)
NOTICE:
”Cold” and ”Hot” in the following sentences express the
temperature of the coils themselves. ”Cold” is from −10° C
(14 °F) to 50° C (122°F) and ”Hot” is from 50 °C (122° F) to
100 °C (212 °F).
28. DISCONNECT DISTRIBUTOR CONNECTOR
29. REMOVE DISTRIBUTOR CAP WITHOUT DISCON- NECTING HIGH−TENSION CORDS
30. REMOVE ROTOR
31. INSPECT AIR GAPS
Using a thickness gauge, measure the gap between the signal
rotor and the pickup coil projection. Air gap: 0.2 − 0.4 mm (0.008 − 0.016 in.)
If the gap is not as specified, replace the distributor housing.
32. INSPECT SIGNAL GENERATOR (PICKUP COIL) RE- SISTANCE
Using an ohmmeter, check that the resistance of the pickup coil. Pickup coil resistance:
Cold G1 and G�
G2 and G�
NE and G�185 − 275 Ω
185 − 275 Ω
185 − 275 Ω
Hot G1 and G�
G2 and G�
NE and G�240 − 325 Ω
240 − 325 Ω
240 − 325 Ω
If the resistance is not as specified, replace the distributor hous-
ing.
33. REINSTALL ROTOR
34. REINSTALL DISTRIBUTOR CAP
35. RECONNECT DISTRIBUTOR CONNECTOR
NOTICE:
”Cold” and ”Hot” in the following sentences express the
temperature of the sensor itself.
”Cold” is from −10° C (14°F) to 50° C (122°F) and ”Hot” is
from 50° C (122°F) to 100° C (212°F).
Brought to you by BirfMark
Brought to you by BirfMark
Version 1.11 - 03/16/2010
Page 986 of 1399
−
PREPARATION SUSPENSION AND AXLE
PP−45
94
Author�: Date�:
1996 LAND CRUISER (RM451U)
09727−30021Coil Spring Compressor
09950−00020Bearing RemoverFront differential
Rear differential
09950−30011Puller A SetFront differential
Rear differential
(09951−03010)Upper Plate
(09953−03010)Center Bolt
(09954−03010)Arm
(09955−03030)Lower Plate 130
(09956−03020)Adapter 18
09950−40011Puller B SetFront differential
Rear differential
(09951−04010)Hanger 150
(09952−04010)Slide Arm
(09953−04020)Center Bolt 150
(09954−04010)Arm 25
Brought to you by BirfMark
Brought to you by BirfMark
Version 1.11 - 03/16/2010
Page 1112 of 1399
SA1UR−01
−
SUSPENSION AND AXLE COIL SPRING AND FRONT SHOCK ABSORBER
SA−49
906
Author�: Date�:
1996 LAND CRUISER (RM451U)
COIL SPRING AND FRONT SHOCK ABSORBER
COMPONENTS
Brought to you by BirfMark
Brought to you by BirfMark
Version 1.11 - 03/16/2010
Page 1113 of 1399

REMOVAL
1. REMOVE FRONT WHEEL Torque:
Steel wheel: 147 N·m (1,500 kgf")
SA1US−01
SA2662
SA2663
R13152
SA−50
−
SUSPENSION AND AXLE COIL SPRING AND FRONT SHOCK ABSORBER
1996 LAND CRUISER (RM451U)
REMOVAL
1. REMOVE FRONT WHEEL Torque:
Steel wheel: 147 N·m (1,500 kgf·cm, 109 ft·lbf)
Aluminum wheel: 103 N·m (1,050 kgf·cm, 76 ft·lbf)
2. REMOVE FRONT SHOCK ABSORBER
(a) Jack up and support the axle housing.
(b) Hold the piston rod and remove the upper mounting nut. Torque: 69 N·m (700 kgf·cm, 51 ft·lbf)
(c) Hold the shock absorber and remove the lower mounting nut, shock absorber, cushions and retainers.
Torque: 69 N·m (700 kgf·cm, 51 ft·lbf)
3. DISCONNECT STABILIZER BAR FROM AXLE HOUS- ING (See page SA−60 )
4. REMOVE COIL SPRING
(a) Jack down and support axle housing.
(b) Using SST, compress the coil spring. SST 09727−30021
NOTICE:
Do not use an impact wrench. It will damage the SST.
(c) Remove the coil spring.
HINT:
Align the coil spring end with the lower seat and install the coil
spring.
5. REMOVE FOLLOW SPRING
Remove the 2 nuts and follow spring. Torque: 9.2 N·m (94 kgf·cm, 82 in.·lbf)
Brought to you by BirfMark
Brought to you by BirfMark
Version 1.11 - 03/16/2010