Page 1143 of 1399
W00493
30 mm
(1.18 in.)
SA1VH−04
SA2446
SA−80
−
SUSPENSION AND AXLE REAR DIFFERENTIAL CARRIER
1996 LAND CRUISER (RM451U)
DISASSEMBLY
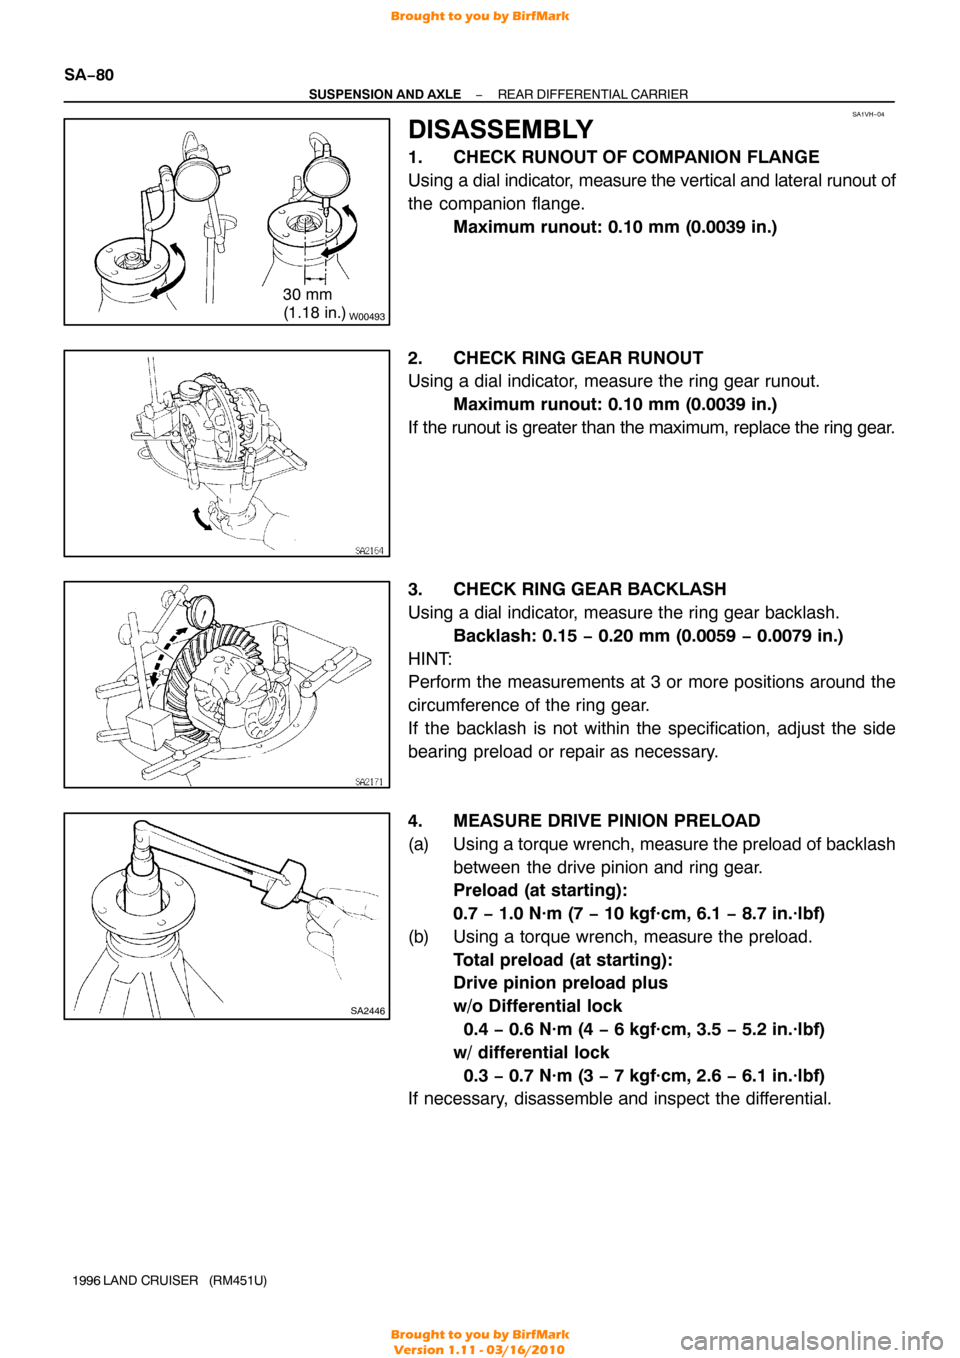
1. CHECK RUNOUT OF COMPANION FLANGE
Using a dial indicator, measure the vertical and lateral runout of
the companion flange. Maximum runout: 0.10 mm (0.0039 in.)
2. CHECK RING GEAR RUNOUT
Using a dial indicator, measure the ring gear runout. Maximum runout: 0.10 mm (0.0039 in.)
If the runout is greater than the maximum, replace the ring gear.
3. CHECK RING GEAR BACKLASH
Using a dial indicator, measure the ring gear backlash. Backlash: 0.15 − 0.20 mm (0.0059 − 0.0079 in.)
HINT:
Perform the measurements at 3 or more positions around the
circumference of the ring gear.
If the backlash is not within the specification, adjust the side
bearing preload or repair as necessary.
4. MEASURE DRIVE PINION PRELOAD
(a) Using a torque wrench, measure the preload of backlash between the drive pinion and ring gear.
Preload (at starting):
0.7 − 1.0 N·m (7 − 10 kgf·cm, 6.1 − 8.7 in.·lbf)
(b) Using a torque wrench, measure the preload. Total preload (at starting):
Drive pinion preload plus
w/o Differential lock
0.4 − 0.6 N·m (4 − 6 kgf·cm, 3.5 − 5.2 in.·lbf)
w/ differential lock
0.3 − 0.7 N·m (3 − 7 kgf·cm, 2.6 − 6.1 in.·lbf)
If necessary, disassemble and inspect the differential.
Brought to you by BirfMark
Brought to you by BirfMark
Version 1.11 - 03/16/2010
Page 1144 of 1399
SA2131
SA2134
SA2448
SST
−
SUSPENSION AND AXLE REAR DIFFERENTIAL CARRIER
SA−81
1996 LAND CRUISER (RM451U)
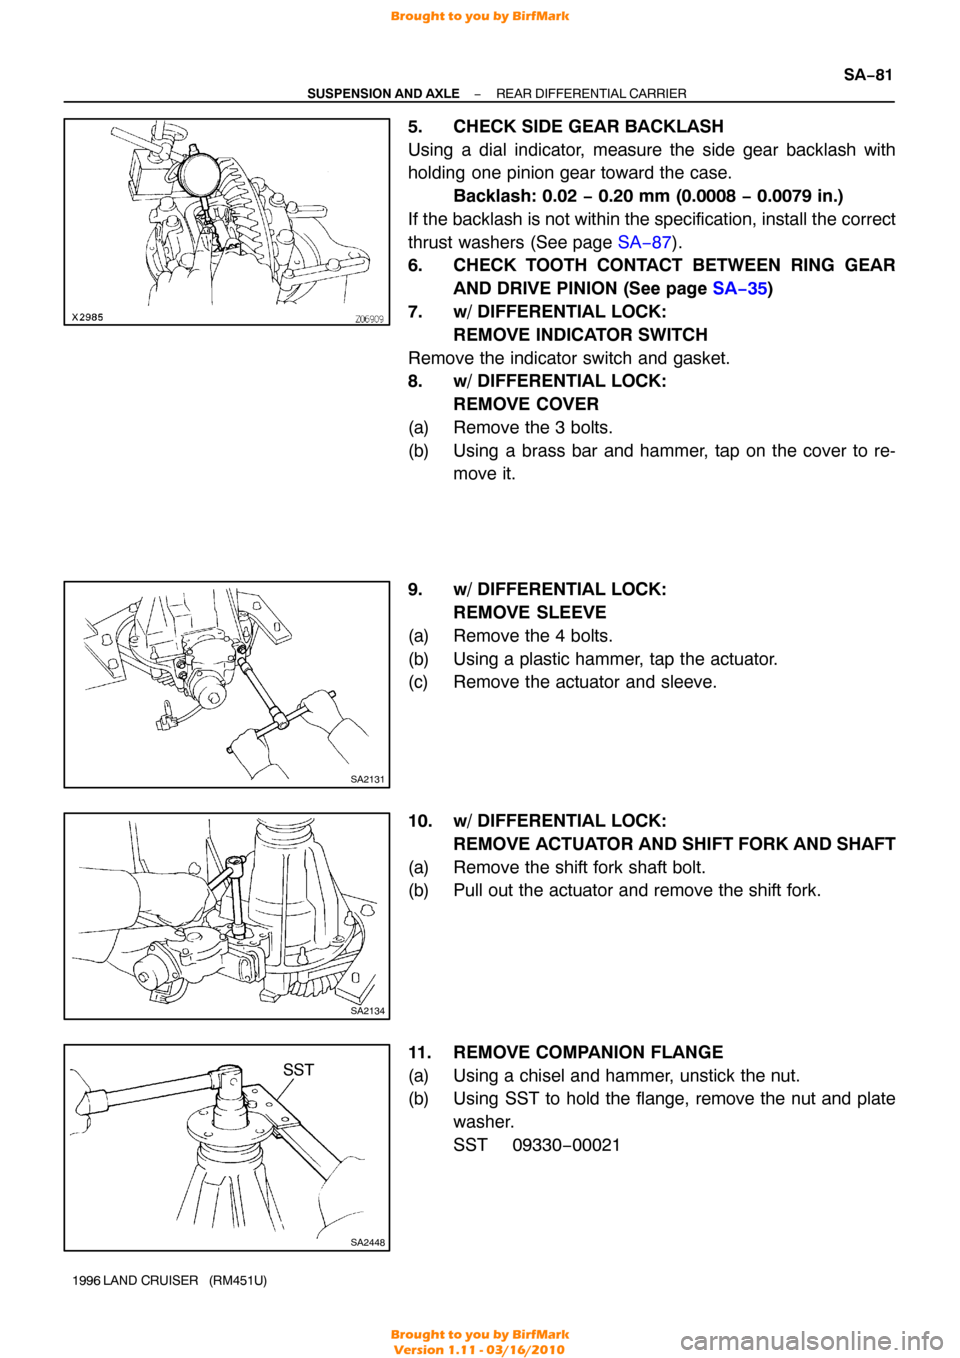
5. CHECK SIDE GEAR BACKLASH
Using a dial indicator, measure the side gear backlash with
holding one pinion gear toward the case.
Backlash: 0.02 − 0.20 mm (0.0008 − 0.0079 in.)
If the backlash is not within the specification, install the correct
thrust washers (See page SA−87).
6. CHECK TOOTH CONTACT BETWEEN RING GEAR
AND DRIVE PINION (See page SA−35 )
7. w/ DIFFERENTIAL LOCK: REMOVE INDICATOR SWITCH
Remove the indicator switch and gasket.
8. w/ DIFFERENTIAL LOCK: REMOVE COVER
(a) Remove the 3 bolts.
(b) Using a brass bar and hammer, tap on the cover to re- move it.
9. w/ DIFFERENTIAL LOCK: REMOVE SLEEVE
(a) Remove the 4 bolts.
(b) Using a plastic hammer, tap the actuator.
(c) Remove the actuator and sleeve.
10. w/ DIFFERENTIAL LOCK: REMOVE ACTUATOR AND SHIFT FORK AND SHAFT
(a) Remove the shift fork shaft bolt.
(b) Pull out the actuator and remove the shift fork.
11. REMOVE COMPANION FLANGE
(a) Using a chisel and hammer, unstick the nut.
(b) Using SST to hold the flange, remove the nut and plate washer.
SST 09330−00021
Brought to you by BirfMark
Brought to you by BirfMark
Version 1.11 - 03/16/2010
Page 1145 of 1399
R13166
SST
SA2348
SST
Z00641
SST
SSTSST
SA−82
−
SUSPENSION AND AXLE REAR DIFFERENTIAL CARRIER
1996 LAND CRUISER (RM451U)
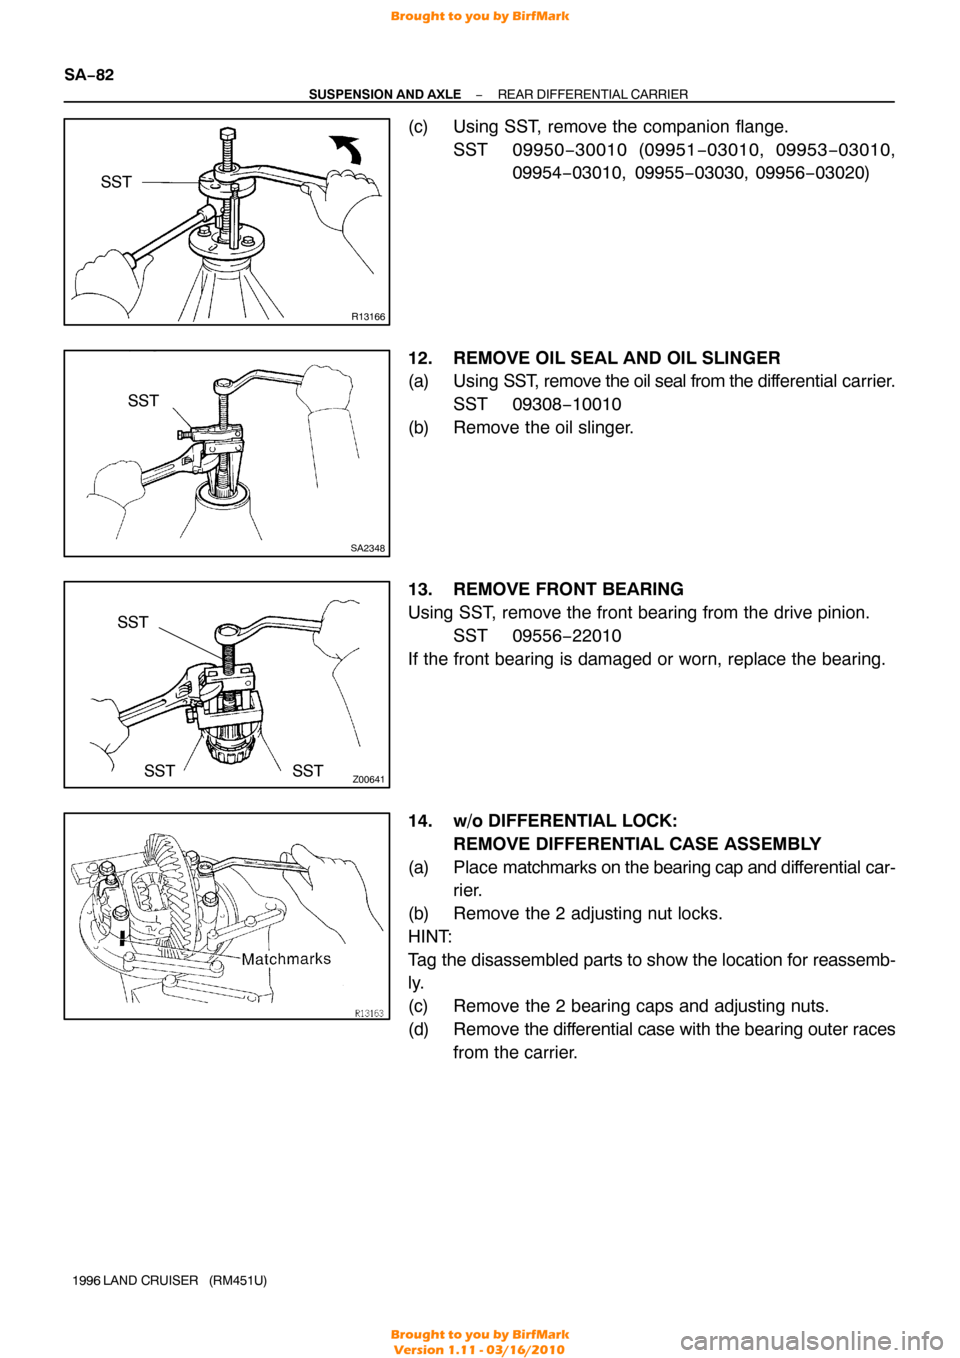
(c) Using SST, remove the companion flange.
SST 09950 −30010 (09951 −03010, 09953 −03010,
09954 −03010, 09955 −03030, 09956−03020)
12. REMOVE OIL SEAL AND OIL SLINGER
(a) Using SST, remove the oil seal from the dif ferential carrier.
SST 09308−10010
(b) Remove the oil slinger.
13. REMOVE FRONT BEARING
Using SST, remove the front bearing from the drive pinion. SST 09556−22010
If the front bearing is damaged or worn, replace the bearing.
14. w/o DIFFERENTIAL LOCK: REMOVE DIFFERENTIAL CASE ASSEMBLY
(a) Place matchmarks on the bearing cap and dif ferential car-
rier.
(b) Remove the 2 adjusting nut locks.
HINT:
Tag the disassembled parts to show the location for reassemb-
ly.
(c) Remove the 2 bearing caps and adjusting nuts.
(d) Remove the differential case with the bearing outer races
from the carrier.
Brought to you by BirfMark
Brought to you by BirfMark
Version 1.11 - 03/16/2010
Page 1146 of 1399
SA2437Matchmarks
R08254
SST
Z06911
SST
SA2424
−
SUSPENSION AND AXLE REAR DIFFERENTIAL CARRIER
SA−83
1996 LAND CRUISER (RM451U)
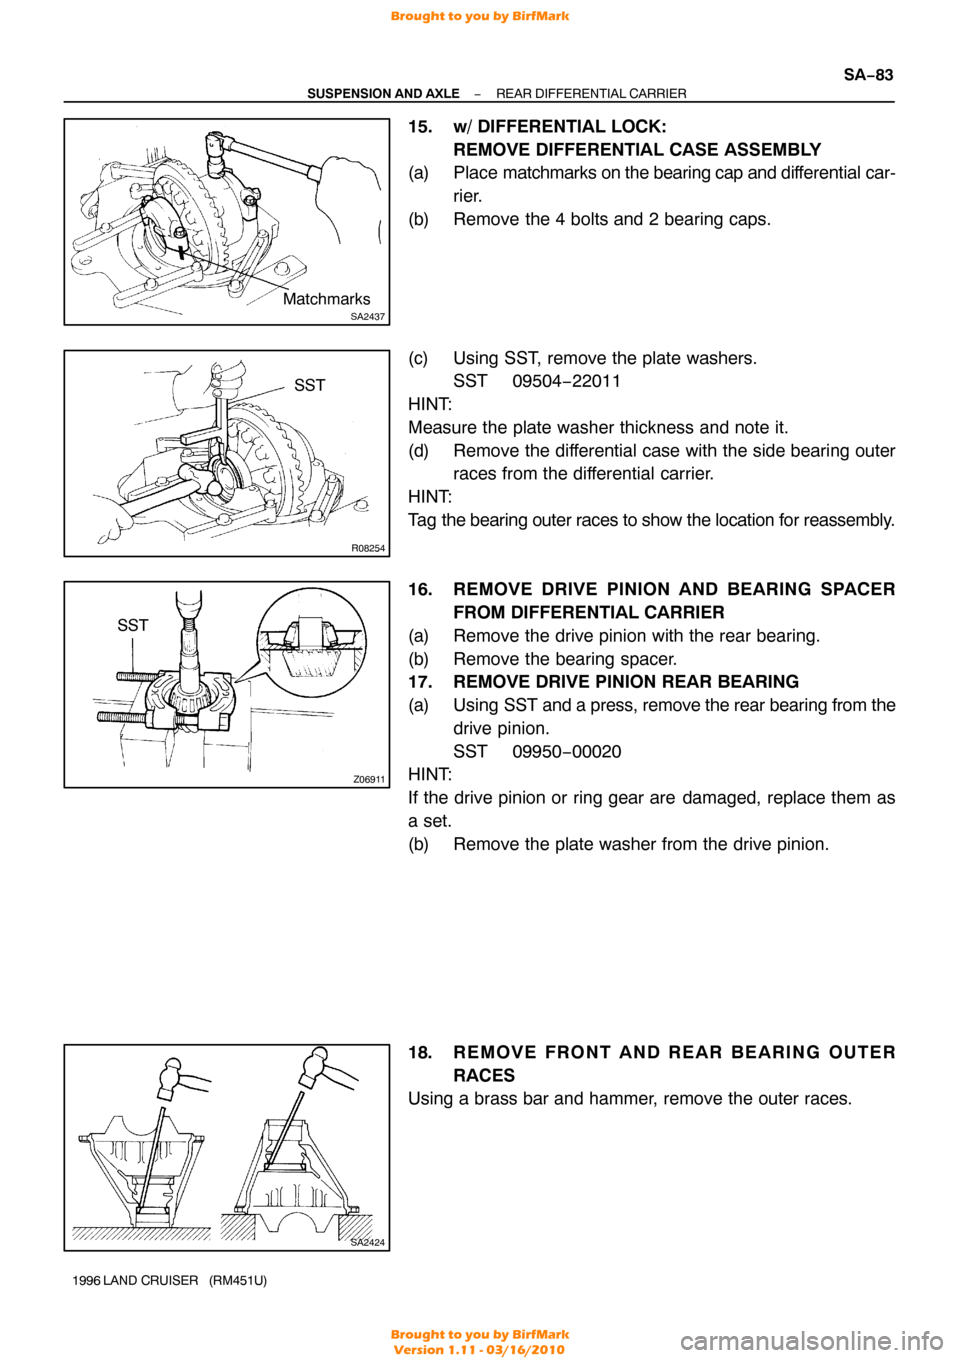
15. w/ DIFFERENTIAL LOCK:
REMOVE DIFFERENTIAL CASE ASSEMBLY
(a) Place matchmarks on the bearing cap and dif ferential car-
rier.
(b) Remove the 4 bolts and 2 bearing caps.
(c) Using SST, remove the plate washers. SST 09504−22011
HINT:
Measure the plate washer thickness and note it.
(d) Remove the differential case with the side bearing outer races from the differential carrier.
HINT:
Tag the bearing outer races to show the location for reassembly.
16. REMOVE DRIVE PINION AND BEARING SPACER FROM DIFFERENTIAL CARRIER
(a) Remove the drive pinion with the rear bearing.
(b) Remove the bearing spacer.
17. REMOVE DRIVE PINION REAR BEARING
(a) Using SST and a press, remove the rear bearing from the
drive pinion.
SST 09950−00020
HINT:
If the drive pinion or ring gear are damaged, replace them as
a set.
(b) Remove the plate washer from the drive pinion.
18. REMOVE FRONT AND REAR BEARING OUTER
RACES
Using a brass bar and hammer, remove the outer races.
Brought to you by BirfMark
Brought to you by BirfMark
Version 1.11 - 03/16/2010
Page 1153 of 1399
SA2425
SSTSST
Front
Rear
SA3102
SST
R13414
SST
SA−90
−
SUSPENSION AND AXLE REAR DIFFERENTIAL CARRIER
1996 LAND CRUISER (RM451U)
(g) After the ring gear cools down enough, tighten the set
bolts uniformly and a little at a time.
Torque: 110 N·m (1,125 kgf·cm, 81 ft·lbf)
6. CHECK RING GEAR RUNOUT
(a) Install the differential case onto the carrier and tighten the
adjusting nut just to where there is no play in the bearings.
(b) Using a dial indicator, check the ring gear runout. Maximum runout: 0.10 mm (0.0039 in.)
(c) Remove the differential case.
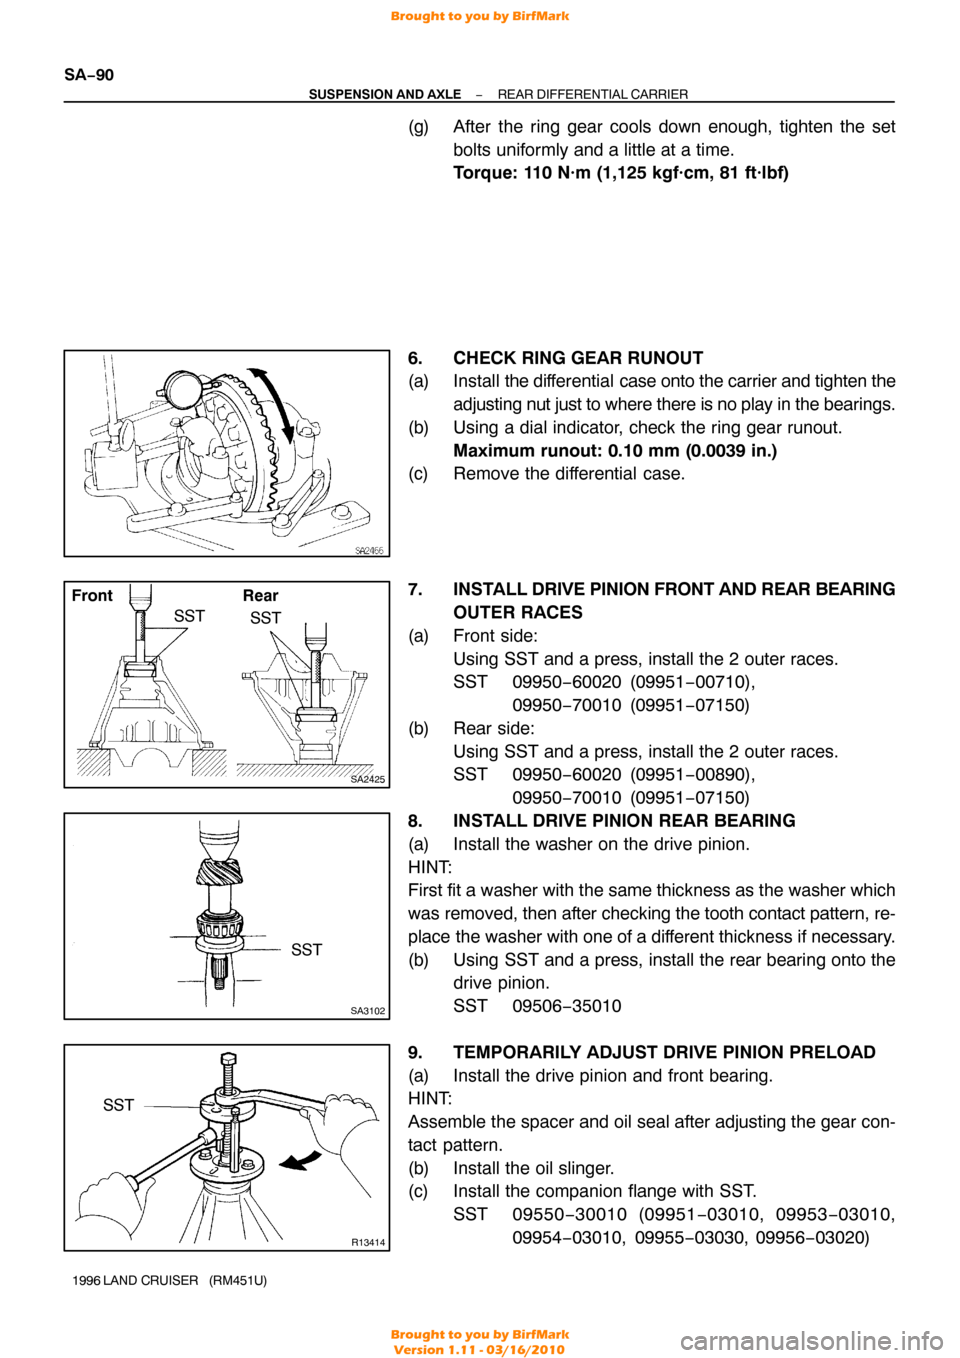
7. INSTALL DRIVE PINION FRONT AND REAR BEARING
OUTER RACES
(a) Front side: Using SST and a press, install the 2 outer races.
SST 09950−60020 (09951 −00710),
09950 −70010 (09951 −07150)
(b) Rear side: Using SST and a press, install the 2 outer races.
SST 09950−60020 (09951 −00890),
09950 −70010 (09951 −07150)
8. INSTALL DRIVE PINION REAR BEARING
(a) Install the washer on the drive pinion.
HINT:
First fit a washer with the same thickness as the washer which
was removed, then after checking the tooth contact pattern, re-
place the washer with one of a different thickne ss if necessary.
(b) Using SST and a press, install the rear bearing onto the drive pinion.
SST 09506−35010
9. TEMPORARILY ADJUST DRIVE PINION PRELOAD
(a) Install the drive pinion and front bearing.
HINT:
Assemble the spacer and oil seal after adjusting the gear con-
tact pattern.
(b) Install the oil slinger.
(c) Install the companion flange with SST. SST 09550 −30010 (09951 −03010, 09953 −03010,
09954 −03010, 09955 −03030, 09956−03020)
Brought to you by BirfMark
Brought to you by BirfMark
Version 1.11 - 03/16/2010
Page 1154 of 1399
SA2450
SST
SA2446
R08261
R08262
−
SUSPENSION AND AXLE REAR DIFFERENTIAL CARRIER
SA−91
1996 LAND CRUISER (RM451U)
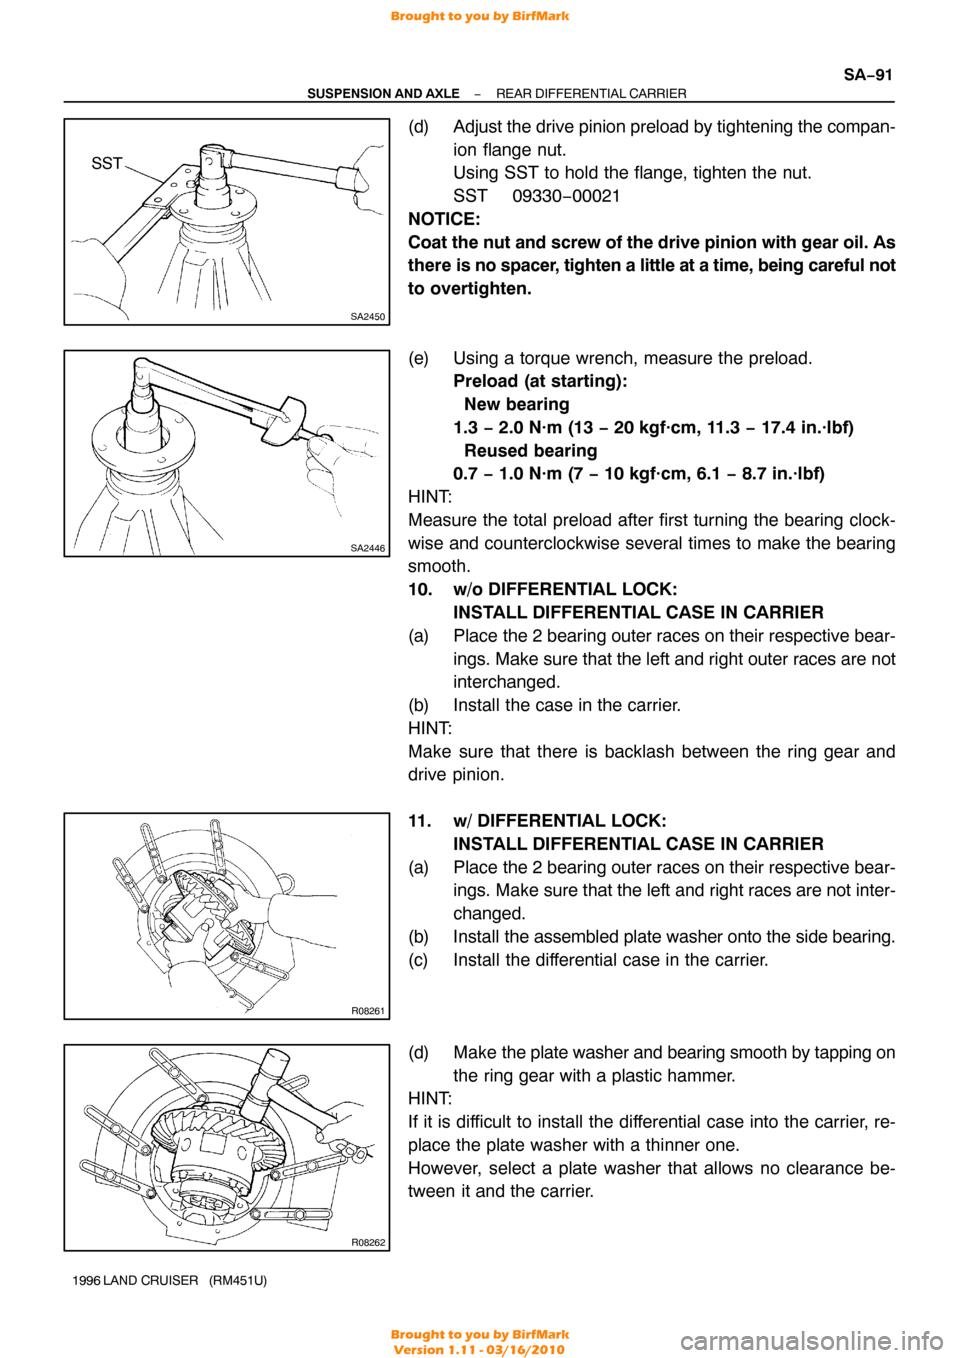
(d) Adjust the drive pinion preload by tightening the compan-
ion flange nut.
Using SST to hold the flange, tighten the nut.
SST 09330−00021
NOTICE:
Coat the nut and screw of the drive pinion with gear oil. As
there is no spacer, tighten a little at a time, being careful not
to overtighten.
(e) Using a torque wrench, measure the preload. Preload (at starting):
New bearing
1.3 − 2.0 N·m (13 − 20 kgf·cm, 11.3 − 17.4 in.·lbf)
Reused bearing
0.7 − 1.0 N·m (7 − 10 kgf·cm, 6.1 − 8.7 in.·lbf)
HINT:
Measure the total preload after first turning the bearing clock-
wise and counterclockwise several times to make the bearing
smooth.
10. w/o DIFFERENTIAL LOCK: INSTALL DIFFERENTIAL CASE IN CARRIER
(a) Place the 2 bearing outer races on their respective bear- ings. Make sure that the left and right outer races are not
interchanged.
(b) Install the case in the carrier.
HINT:
Make sure that there is backlash between the ring gear and
drive pinion.
11. w/ DIFFERENTIAL LOCK: INSTALL DIFFERENTIAL CASE IN CARRIER
(a) Place the 2 bearing outer races on their respective bear- ings. Make sure that the left and right races are not inter-
changed.
(b) Install the assembled plate washer onto the side bearing.
(c) Install the differential case in the carrier.
(d) Make the plate washer and bearing smooth by tapping on
the ring gear with a plastic hammer.
HINT:
If it is difficult to install the differential case into the carrier, re-
place the plate washer with a thinner one.
However, select a plate washer that allows no clearance be-
tween it and the carrier.
Brought to you by BirfMark
Brought to you by BirfMark
Version 1.11 - 03/16/2010
Page 1157 of 1399
Z06953SST
SA2444
SA−94
−
SUSPENSION AND AXLE REAR DIFFERENTIAL CARRIER
1996 LAND CRUISER (RM451U)
14. w/o DIFFERENTIAL LOCK:
INSTALL ADJUSTING NUTS
Install the 2 adjusting nuts on the carrier, making sure the nuts
are threaded properly.
15. w/o DIFFERENTIAL LOCK: INSTALL BEARING CAPS
Align the matchmarks on the cap and carrier. Screw in the 2
bearing cap bolts 2 or 3 turns and press down the bearing cap
by hand.
HINT:
If the bearing cap does not fit tightly on the carrier , the adjusting
nuts are not threaded properly.
Reinstall the adjusting nuts if necessary.
16. w/o DIFFERENTIAL LOCK: ADJUST SIDE BEARING PRELOAD
(a) Torque the 4 bearing cap bolts to the specified torque, then loosen them to the point where the adjusting nuts
can be turned by SST.
SST 09504−00011
Torque:78 N·m (800 kgf·cm, 58 ft·lbf)
(b) Fully tighten the 4 bearing cap bolts by hand.
(c) Using the SST, torque the adjusting nut on the ring gear side until the ring has a backlash of about 0.2 mm (0.008
in.).
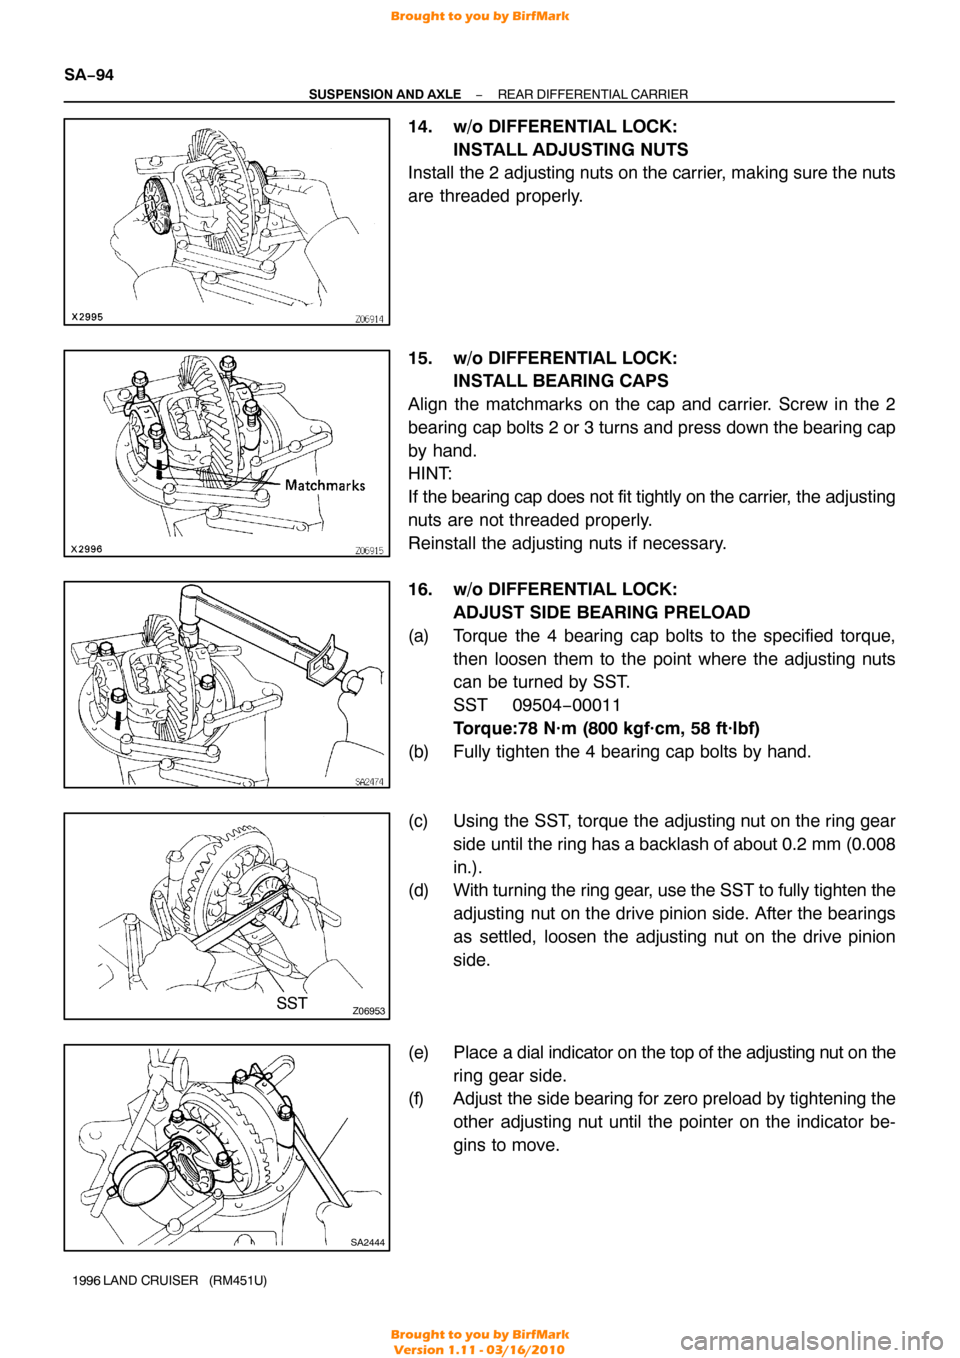
(d) With turning the ring gear, use the SST to fully tighten the
adjusting nut on the drive pinion side. After the bearings
as settled, loosen the adjusting nut on the drive pinion
side.
(e) Place a dial indicator on the top of the adjusting nut on the ring gear side.
(f) Adjust the side bearing for zero preload by tightening the
other adjusting nut until the pointer on the indicator be-
gins to move.
Brought to you by BirfMark
Brought to you by BirfMark
Version 1.11 - 03/16/2010
Page 1158 of 1399
Z06918
−
SUSPENSION AND AXLE REAR DIFFERENTIAL CARRIER
SA−95
1996 LAND CRUISER (RM451U)
(g) Using the SST, torque the adjusting nut 1−1.5 notches
from the zero preload position.
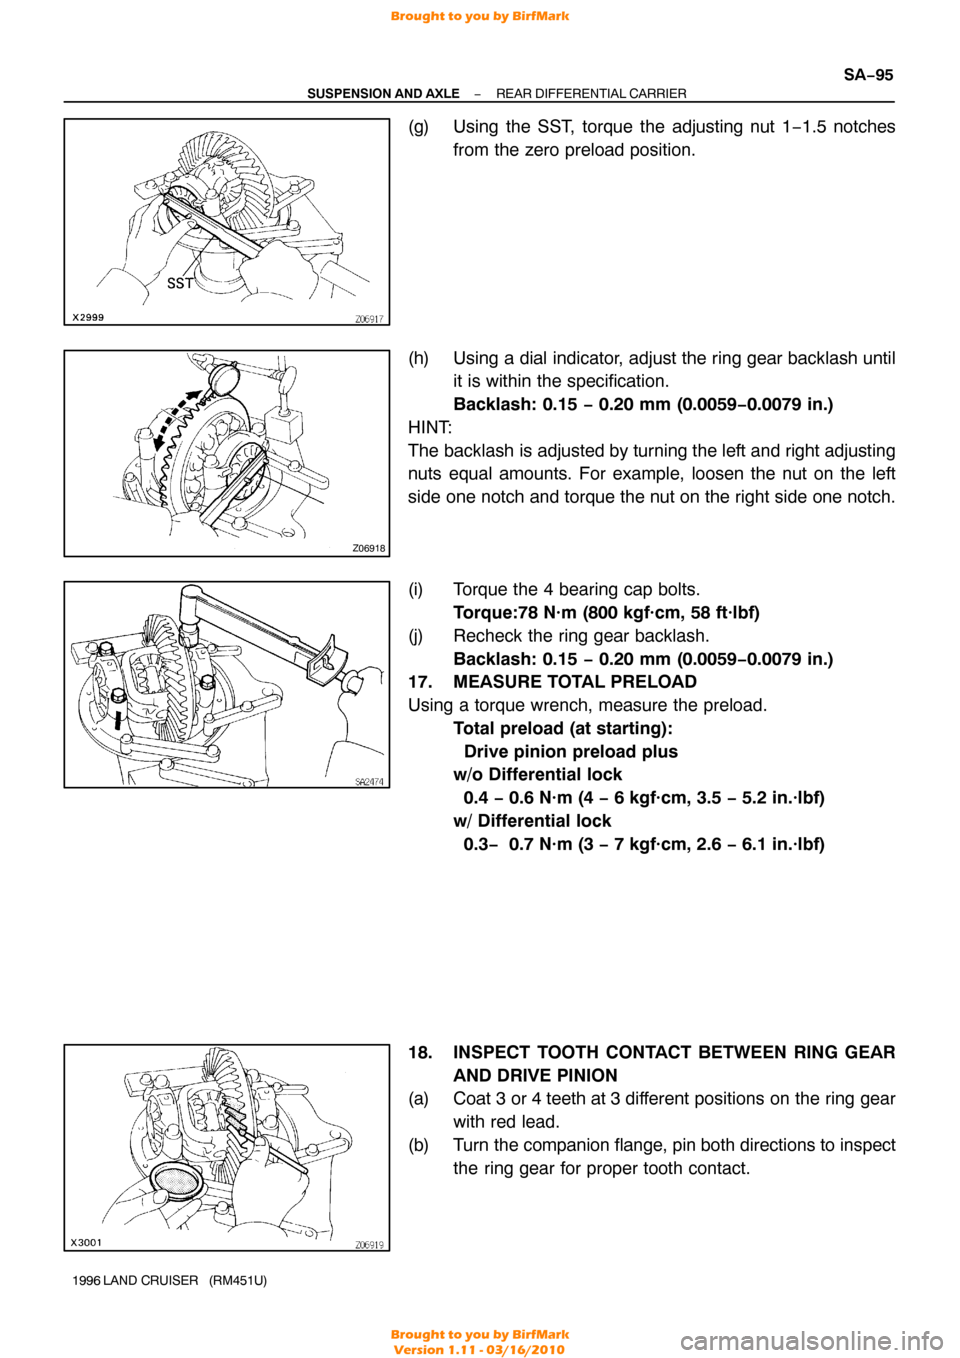
(h) Using a dial indicator, adjust the ring gear backlash until it is within the specification.
Backlash: 0.15 − 0.20 mm (0.0059−0.0079 in.)
HINT:
The backlash is adjusted by turning the left and right adjusting
nuts equal amounts. For example, loosen the nut on the left
side one notch and torque the nut on the right side one notch.
(i) Torque the 4 bearing cap bolts. Torque:78 N·m (800 kgf·cm, 58 ft·lbf)
(j) Recheck the ring gear backlash. Backlash: 0.15 − 0.20 mm (0.0059−0.0079 in.)
17. MEASURE TOTAL PRELOAD
Using a torque wrench, measure the preload.
Total preload (at starting):
Drive pinion preload plus
w/o Differential lock
0.4 − 0.6 N·m (4 − 6 kgf·cm, 3.5 − 5.2 in.·lbf)
w/ Differential lock
0.3− 0.7 N·m (3 − 7 kgf·cm, 2.6 − 6.1 in.·lbf)
18. INSPECT TOOTH CONTACT BETWEEN RING GEAR AND DRIVE PINION
(a) Coat 3 or 4 teeth at 3 different positions on the ring gear
with red lead.
(b) Turn the companion flange, pin both directions to inspect the ring gear for proper tooth contact.
Brought to you by BirfMark
Brought to you by BirfMark
Version 1.11 - 03/16/2010