Page 1105 of 1399

SA2443SST
SA2403
SA2463
FA2013
Proper ContactHeel Contact
Face Contact
Select an adjusting washer that will bring the drive
pinion closer to the ring gear.
Select an adjusting washer that will shift the drive
pinion away from the ring gear.
Toe Contact
Flank Contact
SA−42
−
SUSPENSION AND AXLE FRONT DIFFERENTIAL CARRIER
1996 LAND CRUISER (RM451U)
(h) Using a dial indicator, adjust the ring gear backlash until
it is within the specification.
Backlash: 0.13 − 0.18 mm (0.0051 − 0.0071 in.)
HINT:
The backlash is adjusted by turning the left and right adjusting
nuts equal amounts. For example, loosen the nut on the left
side one notch and torque the nut on the right side one notch.
(i) Torque the 4 bearing cap bolts. Torque: 78 N·m (800 kgf·cm, 58 ft·lbf)
(j) Recheck the ring gear backlash. Backlash: 0.13 −0.18 mm (0.0051 −0.0071 in.)
(k) Using a torque wrench, measure the preload. Total preload (at starting):
Drive pinion preload plus
0.4 − 0.6 N·m (4 − 6 kgf·cm, 3.5 − 5.2 in.·lbf)
17. INSPECT TOOTH CONTACT BETWEEN RING GEAR AND DRIVE PINION
(a) Coat 3 or 4 teeth at 3 different positions on the ring gear with red lead.
(b) Hold the companion flange firmly and rotate the ring gear
in both directions.
(c) Inspect the tooth pattern.
Brought to you by BirfMark
Brought to you by BirfMark
Version 1.11 - 03/16/2010
Page 1106 of 1399

If the teeth are not contacting properly, use the following chart
to")
FA2041
Washer
W00529
SA2407
SST
R13140
SST
−
SUSPENSION AND AXLE FRONT DIFFERENTIAL CARRIER
SA−43
1996 LAND CRUISER (RM451U)
If the teeth are not contacting properly, use the following chart
to select a proper washer for correction.
Washer thickness
Thickness mm (in.)Thickness mm (in.)
1.70 (0.0669)2.03 (0.0799)
1.73 (0.0681)2.06 (0.0811)
1.76 (0.0693)2.09 (0.0823)
1.79 (0.0705)2.12 (0.0835)
1.82 (0.0717)2.15 (0.0846)
1.85 (0.0728)2.18 (0.0858)
1.88 (0.0740)2.21 (0.0870)
1.91 (0.0752)2.24 (0.0882)
1.94 (0.0764)2.27 (0.0894)
1.97 (0.0776)2.30 (0.0906)
2.00 (0.0787)2.33 (0.0917)
18. REMOVE COMPANION FLANGE (See page SA−29)
19. REMOVE OIL SLINGER AND REAR BEARING
20. REMOVE REAR BEARING OUTER RACE AND OIL STORAGE RING (See page SA−29 )
21. INSTALL BEARING SPACER AND REAR BEARING
(a) Install a new bearing spacer on the shaft.
(b) Install a new oil storage ring and rear bearing outer race (See page SA−29 ).
(c) Install the rear bearing and oil slinger.
22. INSTALL OIL SEAL
(a) Using SST, install a new oil seal, as shown. SST 09214−76011
Oil seal drive in depth: 1.0 mm (0.039 in.)
(b) Apply MP grease to the oil seal lip.
23. INSTALL COMPANION FLANGE
(a) Install the companion flange with SST. SST 09550 −30010 (09951 −03010, 09953 −03010,
09954 −03010, 09955 −03030, 09956−03020)
Brought to you by BirfMark
Brought to you by BirfMark
Version 1.11 - 03/16/2010
Page 1110 of 1399

5
°
108 ° 1.5 V
32
SA2306
SA1992
R08218
−
SUSPENSION AND AXLE FRONT DIFFERENTIAL CARRIER
SA−47
1996 LAND CRUISER (RM451U)
(b) Ensure that the matchmarks of the pinio")
R08154
Matchmark
(Groove)
5
°
108 ° 1.5 V
32
SA2306
SA1992
R08218
−
SUSPENSION AND AXLE FRONT DIFFERENTIAL CARRIER
SA−47
1996 LAND CRUISER (RM451U)
(b) Ensure that the matchmarks of the pinion of the actuator
is in the extent between zero and 5 degrees clockwise
above the center line of the actuator.
If the matchmarks is not in this extent, rotate the pinion to be
matched. Do not supply the battery positive voltage directly be-
tween terminals. If the matchmarks come to the extension limit
of the rotation, do not electrify moreover.
(c) Install a new O−ring to the actuator.
(d) Apply a light coat of gear oil on the O −ring.
(e) Apply MP grease to the gear part.
(f) Insert the actuator so that the long hole on the actuator side fits with the knock pin on the carrier side.
HINT:
Do not damage the O −ring of the actuator.
(g) Align the actuator with the long hole and rotate the actua-
tor counterclockwise when the knock pin reaches the
right−hand side.
(h) Install the actuator to the differential carrier with the bolt so that the outermost rack tooth of the shift fork will fit the
matchmarks of the pinion of the actuator.
Torque: 26 N·m (270 kgf·cm, 20 ft·lbf)
Brought to you by BirfMark
Brought to you by BirfMark
Version 1.11 - 03/16/2010
Page 1111 of 1399
SA1UQ−01
SA−48
−
SUSPENSION AND AXLE FRONT DIFFERENTIAL CARRIER
1996 LAND CRUISER (RM451U)
INSTALLATION
Installation is in the reverse order of removal (see page SA−27).
HINT:
�w/ differential lock:
Before installation, check differential lock operation connecting the connector of the actuator to the
connector of the vehicle side.
�w/ differential lock:
Before installation, check that the sleeves on work with switching over the differential lock control
switch.
After checking, lock the front differential.
�After installation, fill the differential with gear oil (See page SA−27).
�w/ differential lock:
After installation, check that the bleeder plug at the point of the bleeder tu\
be (inside of the engine room)
is not damaged or worn.
Brought to you by BirfMark
Brought to you by BirfMark
Version 1.11 - 03/16/2010
Page 1113 of 1399

REMOVAL
1. REMOVE FRONT WHEEL Torque:
Steel wheel: 147 N·m (1,500 kgf")
SA1US−01
SA2662
SA2663
R13152
SA−50
−
SUSPENSION AND AXLE COIL SPRING AND FRONT SHOCK ABSORBER
1996 LAND CRUISER (RM451U)
REMOVAL
1. REMOVE FRONT WHEEL Torque:
Steel wheel: 147 N·m (1,500 kgf·cm, 109 ft·lbf)
Aluminum wheel: 103 N·m (1,050 kgf·cm, 76 ft·lbf)
2. REMOVE FRONT SHOCK ABSORBER
(a) Jack up and support the axle housing.
(b) Hold the piston rod and remove the upper mounting nut. Torque: 69 N·m (700 kgf·cm, 51 ft·lbf)
(c) Hold the shock absorber and remove the lower mounting nut, shock absorber, cushions and retainers.
Torque: 69 N·m (700 kgf·cm, 51 ft·lbf)
3. DISCONNECT STABILIZER BAR FROM AXLE HOUS- ING (See page SA−60 )
4. REMOVE COIL SPRING
(a) Jack down and support axle housing.
(b) Using SST, compress the coil spring. SST 09727−30021
NOTICE:
Do not use an impact wrench. It will damage the SST.
(c) Remove the coil spring.
HINT:
Align the coil spring end with the lower seat and install the coil
spring.
5. REMOVE FOLLOW SPRING
Remove the 2 nuts and follow spring. Torque: 9.2 N·m (94 kgf·cm, 82 in.·lbf)
Brought to you by BirfMark
Brought to you by BirfMark
Version 1.11 - 03/16/2010
Page 1114 of 1399
SA1UT−01
FA0530
−
SUSPENSION AND AXLE COIL SPRING AND FRONT SHOCK ABSORBER
SA−51
1996 LAND CRUISER (RM451U)
INSPECTION
INSPECT SHOCK ABSORBER
Compress and extend the shock absorber rod and check that
there is abnormal resistance or unusual operation sounds.
If there is any abnormality, replace the shock absorber with a
new one.
NOTICE:
When discarding the shock absorber, use the following
procedure.
Brought to you by BirfMark
Brought to you by BirfMark
Version 1.11 - 03/16/2010
Page 1117 of 1399
SA1UW−01
SA2675
SA2676
SA−54
−
SUSPENSION AND AXLE FRONT LATERAL CONTROL ROD
911
Author�: Date�:
1996 LAND CRUISER (RM451U)
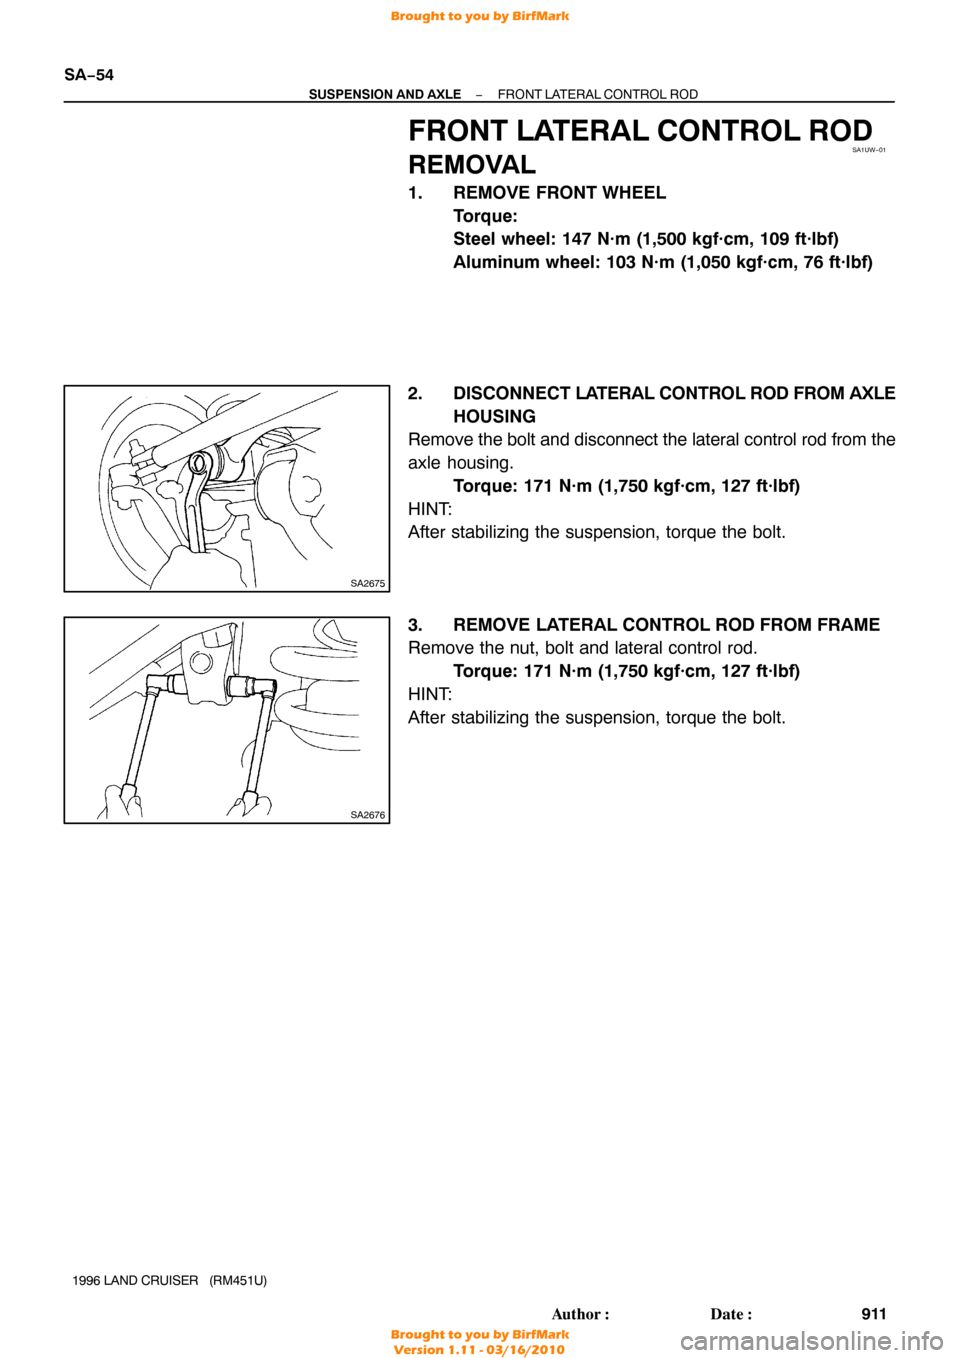
FRONT LATERAL CONTROL ROD
REMOVAL
1. REMOVE FRONT WHEEL
Torque:
Steel wheel: 147 N·m (1,500 kgf·cm, 109 ft·lbf)
Aluminum wheel: 103 N·m (1,050 kgf·cm, 76 ft·lbf)
2. DISCONNECT LA TERAL CONTROL ROD FROM AXLE
HOUSING
Remove the bolt and disconnect the lateral control rod from the
axle housing.
Torque: 171 N·m (1,750 kgf·cm, 127 ft·lbf)
HINT:
After stabilizing the suspension, torque the bolt.
3. REMOVE LATERAL CONTROL ROD FROM FRAME
Remove the nut, bolt and lateral control rod. Torque: 171 N·m (1,750 kgf·cm, 127 ft·lbf)
HINT:
After stabilizing the suspension, torque the bolt.
Brought to you by BirfMark
Brought to you by BirfMark
Version 1.11 - 03/16/2010
Page 1123 of 1399
SA1V2−01
R07756
R08394
R13153
Paint
SA−60
−
SUSPENSION AND AXLE FRONT STABILIZER BAR
917
Author�: Date�:
1996 LAND CRUISER (RM451U)
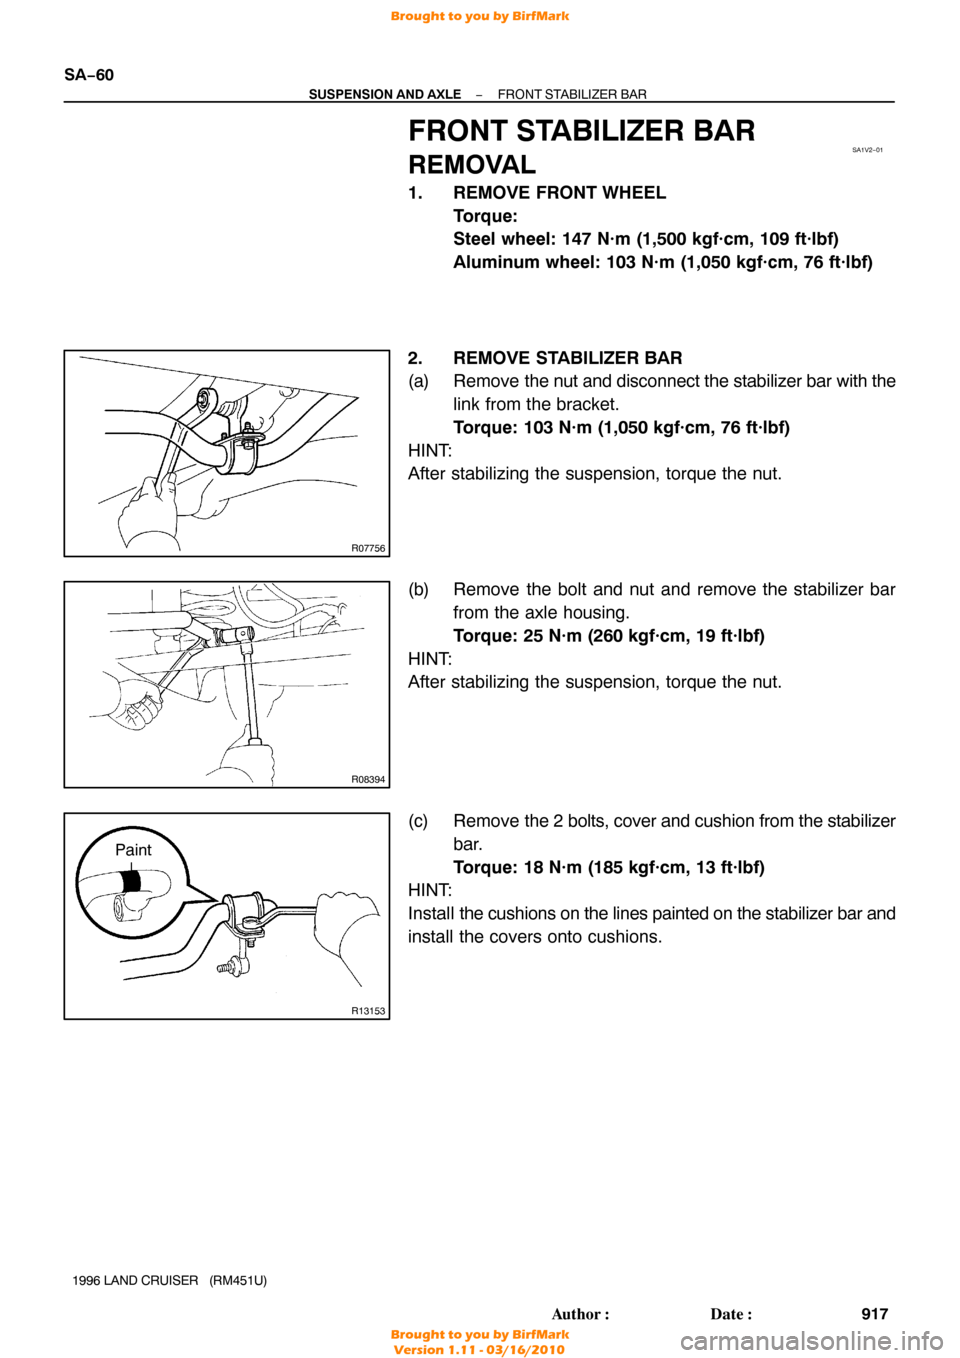
FRONT STABILIZER BAR
REMOVAL
1. REMOVE FRONT WHEEL
Torque:
Steel wheel: 147 N·m (1,500 kgf·cm, 109 ft·lbf)
Aluminum wheel: 103 N·m (1,050 kgf·cm, 76 ft·lbf)
2. REMOVE STABILIZER BAR
(a) Remove the nut and disconnect the stabilizer bar with the
link from the bracket.
Torque: 103 N·m (1,050 kgf·cm, 76 ft·lbf)
HINT:
After stabilizing the suspension, torque the nut.
(b) Remove the bolt and nut and remove the stabilizer bar from the axle housing.
Torque: 25 N·m (260 kgf·cm, 19 ft·lbf)
HINT:
After stabilizing the suspension, torque the nut.
(c) Remove the 2 bolts, cover and cushion from the stabilizer
bar.
Torque: 18 N·m (185 kgf·cm, 13 ft·lbf)
HINT:
Install the cushions on the lines painted on the stabilizer bar and
install the covers onto cushions.
Brought to you by BirfMark
Brought to you by BirfMark
Version 1.11 - 03/16/2010

INSPECTION
INSPECT SHOCK ABSORBER
Compress and extend the shock absorber rod and che")