Page 786 of 2890
3. Rear Case (FWD Model)
A: DISASSEMBLY
G3M0952
Tightening torque: N⋅m (kg-m, ft-lb)
T1: 6.4±0.5 (0.65±0.05, 4.7±0.4)
T2: 10±1 (1.0±0.1, 7.2±0.7)
T3: 25±2 (2.5±0.2, 18.1±1.4)
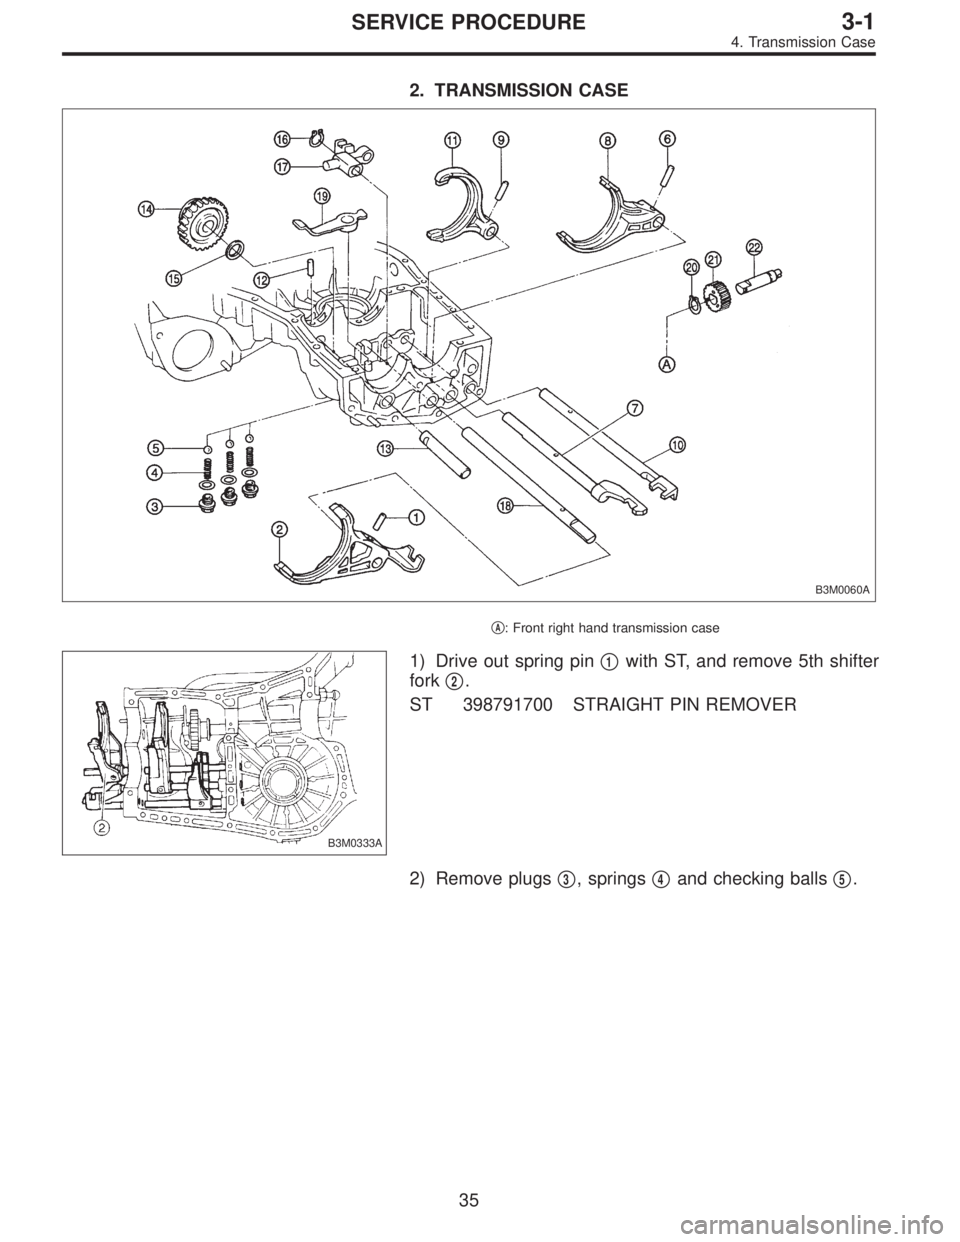
1) Remove rear case�1.
2) Remove plug�
2, spring�3and reverse check ball�4.
3) Remove neutral switch�
5.
4) Pull out shifter arm�
6.
5) Remove reverse check sleeve�
7.
NOTE:
The disassembly procedure is the same as for AWD model.
B3M0056A
6) Remove back-up light switch�8.
7) Remove oil seal�
9.
CAUTION:
Do not reuse oil seal.
30
3-1SERVICE PROCEDURE
3. Rear Case (FWD Model)
Page 787 of 2890
B: ASSEMBLY
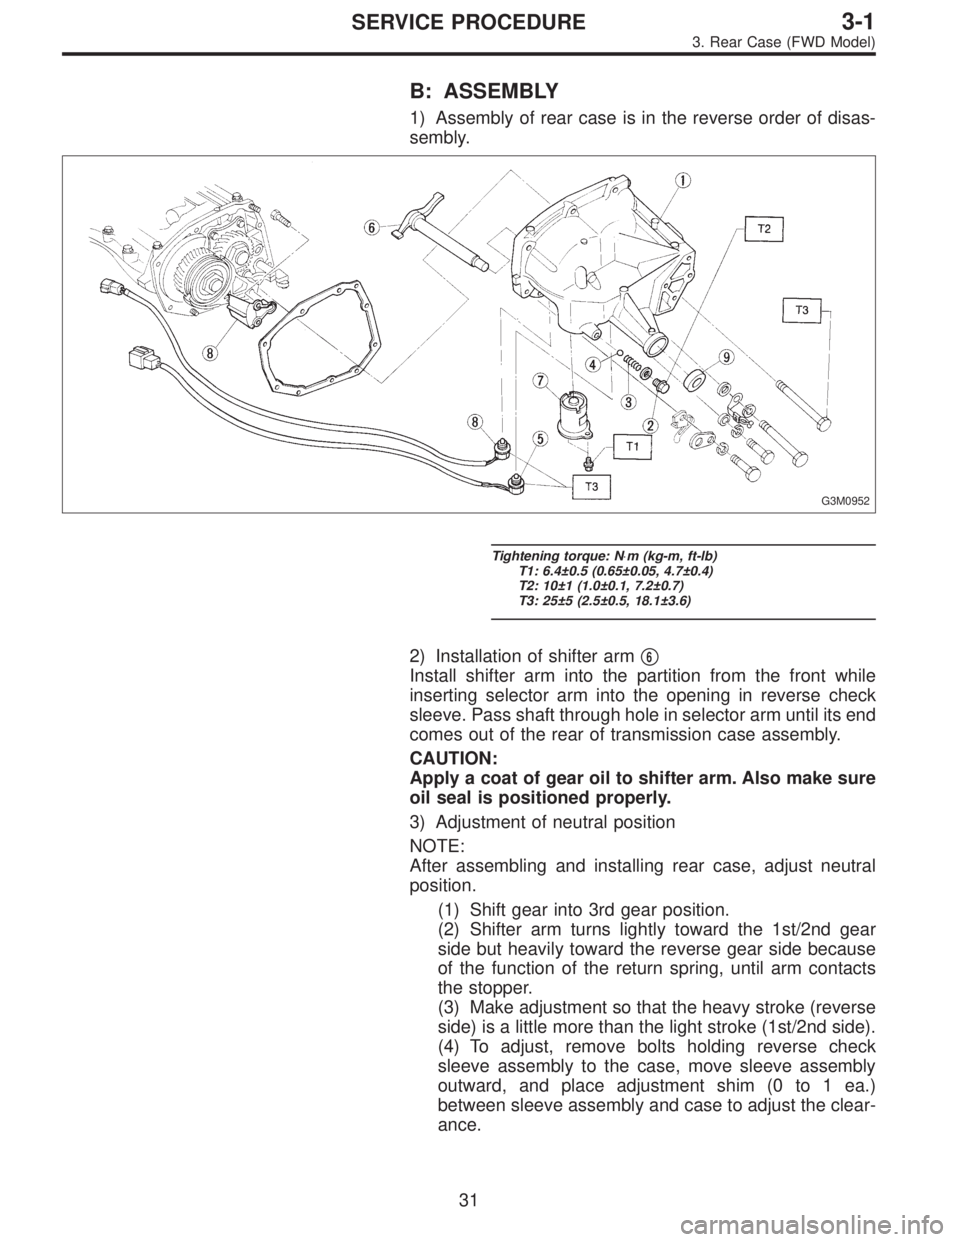
1) Assembly of rear case is in the reverse order of disas-
sembly.
G3M0952
Tightening torque: N⋅m (kg-m, ft-lb)
T1: 6.4±0.5 (0.65±0.05, 4.7±0.4)
T2: 10±1 (1.0±0.1, 7.2±0.7)
T3: 25±5 (2.5±0.5, 18.1±3.6)
2) Installation of shifter arm�6
Install shifter arm into the partition from the front while
inserting selector arm into the opening in reverse check
sleeve. Pass shaft through hole in selector arm until its end
comes out of the rear of transmission case assembly.
CAUTION:
Apply a coat of gear oil to shifter arm. Also make sure
oil seal is positioned properly.
3) Adjustment of neutral position
NOTE:
After assembling and installing rear case, adjust neutral
position.
(1) Shift gear into 3rd gear position.
(2) Shifter arm turns lightly toward the 1st/2nd gear
side but heavily toward the reverse gear side because
of the function of the return spring, until arm contacts
the stopper.
(3) Make adjustment so that the heavy stroke (reverse
side) is a little more than the light stroke (1st/2nd side).
(4) To adjust, remove bolts holding reverse check
sleeve assembly to the case, move sleeve assembly
outward, and place adjustment shim (0 to 1 ea.)
between sleeve assembly and case to adjust the clear-
ance.
31
3-1SERVICE PROCEDURE
3. Rear Case (FWD Model)
Page 788 of 2890
CAUTION:
Be careful not to break O-ring when placing shim(s).
Adjustment shim
Part No. Thickness mm (in)
32190AA000 0.15 (0.0059)
32190AA010 0.30 (0.0118)
NOTE:
�When shim is removed, the neutral position will move
closer to reverse; when shim is added, the neutral position
will move closer to 1st gear.
�If shims alone cannot adjust the clearance, replace
reverse accent shaft and re-adjust.
Reverse accent shaft
Part No. Mark Remarks
32188AA040 1Neutral position is closer to 1st
gear.
32188AA011 No mark or 2 Standard
32188AA050 3Neutral position is closer to
reverse gear.
B3M0054A
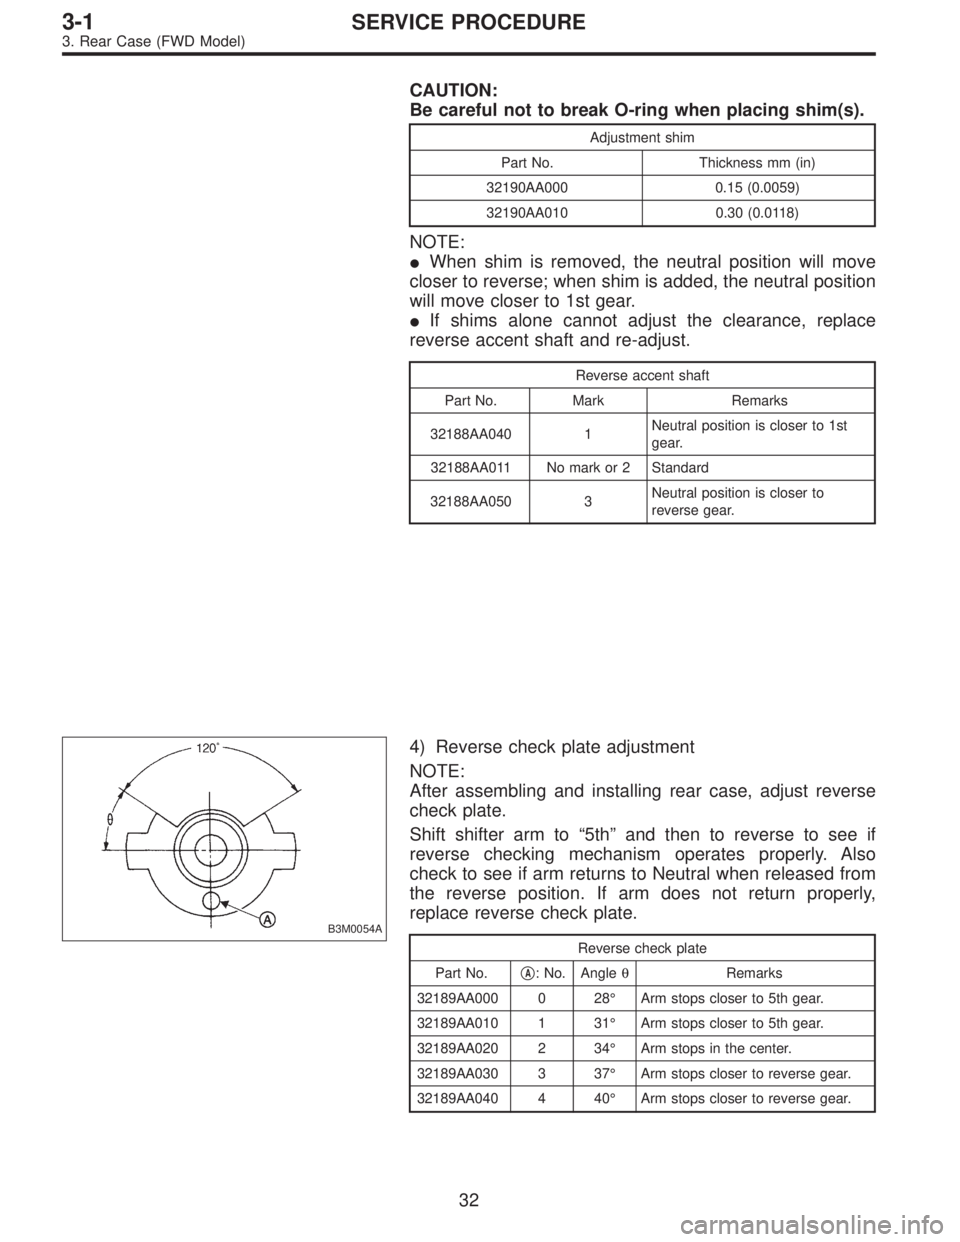
4) Reverse check plate adjustment
NOTE:
After assembling and installing rear case, adjust reverse
check plate.
Shift shifter arm to“5th”and then to reverse to see if
reverse checking mechanism operates properly. Also
check to see if arm returns to Neutral when released from
the reverse position. If arm does not return properly,
replace reverse check plate.
Reverse check plate
Part No.�
A: No. AngleθRemarks
32189AA000 0 28°Arm stops closer to 5th gear.
32189AA010 1 31°Arm stops closer to 5th gear.
32189AA020 2 34°Arm stops in the center.
32189AA030 3 37°Arm stops closer to reverse gear.
32189AA040 4 40°Arm stops closer to reverse gear.
32
3-1SERVICE PROCEDURE
3. Rear Case (FWD Model)
Page 791 of 2890
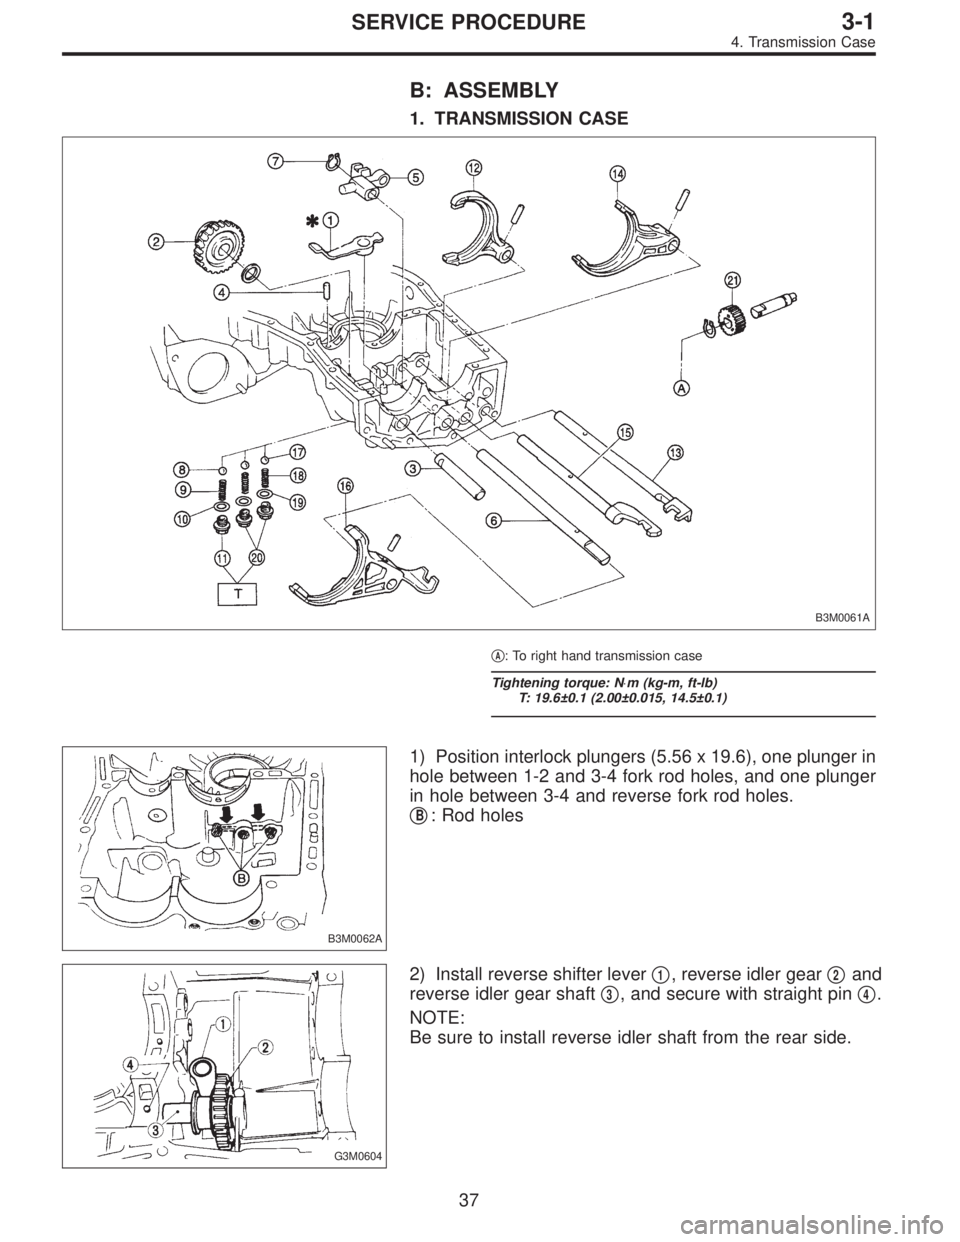
2. TRANSMISSION CASE
B3M0060A
�A: Front right hand transmission case
B3M0333A
1) Drive out spring pin�1with ST, and remove 5th shifter
fork�
2.
ST 398791700 STRAIGHT PIN REMOVER
2) Remove plugs�
3, springs�4and checking balls�5.
35
3-1SERVICE PROCEDURE
4. Transmission Case
Page 792 of 2890
B3M0333B
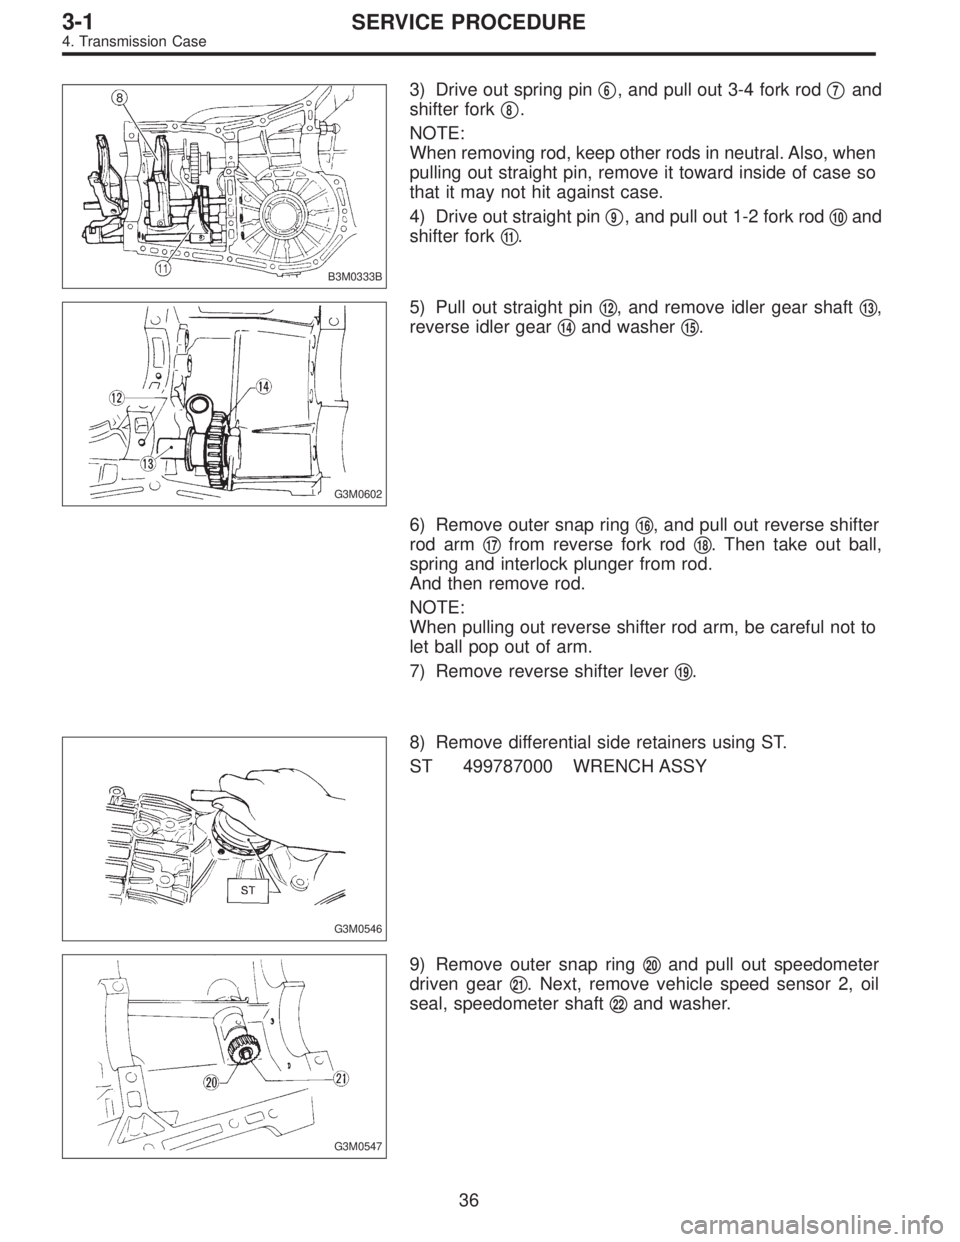
3) Drive out spring pin�6, and pull out 3-4 fork rod�7and
shifter fork�
8.
NOTE:
When removing rod, keep other rods in neutral. Also, when
pulling out straight pin, remove it toward inside of case so
that it may not hit against case.
4) Drive out straight pin�
9, and pull out 1-2 fork rod�10and
shifter fork�
11.
G3M0602
5) Pull out straight pin�12, and remove idler gear shaft�13,
reverse idler gear�
14and washer�15.
6) Remove outer snap ring�
16, and pull out reverse shifter
rod arm�
17from reverse fork rod�18. Then take out ball,
spring and interlock plunger from rod.
And then remove rod.
NOTE:
When pulling out reverse shifter rod arm, be careful not to
let ball pop out of arm.
7) Remove reverse shifter lever�
19.
G3M0546
8) Remove differential side retainers using ST.
ST 499787000 WRENCH ASSY
G3M0547
9) Remove outer snap ring�20and pull out speedometer
driven gear�
21. Next, remove vehicle speed sensor 2, oil
seal, speedometer shaft�
22and washer.
36
3-1SERVICE PROCEDURE
4. Transmission Case
Page 793 of 2890
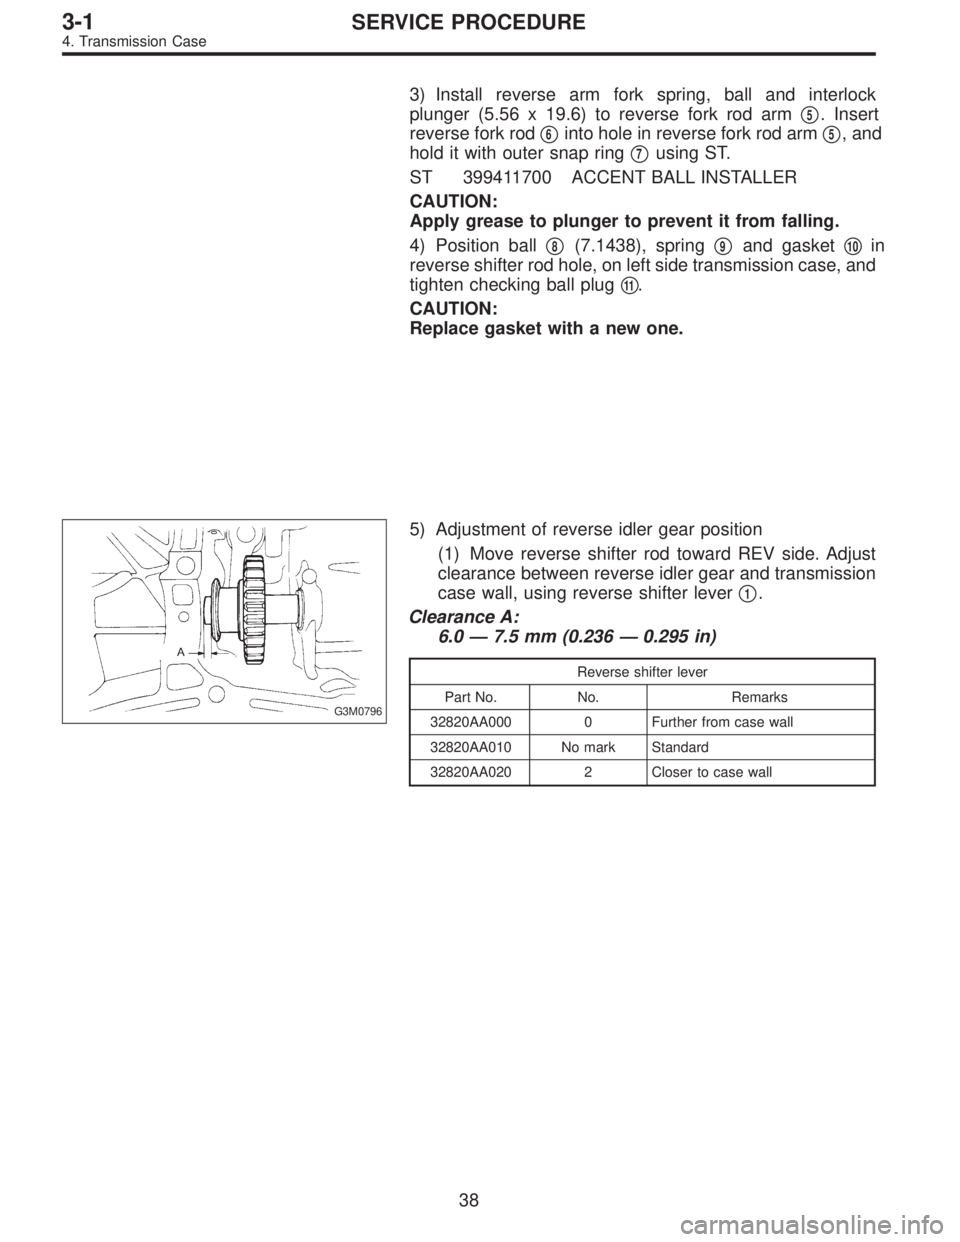
B: ASSEMBLY
1. TRANSMISSION CASE
B3M0061A
�A: To right hand transmission case
Tightening torque: N⋅m (kg-m, ft-lb)
T: 19.6±0.1 (2.00±0.015, 14.5±0.1)
B3M0062A
1) Position interlock plungers (5.56 x 19.6), one plunger in
hole between 1-2 and 3-4 fork rod holes, and one plunger
in hole between 3-4 and reverse fork rod holes.
�
B: Rod holes
G3M0604
2) Install reverse shifter lever�1, reverse idler gear�2and
reverse idler gear shaft�
3, and secure with straight pin�4.
NOTE:
Be sure to install reverse idler shaft from the rear side.
37
3-1SERVICE PROCEDURE
4. Transmission Case
Page 794 of 2890
3) Install reverse arm fork spring, ball and interlock
plunger (5.56 x 19.6) to reverse fork rod arm�
5. Insert
reverse fork rod�
6into hole in reverse fork rod arm�5, and
hold it with outer snap ring�
7using ST.
ST 399411700 ACCENT BALL INSTALLER
CAUTION:
Apply grease to plunger to prevent it from falling.
4) Position ball�
8(7.1438), spring�9and gasket�10in
reverse shifter rod hole, on left side transmission case, and
tighten checking ball plug�
11.
CAUTION:
Replace gasket with a new one.
G3M0796
5) Adjustment of reverse idler gear position
(1) Move reverse shifter rod toward REV side. Adjust
clearance between reverse idler gear and transmission
case wall, using reverse shifter lever�
1.
Clearance A:
6.0—7.5 mm (0.236—0.295 in)
Reverse shifter lever
Part No. No. Remarks
32820AA000 0 Further from case wall
32820AA010 No mark Standard
32820AA020 2 Closer to case wall
38
3-1SERVICE PROCEDURE
4. Transmission Case
Page 795 of 2890

B3M0063
(2) After installing a suitable reverse shifter lever, shift
into neutral. Using a thickness gauge, measure clear-
ance between reverse idler gear and transmission case
wall and adjust with washer(s).
Clearance:
0—0.5 mm (0—0.020 in)
Washer (20.5 x 26 x t)
Part No. Thickness mm (in)
803020151 0.4 (0.016)
803020152 1.1 (0.043)
803020153 1.5 (0.059)
803020154 1.9 (0.075)
803020155 2.3 (0.091)
B3M0333C
6) Installation of 1-2 shifter fork�12and rod�13
(1) Install 1-2 fork rod into 1-2 shifter fork via the hole
on the rear of transmission case.
(2) Align the holes in rod and fork, and drive straight
pin (6 x 22) into these holes using ST.
ST 398791700 STRAIGHT PIN REMOVER
NOTE:
�Set other rods to neutral.
�Make sure interlock plunger (5.56 x 19.6) is on the 3-4
fork rod side.
7) Installation of 3-4 shifter fork�
14and rod�15
(1) Install interlock plunger (3 x 11.9) onto 3-4 fork rod.
CAUTION:
Apply a coat of grease to plunger to prevent it from
falling.
(2) Install 3-4 fork rod into 3-4 shifter fork via the hole
on the rear of transmission case.
(3) Align the holes in rod and fork, and drive straight
pin (6 x 22) into these holes.
ST 398791700 STRAIGHT PIN REMOVER
NOTE:
�Set reverse fork rod to neutral.
�Make sure interlock plunger (installed before) is on the
reverse fork rod side.
8) Install 5th shifter fork�
16onto the rear of reverse fork rod
�
6. Align holes in the two parts and drive straight pin into
place.
ST 398791700 STRAIGHT PIN REMOVER
39
3-1SERVICE PROCEDURE
4. Transmission Case