1996 NISSAN QUEST light
[x] Cancel search: lightPage 144 of 235

cDriving with vacuum assisted brake:
The brake booster aids braking by using
engine vacuum. If the engine stops, you
can stop the vehicle by depressing the
brake pedal. However, greater foot pres-
sure on the brake pedal is required to
stop the vehicle and the stopping dis-
tance is longer.
cDriving with the power assisted steer-
ing:
The power assisted steering is designed
to use a hydraulic pump, driven by the
engine, to assist steering.
If the engine stops or the drive belt
breaks, you still have control of the ve-
hicle. However, much greater steering
effort is needed, especially in sharp turns
or at low speeds.
cWet brakes:
When the vehicle is washed or driven
through water, the brakes may get wet.
As a result, your braking distance is
longer and the vehicle may pull to one
side during braking.
To dry brakes, drive the vehicle at a safe
speed while lightly pressing the brakepedal to heat up the brakes. Do this until
the brakes return to normal. Avoid driving
the vehicle at high speeds until the
brakes function correctly.
cAvoid resting your foot on the brake
pedal while driving. This overheats the
brakes, wears out the brake linings and
pads faster and reduces gas mileage.
cTo help save the brakes and to prevent
the brakes from overheating, reduce
speed and downshift to a lower gear
before going down a slope or long grade.
Overheated brakes may reduce braking
performance and could result in loss of
vehicle control.
cWhile driving on a slippery surface, be
careful when braking, accelerating or
downshifting. Abrupt braking actions or
sudden acceleration could cause the
wheels to skid.The anti-lock brake system controls the
brakes at each wheel so the wheels do not
lock when braking abruptly or when braking
on slippery surfaces. The system detects the
rotation speed at each wheel and varies the
brake fluid pressure to prevent each wheel
from locking and sliding. By preventing wheel
lockup, the system helps the driver maintain
steering control and helps to minimize swerv-
ing and spinning on slippery surfaces.
Using the system
Depress the brake pedal and hold it down.
It is not necessary to pump the brake
pedal.
Doing so may result in increased stopping
distances.
Normal operation
The anti-lock brake system does not oper-
ate at speeds below 3 to 6 MPH (5 to 10
km/h) to completely stop the vehicle. (The
speeds vary according to road conditions.)
When the anti-lock system senses one or
more wheels are close to locking up, the
actuator (under the hood) rapidly applies
and releases hydraulic pressure (like pump-
ing the brakes very quickly). While the ac-
PRECAUTIONS WHEN
DRIVINGANTI-LOCK BRAKE SYSTEM
(If so equipped)
4-13
ZX
Page 145 of 235
tuator is working, you may feel a pulsation in
the brake pedal and hear a noise or vibra-
tion from the actuator under the hood. This
is normal and indicates the anti-lock system
is working properly. However, the pulsation
may indicate road conditions are hazardous
and extra care is required while driving.
Self-test feature
The anti-lock brake system consists of elec-
tronic sensors, electric pumps, and hydrau-
lic solenoids controlled by a computer. The
computer has a built-in diagnostic feature
that tests the system each time you start the
engine and move the vehicle at a low speed
in forward or reverse. When the ``self-test''
occurs, you may hear a ``clunk'' noise
and/or feel a ``pulsation'' in the brake pedal.
This is normal and is not an indication of any
malfunction. If the computer senses any
malfunction, it switches the anti-lock brake
system OFF and turns on the ANTI-LOCK
brake warning light in the dashboard. The
brake system then operates normally, but
without anti-lock assistance.
If the light comes on during the self check,
or while driving, take your vehicle to your
NISSAN dealer for repair at your earliest
convenience.
WARNING
The anti-lock brake system is a sophis-
ticated device, but it cannot prevent
accidents resulting from careless or
dangerous driving techniques. It can
help maintain vehicle control during
braking on slippery surfaces, but re-
member that the stopping distance on
slippery surfaces will be longer than on
normal surfaces, even with the anti-
lock system. Stopping distances may
also be longer on rough, gravel or
snow covered roads, or if you are using
tire chains. Always maintain a safe dis-
tance from the vehicle in front of you.
Ultimately, the responsibility for safety
of self and others rests in the hands of
the driver.
Tire type and condition of tires may
also affect braking effectiveness.
cWhen replacing tires, install the
specified size of tires on all 4 wheels.cWhen installing a spare tire, make
sure it is the proper size and type as
specified on the tire placard. For tire
placard location information, refer to
``Tire placard'' in the Owner's
Manual index.
cRefer to ``Wheels and tires'' in the
``Do-it-yourself operations'' section
of this manual.
4-14
ZX
Page 155 of 235
Always follow the instructions below.
Failure to do so could result in damage
to the charging system and cause per-
sonal injury.
1. If the booster battery is in another ve-
hicle, position the two vehicles to bring
their batteries close to each other.
Do not allow the two vehicles to touch.
2. Apply the parking brake. Move the gear-
shift lever to the P (Park) position. Switch
off all unnecessary electrical systems
(lights, heater, air conditioner, etc.).3. Remove vent caps on the battery (if so
equipped). Cover the battery with an old
cloth to reduce explosion hazard.
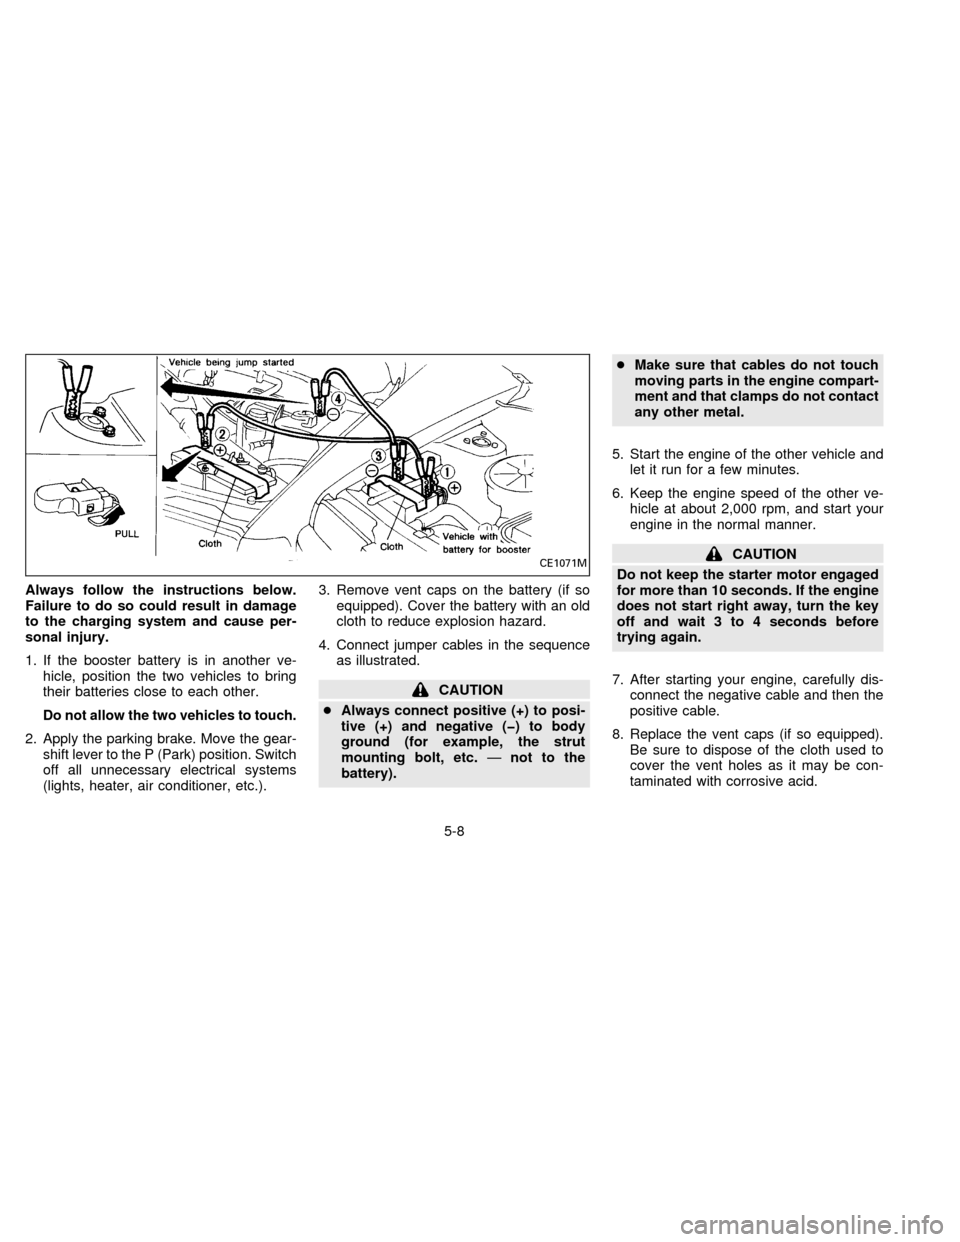
4. Connect jumper cables in the sequence
as illustrated.
CAUTION
cAlways connect positive (+) to posi-
tive (+) and negative (þ) to body
ground (for example, the strut
mounting bolt, etc.Ðnot to the
battery).cMake sure that cables do not touch
moving parts in the engine compart-
ment and that clamps do not contact
any other metal.
5. Start the engine of the other vehicle and
let it run for a few minutes.
6. Keep the engine speed of the other ve-
hicle at about 2,000 rpm, and start your
engine in the normal manner.
CAUTION
Do not keep the starter motor engaged
for more than 10 seconds. If the engine
does not start right away, turn the key
off and wait 3 to 4 seconds before
trying again.
7. After starting your engine, carefully dis-
connect the negative cable and then the
positive cable.
8. Replace the vent caps (if so equipped).
Be sure to dispose of the cloth used to
cover the vent holes as it may be con-
taminated with corrosive acid.CE1071M
5-8
ZX
Page 168 of 235

7 Do-it-yourself operations
Maintenance precautions ..................................... 7-2
Engine compartment check locations .................. 7-3
Engine cooling system ......................................... 7-4
Engine oil ............................................................ 7-5
Automatic transmission fluid ................................ 7-8
Power steering fluid.............................................. 7-9
Brake fluid .......................................................... 7-10
Window washer fluid .......................................... 7-10
Battery ................................................................ 7-11
Drive belts .......................................................... 7-12Spark plug replacement ..................................... 7-12
Air cleaner housing filter .................................... 7-13
Wiper blades ...................................................... 7-14
Parking brake check........................................... 7-16
Brake pedal ........................................................ 7-16
Brake booster ..................................................... 7-17
Fuses .................................................................. 7-17
Fusible links........................................................ 7-18
Light bulbs .......................................................... 7-19
Wheels and tires ................................................ 7-24
ZX
Page 174 of 235
Drain plug tightening torque:
22 to 29 ft-lb
(29 to 39 Nzm)
Do not use excessive force.
7. Refill the engine with a recommended oil
and install the cap securely. See the
``Technical and consumer information''
section for refill capacity.
8. Start the engine. Check for leakage
around the drain plug. Correct as re-
quired.
9. Turn the engine off and wait several
minutes. Check the oil level with the
dipstick. Add engine oil if necessary.
CHANGING ENGINE OIL FILTER
1. Park the vehicle on a level surface and
apply the parking brake.
2. Turn the engine off.
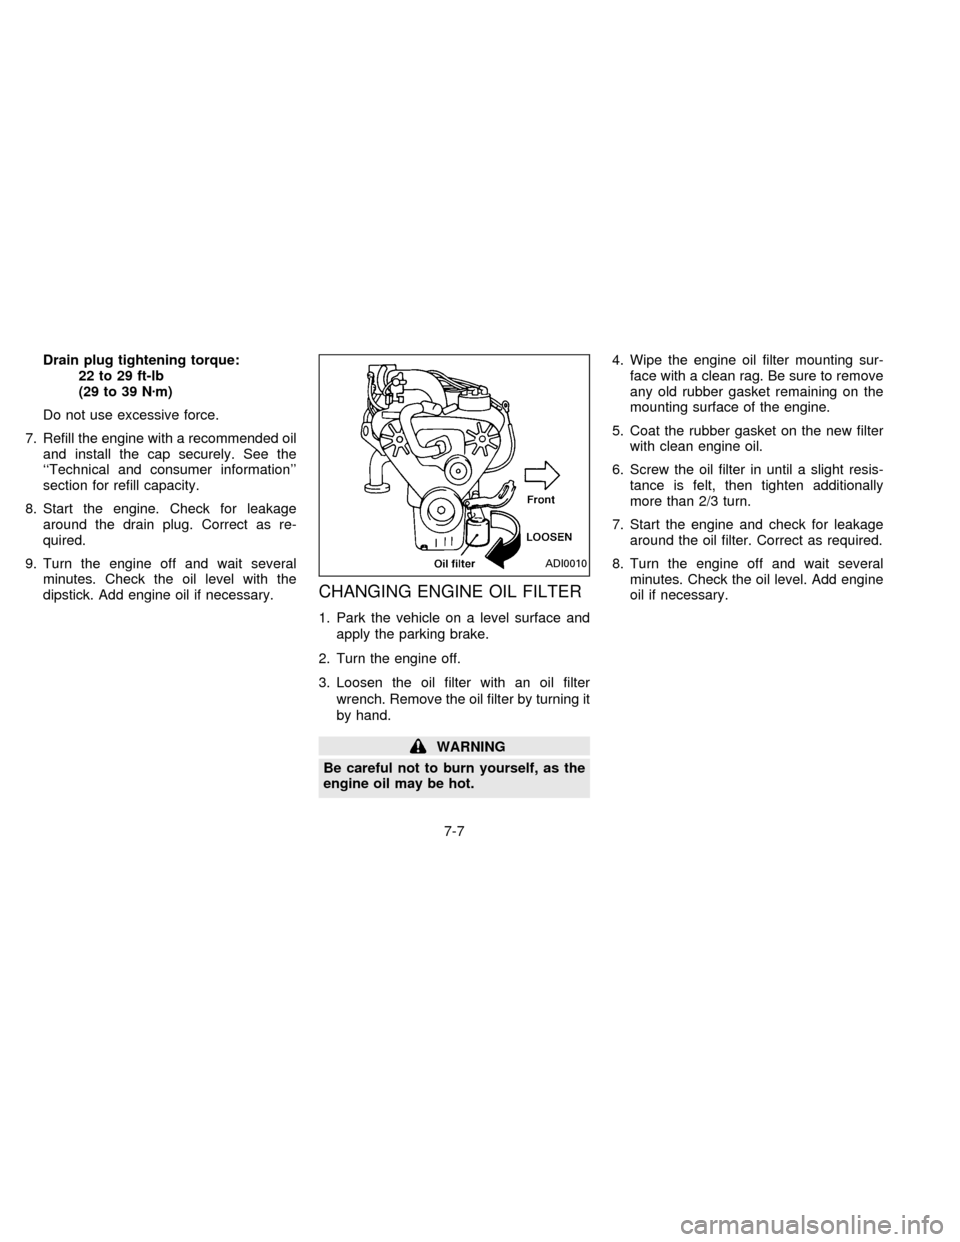
3. Loosen the oil filter with an oil filter
wrench. Remove the oil filter by turning it
by hand.
WARNING
Be careful not to burn yourself, as the
engine oil may be hot.4. Wipe the engine oil filter mounting sur-
face with a clean rag. Be sure to remove
any old rubber gasket remaining on the
mounting surface of the engine.
5. Coat the rubber gasket on the new filter
with clean engine oil.
6. Screw the oil filter in until a slight resis-
tance is felt, then tighten additionally
more than 2/3 turn.
7. Start the engine and check for leakage
around the oil filter. Correct as required.
8. Turn the engine off and wait several
minutes. Check the oil level. Add engine
oil if necessary.
ADI0010
7-7
ZB13-DX
Page 177 of 235
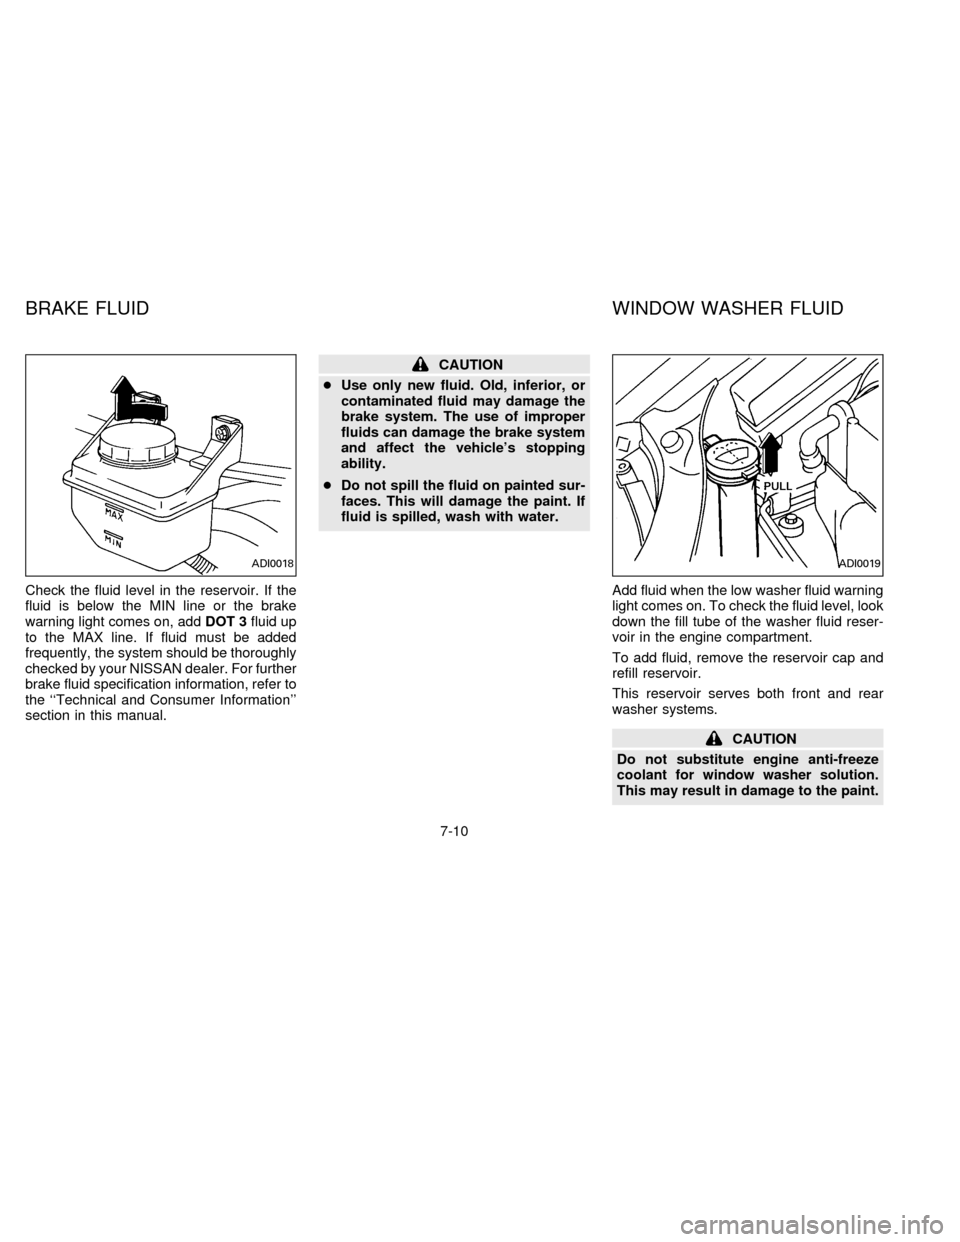
Check the fluid level in the reservoir. If the
fluid is below the MIN line or the brake
warning light comes on, addDOT 3fluid up
to the MAX line. If fluid must be added
frequently, the system should be thoroughly
checked by your NISSAN dealer. For further
brake fluid specification information, refer to
the ``Technical and Consumer Information''
section in this manual.
CAUTION
cUse only new fluid. Old, inferior, or
contaminated fluid may damage the
brake system. The use of improper
fluids can damage the brake system
and affect the vehicle's stopping
ability.
cDo not spill the fluid on painted sur-
faces. This will damage the paint. If
fluid is spilled, wash with water.
Add fluid when the low washer fluid warning
light comes on. To check the fluid level, look
down the fill tube of the washer fluid reser-
voir in the engine compartment.
To add fluid, remove the reservoir cap and
refill reservoir.
This reservoir serves both front and rear
washer systems.
CAUTION
Do not substitute engine anti-freeze
coolant for window washer solution.
This may result in damage to the paint.
ADI0018ADI0019
BRAKE FLUID WINDOW WASHER FLUID
7-10
ZB13-DX
Page 183 of 235
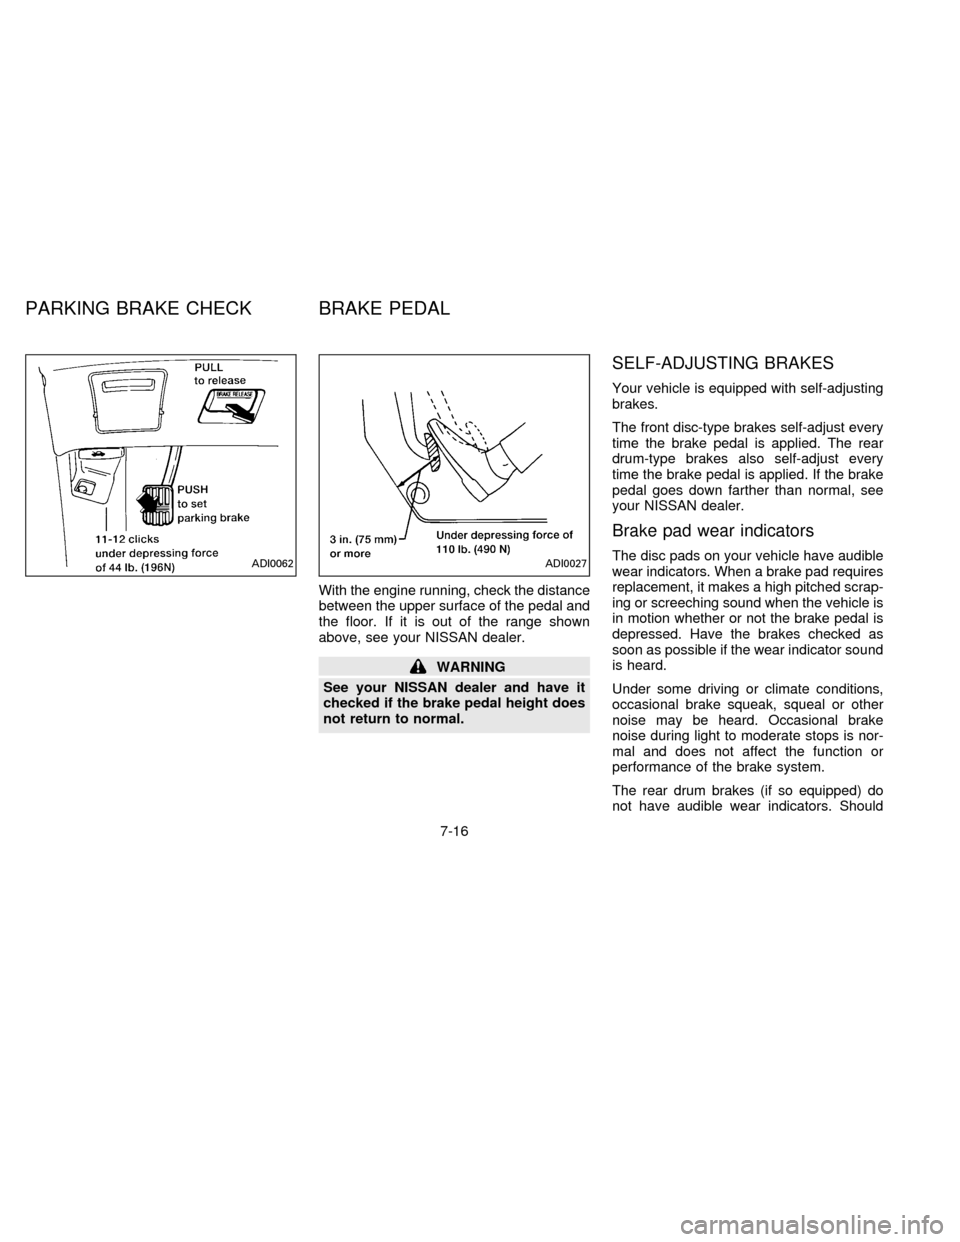
With the engine running, check the distance
between the upper surface of the pedal and
the floor. If it is out of the range shown
above, see your NISSAN dealer.
WARNING
See your NISSAN dealer and have it
checked if the brake pedal height does
not return to normal.
SELF-ADJUSTING BRAKES
Your vehicle is equipped with self-adjusting
brakes.
The front disc-type brakes self-adjust every
time the brake pedal is applied. The rear
drum-type brakes also self-adjust every
time the brake pedal is applied. If the brake
pedal goes down farther than normal, see
your NISSAN dealer.
Brake pad wear indicators
The disc pads on your vehicle have audible
wear indicators. When a brake pad requires
replacement, it makes a high pitched scrap-
ing or screeching sound when the vehicle is
in motion whether or not the brake pedal is
depressed. Have the brakes checked as
soon as possible if the wear indicator sound
is heard.
Under some driving or climate conditions,
occasional brake squeak, squeal or other
noise may be heard. Occasional brake
noise during light to moderate stops is nor-
mal and does not affect the function or
performance of the brake system.
The rear drum brakes (if so equipped) do
not have audible wear indicators. ShouldADI0062ADI0027
PARKING BRAKE CHECK BRAKE PEDAL
7-16
ZB13-DX
Page 184 of 235
you ever hear an unusually loud noise from
the rear drum brakes, have them inspected
as soon as possible by your NISSAN
dealer.
Proper brake inspection intervals should
be followed.For more information regard-
ing brake inspections, see the appropriate
maintenance schedule information in the
``Maintenance Schedule'' section of this
manual.Check the brake booster function as fol-
lows:
1. With the engine off, press and release
the brake pedal several times. When
brake pedal movement (distance of
travel) remains the same from one pedal
application to the next, continue on to the
next step.
2. While depressing the brake pedal, start
the engine. The pedal height should drop
a little.
3. With the brake pedal depressed, turn the
engine off. Keep the pedal depressed for
about 30 seconds; the pedal height
should not change.
4. Run the engine for one minute without
depressing the brake pedal, then turn it
off. Depress the brake pedal several
times. The pedal travel distance will de-
crease gradually with each depression
as the vacuum is released from the
booster.
If the brakes do not operate properly, see
your NISSAN dealer.
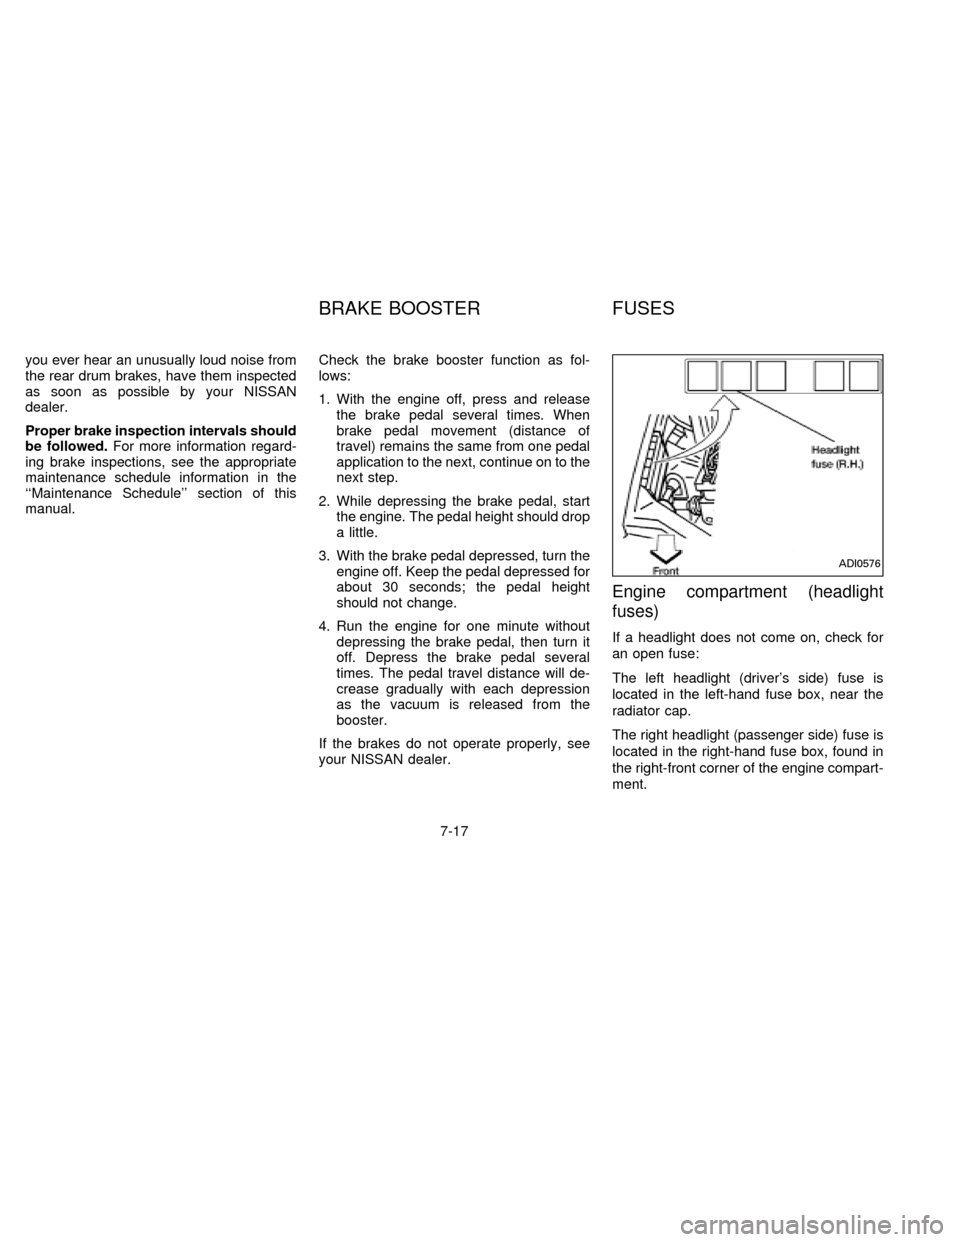
Engine compartment (headlight
fuses)
If a headlight does not come on, check for
an open fuse:
The left headlight (driver's side) fuse is
located in the left-hand fuse box, near the
radiator cap.
The right headlight (passenger side) fuse is
located in the right-hand fuse box, found in
the right-front corner of the engine compart-
ment.
ADI0576
BRAKE BOOSTER FUSES
7-17
ZB13-DX