1996 NISSAN QUEST light
[x] Cancel search: lightPage 101 of 235

7.Place the left shoulder harness over the
child's left shoulder. Insert the left shoulder
harness tongue into the left side of the belt
buckle. Confirm that the left shoulder har-
ness tongue indicator is green. The shoul-
der harness tongues only fit into the proper
sides of the belt buckle.
8.Place the right shoulder harness over the
child's right shoulder. Insert the right shoul-
der harness tongue into the right side of the
belt buckle. Confirm that the right shoulder
harness tongue indicator is green. The
shoulder harness tongues only fit into the
proper sides of the belt buckle.
9. Fasten the two halves of the chest clip
and confirm that the chest clip indicator is
green. Adjust the chest clip (slightly lower
than the child's shoulders) so it comfort-
ably holds the shoulder harness in positi-
ton on the child's shoulders.
Shoulder harness tongues and chest
clips are equipped with visual indicators
to confirm proper and secure latching.
For the safety of the child and occupants
of the vehicle, all indicators must show
green before operating the vehicle.10. Grasp the right shoulder harness above
the chest clip and pull until the harness
fully extends and a click is heard. At this
time, the harness retractor is in the
automatic locking mode (child restraint
mode). With the child sitting properly
(straight up and back) in the integrated
child safety seat, allow the right shoul-
der harness to retract over the right
shoulder and securely restrain the child.
A clicking should is heard as the har-
ness retracts, indicating that the retrac-
tor is in the automatic locking mode. Be
sure the left shoulder harness is also
APD0817APD0818APD0819
2-72
ZX
Page 105 of 235

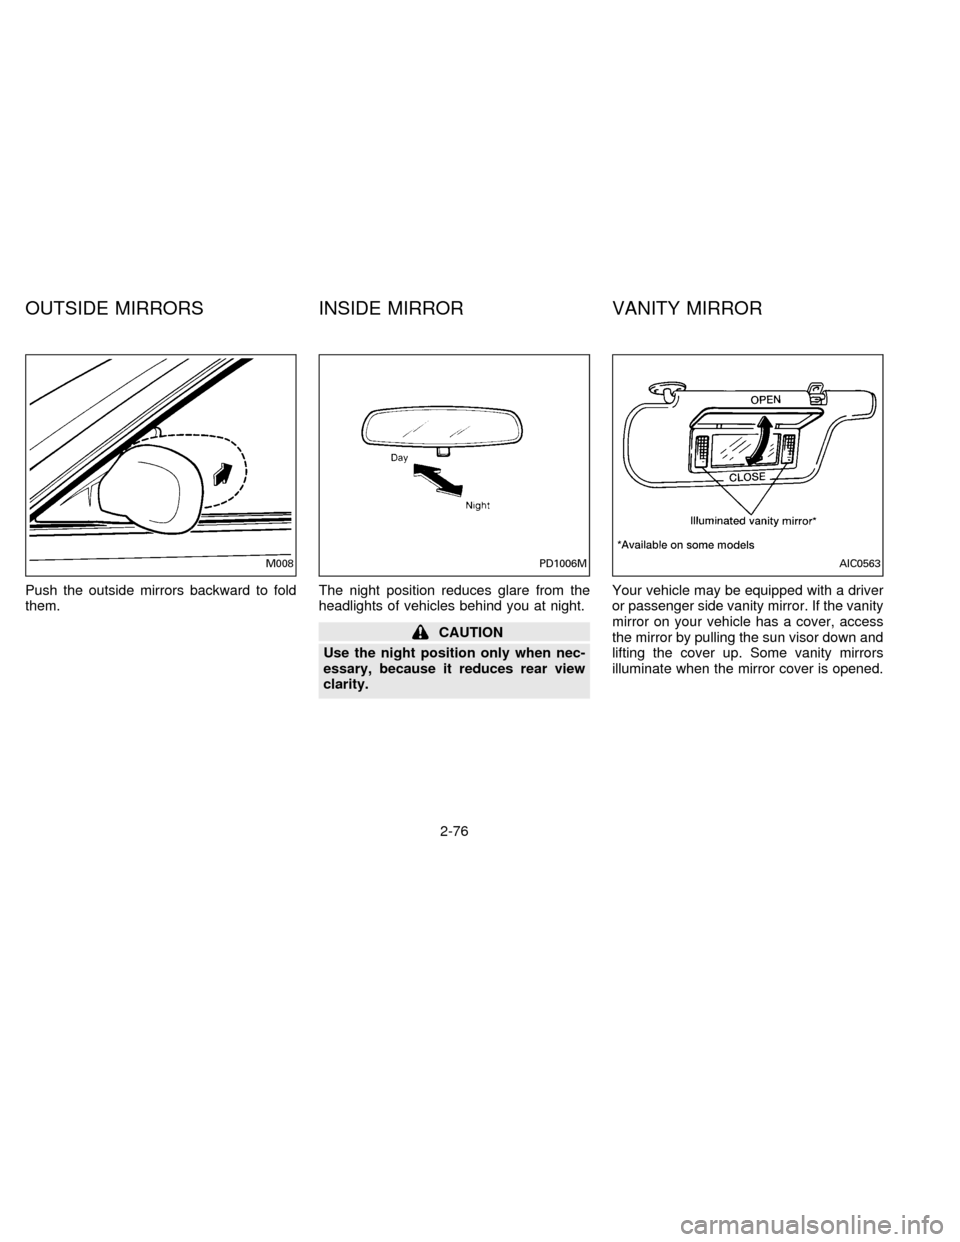
Push the outside mirrors backward to fold
them.The night position reduces glare from the
headlights of vehicles behind you at night.
CAUTION
Use the night position only when nec-
essary, because it reduces rear view
clarity.Your vehicle may be equipped with a driver
or passenger side vanity mirror. If the vanity
mirror on your vehicle has a cover, access
the mirror by pulling the sun visor down and
lifting the cover up. Some vanity mirrors
illuminate when the mirror cover is opened.
M008PD1006MAIC0563
OUTSIDE MIRRORS INSIDE MIRROR VANITY MIRROR
2-76
ZX
Page 108 of 235

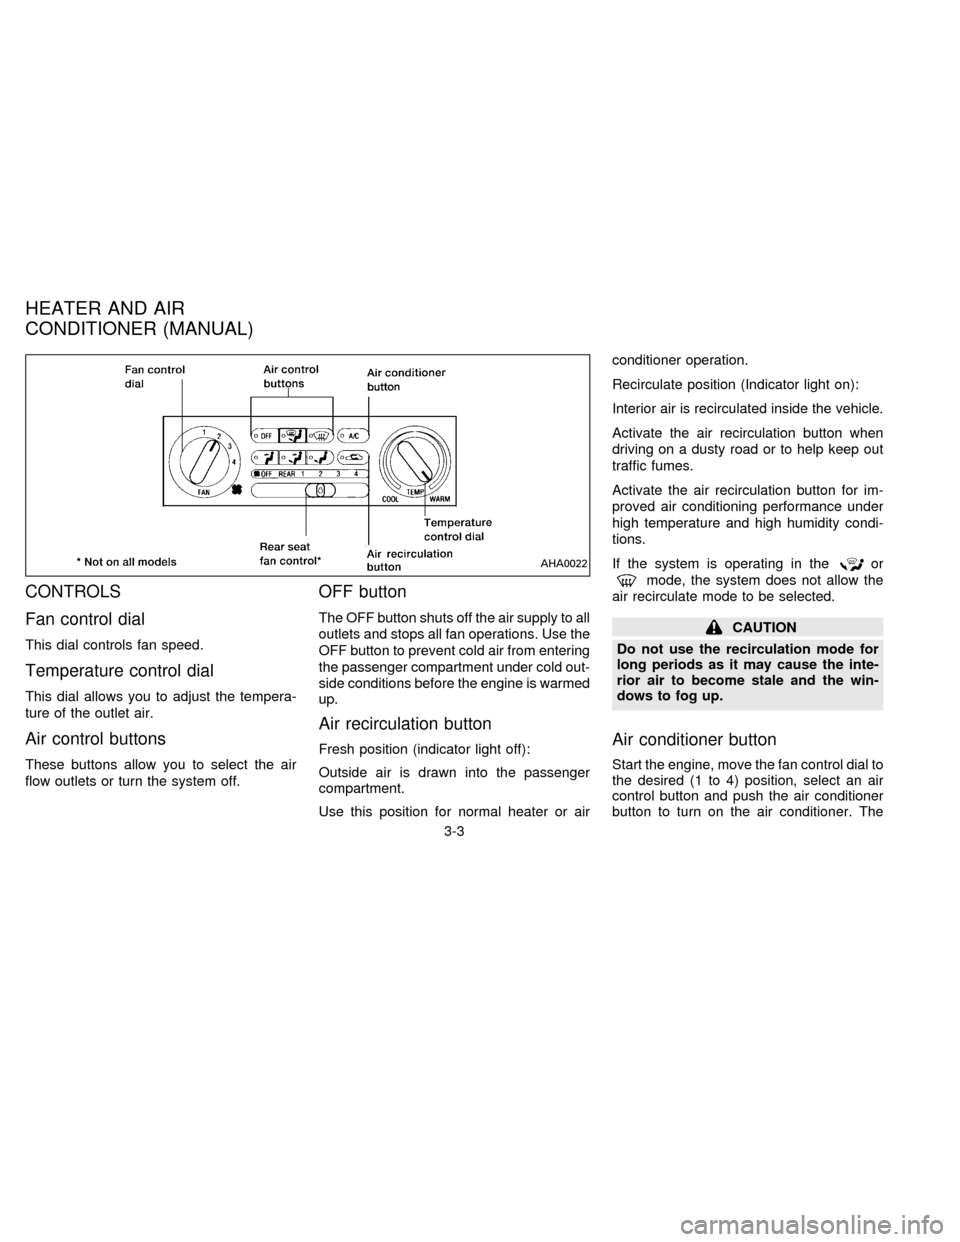
CONTROLS
Fan control dial
This dial controls fan speed.
Temperature control dial
This dial allows you to adjust the tempera-
ture of the outlet air.
Air control buttons
These buttons allow you to select the air
flow outlets or turn the system off.
OFF button
The OFF button shuts off the air supply to all
outlets and stops all fan operations. Use the
OFF button to prevent cold air from entering
the passenger compartment under cold out-
side conditions before the engine is warmed
up.
Air recirculation button
Fresh position (indicator light off):
Outside air is drawn into the passenger
compartment.
Use this position for normal heater or airconditioner operation.
Recirculate position (Indicator light on):
Interior air is recirculated inside the vehicle.
Activate the air recirculation button when
driving on a dusty road or to help keep out
traffic fumes.
Activate the air recirculation button for im-
proved air conditioning performance under
high temperature and high humidity condi-
tions.
If the system is operating in the
or
mode, the system does not allow the
air recirculate mode to be selected.
CAUTION
Do not use the recirculation mode for
long periods as it may cause the inte-
rior air to become stale and the win-
dows to fog up.
Air conditioner button
Start the engine, move the fan control dial to
the desired (1 to 4) position, select an air
control button and push the air conditioner
button to turn on the air conditioner. The
AHA0022
HEATER AND AIR
CONDITIONER (MANUAL)
3-3
ZX
Page 109 of 235

indicator light comes on when the air condi-
tioner is on. To stop the air conditioner,
push the button again; the indicator light
goes off.
The air conditioner cooling function op-
erates only when the engine is running.
WARNING
Positioning of the heating or air condi-
tioning controls should not be done
while driving, in order that full attention
may be given to the driving operation.
HEATER OPERATION
Heating
This mode is used to direct most of the hot
air to the floor outlets.
The air recirculation button light shouldnot
be on for normal heating.
1. Push the
button in.
2. Turn the fan control dial to select speed.
3. Move the temperature control dial to the
desired position.
Ventilation
This mode directs air to the side and center
vents.
1. Push the
button in.
2. Turn the fan control dial to select speed.
3. Move the temperature control dial to the
desired position.
NOTE: The recirculate position can be
used.
Defrosting or defogging
This mode is used to defrost/defog the
windows.
1. Push the
button in.
2. Turn the fan control dial to select speed.
3. Move the temperature control dial to the
desired position.
When the
button is pushed, the air
conditioner automatically turns on to de-
fog the windshield. The recirculated air
mode automatically turns off to reduce
window fogging.
When
is selected, the air condi-
tioner indicator light does not illuminateunless illuminated in the previously se-
lected mode. However, the air condi-
tioner operates to dehumidify if the out-
side temperature is more than 40ÉF
(4ÉC), whether or not the A/C button has
been pressed. Manual selection and illu-
mination of the A/C button does not
override the automatic dehumidifying
which occurs when
is selected.
Operating Tips
Clear snow and ice from the wiper
blades and air inlet in front of the wind-
shield. This improves defrosting/-
defogging operation.
Bi-level heating/cooling
The bi-level mode directs air to the side and
center vents and to the floor outlets.
Bi-level is also a cooling mode when high
sun load conditions are present with cool
temperatures.
With the A/C system in operation, this mode
can be used to cool the passenger's or
driver's feet under high temperature condi-
tions.
With the A/C system in operation under high
3-4
ZX
Page 110 of 235

temperature conditions, improved cooling
can be obtained by pushing the recirculation
button to the on position.
Push the air recirculation button to the off
position when heating is required.
1. Push the
button in.
2. Turn the fan control dial to the desired
position.
3. Move the temperature control dial to the
desired position.
Heating and demisting
This mode heats the interior and demists
the windshield.
1. Push the
button in.
2. Turn the fan control dial to the desired
position.
3. Move the temperature control dial to the
desired position.
When the
button is pushed, the air
recirculate mode automatically turns off.
Outside air is drawn into the passenger
compartment to improve the defogging
performance.
Operating tips
cClear snow and ice from the wiper
blades and air inlet in front of the
windshield. This improves heater op-
eration.
cTo defog the side windows more effec-
tively when in bi-level or ventilation
mode, close the center vent and direct
the side vents toward the side windows.
cA slight delay may be experienced when
changing air control buttons. This is not a
problem, it is only the system motors and
solenoids switching from one outlet to
another.
AIR CONDITIONER OPERATION
Start the engine, move the fan control dial to
the desired (1 to 4) position, and select an
air control button before pushing in the air
conditioner button to activate the air condi-
tioner. When the air conditioner is on, cool-
ing and dehumidifying functions are added
to the system operation.
The air conditioner cooling function op-
erates only when the engine is running.
NOTE: When switching air flow outlets, the
A/C system remains activated unless theA/C button is pressed again to turn it off.
The indicator light on the A/C button re-
mains illuminated unless the button is
pressed to turn it off, or the OFF air control
button is pressed.
Cooling
This mode is used to cool and dehumidify.
1. Push the
button in.
2. Turn the fan control dial to select speed.
3. Push the air conditioner button. The indi-
cator light comes on.
4. Move the temperature control dial to the
desired position.
cFor quick cooling when the outside tem-
perature is high, move the air recircula-
tion button to the on position. Be sure to
return the air recirculation button to the
off position for normal cooling.
cOpening the windows helps to vent heat
buildup when parked in the sun.
Dehumidified heating
This mode is used to heat and dehumidify.
1. Push the air recirculation button to the off
position.
3-5
ZX
Page 111 of 235

2. Push thebutton in.
3. Turn the fan control dial to select speed.
4. Push on the air conditioner button. The
indicator light comes on.
5. Move the temperature control dial to the
desired position.
Dehumidified defogging
This mode is used to defog the windows
and dehumidify.
1. Push the
button in.
2. Turn the fan control dial to the desired
speed.
3. Move the temperature control dial to the
desired position.
When the
button is pushed, the air
conditioner automatically turns on to de-
fog the windshield, (however, the light
does not illuminate unless illuminated in
the previously selected mode) and the
recirculated air mode automatically turns
off.
Operating tips
cKeep windows and sun roof closed while
the air conditioner is in operation.cAfter parking in the sun, drive for two or
three minutes with the windows open to
vent hot air from the passenger compart-
ment. Then, close the windows. This
allows the air conditioner to cool the
interior more quickly.
cThe air conditioning system should be
operated for about ten minutes at
least once a month. This helps pre-
vent damage to the system due to lack
of lubrication.
cIf the coolant temperature gauge ex-
ceeds the H (hot) position, turn the air
conditioner off. See ``If your vehicle over-
heats'' in the ``In case of emergency''
section for additional information.
Servicing air conditioning
The air conditioning system in your NISSAN
vehicle is charged with a new refrigerant
designed with the environment in mind.
This new refrigerant does not harm the
earth's ozone layer.
Special charging equipment and lubricant
are required when servicing your NISSAN
air conditioner. Using improper refrigerants
or lubricants causes severe damage to yourair conditioning system. See ``Air condition-
ing system refrigerant and lubricant recom-
mendations'' in the ``Technical and con-
sumer information'' section of this manual.
Your NISSAN dealer is able to service your
environmentally ``friendly'' air conditioning
system.
3-6
ZX
Page 117 of 235

temperature, and theside raises the
set temperature. Press and hold either side
of the button to rapidly change the tempera-
ture setting in one degree increments to
either 65ÉF (18ÉC) or 85ÉF (29ÉC). If you
want continuous maximum cooling, push
the
side of the TEMP button until
60ÉF (16ÉC) shows in the display window.
The EATC cools at maximum and disre-
gards the 60ÉF (16ÉC) setting until a warmer
temperature is selected. If you want con-
tinuous maximum heating, push the
side of the TEMP button until 90ÉF
(32ÉC) shows in the display window. The
EATC provides maximum heat regardless
of the 90ÉF (32ÉC) setting until a cooler
temperature is selected.
Fan speed and thumbwheel
Your EATC automatically adjusts the fan
speed to the existing conditions. To control
the fan speed yourself, use the thumbwheel
located at the extreme right side of the
EATC control panel. Using the thumbwheel
cancels the automatic fan speed control,
and causes a
to appear in the display
window. Rotate the thumbwheel up for HI
speeds and down for LO speeds.To return to auto fan control, press the
AUTOMATIC button.
AIR CONTROL BUTTONS
Your EATC has five buttons which allow you
to make special selections. The buttons are
grouped in the middle of the EATC panel
and allow you to determine airflow location.
Pressing any of the air control buttons
changes airflow location only, and does not
affect the ability of the system to control
temperature or fan speed. Return to fully
automatic operation by pushing the AUTO-
MATIC button.
Push this button for airflow to the floor and
windshield at the same time. Thein-
dicator light comes on, and the display
window shows the set temperature.
Press this button to obtain maximum airflow
to the windshield. Adjust the temperature
setting as required for defrosting. The
indicator light comes on and the dis-
play window shows the set temperature.
When the outside temperature is about
50ÉF (10ÉC) or above the air is dehumidified
to prevent window fogging.
Push this button to select airflow through
the instrument panel registers. The
indicator light comes on and the dis-
play window shows the set temperature.
The EATC heats the air if the selected
temperature is warmer than the outside air
coming into the vehicle. However, the air is
not cooled regardless of the temperature
setting.
Push this button to get air from the floor and
instrument panel registers at the same time.
The
indicator light comes on and the
display window shows the set temperature.
Depending on the selected temperature, the
air is automatically heated or cooled.
Push this button to direct airflow to the floor.
Theindicator light comes on and the
display window shows the set temperature.
The air cannot be cooled in the
mode, only heated.
AIR CONDITIONING AND AIR
RECIRCULATION
Activate the air conditioning in any of the
override modes listed above by pressing the
3-12
ZX
Page 118 of 235

A/C button. The A/C indicator light comes
on to verify activation, and cooled air flows
from the vents. Fan speed continues to be
controlled by the EATC unless the fan
speed thumbwheel is used to override.
Press the
button to choose air recir-
culation. In this mode the EATC system
recirculates the air inside the vehicle rather
than drawing air from outside. Use this
mode together with the air conditioning to
rapidly cool the inside of the vehicle, or to
dehumidify the air inside the vehicle.
ENGLISH METRIC MODE
Switch from English to metric temperature
display by simultaneously pressing the
and A/C buttons and holding the
thumbwheel in upper position (HI) for one
second.
AHA762
3-13
ZX