1996 NISSAN QUEST phone
[x] Cancel search: phonePage 3 of 235

NISSAN CUSTOMER CARE PROGRAM
NISSAN CARES ...
Both NISSAN and your NISSAN dealer are dedicated to serving all your automotive needs. Your satisfaction with
your vehicle and your NISSAN dealer are our primary concerns. Your NISSAN dealer is always available to assist
you with all your automobile sales and service needs.
However, if there is something that your NISSAN
dealer cannot assist you with or you would like to
provide NISSAN directly with comments or questions,
please contact our (NISSAN's) Consumer Affairs De-
partment using our toll-free number:
For U.S. mainland and Alaska customers
1-800-NISSAN-1 (1-800-647-7261)
For Hawaii customers
(808) 531-0231 (Oahu Number)
For Canada customers
1-800-387-0122
The Consumer Affairs Department will ask for the following infor-
mation:
Ð Your name, address, and telephone number
Ð Vehicle identification number (on dashboard)
Ð Date of purchase
Ð Current odometer reading
Ð Your NISSAN dealer's name
Ð Your comments or questionsOR
you may write to NISSAN with the information on the
left at:
For U.S. mainland and Alaska customers
Nissan Motor Corporation in U.S.A.
Consumer Affairs Department
P.O. Box 191
Gardena, California 90247
For Hawaii customers
Nissan Motor Corporation in Hawaii
2880 Kilihau St.
Honolulu, Hawaii 96819
For Canada customers
Nissan Canada Inc.
P.O. Box 1709, Station ``B''
Mississauga, Ontario L4Y 4H6
We appreciate your interest in NISSAN and thank you for buying a quality NISSAN vehicle.
ZX
Page 23 of 235

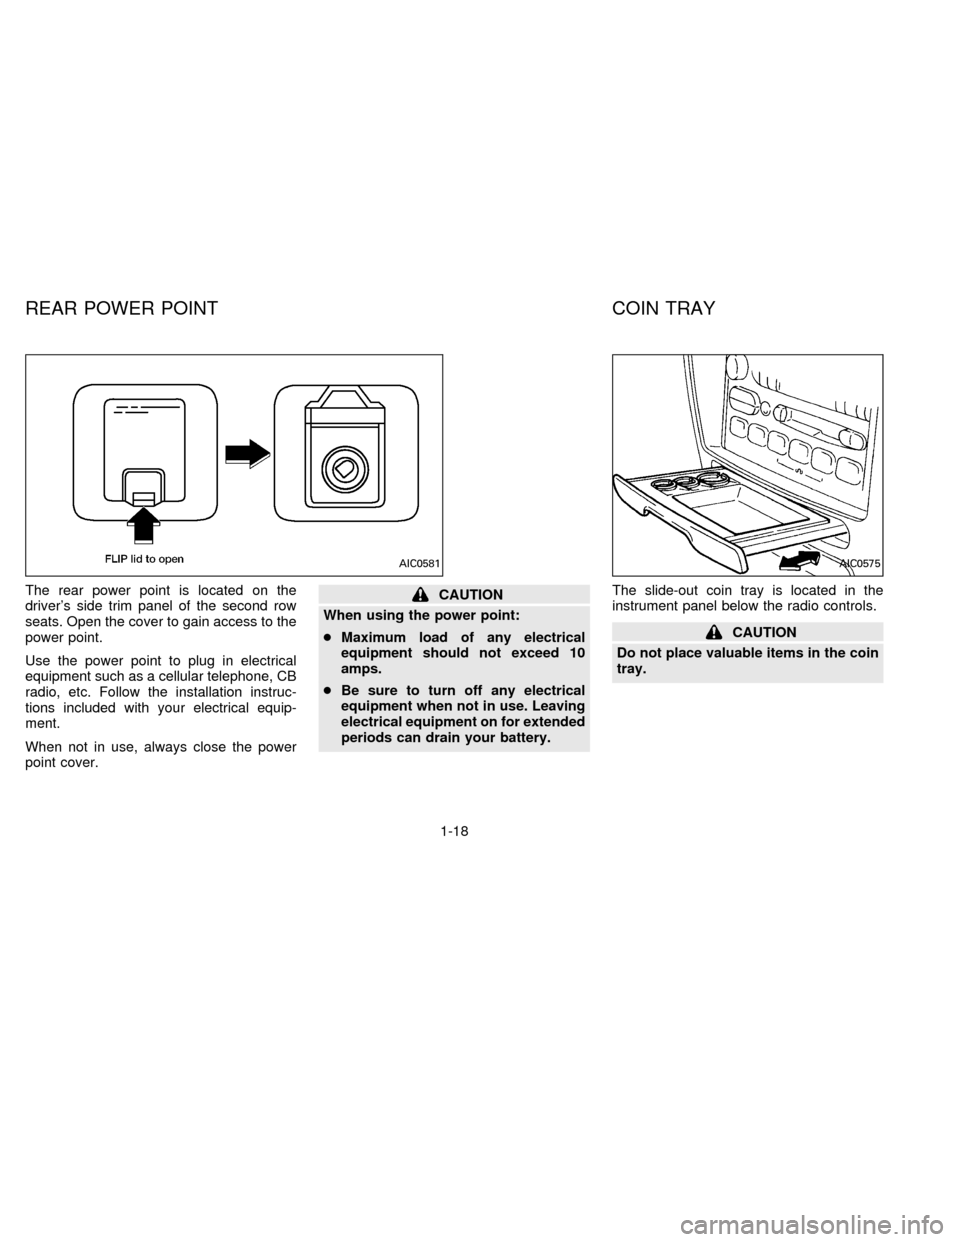
The rear power point is located on the
driver's side trim panel of the second row
seats. Open the cover to gain access to the
power point.
Use the power point to plug in electrical
equipment such as a cellular telephone, CB
radio, etc. Follow the installation instruc-
tions included with your electrical equip-
ment.
When not in use, always close the power
point cover.CAUTION
When using the power point:
cMaximum load of any electrical
equipment should not exceed 10
amps.
cBe sure to turn off any electrical
equipment when not in use. Leaving
electrical equipment on for extended
periods can drain your battery.The slide-out coin tray is located in the
instrument panel below the radio controls.
CAUTION
Do not place valuable items in the coin
tray.
AIC0581AIC0575
REAR POWER POINT COIN TRAY
1-18
ZX
Page 106 of 235

3 Heater, air conditioner and audio system
Ventilators............................................................. 3-2
Heater and air conditioner (manual) .................... 3-3
Heater and air conditioner (automatic)
(If so equipped) .................................................. 3-11
Rear seat heater and air conditioner ................. 3-14
Radio .................................................................. 3-15
Antenna .............................................................. 3-21
CB radio or car phone........................................ 3-26
ZX
Page 123 of 235

the frequency band. To change frequencies
quickly, press and hold either side of the
SEEK button.
SCAN tuning
Push SCAN to enter the scan tuning mode.
The radio searches up the frequency band,
stopping and playing each strong frequency
station for five seconds. This continues until
the SCAN button is pushed a second time
or a different tuning function is selected.
The AM or FM1 or FM2 symbol in the
display window flashes while each station is
being played.
AM/FM
Press the AM/FM button to select the de-
sired band: AM, FM1, or FM2. The stereo
indicator shows in the display window dur-
ing FM stereo reception. When the stereo
broadcast signal is weak, the radio auto-
matically changes from stereo to monaural
reception.
Station memory operations
Your radio comes equipped with six
memory buttons, which are used to preset
up to six AM stations and 12 FM stations.NOTE: If the vehicle's battery is discon-
nected, the memory buttons need to be
reset.
To set the memory buttons:
1. Select the desired band (AM, FM1, or
FM2) by pressing the AM/FM button.
2. Tune to the desired frequency.
3. Press one of the memory buttons and
hold the button in. The sound mutes out
for about two seconds, then returns. That
station is now held in memory on that
button.
Repeat the three steps above for each
memory button you want to set.
The memory buttons also control the rear
audio controls. Push memory buttons 3 and
5 simultaneously to turn the rear audio
controls on. Push them again to turn the
rear audio controls off. A headphone sym-
bol appears in the display window when the
rear controls are activated.
ADJUSTING TONE QUALITY
BASS
Bass control allows you to adjust the lower,
bass frequencies to your preference.Push the BASS button either
or
; BASS and the setting indicator bar
appear in the display window. Pressing the
BASS button either
orin-
creases or decreases the level of bass, as
indicated by the number of bar segments
showing in the display window.
Following bass adjustment, the display win-
dow shows the current setting for three
seconds, then returns to the display prior to
adjustment.
TREB
Treble control allows you to adjust the
higher, treble frequencies to your prefer-
ence.
Push the TREB button either
or
; TREB and the setting indicator bar
appear in the display window. Pressing the
TREB button either
orin-
creases or decreases the level of treble, as
indicated by the number of bar segments
showing in the display window.
Following treble adjustment, the display
window shows the current setting for three
seconds, then returns to the display prior to
adjustment.
3-18
ZX
Page 130 of 235

Rear audio controls
Radio features controlled by the rear seat
remote control (if so equipped) are listed
below:
cVolume: þ/+
cProgram advance: proceed to the next
preset station (AM/FM), the other side of
the tape, or the next CD.
cSource select: AM/FM, tape, or CD
cSpeakers ON/OFF
cSeek:bcPush the Memory 3 and Memory 5 buttons
on the front radio controls simultaneously to
turn the rear controls on. Push them again
to turn the rear audio controls off.
The headphones symbol illuminates in the
front display when the rear audio controls
are on. Two headphone jacks are provided
so two rear seat passengers may listen to
the audio system privately.
The rear controls can only increase the
volume to the level which the front radio is
set.
Headphones are not included with the ve-hicle. Most portable radio headphones work
with the rear audio controls.
When the rear seat controls are on, push
the SPKRS ON-OFF button to turn all
speakers off. Push again to turn all speak-
ers on.
If the rear audio system was on when the
ignition was turned OFF, the audio system
``remembers'' and the rear system is still on
when the engine is started again. The sys-
tem also ``remembers'' if the speakers were
ON or OFF. Therefore, the speakers may
have to be turned on again with the SPKRS
ON-OFF button.
AHA0595
3-25
ZX
Page 131 of 235

When installing a CB ham radio, a car
phone or other transmitters in your NISSAN,
be sure to observe the following cautions,
otherwise the new equipment may ad-
versely affect the MFI system and other
electronic parts.
CAUTION
cKeep the antenna as far away as
possible from the Engine Control
Module.
cAlso keep the antenna wire more
than 8 inches (20 cm) away from the
Multiport Electronic Fuel Injection
(MFI) harness. Do not route the an-
tenna wire next to any harness.
cAdjust the antenna standing-wave
ratio as recommended by the
manufacturer.
cConnect the ground wire from the
CB radio chassis to the body.
cFor details, consult a NISSAN dealer.
CB RADIO OR CAR PHONE
3-26
ZX
Page 229 of 235

A Genuine Nissan Service Manual is the best
source of service and repair information for
your vehicle. Filled with wiring diagrams, illus-
trations and step-by-step diagnostic and ad-
justment procedures, this manual is the same
one used by the factory trained technicians
working at your Nissan dealership. Also avail-
able are Genuine NISSAN Owner's Manuals.
For current pricing and availability of a Genu-
ine NISSAN Service Manual or Genuine NIS-
SAN Owner's Manual, contact:
In the USA:
See your NISSAN dealer or contact:
Dyment Distribution Services
20770 Westwood Dr.
Strongsville OH 44136
In a hurry? Call 1-800-247-5321 and charge
your purchase to Visa/Master Card.
In Canada:
To purchase a copy of a Genuine NISSAN
Service Manual or Owner's Manual please
contact your nearest NISSAN Dealer. For the
phone number and location of a NISSAN
Dealer in your area call the Nissan Satisfaction
Center at 1-800-387-0122 and a bilingual NIS-
SAN representative will assist you.
Also available are Genuine NISSAN Service
and Owner's Manuals for older Nissan models.
9-20
ZX
Page 230 of 235

10 Index
A
After an accident........................................ 5-10
Air bag (See supplemental restraint system)
Air bag warning light .................................. 2-45
Air cleaner housing filter ............................ 7-13
Air conditioner
Air conditioner operation ........................ 3-5
Air conditioner service ............................ 3-6
Air conditioner specification label ......... 9-11
Air conditioning system refrigerant and
lubricant recommendations .................... 9-6
Air flow charts ......................................... 3-7
Heater and air conditioner (automatic)
(If so equipped) .................................... 3-11
Heater and air conditioner (manual)....... 3-3
Rear seat heater and air conditioner ... 3-14
Air conditioning system refrigerant and lubricant
recommendations ........................................ 9-6
Anchor point location ................................. 2-66
Antenna
Manual .................................................. 3-21
Power.................................................... 3-21
Anti-lock brake system .............................. 4-13
Armrests..................................................... 2-29
Ashtray (See cigarette lighter and ashtray)
Audio system
AM-FM radio with cassette player ........ 3-15Compact disc (CD) player .................... 3-22
Autolamp switch......................................... 1-13
Automatic
Automatic transmission fluid ................... 7-8
Driving with an automatic transmission .. 4-5
B
Battery........................................................ 7-11
Before starting the engine ........................... 4-5
Brake
Anti-lock brake system ......................... 4-13
Brake booster ....................................... 7-17
Brake fluid ..................................... 7-10, 9-2
Brake pedal .......................................... 7-16
Brake wear indicators ................... 1-9, 7-16
Parking brake check ............................. 7-16
Parking brake operation ......................... 4-8
Self-adjusting brakes ............................ 7-16
Break-in schedule ...................................... 4-11
Bulb check/instrument panel ....................... 1-6
Bulb replacement ....................................... 7-21
C
Capacities and recommended fuel/
lubricants...................................................... 9-2
Cargo net ................................................... 2-13Cassette player (See audio system)
CB radio or car phone ............................... 3-26
Child restraints for infants and
small children ............................................. 2-58
Child restraint with top tether strap ........... 2-62
Child safety sliding door lock....................... 2-4
Cigarette lighter and ashtray ..................... 1-17
Cleaning exterior and interior ...................... 6-2
Clock .......................................................... 1-22
Coin tray .................................................... 1-18
Cold weather driving cautions ................... 4-15
Compact disc (CD) player ......................... 3-22
Controls
Audio controls (rear) ............................. 3-25
Heater and air conditioner controls ........ 3-3
Rear seat heater and air conditioner
controls ................................................. 3-14
Coolant
Capacities and recommended fuel/
lubricants ................................................ 9-2
Changing engine coolant........................ 7-5
Checking engine coolant level ............... 7-4
Engine coolant temperature gauge ........ 1-4
Cornering light ........................................... 1-16
Corrosion protection .................................... 6-4
Cruise control............................................... 4-9
Cup holder ................................................. 2-31
ZX