1996 NISSAN QUEST reset
[x] Cancel search: resetPage 9 of 235

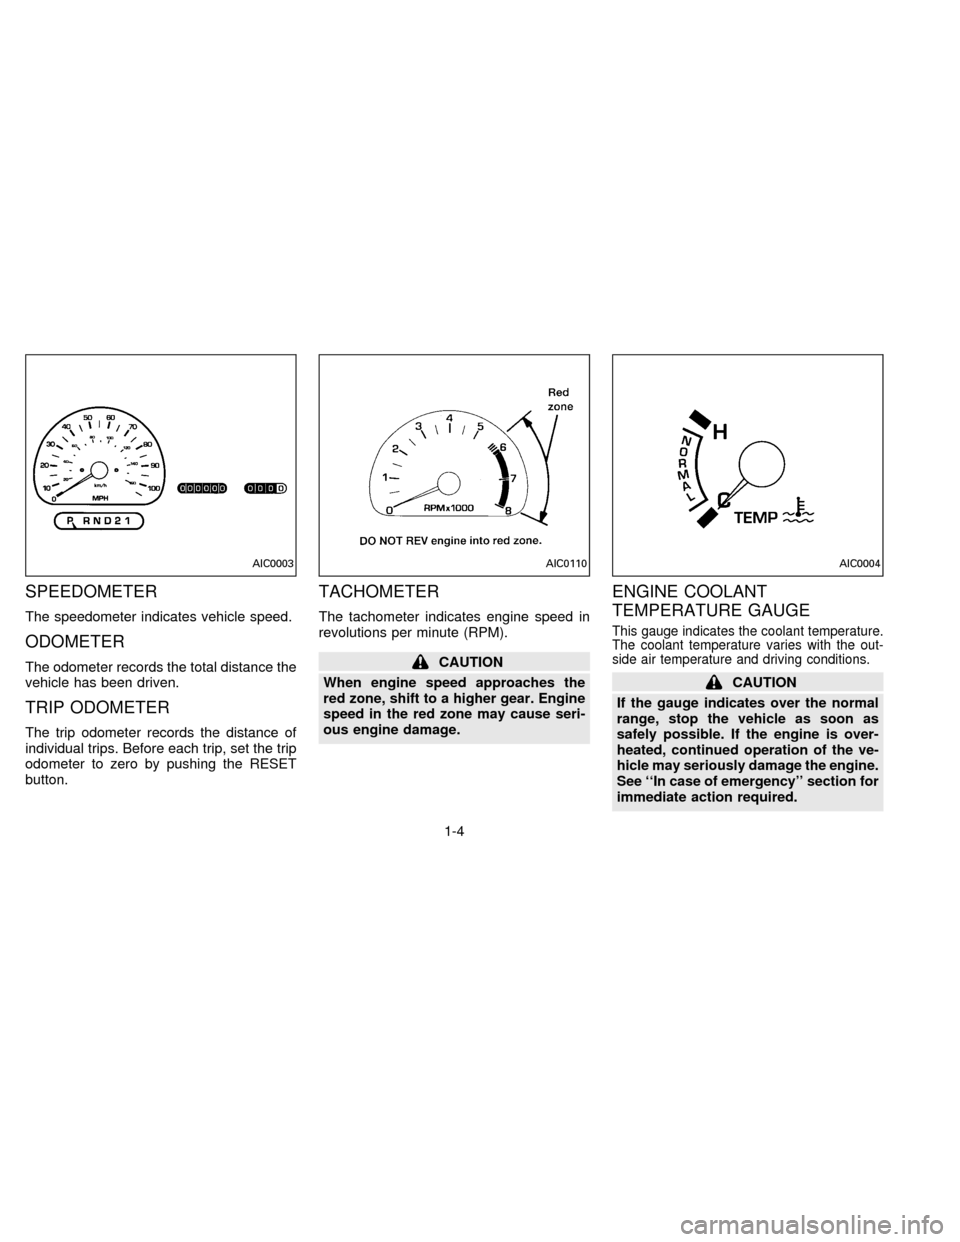
SPEEDOMETER
The speedometer indicates vehicle speed.
ODOMETER
The odometer records the total distance the
vehicle has been driven.
TRIP ODOMETER
The trip odometer records the distance of
individual trips. Before each trip, set the trip
odometer to zero by pushing the RESET
button.
TACHOMETER
The tachometer indicates engine speed in
revolutions per minute (RPM).
CAUTION
When engine speed approaches the
red zone, shift to a higher gear. Engine
speed in the red zone may cause seri-
ous engine damage.
ENGINE COOLANT
TEMPERATURE GAUGE
This gauge indicates the coolant temperature.
The coolant temperature varies with the out-
side air temperature and driving conditions.
CAUTION
If the gauge indicates over the normal
range, stop the vehicle as soon as
safely possible. If the engine is over-
heated, continued operation of the ve-
hicle may seriously damage the engine.
See ``In case of emergency'' section for
immediate action required.
AIC0003AIC0110AIC0004
1-4
ZX
Page 39 of 235

1. Pull the hood lock release handles1
located below the instrument panel; the
hood then springs up slightly.
2. Pull up on the lever
s2at the front of the
hood and raise the hood.3. Insert the support rod
s3into the slot on
the underside of the hood.
4. When closing the hood, reset the support
rod to its original position, then slowly
close the hood and make sure it locks
into place.
PD1336MAPD0141
HOOD RELEASE
2-10
ZX
Page 56 of 235

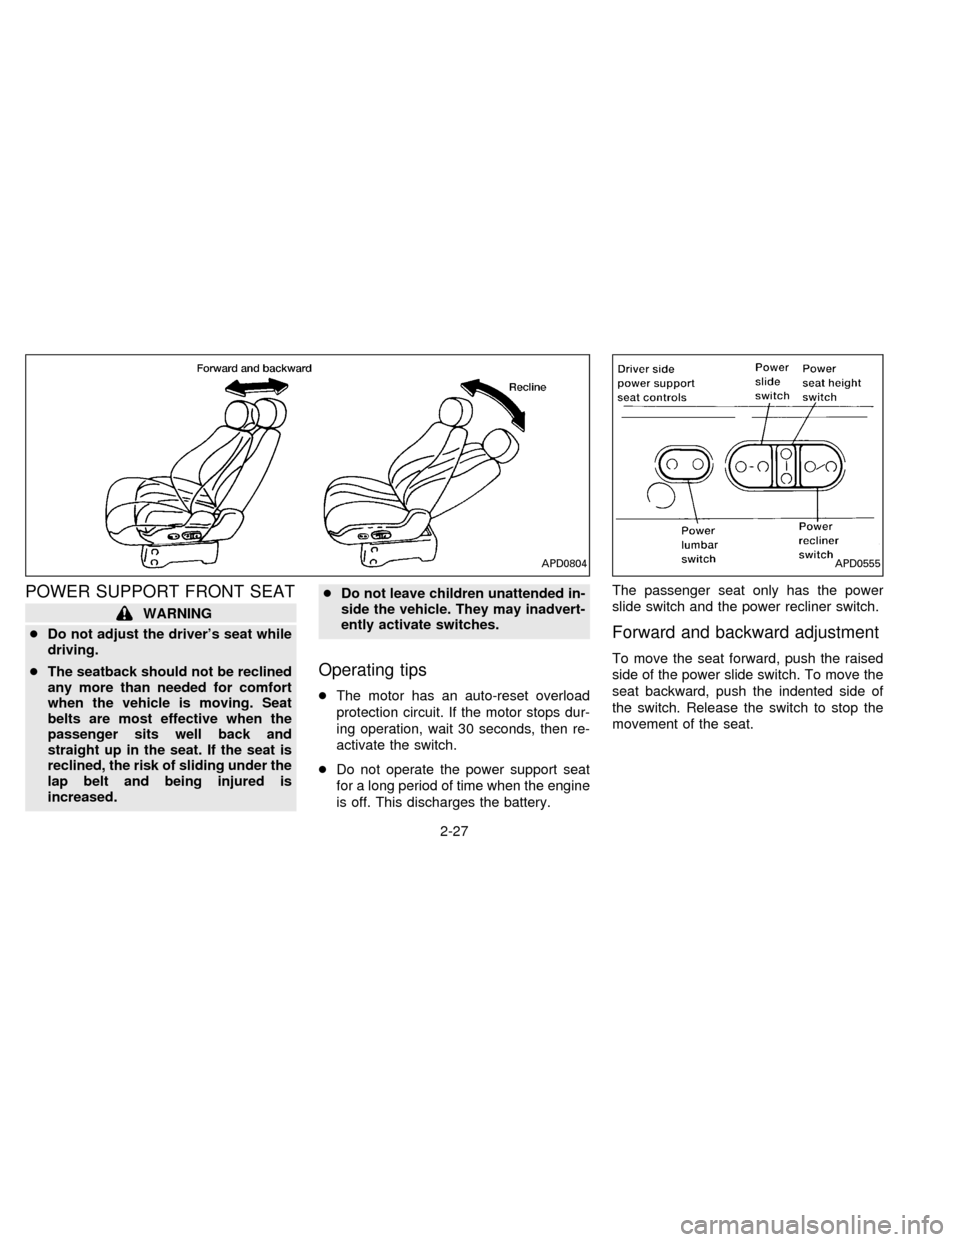
POWER SUPPORT FRONT SEAT
WARNING
cDo not adjust the driver's seat while
driving.
cThe seatback should not be reclined
any more than needed for comfort
when the vehicle is moving. Seat
belts are most effective when the
passenger sits well back and
straight up in the seat. If the seat is
reclined, the risk of sliding under the
lap belt and being injured is
increased.cDo not leave children unattended in-
side the vehicle. They may inadvert-
ently activate switches.
Operating tips
cThe motor has an auto-reset overload
protection circuit. If the motor stops dur-
ing operation, wait 30 seconds, then re-
activate the switch.
cDo not operate the power support seat
for a long period of time when the engine
is off. This discharges the battery.The passenger seat only has the power
slide switch and the power recliner switch.
Forward and backward adjustment
To move the seat forward, push the raised
side of the power slide switch. To move the
seat backward, push the indented side of
the switch. Release the switch to stop the
movement of the seat.
APD0804APD0555
2-27
ZX
Page 123 of 235

the frequency band. To change frequencies
quickly, press and hold either side of the
SEEK button.
SCAN tuning
Push SCAN to enter the scan tuning mode.
The radio searches up the frequency band,
stopping and playing each strong frequency
station for five seconds. This continues until
the SCAN button is pushed a second time
or a different tuning function is selected.
The AM or FM1 or FM2 symbol in the
display window flashes while each station is
being played.
AM/FM
Press the AM/FM button to select the de-
sired band: AM, FM1, or FM2. The stereo
indicator shows in the display window dur-
ing FM stereo reception. When the stereo
broadcast signal is weak, the radio auto-
matically changes from stereo to monaural
reception.
Station memory operations
Your radio comes equipped with six
memory buttons, which are used to preset
up to six AM stations and 12 FM stations.NOTE: If the vehicle's battery is discon-
nected, the memory buttons need to be
reset.
To set the memory buttons:
1. Select the desired band (AM, FM1, or
FM2) by pressing the AM/FM button.
2. Tune to the desired frequency.
3. Press one of the memory buttons and
hold the button in. The sound mutes out
for about two seconds, then returns. That
station is now held in memory on that
button.
Repeat the three steps above for each
memory button you want to set.
The memory buttons also control the rear
audio controls. Push memory buttons 3 and
5 simultaneously to turn the rear audio
controls on. Push them again to turn the
rear audio controls off. A headphone sym-
bol appears in the display window when the
rear controls are activated.
ADJUSTING TONE QUALITY
BASS
Bass control allows you to adjust the lower,
bass frequencies to your preference.Push the BASS button either
or
; BASS and the setting indicator bar
appear in the display window. Pressing the
BASS button either
orin-
creases or decreases the level of bass, as
indicated by the number of bar segments
showing in the display window.
Following bass adjustment, the display win-
dow shows the current setting for three
seconds, then returns to the display prior to
adjustment.
TREB
Treble control allows you to adjust the
higher, treble frequencies to your prefer-
ence.
Push the TREB button either
or
; TREB and the setting indicator bar
appear in the display window. Pressing the
TREB button either
orin-
creases or decreases the level of treble, as
indicated by the number of bar segments
showing in the display window.
Following treble adjustment, the display
window shows the current setting for three
seconds, then returns to the display prior to
adjustment.
3-18
ZX
Page 130 of 235

Rear audio controls
Radio features controlled by the rear seat
remote control (if so equipped) are listed
below:
cVolume: þ/+
cProgram advance: proceed to the next
preset station (AM/FM), the other side of
the tape, or the next CD.
cSource select: AM/FM, tape, or CD
cSpeakers ON/OFF
cSeek:bcPush the Memory 3 and Memory 5 buttons
on the front radio controls simultaneously to
turn the rear controls on. Push them again
to turn the rear audio controls off.
The headphones symbol illuminates in the
front display when the rear audio controls
are on. Two headphone jacks are provided
so two rear seat passengers may listen to
the audio system privately.
The rear controls can only increase the
volume to the level which the front radio is
set.
Headphones are not included with the ve-hicle. Most portable radio headphones work
with the rear audio controls.
When the rear seat controls are on, push
the SPKRS ON-OFF button to turn all
speakers off. Push again to turn all speak-
ers on.
If the rear audio system was on when the
ignition was turned OFF, the audio system
``remembers'' and the rear system is still on
when the engine is started again. The sys-
tem also ``remembers'' if the speakers were
ON or OFF. Therefore, the speakers may
have to be turned on again with the SPKRS
ON-OFF button.
AHA0595
3-25
ZX
Page 138 of 235

position, the O/D OFF light blinks for ap-
proximately 8 seconds after coming on for 2
seconds. While the vehicle can be driven
under these circumstances please note that
the gears in the automatic transmission will
be locked in 3rd gear.
NOTE: If the vehicle is driven under ex-
treme conditions, such as excessive wheel
spinning and subsequent hard braking, the
Fail-safe system may be activated. This will
occur even if all electrical circuits are func-
tioning properly. In this case, turn the igni-
tion key OFF and wait for 3 seconds. Then
turn the key back to the ON position. The
vehicle should return to its normal operating
condition. If it does not return to its normal
operating condition have your NISSAN
dealer check the transmission and repair if
necessary.
Overdrive switch
Each time your vehicle is started, the trans-
mission is automatically ``reset'' to overdrive
ON.
ON:For normal driving the Overdrive
switch is engaged. The transmis-
sion is upshifted into Overdrive as
the vehicle speed increases.
The overdrive does not engage until the
engine has warmed up.
OFF:For driving up and down long
slopeswhere engine ``braking''
would be advantageous, push theoverdrive switch. The O/D OFF light
illuminates. When cruising at a low
speed or climbing a gentle slope,
you may feel uncomfortable shift
shocks as the transmission shifts
between 3rd and overdrive repeat-
edly. In this case, press the over-
drive switch. The O/D OFF indicator
light comes on at this time.
When driving conditions change, press the
overdrive switch again. The O/D OFF indi-
cator light goes out.
Remember not to drive at high speeds for
extended periods of time with the O/D OFF
light illuminated. This reduces the fuel
economy.
ASD0561
4-7
ZX
Page 140 of 235

The cruise control allows driving at speeds
between 30 and 90 MPH (48 and 144 km/h)
without keeping your foot on the accelerator
pedal.
To turn the cruise control on,push the
CRUISE CONT main switch. The indicator
light on the switch comes on.
To set at cruising speed,accelerate your
vehicle to the desired speed, push the
COAST/SET switch and release it. The
CRUISE light in the instrument cluster
comes on. Take your foot off the accelerator
pedal. Your vehicle maintains the set
speed.cTo pass another vehicle,depress the
accelerator pedal. When you release the
pedal, the vehicle returns to the previ-
ously set speed.
cThe vehicle may not maintain the set
speed when going up or down steep hills.
If this happens, drive without the cruise
control.
To cancel the preset speed,follow any of
these three methods:
a) Push the CANCEL button; the CRUISE
light goes out.b) Tap the brake pedal; the CRUISE light
goes out.
c)
Push the cruise control OFF switch. Both
the ON indicator and CRUISE lights go out.
cIf you depress the brake pedal while
pushing the RES/ACCEL switch, the
RES/ ACCEL function is cancelled.
In order for the RES/ACCEL switch to
operate, the COAST/SET must be used
to re-engage the system.
cThe cruise control automatically cancels
if the vehicle slows down more than 8
MPH (13 km/h) below the set speed.
ASD0562
CRUISE CONTROL
4-9
ZX
Page 141 of 235

cMove the selector lever to N (Neutral).
The CRUISE light goes out.
To reset at a faster cruising speed,use
one of the following three methods:
a) Depress the accelerator pedal. When the
vehicle attains the desired speed, push
and release the COAST/SET switch.
b) Push and hold the RES/ACCEL switch.
When the vehicle attains the speed you
desire, release the switch.
c) Push, then quickly release the
RES/ACCEL switch. Each time you do
this, the set speed increases by about 1
MPH (1.6 km/h).
To reset at a slower cruising speed,use
one of the following three methods:
a) Lightly tap the brake pedal. When the
vehicle attains the desired speed, push
the COAST/SET switch and release it.
b) Push and hold the COAST/SET switch.
Release the switch when the vehicle
slows down to the desired speed.
c) Push, then quickly release the
COAST/SET switch. Each time you dothis, the set speed decreases by about 1
MPH (1.6 km/h).
To resume the preset speed,push and
release the RES/ACCEL switch. The ve-
hicle resumes the last set cruising speed
when the vehicle speed is over 30 MPH (48
km/h).
Precautions
cIf the cruise control system malfunctions,
it cancels automatically. The CRUISE
indicator in the instrument cluster then
blinks to warn the driver.
cWhen the cruise indicator blinks, turn the
cruise control switch (main switch) OFF
and have the system checked by your
NISSAN dealer.
cThe cruise indicator may blink when the
cruise control main switch is turned ON
while pushing either the RES/ACCEL,
COAST/SET, or the CANCEL switch (lo-
cated on the steering wheel). To properly
set the cruise control system perform the
steps above in the order indicated.
Avoid using the cruise control when
driving under the following conditions:cwhen it is not possible to keep the vehicle
at a set speed.
cin heavy traffic or in traffic that varies in
speed.
con winding or hilly roads.
con slippery roads (rain, snow, ice, etc.).
cin very windy areas.
4-10
ZX