Page 1846 of 1938

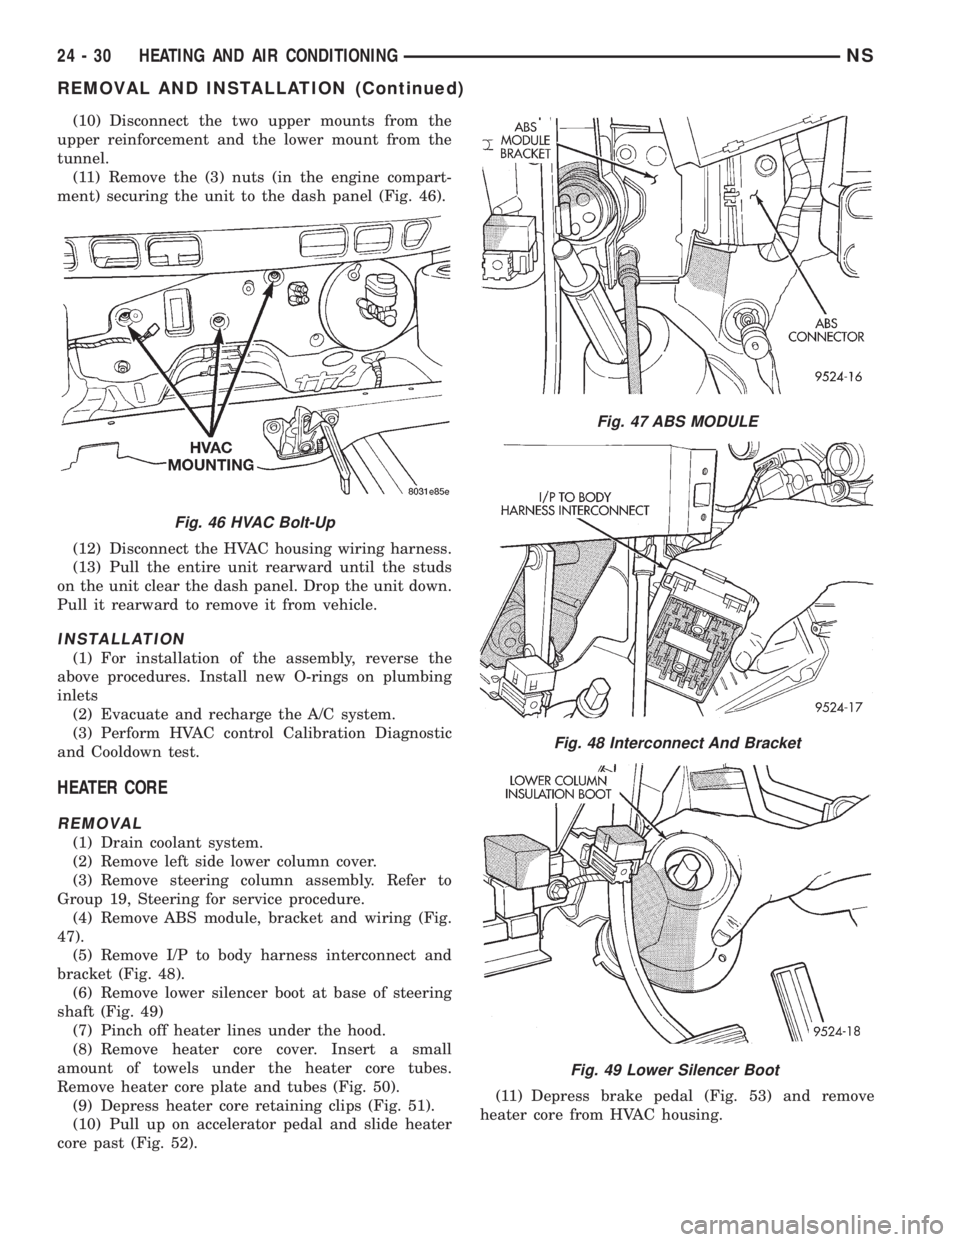
(10) Disconnect the two upper mounts from the
upper reinforcement and the lower mount from the
tunnel.
(11) Remove the (3) nuts (in the engine compart-
ment) securing the unit to the dash panel (Fig. 46).
(12) Disconnect the HVAC housing wiring harness.
(13) Pull the entire unit rearward until the studs
on the unit clear the dash panel. Drop the unit down.
Pull it rearward to remove it from vehicle.
INSTALLATION
(1) For installation of the assembly, reverse the
above procedures. Install new O-rings on plumbing
inlets
(2) Evacuate and recharge the A/C system.
(3) Perform HVAC control Calibration Diagnostic
and Cooldown test.
HEATER CORE
REMOVAL
(1) Drain coolant system.
(2) Remove left side lower column cover.
(3) Remove steering column assembly. Refer to
Group 19, Steering for service procedure.
(4) Remove ABS module, bracket and wiring (Fig.
47).
(5) Remove I/P to body harness interconnect and
bracket (Fig. 48).
(6) Remove lower silencer boot at base of steering
shaft (Fig. 49)
(7) Pinch off heater lines under the hood.
(8) Remove heater core cover. Insert a small
amount of towels under the heater core tubes.
Remove heater core plate and tubes (Fig. 50).
(9) Depress heater core retaining clips (Fig. 51).
(10) Pull up on accelerator pedal and slide heater
core past (Fig. 52).(11) Depress brake pedal (Fig. 53) and remove
heater core from HVAC housing.
Fig. 46 HVAC Bolt-Up
Fig. 47 ABS MODULE
Fig. 48 Interconnect And Bracket
Fig. 49 Lower Silencer Boot
24 - 30 HEATING AND AIR CONDITIONINGNS
REMOVAL AND INSTALLATION (Continued)
Page 1847 of 1938
INSTALLATION
For installation, reverse the above procedures.
Install screws to retain heater core in housing.
Replace heater core tube inlet O-rings. Tightenheater core tube retaining plate to 361 N´m (276
9 in. lbs.) torque.
HEATER HOSES
REMOVAL
NOTE: Review Safety Precautions and Warnings
before proceeding with this operation.
(1) Drain engine cooling system. Refer to Group 7,
Engine Cooling.
(2) Loosen clamps at each end of heater hose to be
removed (Fig. 54) and (Fig. 55).
Fig. 50 Heater Core Plate And Tubes
Fig. 51 Depress Clips
Fig. 52 Accelerator Pedal
Fig. 53 Brake Pedal
Fig. 54 Upper Heater Hose
NSHEATING AND AIR CONDITIONING 24 - 31
REMOVAL AND INSTALLATION (Continued)
Page 1848 of 1938

CAUTION: When removing hoses from heater core
inlet or outlet nipples, do not use excessive force.
Heater core may become damaged and leak engine
coolant.
(3) Carefully rotate hose back and forth while tug-
ging slightly away from connector nipple. If the hose
will not come off, slice the hose at the connector nip-
ple and peel off heater hose. This method will require
heater hose replacement.
INSTALLATION
For installation, reverse the above procedures.
LIQUID LINE
REMOVAL
(1) Disconnect the battery negative cable.
(2) Recover A/C system refrigerant.
(3) Remove the accessory drive belt.
(4) Remove upper generator bracket.
(5) Remove ground wire at dash panel.
(6) Remove the nut retaining the refrigerant line
sealing plate to the expansion valve (Fig. 39).
(7) Remove the stud from the expansion valve (Fig.
40).
(8) Remove liquid line from expansion valve.
(9) Cover the openings to prevent contamination.
(10) Disconnect wire connector at pressure trans-
ducer.
(11) Remove liquid line mounting bracket at right
frame rail.
(12) Using access slot between radiator crossmem-
ber and grille, loosen liquid line mounting plate at
filter-drier. Remove liquid line from filter-drier. It
may be necessary to bend liquid line in half to
remove line. The replacement line is a two-piece
assembly.
(13) Remove the old O-rings.
INSTALLATION
For installation, reverse the above procedures.
²Install the stud to the evaporator sealing plate
and tighten 7 to 11 N´m (64 to 96 in. lbs.) torque.
²Install new O-rings.
²Install two-piece line in place of original part.
²A
ssemble line halves after it is installed on vehicle.²Evacuate and recharge A/C system.
MODE DOOR ACTUATOR
REMOVAL
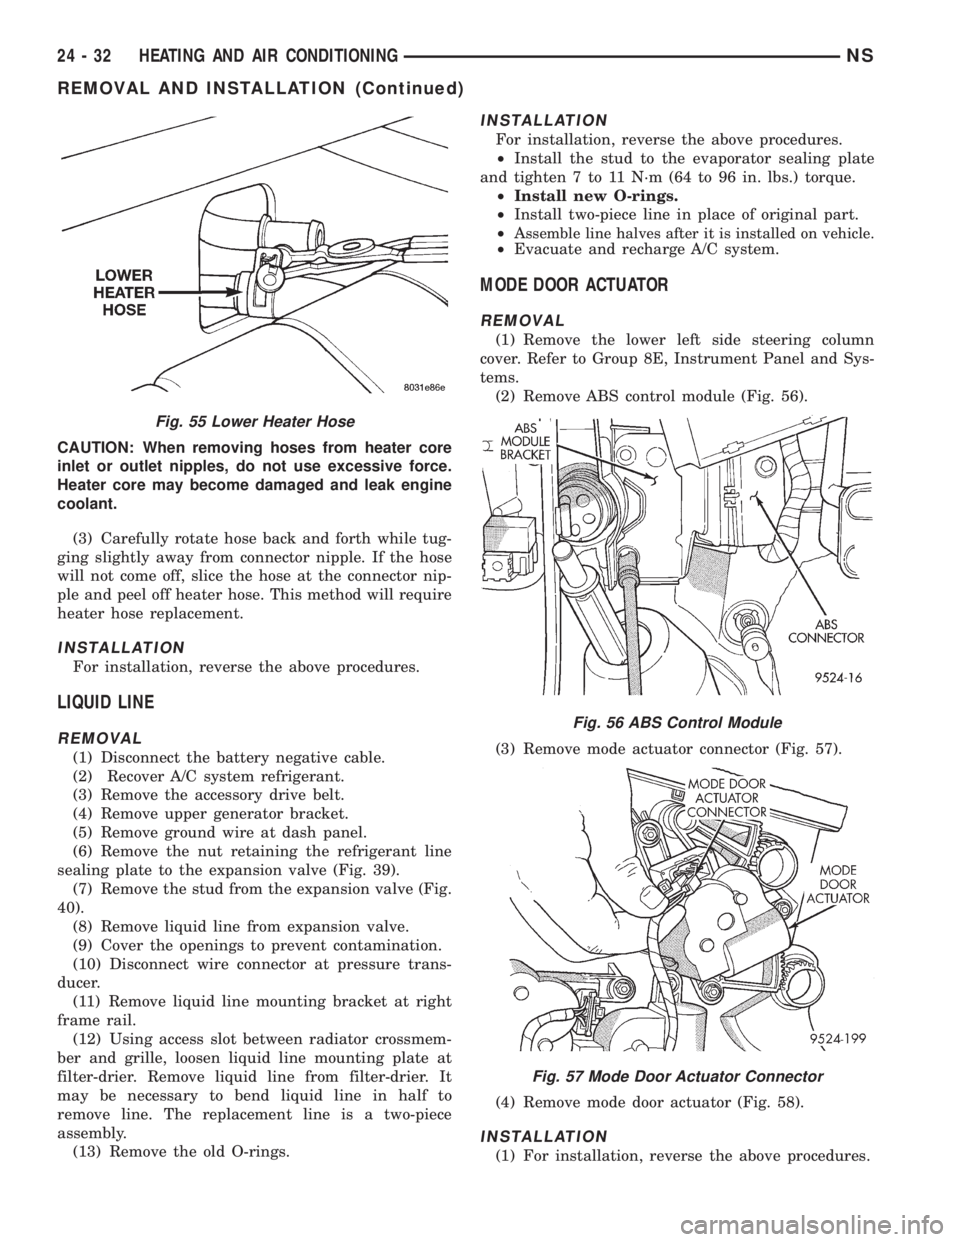
(1) Remove the lower left side steering column
cover. Refer to Group 8E, Instrument Panel and Sys-
tems.
(2) Remove ABS control module (Fig. 56).
(3) Remove mode actuator connector (Fig. 57).
(4) Remove mode door actuator (Fig. 58).
INSTALLATION
(1) For installation, reverse the above procedures.
Fig. 55 Lower Heater Hose
Fig. 56 ABS Control Module
Fig. 57 Mode Door Actuator Connector
24 - 32 HEATING AND AIR CONDITIONINGNS
REMOVAL AND INSTALLATION (Continued)
Page 1849 of 1938

(2) Perform the HVAC control Calibration Diagnos-
tic and Cooldown test.
SIDE WINDOW DEMISTER DUCTS
LEFT SIDE
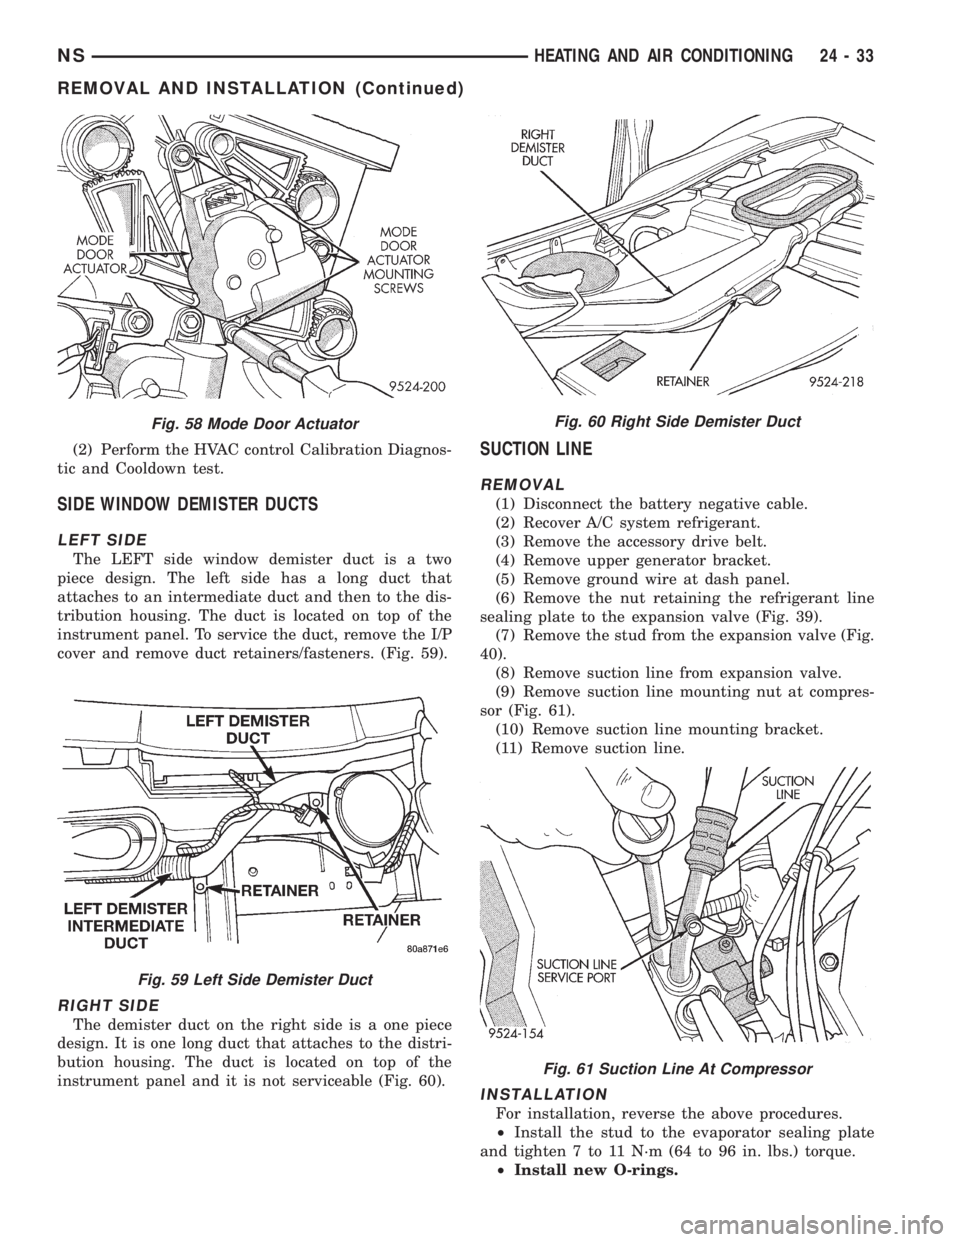
The LEFT side window demister duct is a two
piece design. The left side has a long duct that
attaches to an intermediate duct and then to the dis-
tribution housing. The duct is located on top of the
instrument panel. To service the duct, remove the I/P
cover and remove duct retainers/fasteners. (Fig. 59).
RIGHT SIDE
The demister duct on the right side is a one piece
design. It is one long duct that attaches to the distri-
bution housing. The duct is located on top of the
instrument panel and it is not serviceable (Fig. 60).
SUCTION LINE
REMOVAL
(1) Disconnect the battery negative cable.
(2) Recover A/C system refrigerant.
(3) Remove the accessory drive belt.
(4) Remove upper generator bracket.
(5) Remove ground wire at dash panel.
(6) Remove the nut retaining the refrigerant line
sealing plate to the expansion valve (Fig. 39).
(7) Remove the stud from the expansion valve (Fig.
40).
(8) Remove suction line from expansion valve.
(9) Remove suction line mounting nut at compres-
sor (Fig. 61).
(10) Remove suction line mounting bracket.
(11) Remove suction line.
INSTALLATION
For installation, reverse the above procedures.
²Install the stud to the evaporator sealing plate
and tighten 7 to 11 N´m (64 to 96 in. lbs.) torque.
²Install new O-rings.
Fig. 58 Mode Door Actuator
Fig. 59 Left Side Demister Duct
Fig. 60 Right Side Demister Duct
Fig. 61 Suction Line At Compressor
NSHEATING AND AIR CONDITIONING 24 - 33
REMOVAL AND INSTALLATION (Continued)
Page 1850 of 1938

²Install two-piece line in place of original part.
²Assemble line halves after it is installed on vehi-
cle.
²Evacuate and recharge A/C system.
RECIRC DOOR ACTUATOR
REMOVAL
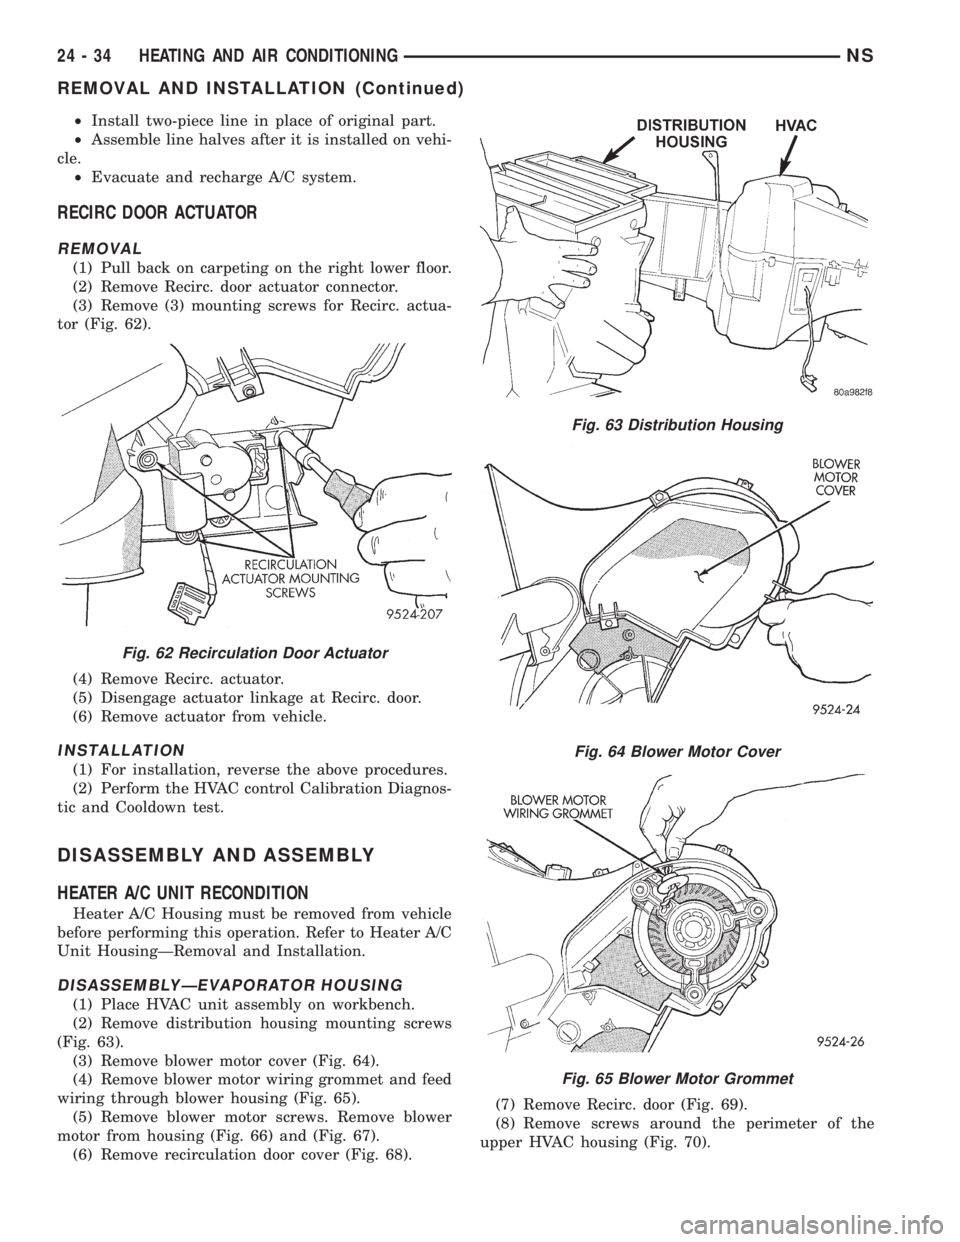
(1) Pull back on carpeting on the right lower floor.
(2) Remove Recirc. door actuator connector.
(3) Remove (3) mounting screws for Recirc. actua-
tor (Fig. 62).
(4) Remove Recirc. actuator.
(5) Disengage actuator linkage at Recirc. door.
(6) Remove actuator from vehicle.
INSTALLATION
(1) For installation, reverse the above procedures.
(2) Perform the HVAC control Calibration Diagnos-
tic and Cooldown test.
DISASSEMBLY AND ASSEMBLY
HEATER A/C UNIT RECONDITION
Heater A/C Housing must be removed from vehicle
before performing this operation. Refer to Heater A/C
Unit HousingÐRemoval and Installation.
DISASSEMBLYÐEVAPORATOR HOUSING
(1) Place HVAC unit assembly on workbench.
(2) Remove distribution housing mounting screws
(Fig. 63).
(3) Remove blower motor cover (Fig. 64).
(4) Remove blower motor wiring grommet and feed
wiring through blower housing (Fig. 65).
(5) Remove blower motor screws. Remove blower
motor from housing (Fig. 66) and (Fig. 67).
(6) Remove recirculation door cover (Fig. 68).(7) Remove Recirc. door (Fig. 69).
(8) Remove screws around the perimeter of the
upper HVAC housing (Fig. 70).
Fig. 62 Recirculation Door Actuator
Fig. 63 Distribution Housing
Fig. 64 Blower Motor Cover
Fig. 65 Blower Motor Grommet
24 - 34 HEATING AND AIR CONDITIONINGNS
REMOVAL AND INSTALLATION (Continued)
Page 1851 of 1938
CAUTION: Do not damage the insulation barrier
surrounding the evaporator.(9) Carefully pull up on evaporator and remove
from housing (Fig. 71).
(10) If replacing evaporator, drain and measure
amount of oil from old evaporator and add new oil of
the same amount (ND8 PAG) to the new evaporator
before installing. Use SP 10 PAG oil for 2.5L diesel
and 2.0L gasoline engine vehicles.
ASSEMBLYÐEVAPORATOR HOUSING
(1) For reassembly of the evaporator housing,
reverse the above procedures.
(2) Perform the HVAC control Calibration Diagnos-
tic and Cooldown test.
DISASSEMBLYÐDISTRIBUTION HOUSING
(1) Place distribution housing on workbench (Fig.
72).
(2) Remove heater core cover (Fig. 73).
(3) Remove heater core tube plate (Fig. 74) and
(Fig. 75).
(4) Remove heater core tubes (Fig. 76).
Fig. 66 Blower Motor Screws
Fig. 67 Blower Motor
Fig. 68 Recirculation Door Cover
Fig. 69 Recirc. Door
Fig. 70 HVAC Cover
NSHEATING AND AIR CONDITIONING 24 - 35
DISASSEMBLY AND ASSEMBLY (Continued)
Page 1852 of 1938
(5) Depress heater core retaining clips at housing.
When reinstalling core use screws to fasten the
heater core to the housing.
(6) Slide heater core out of the housing.(7) Remove driver's zone actuator from distribution
housing (Fig. 77).
(8) Remove passenger zone actuator from distribu-
tion housing (Fig. 78).
Fig. 71 Evaporator
Fig. 72 Distribution Housing
Fig. 73 Heater Core Cover
Fig. 74 Heater Core Tube Plate
Fig. 75 Plate Removal
Fig. 76 Heater Core Tube Removal
24 - 36 HEATING AND AIR CONDITIONINGNS
DISASSEMBLY AND ASSEMBLY (Continued)
Page 1853 of 1938
(9) Using a long thin flat blade tool, insert tool
through blend-air opening on top of distribution
housing (Fig. 79). Depress clip retaining the driver's
blend-air door drive gear. Pull out on gear and
remove from the housing (Fig. 80).(10) Remove mode door motor.
(11) Remove Panel door actuator gear (Fig. 81).
(12) Remove defrost door actuator gear (Fig. 82).
Fig. 77 Driver's Zone Actuator
Fig. 78 Passenger Zone Actuator
Fig. 79 Distribution Housing
Fig. 80 Blend-Air Door Drive Gear
Fig. 81 Panel Door Gear
Fig. 82 Defrost Door Gear
NSHEATING AND AIR CONDITIONING 24 - 37
DISASSEMBLY AND ASSEMBLY (Continued)