1996 ACURA RL KA9 belt
[x] Cancel search: beltPage 1797 of 1954
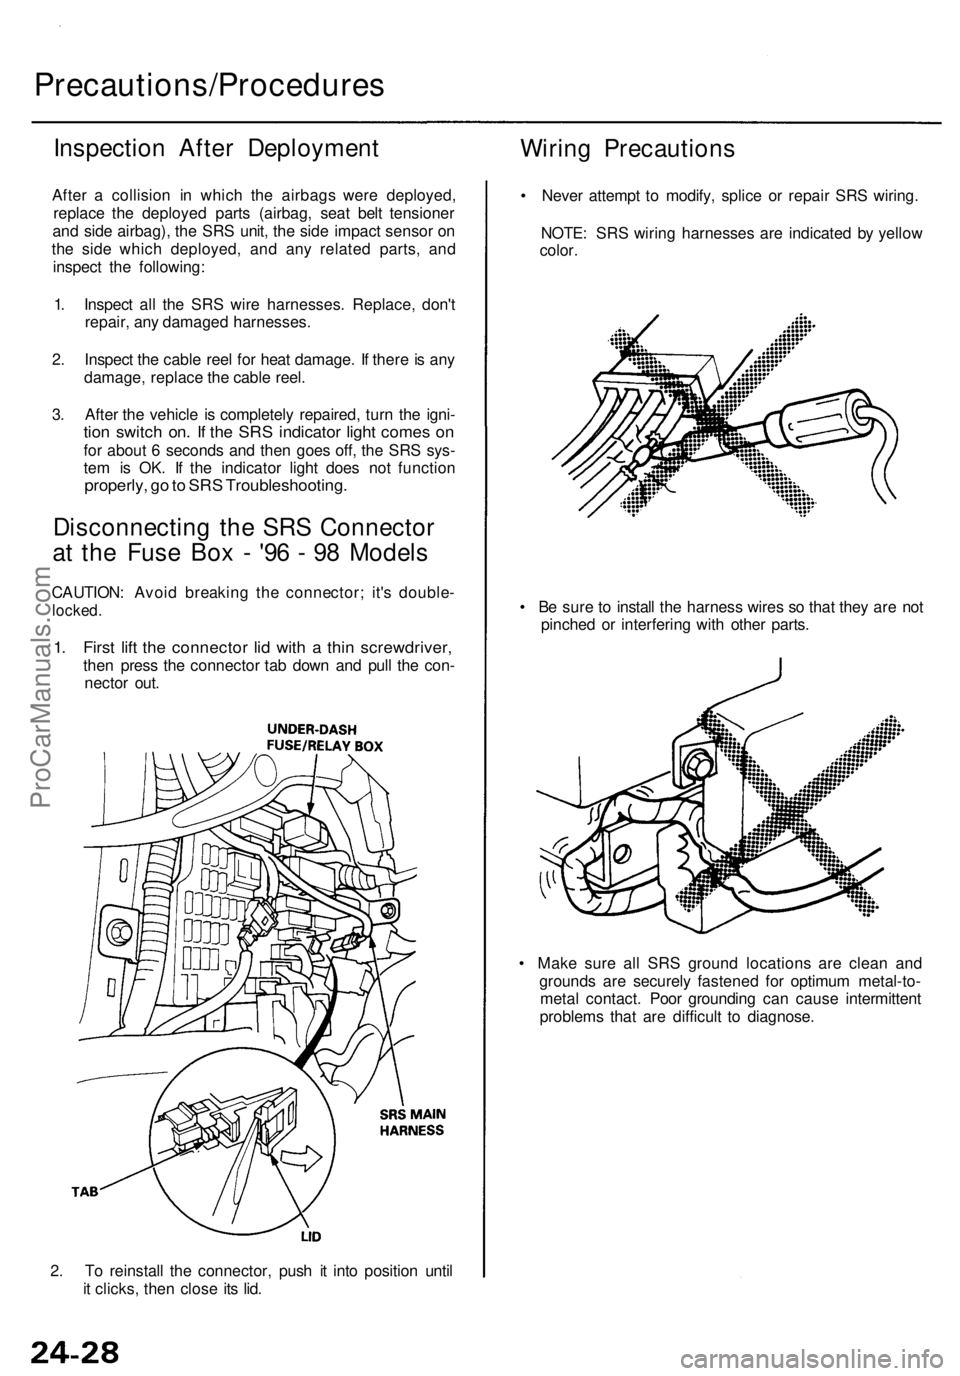
2. To reinstall the connector, push it into position until
it clicks, then close its lid.
Precautions/Procedures
Inspection After Deployment
After a collision in which the airbags were deployed,
replace the deployed parts (airbag, seat belt tensioner
and side airbag), the SRS unit, the side impact sensor on
the side which deployed, and any related parts, and
inspect the following:
1. Inspect all the SRS wire harnesses. Replace, don't
repair, any damaged harnesses.
2. Inspect the cable reel for heat damage. If there is any
damage, replace the cable reel.
3. After the vehicle is completely repaired, turn the igni-
tion switch on. If the SRS indicator light comes on
for about 6 seconds and then goes off, the SRS sys-
tem is OK. If the indicator light does not function
properly, go to SRS Troubleshooting.
Disconnecting the SRS Connector
at the Fuse Box - '96 - 98 Models
CAUTION: Avoid breaking the connector; it's double-
locked.
1. First lift the connector lid with a thin screwdriver,
then press the connector tab down and pull the con-
nector out.
Wiring Precautions
• Never attempt to modify, splice or repair SRS wiring.
NOTE: SRS wiring harnesses are indicated by yellow
color.
• Be sure to install the harness wires so that they are not
pinched or interfering with other parts.
• Make sure all SRS ground locations are clean and
grounds are securely fastened for optimum metal-to-
metal contact. Poor grounding can cause intermittent
problems that are difficult to diagnose.ProCarManuals.com
Page 1798 of 1954

Side Airbag Connector:
Disconnecting
To release the lock, pull the slider and the spring-loaded
sleeve while holding the opposite half of the connector.
Then pull the connector halves apart. Be sure to pull on
the sleeve and not on the connector half.
Spring-loaded Lock Connector
Some SRS system connectors have a spring-loaded lock.
Frontal Airbags and Seat Belt Tensioners:
Disconnecting
To release the lock, pull the spring-loaded sleeve toward
the stop while holding the opposite half of the connector.
Then pull the connector halves apart.
NOTE: Be sure to pull on the sleeve and not on the
connector half. SPRING-LOADED
SLEEVE
Connecting
1. Hold the pawl-side connector half, and press on the
back of the sleeve-side connector half in the direction
shown. As the two connector halves are pressed
together, the sleeve is pushed back by the pawl.
NOTE: Do not touch the sleeve.
2. When the connector halves are completely connected,
the pawl is released, and the spring-loaded sleeve
locks the connector.
SPRING-LOADED
SLEEVE
Connecting
Hold the both connector halves, and press them forcibly
until the projection of the sleeve-side connector clicks to
lock.ProCarManuals.com
Page 1937 of 1954
Seat Belt Tensioner
Replacement (cont'd)
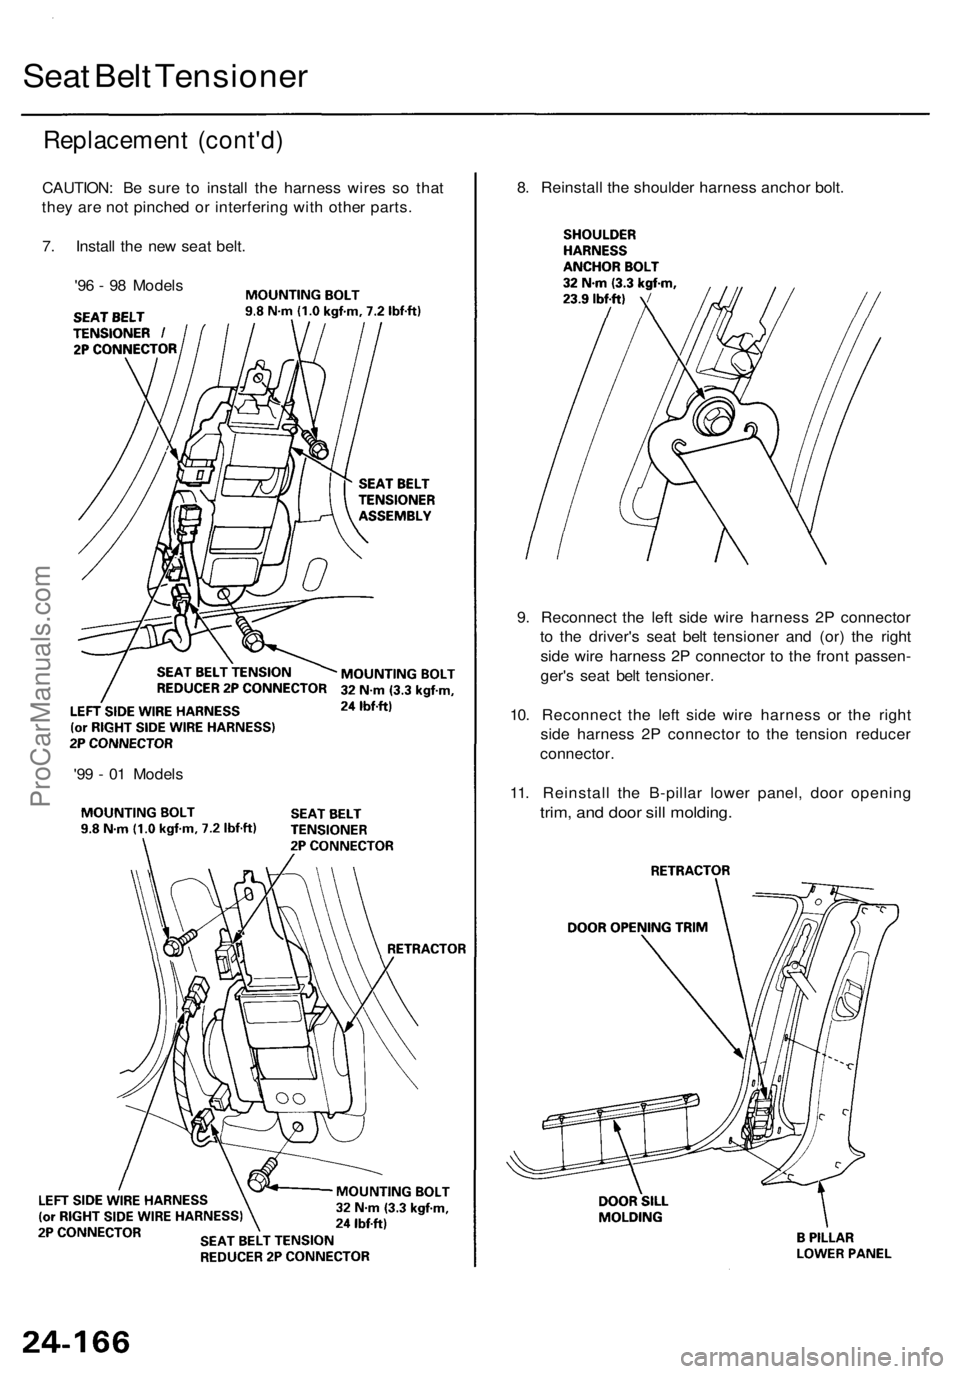
CAUTION: Be sure to install the harness wires so that
they are not pinched or interfering with other parts.
7. Install the new seat belt.
'96 - 98 Models
'99 - 01 Models
9. Reconnect the left side wire harness 2P connector
to the driver's seat belt tensioner and (or) the right
side wire harness 2P connector to the front passen-
ger's seat belt tensioner.
10. Reconnect the left side wire harness or the right
side harness 2P connector to the tension reducer
connector.
11. Reinstall the B-pillar lower panel, door opening
trim, and door sill molding.
8. Reinstall the shoulder harness anchor bolt.ProCarManuals.com
Page 1938 of 1954
12. Reconnect the battery positive cable, then the nega-
tive cable.
13. After installing the seat belt, confirm proper system
operation: Turn the ignition switch ON (II); the SRS
indicator light should come on for about 6 seconds
and then go off.
14. Enter the anti-theft code for the radio, then enter the
customer's radio station presets.ProCarManuals.com
Page 1940 of 1954
6. Connec t a 1 2 vol t batter y to th e tool :
• I f th e gree n ligh t o n th e too l come s on , th e airba g
ignite r circui t i s defectiv e an d canno t deplo y th e
airbag . G o to Damage d Airba g Specia l Procedure .
• I f th e re d ligh t o n th e too l come s on , th e airba g i s
read y t o b e deployed .
7 . Pus h th e tool' s deploymen t switch . Th e airba g
shoul d deplo y (deploymen t i s bot h highl y audibl e
an d visibl e a lou d nois e an d rapi d inflatio n o f th e
bag , followe d b y slo w deflation) .
• I f audible/visibl e deploymen t happens , an d th e
gree n ligh t o n th e too l come s on , continu e wit h
thi s procedure .
• I f th e airba g doesn' t deploy , ye t th e gree n ligh t
come s ON , it s ignite r i s defective . G o to Damage d
Airba g Specia l Procedure .
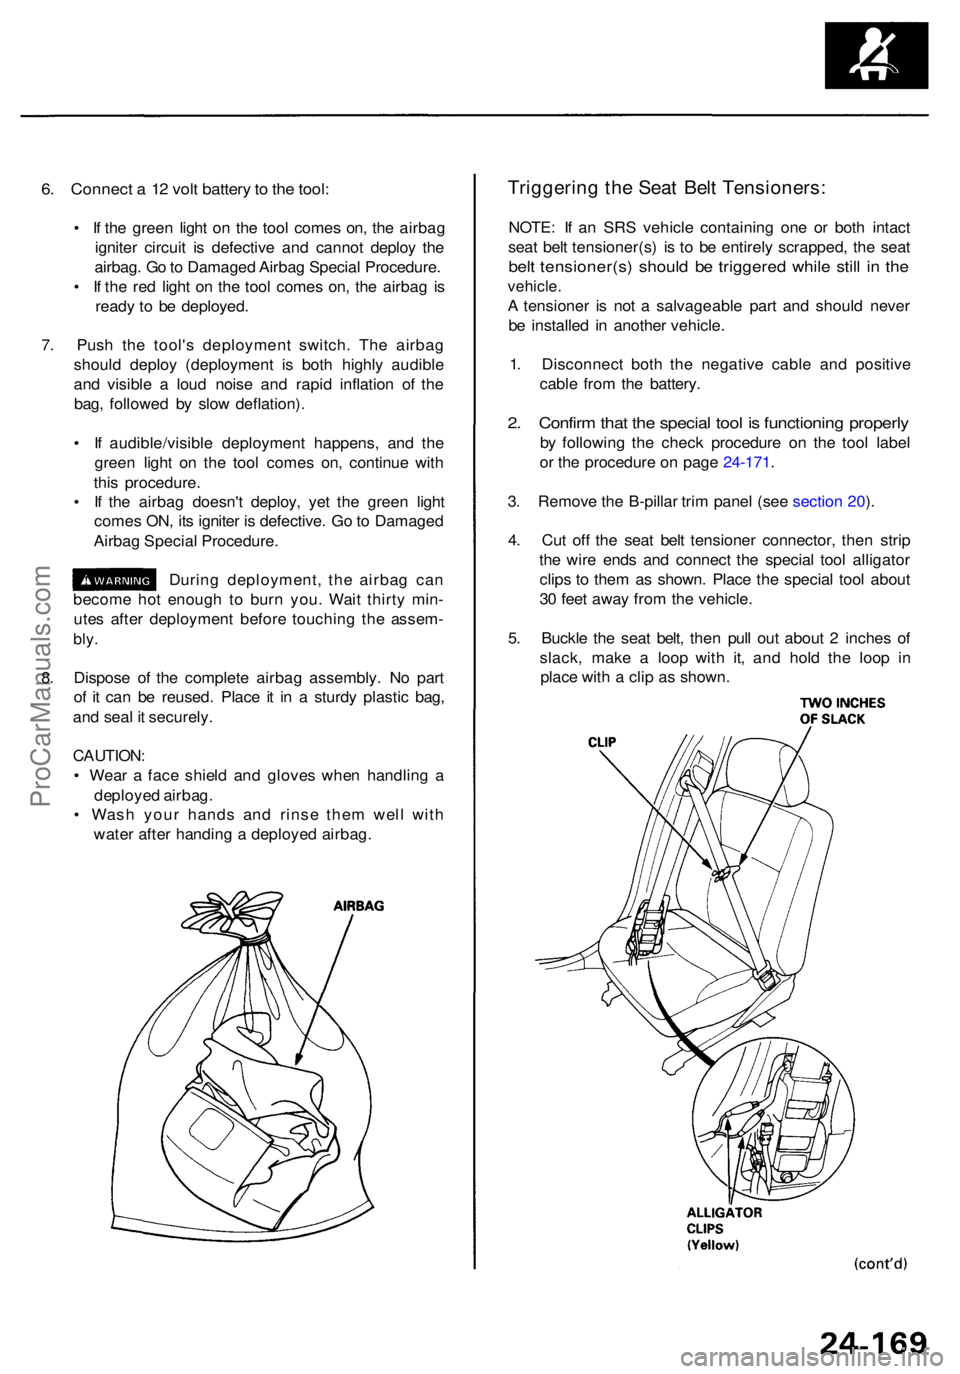
During deployment , th e airba g ca n
becom e ho t enoug h t o bur n you . Wai t thirt y min -
ute s afte r deploymen t befor e touchin g th e assem -
bly.
8. Dispos e o f th e complet e airba g assembly . N o par t
o f i t can be reused . Plac e i t i n a sturd y plasti c bag ,
an d sea l i t securely .
CAUTION :
• Wea r a fac e shiel d an d glove s whe n handlin g a
deploye d airbag .
• Was h you r hand s an d rins e the m wel l wit h
wate r afte r handin g a deploye d airbag .
Triggerin g th e Sea t Bel t Tensioners :
NOTE: I f a n SR S vehicl e containin g on e o r bot h intac t
sea t bel t tensioner(s ) i s t o b e entirel y scrapped , th e sea t
belt tensioner(s ) shoul d b e triggere d whil e stil l i n th e
vehicle .
A tensione r i s no t a salvageabl e par t an d shoul d neve r
b e installe d i n anothe r vehicle .
1 . Disconnec t bot h th e negativ e cabl e an d positiv e
cabl e fro m th e battery .
2. Confir m tha t th e specia l too l i s functionin g properl y
by followin g th e chec k procedur e o n th e too l labe l
o r th e procedur e o n pag e 24-171 .
3 . Remov e th e B-pilla r tri m pane l (se e sectio n 20 ).
4 . Cu t of f th e sea t bel t tensione r connector , the n stri p
th e wir e end s an d connec t th e specia l too l alligato r
clip s t o the m a s shown . Plac e th e specia l too l abou t
3 0 fee t awa y fro m th e vehicle .
5 . Buckl e th e sea t belt , the n pul l ou t abou t 2 inche s o f
slack , mak e a loo p wit h it , an d hol d th e loo p i n
plac e wit h a cli p a s shown .
ProCarManuals.com
Page 1942 of 1954
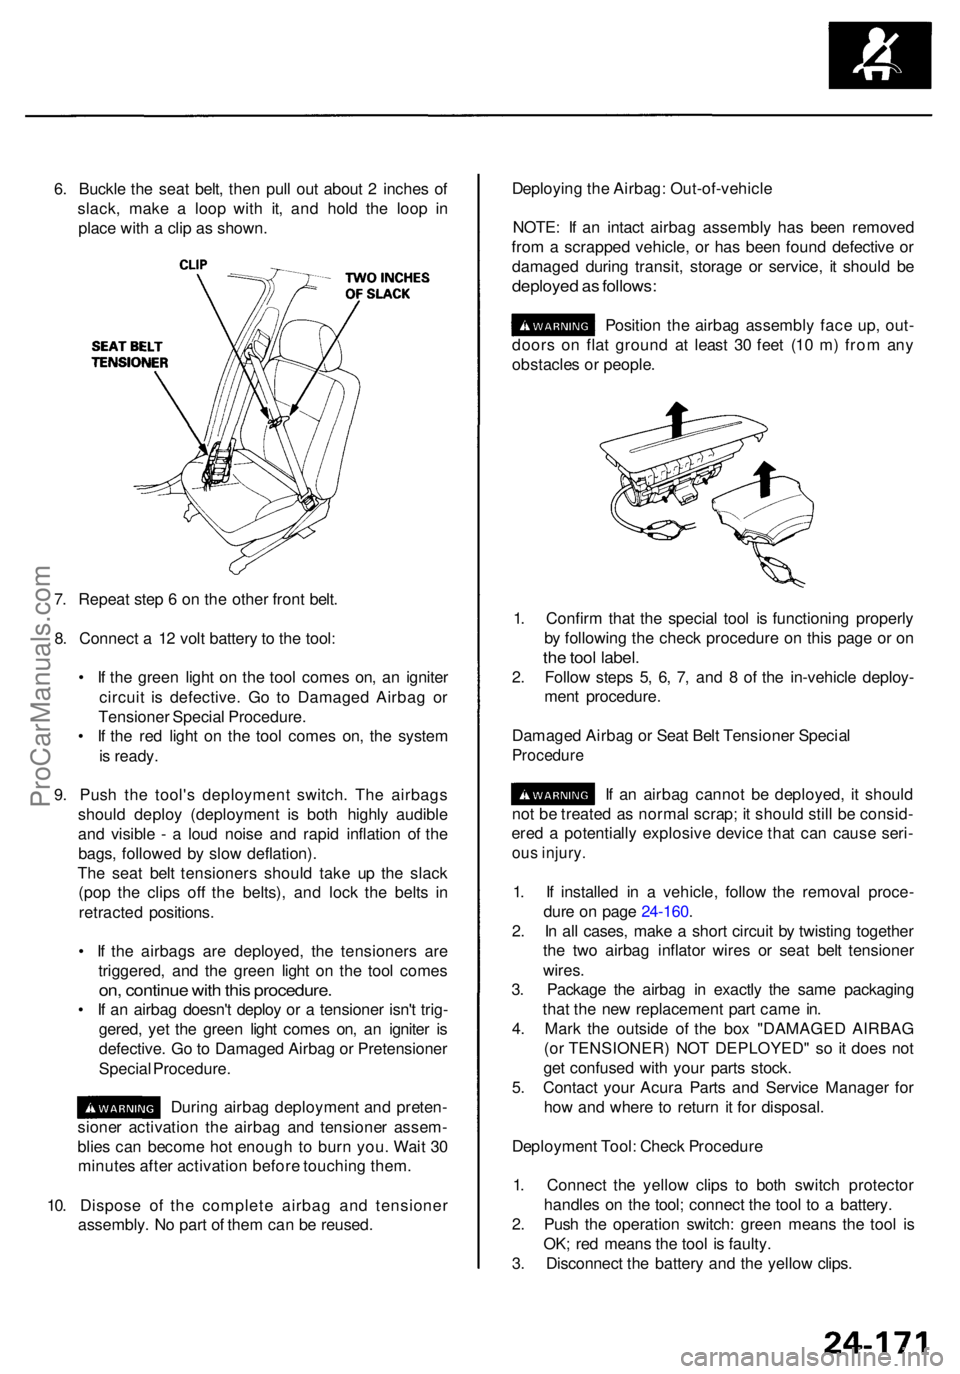
6. Buckl e th e sea t belt , the n pul l ou t abou t 2 inche s o f
slack , mak e a loo p wit h it , an d hol d th e loo p i n
plac e wit h a cli p a s shown . Deployin
g th e Airbag : Out-of-vehicl e
NOTE : I f a n intac t airba g assembl y ha s bee n remove d
fro m a scrappe d vehicle , o r ha s bee n foun d defectiv e o r
damage d durin g transit , storag e o r service , i t shoul d b e
deploye d a s follows :
Position th e airba g assembl y fac e up , out -
door s o n fla t groun d a t leas t 3 0 fee t (1 0 m ) fro m an y
obstacle s o r people .
7 . Repea t ste p 6 o n th e othe r fron t belt .
8 . Connec t a 1 2 vol t batter y t o th e tool :
• I f th e gree n ligh t o n th e too l come s on , a n ignite r
circui t i s defective . G o t o Damage d Airba g o r
Tensione r Specia l Procedure .
• I f th e re d ligh t o n th e too l come s on , th e syste m
i s ready .
9 . Pus h th e tool' s deploymen t switch . Th e airbag s
shoul d deplo y (deploymen t i s bot h highl y audibl e
an d visibl e - a lou d nois e an d rapi d inflatio n o f th e
bags , followe d b y slo w deflation) .
Th e sea t bel t tensioner s shoul d tak e u p th e slac k
(po p th e clip s of f th e belts) , an d loc k th e belt s i n
retracte d positions .
• I f th e airbag s ar e deployed , th e tensioner s ar e
triggered , an d th e gree n ligh t o n th e too l come s
on, continu e wit h thi s procedure .
• I f a n airba g doesn' t deplo y o r a tensione r isn' t trig -
gered , ye t th e gree n ligh t come s on , a n ignite r i s
defective . G o to Damage d Airba g o r Pretensione r
Specia l Procedure .
During airba g deploymen t an d preten -
sione r activatio n th e airba g an d tensione r assem -
blie s ca n becom e ho t enoug h t o bur n you . Wai t 3 0
minute s afte r activatio n befor e touchin g them .
10 . Dispos e o f th e complet e airba g an d tensione r
assembly . N o par t o f the m ca n b e reused . 1
. Confir m tha t th e specia l too l i s functionin g properl y
b y followin g th e chec k procedur e o n thi s pag e o r o n
the too l label .
2. Follo w step s 5 , 6 , 7 , an d 8 of th e in-vehicl e deploy -
men t procedure .
Damage d Airba g o r Sea t Bel t Tensione r Specia l
Procedur e
If a n airba g canno t b e deployed , i t shoul d
no t b e treate d a s norma l scrap ; i t shoul d stil l b e consid -
ere d a potentiall y explosiv e devic e tha t ca n caus e seri -
ous injury .
1. I f installe d i n a vehicle , follo w th e remova l proce -
dur e o n pag e 24-160 .
2 . I n al l cases , mak e a shor t circui t b y twistin g togethe r
th e tw o airba g inflato r wire s o r sea t bel t tensione r
wires .
3 . Packag e th e airba g i n exactl y th e sam e packagin g
tha t th e ne w replacemen t par t cam e in .
4 . Mar k th e outsid e o f th e bo x "DAMAGE D AIRBA G
(o r TENSIONER ) NO T DEPLOYED " s o it doe s no t
ge t confuse d wit h you r part s stock .
5 . Contac t you r Acur a Part s an d Servic e Manage r fo r
ho w an d wher e t o retur n i t fo r disposal .
Deploymen t Tool : Chec k Procedur e
1 . Connec t th e yello w clip s t o bot h switc h protecto r
handle s o n th e tool ; connec t th e too l t o a battery .
2 . Pus h th e operatio n switch : gree n mean s th e too l i s
OK ; re d mean s th e too l i s faulty .
3 . Disconnec t th e batter y an d th e yello w clips .
ProCarManuals.com
Page 1943 of 1954
Airbag, Side Airbag and Seat Belt Tensioner - '99 - 01 Models
Disposal
Before scrappin g an y airbag s o r sid e airbag s o r sea t bel t
tensioner s (includin g thos e i n a whol e vehicl e t o b e
scrapped) , th e airbag s o r sid e airbag s mus t b e deploye d
and th e sea t bel t tensioner s mus t b e triggered . I f th e
vehicl e i s stil l withi n th e warrant y period , befor e deploy -
in g th e airbag s o r sid e airbag s o r triggerin g th e sea t bel t
tensioners , th e Acur a Part s an d Servic e Manage r mus t
giv e approva l and/o r specia l instruction . Onl y afte r th e
airbag s o r sid e airbag s hav e bee n deploye d o r a sea t
bel t tensione r i s triggere d (a s th e resul t o f vehicl e colli -
sion , fo r example) , ca n the y b e scrapped .
I f th e airbag s o r sid e airbag s o r th e sea t bel t tensioner s
appear intac t (no t deploye d o r triggered) , trea t the m
with extrem e caution . Follo w th e procedure .
Deploying th e Airbags : In-vehicl e
NOTE:
• I f a n SR S vehicl e i s t o b e entirel y scrapped , it s
airbag s o r sid e airba g shoul d b e deploye d whil e stil l
in th e vehicle . Th e airbag s o r sid e airba g shoul d no t
b e considere d a s salvageabl e part s an d shoul d neve r
be installe d in anothe r vehicle .
Confirm tha t eac h airba g o r sid e airba g is
securel y mounted ; otherwise , sever e persona l injur y coul d
resul t fro m deployment .
1 . Disconnec t bot h th e negativ e cabl e an d positiv e
cable fro m th e battery .
2. Confir m tha t th e specia l too l i s functionin g properl y
b y followin g th e chec k procedur e o n th e too l labe l
o r th e procedur e o n pag e 24-175 .
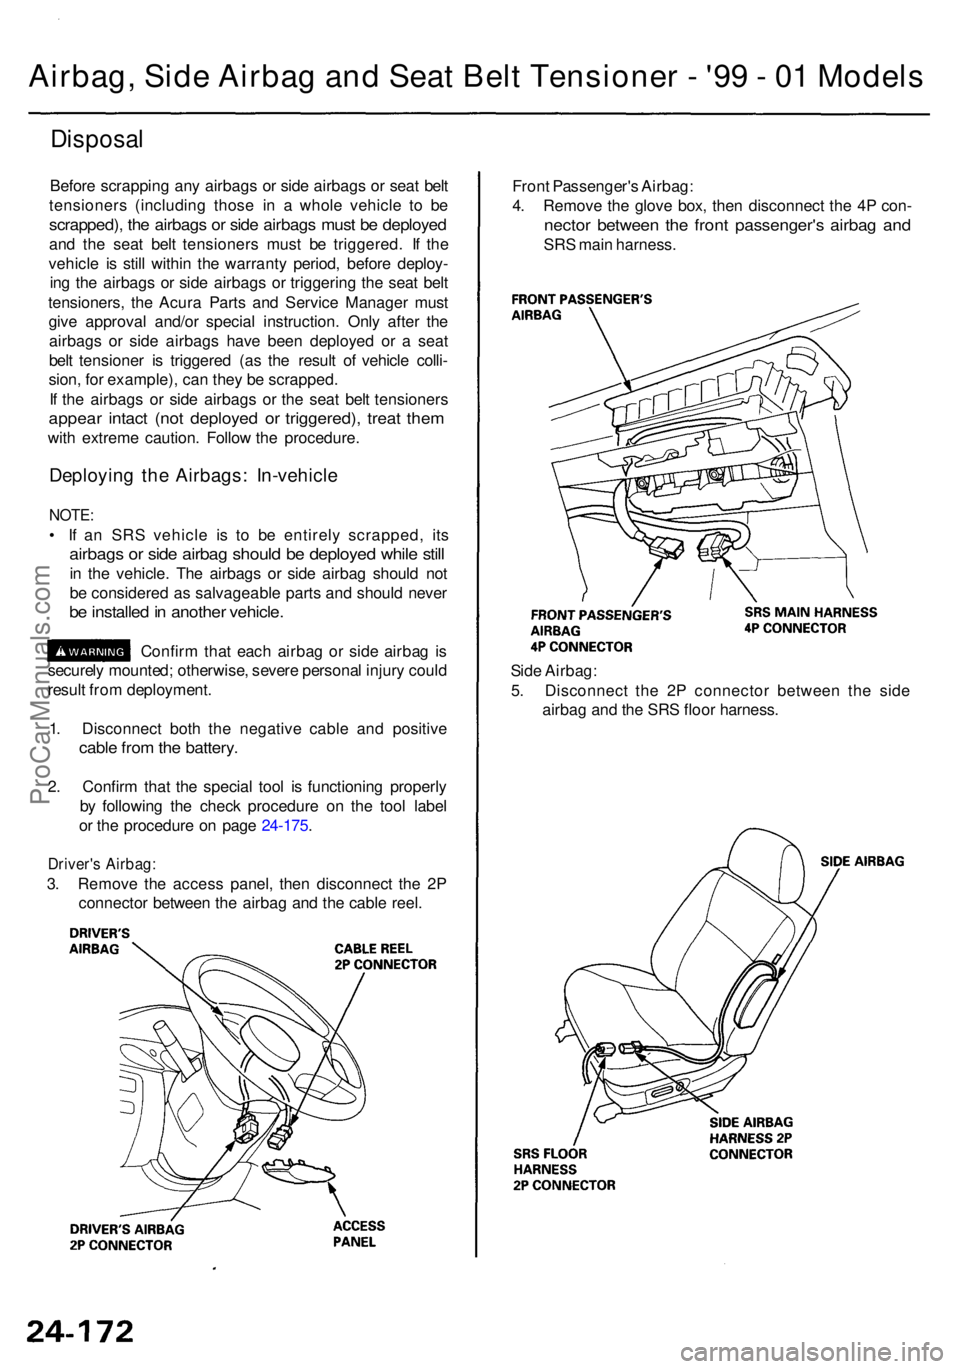
Driver's Airbag :
3. Remov e th e acces s panel , the n disconnec t th e 2 P
connecto r betwee n th e airba g an d th e cabl e reel . Fron
t Passenger' s Airbag :
4 . Remov e th e glov e box , the n disconnec t th e 4 P con -
necto r betwee n th e fron t passenger' s airba g an d
SRS mai n harness .
Sid e Airbag :
5 . Disconnec t th e 2 P connecto r betwee n th e sid e
airba g an d th e SR S floo r harness .
ProCarManuals.com
Page 1945 of 1954
Airbag, Side Airbag and Seat Belt Tensioner - '99 - 01 Models
Disposal (cont'd )
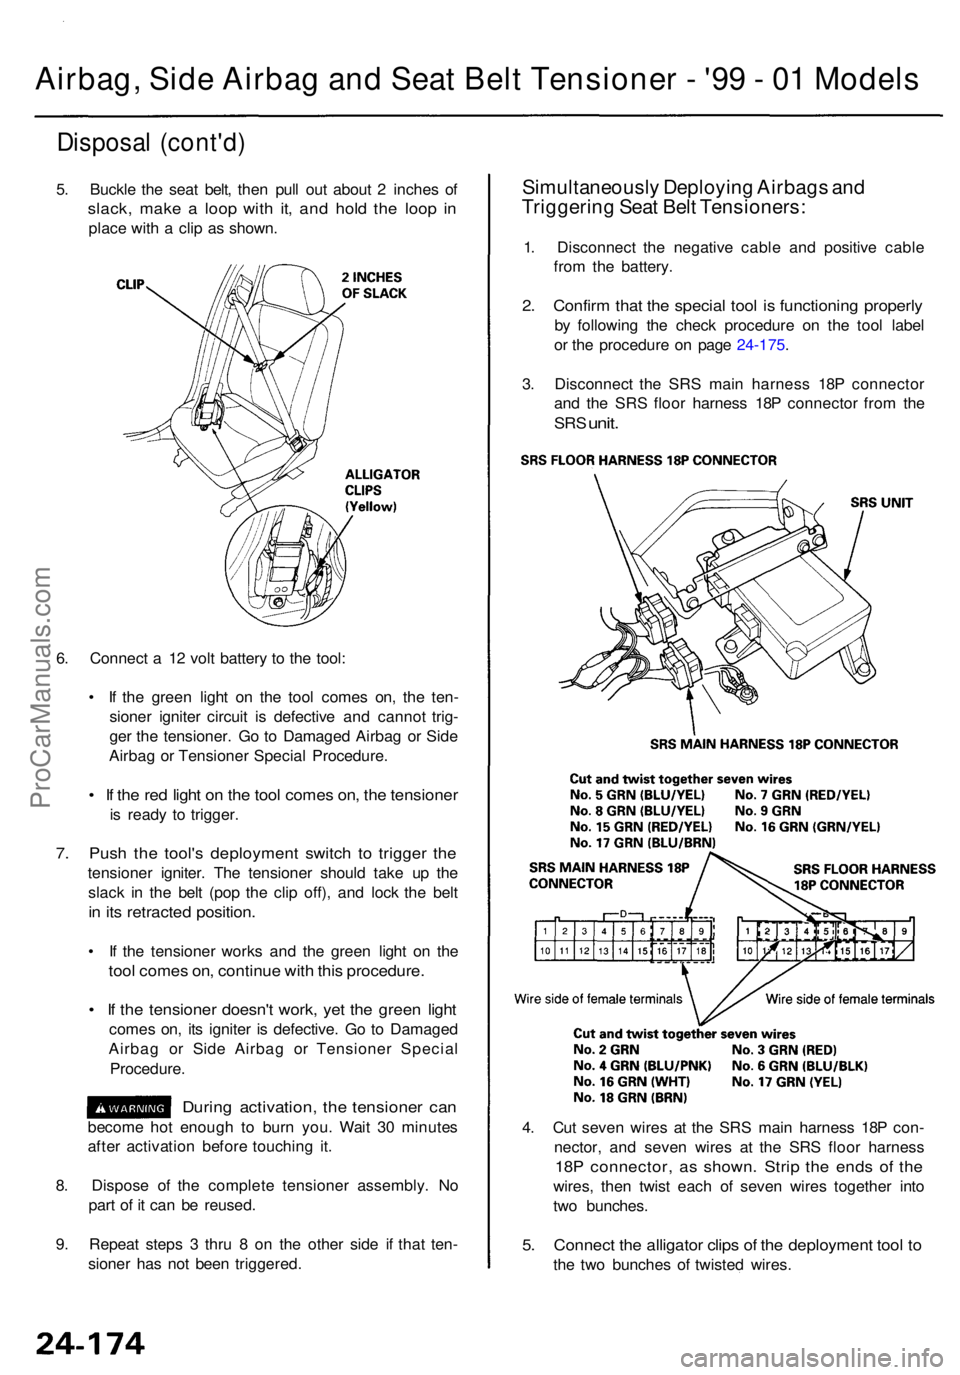
5. Buckl e th e sea t belt , the n pul l ou t abou t 2 inche s o f
slack , mak e a loo p wit h it , an d hol d th e loo p i n
plac e wit h a cli p a s shown .
Simultaneousl y Deployin g Airbag s an d
Triggerin g Sea t Bel t Tensioners :
1. Disconnec t th e negativ e cabl e an d positiv e cabl e
fro m th e battery .
2. Confir m tha t th e specia l too l i s functionin g properl y
by followin g th e chec k procedur e o n th e too l labe l
o r th e procedur e o n pag e 24-175 .
3 . Disconnec t th e SR S mai n harnes s 18 P connecto r
an d th e SR S floo r harnes s 18 P connecto r fro m th e
SR S unit .
6. Connec t a 1 2 vol t batter y t o th e tool :
• I f th e gree n ligh t o n th e too l come s on , th e ten -
sione r ignite r circui t i s defectiv e an d canno t trig -
ge r th e tensioner . G o t o Damage d Airba g o r Sid e
Airba g o r Tensione r Specia l Procedure .
• I f th e re d ligh t o n th e too l come s on , th e tensione r
is read y t o trigger .
7. Pus h th e tool' s deploymen t switc h t o trigge r th e
tensione r igniter . Th e tensione r shoul d tak e u p th e
slac k i n th e bel t (po p th e cli p off) , an d loc k th e bel t
in it s retracte d position .
• I f th e tensione r work s an d th e gree n ligh t o n th e
too l come s on , continu e wit h thi s procedure .
• I f th e tensione r doesn' t work , ye t th e gree n ligh t
come s on , it s ignite r i s defective . G o t o Damage d
Airba g o r Sid e Airba g o r Tensione r Specia l
Procedure .
During activation , th e tensione r ca n
becom e ho t enoug h t o bur n you . Wai t 3 0 minute s
afte r activatio n befor e touchin g it .
8 . Dispos e o f th e complet e tensione r assembly . N o
par t o f i t ca n b e reused .
9 . Repea t step s 3 thr u 8 on th e othe r sid e i f tha t ten -
sione r ha s no t bee n triggered . 4
. Cu t seve n wire s a t th e SR S mai n harnes s 18 P con -
nector , an d seve n wire s a t th e SR S floo r harnes s
18P connector , a s shown . Stri p th e end s o f th e
wires , the n twis t eac h o f seve n wire s togethe r int o
tw o bunches .
5. Connec t th e alligato r clip s o f th e deploymen t too l t o
th e tw o bunche s o f twiste d wires .
ProCarManuals.com