1996 ACURA RL KA9 belt
[x] Cancel search: beltPage 972 of 1954
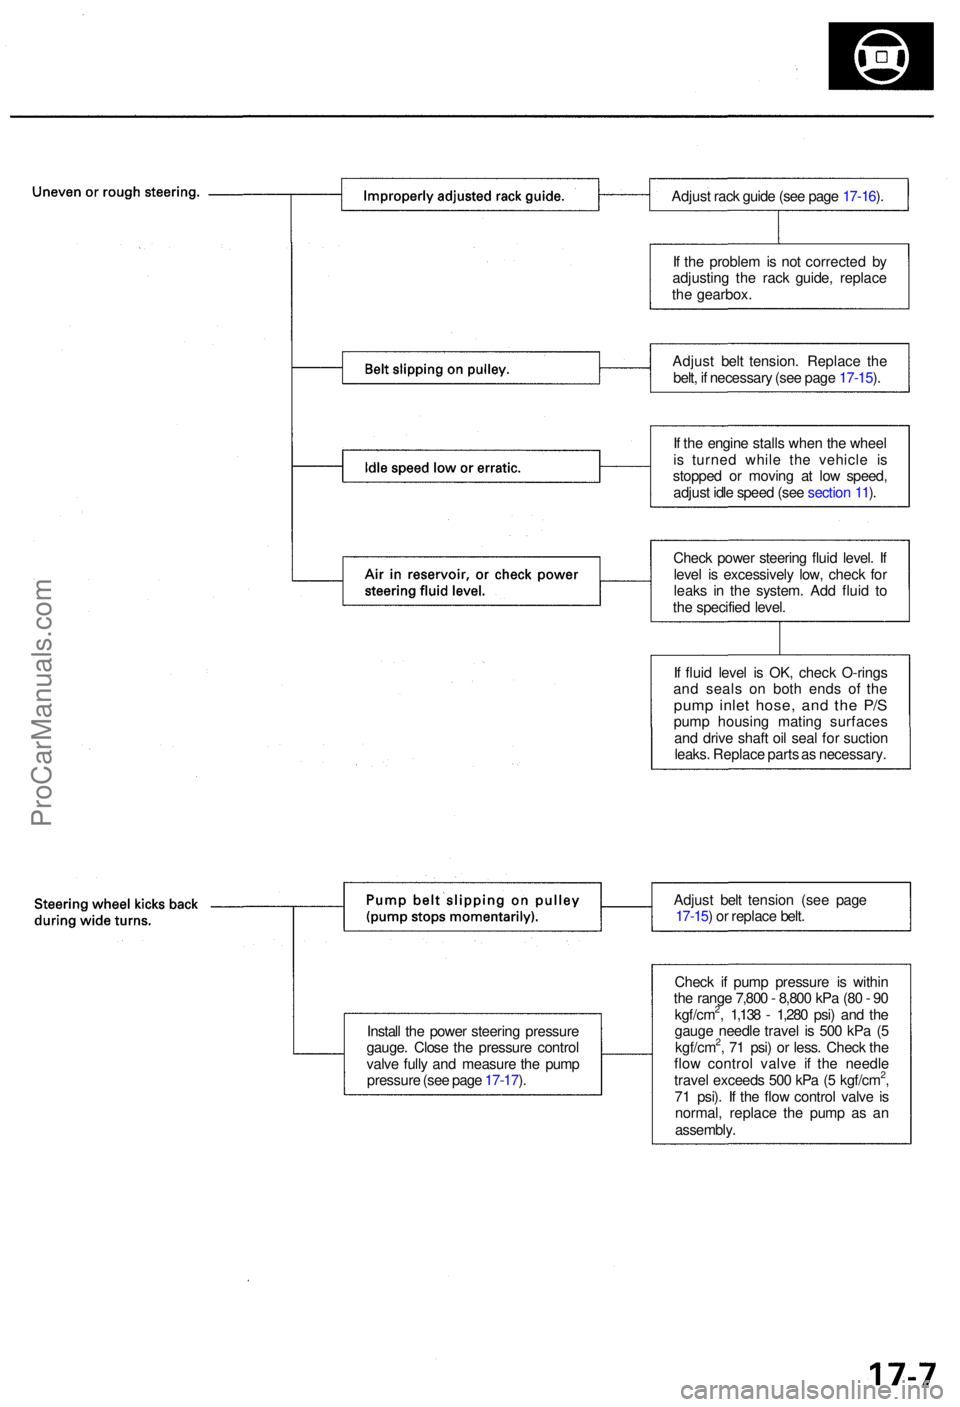
Install th e powe r steerin g pressur e
gauge . Clos e th e pressur e contro l
valv e full y an d measur e th e pum p
pressur e (se e pag e 17-17 ). Adjus
t bel t tensio n (se e pag e
17-15 ) o r replac e belt .
Adjus
t rac k guid e (se e pag e 17-16 ).
I f th e proble m is no t correcte d b y
adjustin g th e rac k guide , replac e
th e gearbox .
Adjus t bel t tension . Replac e th e
belt , i f necessar y (se e pag e 17-15 ).
I f th e engin e stall s whe n th e whee l
i s turne d whil e th e vehicl e i s
stoppe d o r movin g a t lo w speed ,
adjus t idl e spee d (se e sectio n 11 ).
Chec k powe r steerin g flui d level . I f
leve l i s excessivel y low , chec k fo r
leak s i n th e system . Ad d flui d t o
th e specifie d level .
I f flui d leve l i s OK , chec k O-ring s
an d seal s o n bot h end s o f th e
pum p inle t hose , an d th e P/ Spum p housin g matin g surface s
an d driv e shaf t oi l sea l fo r suctio n
leaks . Replac e part s a s necessary .
Chec k i f pum p pressur e i s withi n
th e rang e 7,80 0 - 8,80 0 kP a (8 0 - 9 0
kgf/cm
2, 1,13 8 - 1,28 0 psi ) an d th e
gaug e needl e trave l i s 50 0 kP a ( 5
kgf/cm
2, 7 1 psi ) o r less . Chec k th e
flo w contro l valv e i f th e needl e
trave l exceed s 50 0 kP a ( 5 kgf/cm
2,
7 1 psi) . I f th e flo w contro l valv e i s
normal , replac e th e pum p a s a n
assembly .
ProCarManuals.com
Page 980 of 1954
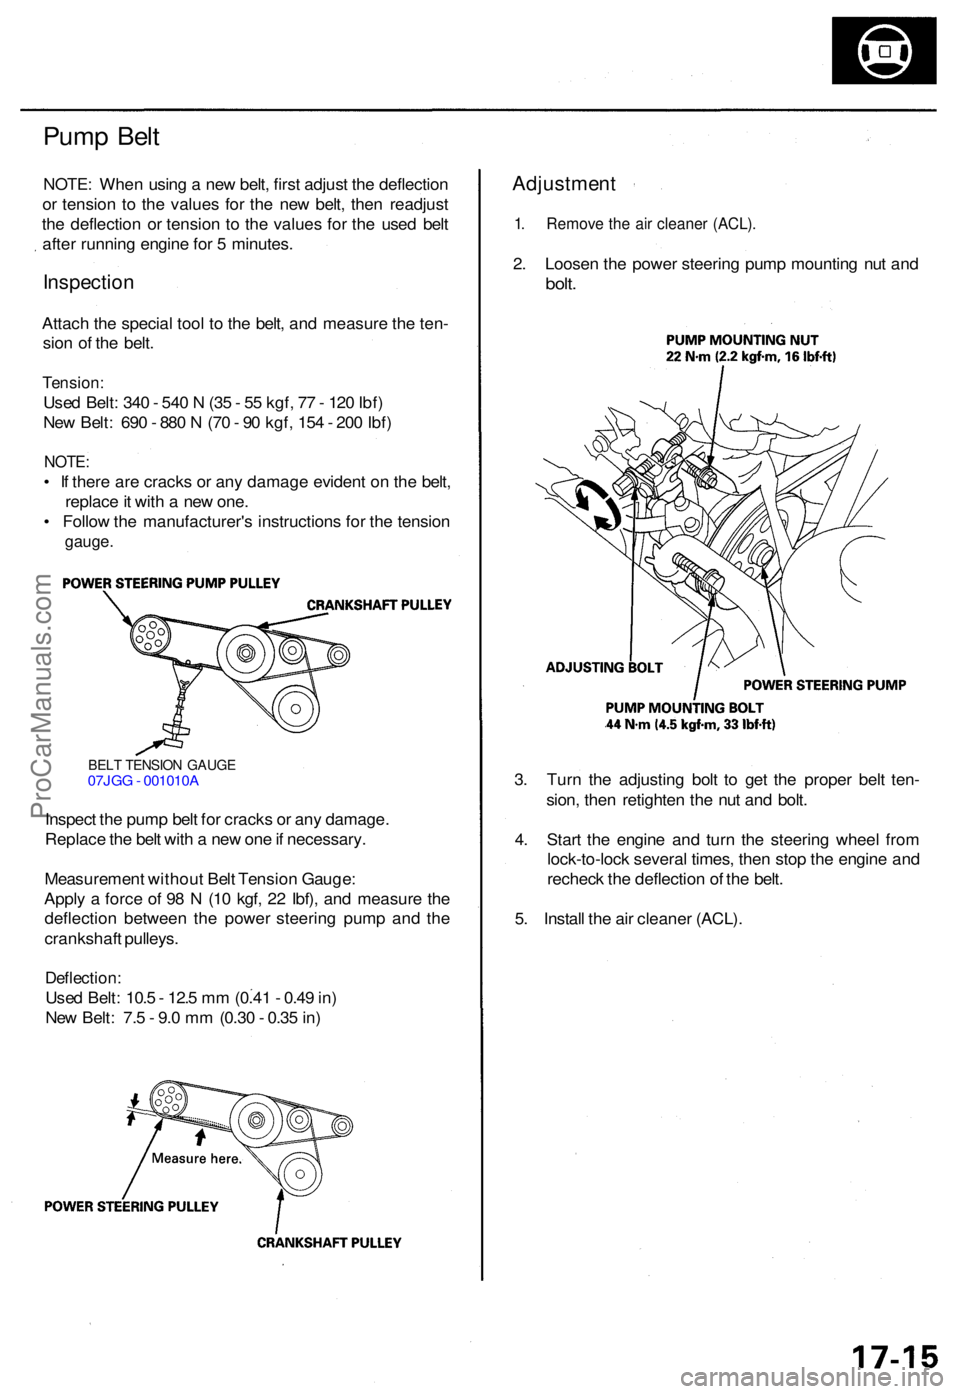
BELT TENSIO N GAUG E07JGG - 001010 A
Inspect th e pum p bel t fo r crack s o r an y damage .
Replac e th e bel t wit h a ne w on e if necessary .
Measuremen t withou t Bel t Tensio n Gauge :
Appl y a forc e o f 9 8 N (1 0 kgf , 2 2 Ibf) , an d measur e th e
deflectio n betwee n th e powe r steerin g pum p an d th e
crankshaf t pulleys .
Deflection :
Used Belt : 10. 5 - 12. 5 m m (0.4 1 - 0.4 9 in )
Ne w Belt : 7. 5 - 9. 0 m m (0.3 0 - 0.3 5 in ) 3
. Tur n th e adjustin g bol t t o ge t th e prope r bel t ten -
sion , the n retighte n th e nu t an d bolt .
4 . Star t th e engin e an d tur n th e steerin g whee l fro m
lock-to-loc k severa l times , the n sto p th e engin e an d
rechec k th e deflectio n o f th e belt .
5 . Instal l th e ai r cleane r (ACL) .
Adjustmen t
1. Remov e th e ai r cleane r (ACL) .
2. Loose n th e powe r steerin g pum p mountin g nu t an d
bolt .
Pum p Bel t
NOTE : Whe n usin g a ne w belt , firs t adjus t th e deflectio n
o r tensio n t o th e value s fo r th e ne w belt , the n readjus t
th e deflectio n o r tensio n t o th e value s fo r th e use d bel t
afte r runnin g engin e fo r 5 minutes .
Inspectio n
Attach th e specia l too l t o th e belt , an d measur e th e ten -
sio n o f th e belt .
Tension :
Used Belt : 34 0 - 54 0 N (3 5 - 5 5 kgf , 7 7 - 12 0 Ibf )
Ne w Belt : 69 0 - 88 0 N (7 0 - 9 0 kgf , 15 4 - 20 0 Ibf )
NOTE :
• I f ther e ar e crack s o r an y damag e eviden t o n th e belt ,
replac e it wit h a ne w one .
• Follo w th e manufacturer' s instruction s fo r th e tensio n
gauge.
ProCarManuals.com
Page 1357 of 1954
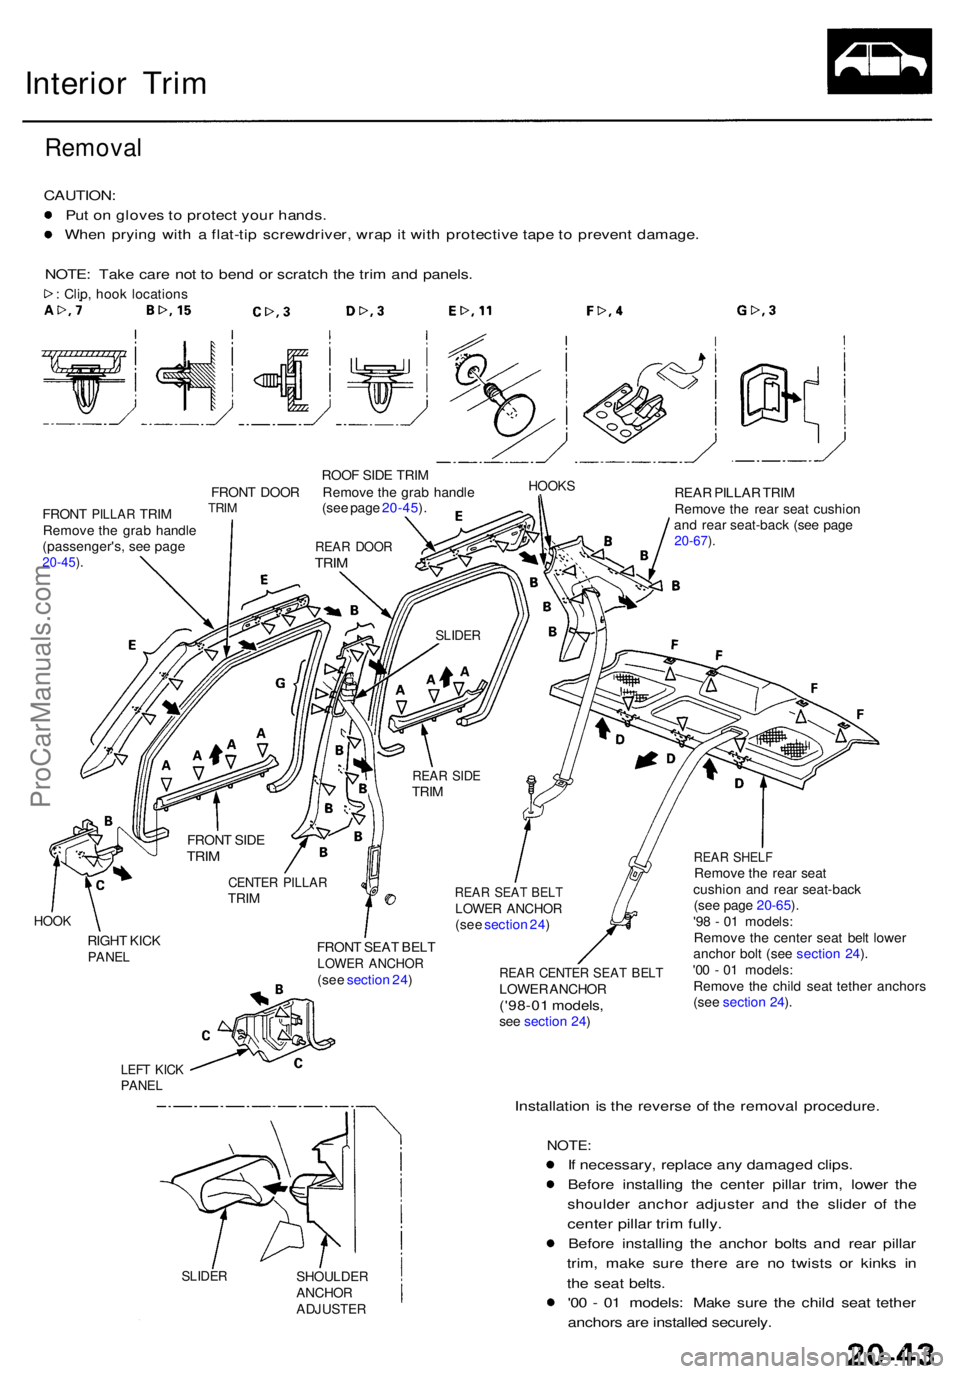
Interior Tri m
Remova l
CAUTION :
Pu t o n glove s to protec t you r hands .
Whe n pryin g wit h a flat-ti p screwdriver , wra p it wit h protectiv e tap e t o preven t damage .
NOTE : Tak e car e no t t o ben d o r scratc h th e tri m an d panels .
: Clip , hoo k location s
ROOF SID E TRI M
FRON T DOO R Remov e th e gra b handl e
HOOK S
FRONT PILLA R TRIM TRIM
Remov e th e gra b handl e
(passenger's , se e pag e
20-45 ).
(se e pag e 20-45 ). REA
R PILLA R TRI M
Remov e th e rea r sea t cushio n
an d rea r seat-bac k (se e pag e
20-67 ).
HOO K
RIGH T KIC KPANE L
LEFT KIC KPANE L
FRON T SEA T BEL TLOWE R ANCHO R(see sectio n 24 ) REA R CENTE R SEA T BEL TLOWE R ANCHO R('98-01 models ,see sectio n 24 )
REA R SHEL FRemov e th e rea r sea t
cushio n an d rea r seat-bac k
(se e pag e 20-65 ).
'9 8 - 0 1 models :
Remov e th e cente r sea t bel t lowe r
ancho r bol t (se e sectio n 24 ).
'0 0 - 0 1 models :
Remov e th e chil d sea t tethe r anchor s
(se e sectio n 24 ).
SLIDE RSHOULDE RANCHORADJUSTE R
Installation i s th e revers e o f th e remova l procedure .
NOTE:
If necessary , replac e an y damage d clips .
Befor e installin g th e cente r pilla r trim , lowe r th e
shoulde r ancho r adjuste r an d th e slide r o f th e
cente r pilla r tri m fully .
Befor e installin g th e ancho r bolt s an d rea r pilla r
trim , mak e sur e ther e ar e n o twist s o r kink s i n
th e sea t belts .
'0 0 - 0 1 models : Mak e sur e th e chil d sea t tethe r
anchor s ar e installe d securely .
REAR SEA T BEL TLOWE R ANCHO R(see sectio n 24 )
CENTE R PILLA RTRIM
FRON
T SID E
TRIM
REA R SID ETRIM
SLIDE R
REAR DOO RTRIM
ProCarManuals.com
Page 1384 of 1954
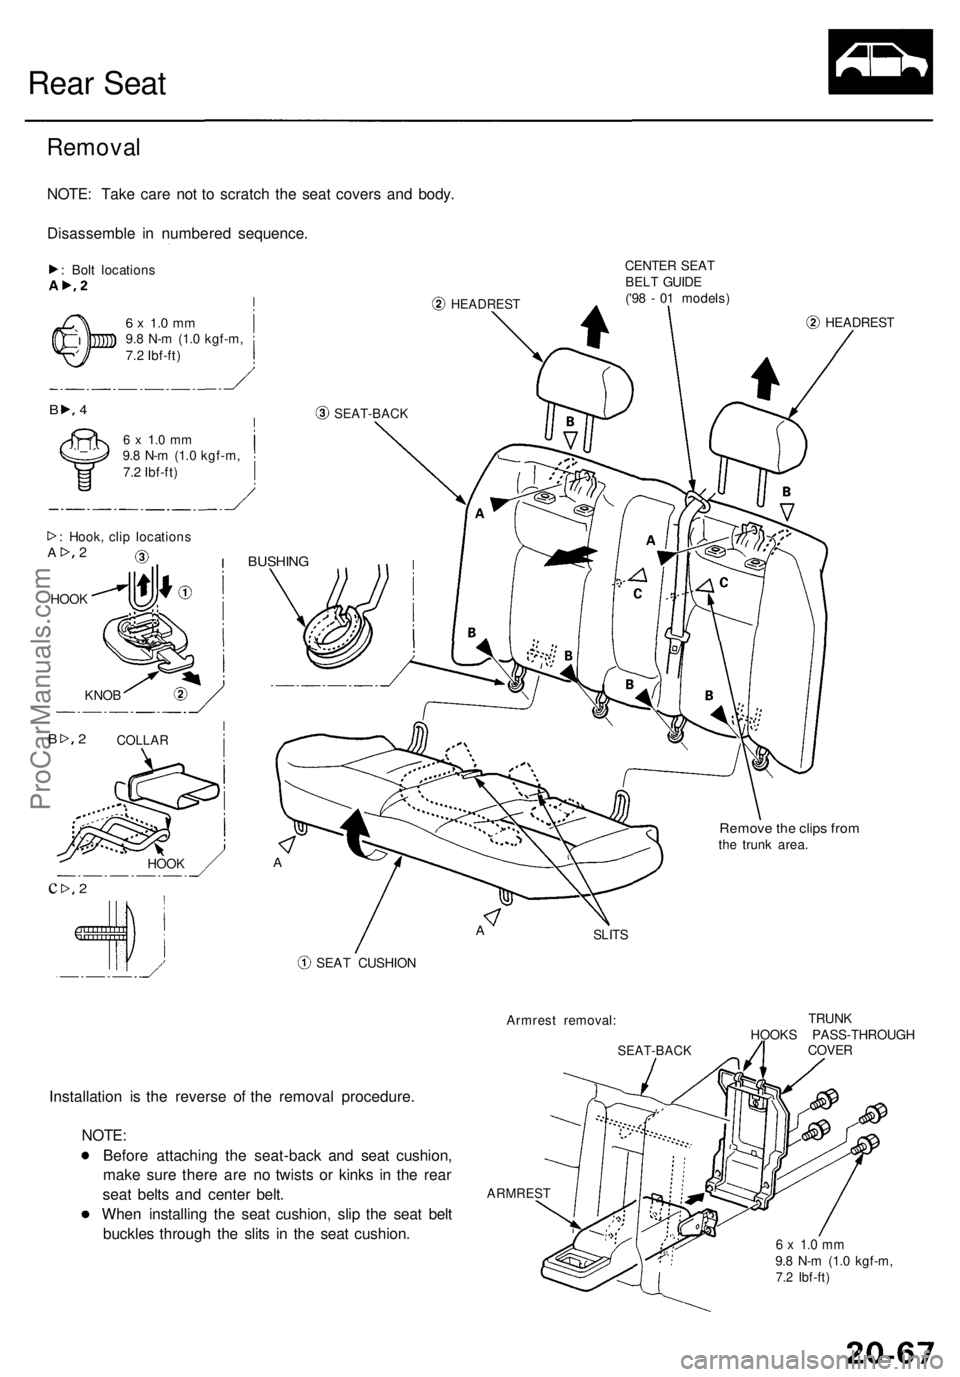
Rear Sea t
Remova l
NOTE: Tak e car e no t t o scratc h th e sea t cover s an d body .
Disassembl e i n numbere d sequence .
: Bol t location s
HEADRES T
CENTER SEA T
BEL T GUID E
('9 8 - 0 1 models )
4
6 x 1. 0 m m9.8 N- m (1. 0 kgf-m ,
7. 2 Ibf-ft )
6 x 1. 0 m m9.8 N- m (1. 0 kgf-m ,
7. 2 Ibf-ft )
: Hook , cli p location s
HOO K
BUSHIN G
HEADRES T
A
Remove th e clip s fro mthe trun k area .
SLIT S
SEA T CUSHIO N
Armrest removal :
Installation i s th e revers e o f th e remova l procedure .
NOTE :
Befor e attachin g th e seat-bac k an d sea t cushion ,
mak e sur e ther e ar e n o twist s o r kink s i n th e rea r
sea t belt s an d cente r belt .
Whe n installin g th e sea t cushion , sli p th e sea t bel t
buckle s throug h th e slit s i n th e sea t cushion .
SEAT-BAC K
TRUNK
HOOK S PASS-THROUG H
COVER
ARMRES T
6 x 1. 0 m m9.8 N- m (1. 0 kgf-m ,7.2 Ibf-ft )
SEAT-BAC KB
2A
KNOB
COLLA R2B
HOOK
2c
A
ProCarManuals.com
Page 1501 of 1954
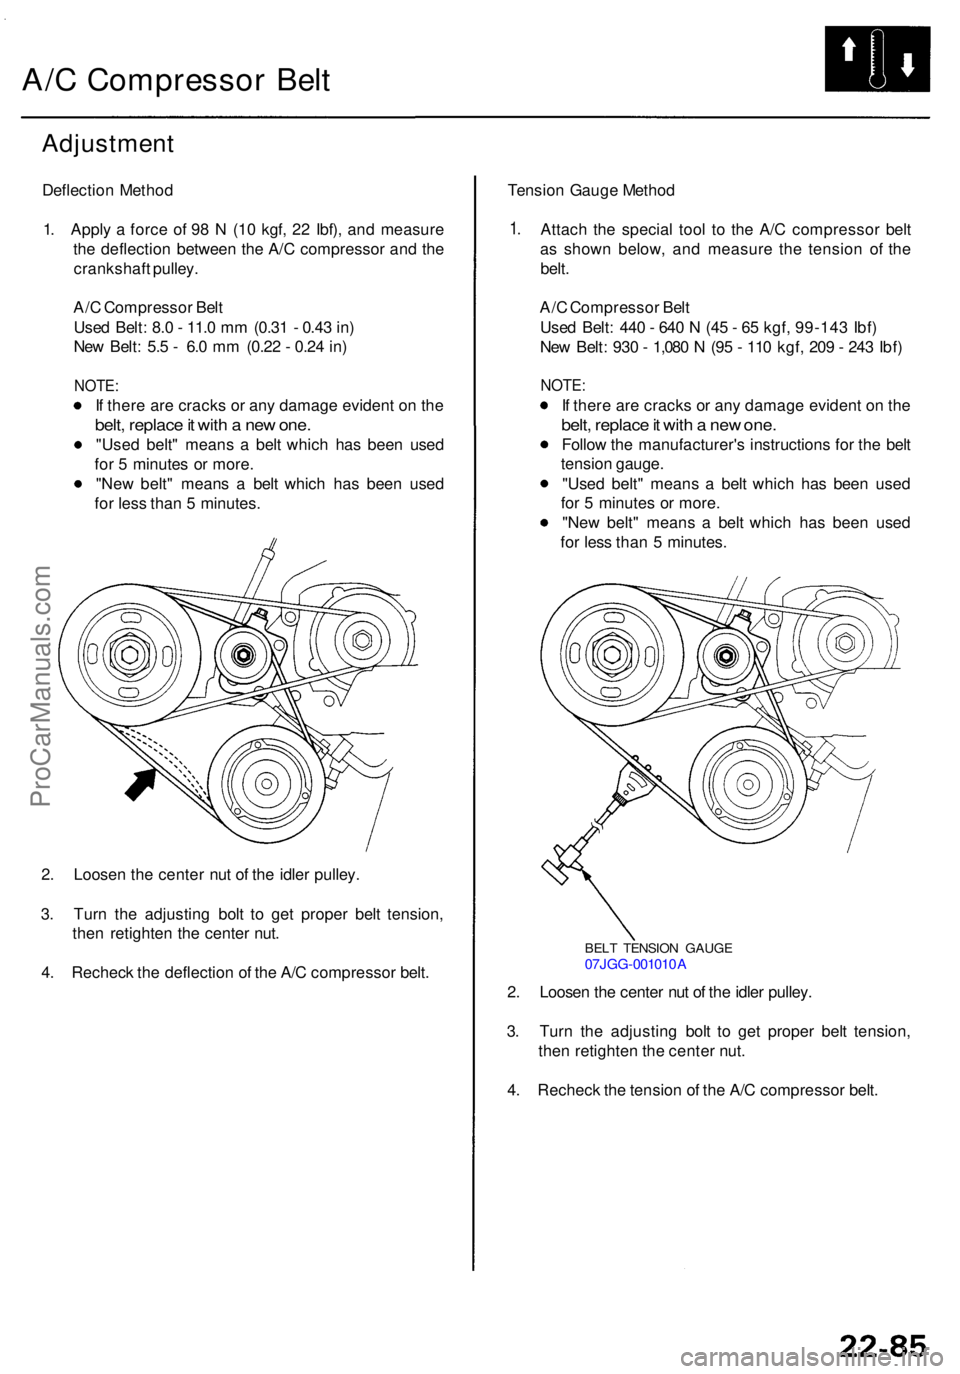
A/C Compresso r Bel t
Adjustmen t
Deflection Metho d
1 . Appl y a forc e o f 9 8 N (1 0 kgf , 2 2 Ibf) , an d measur e
th e deflectio n betwee n th e A/ C compresso r an d th e
crankshaf t pulley .
A/ C Compresso r Bel t
Use d Belt : 8. 0 - 11. 0 m m (0.3 1 - 0.4 3 in )
Ne w Belt : 5. 5 - 6. 0 m m (0.2 2 - 0.2 4 in )
NOTE :
If ther e ar e crack s o r an y damag e eviden t o n th e
belt , replac e it wit h a ne w one .
"Use d belt " mean s a bel t whic h ha s bee n use d
fo r 5 minute s o r more .
"Ne w belt " mean s a bel t whic h ha s bee n use d
fo r les s tha n 5 minutes .
2 . Loose n th e cente r nu t o f th e idle r pulley .
3 . Tur n th e adjustin g bol t t o ge t prope r bel t tension ,
the n retighte n th e cente r nut .
4 . Rechec k th e deflectio n o f th e A/ C compresso r belt . Tensio
n Gaug e Metho d
1. Attac h th e specia l too l t o th e A/ C compresso r bel t
a s show n below , an d measur e th e tensio n of the
belt .
A/ C Compresso r Bel t
Use d Belt : 44 0 - 64 0 N (4 5 - 6 5 kgf , 99-14 3 Ibf )
Ne w Belt : 93 0 - 1,08 0 N (9 5 - 11 0 kgf , 20 9 - 24 3 Ibf )
NOTE :
If ther e ar e crack s o r an y damag e eviden t o n th e
belt , replac e it wit h a ne w one .
Follo w th e manufacturer' s instruction s fo r th e bel t
tensio n gauge .
"Use d belt " mean s a bel t whic h ha s bee n use d
fo r 5 minute s o r more .
"Ne w belt " mean s a bel t whic h ha s bee n use d
fo r les s tha n 5 minutes .
BELT TENSIO N GAUG E07JGG-00101 0 A
2. Loose n th e cente r nu t o f th e idle r pulley .
3 . Tur n th e adjustin g bol t t o ge t prope r bel t tension ,
the n retighte n th e cente r nut .
4 . Rechec k th e tensio n o f th e A/ C compresso r belt .
ProCarManuals.com
Page 1778 of 1954
Seat Belt s
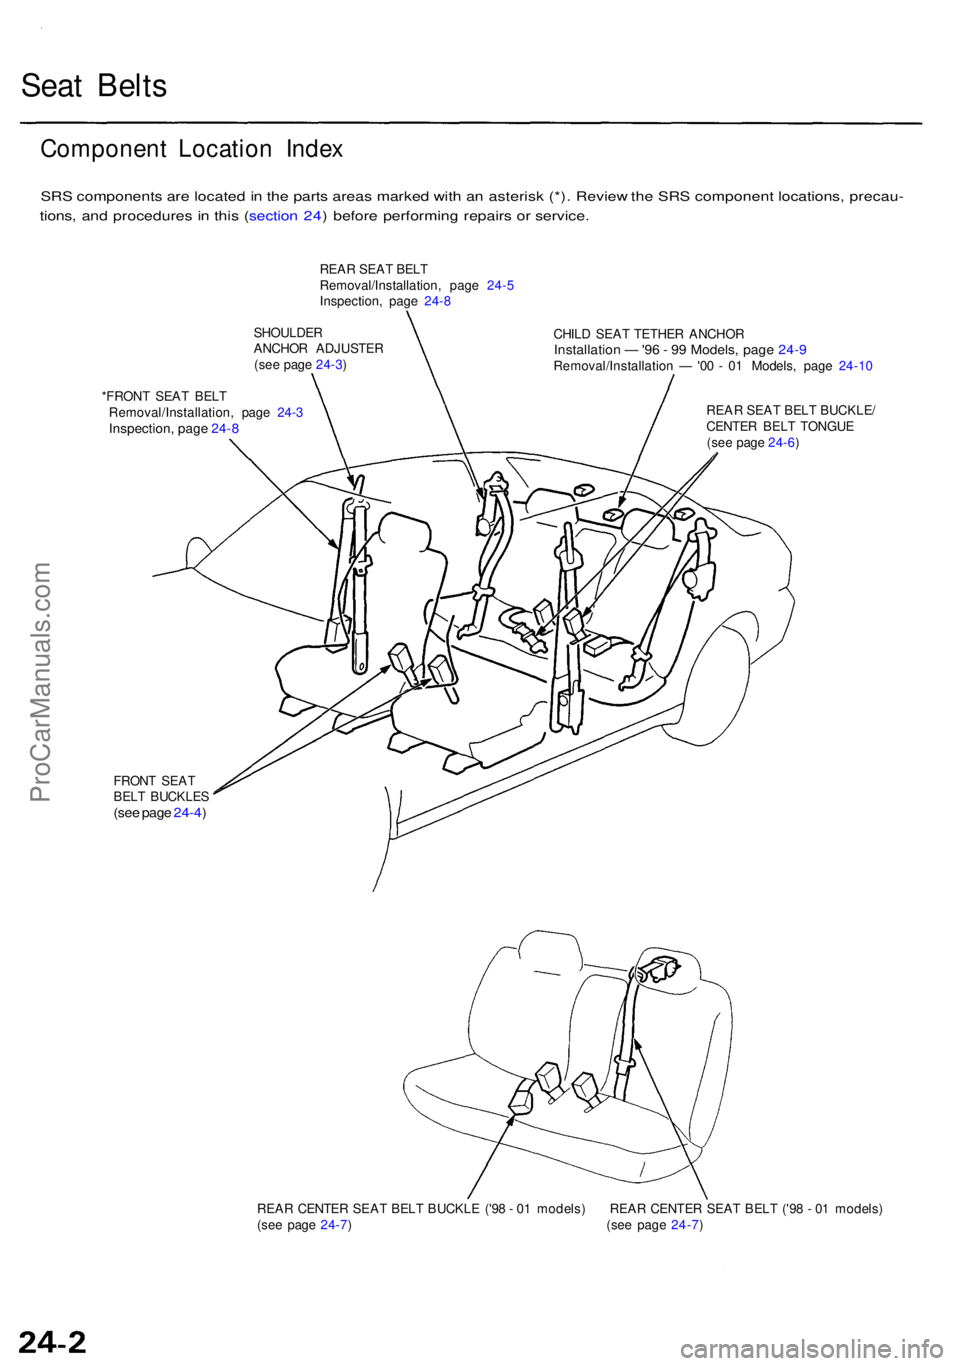
Componen t Locatio n Inde x
SRS component s ar e locate d in th e part s area s marke d wit h a n asteris k (*) . Revie w th e SR S componen t locations , precau -
tions , an d procedure s i n thi s ( sectio n 24 ) befor e performin g repair s o r service .
REAR SEA T BEL T
Removal/Installation , pag e 24- 5
Inspection , pag e 24- 8
SHOULDE R
ANCHO R ADJUSTE R
(se e pag e 24-3 )
*FRON T SEA T BEL T
Removal/Installation , pag e 24- 3
Inspection , pag e 24-8
CHIL D SEA T TETHE R ANCHO RInstallatio n — '96 - 9 9 Models , pag e 24- 9Removal/Installatio n — '00 - 0 1 Models , pag e 24-1 0
REA R SEA T BEL T BUCKLE /
CENTE R BEL T TONGU E
(se e pag e 24-6 )
FRON T SEA T
BEL T BUCKLE S
(see pag e 24-4 )
REA R CENTE R SEA T BEL T BUCKL E ('9 8 - 0 1 models ) REA R CENTE R SEA T BEL T ('9 8 - 0 1 models )
(se e pag e 24-7 ) (se e pag e 24-7 )
ProCarManuals.com
Page 1779 of 1954
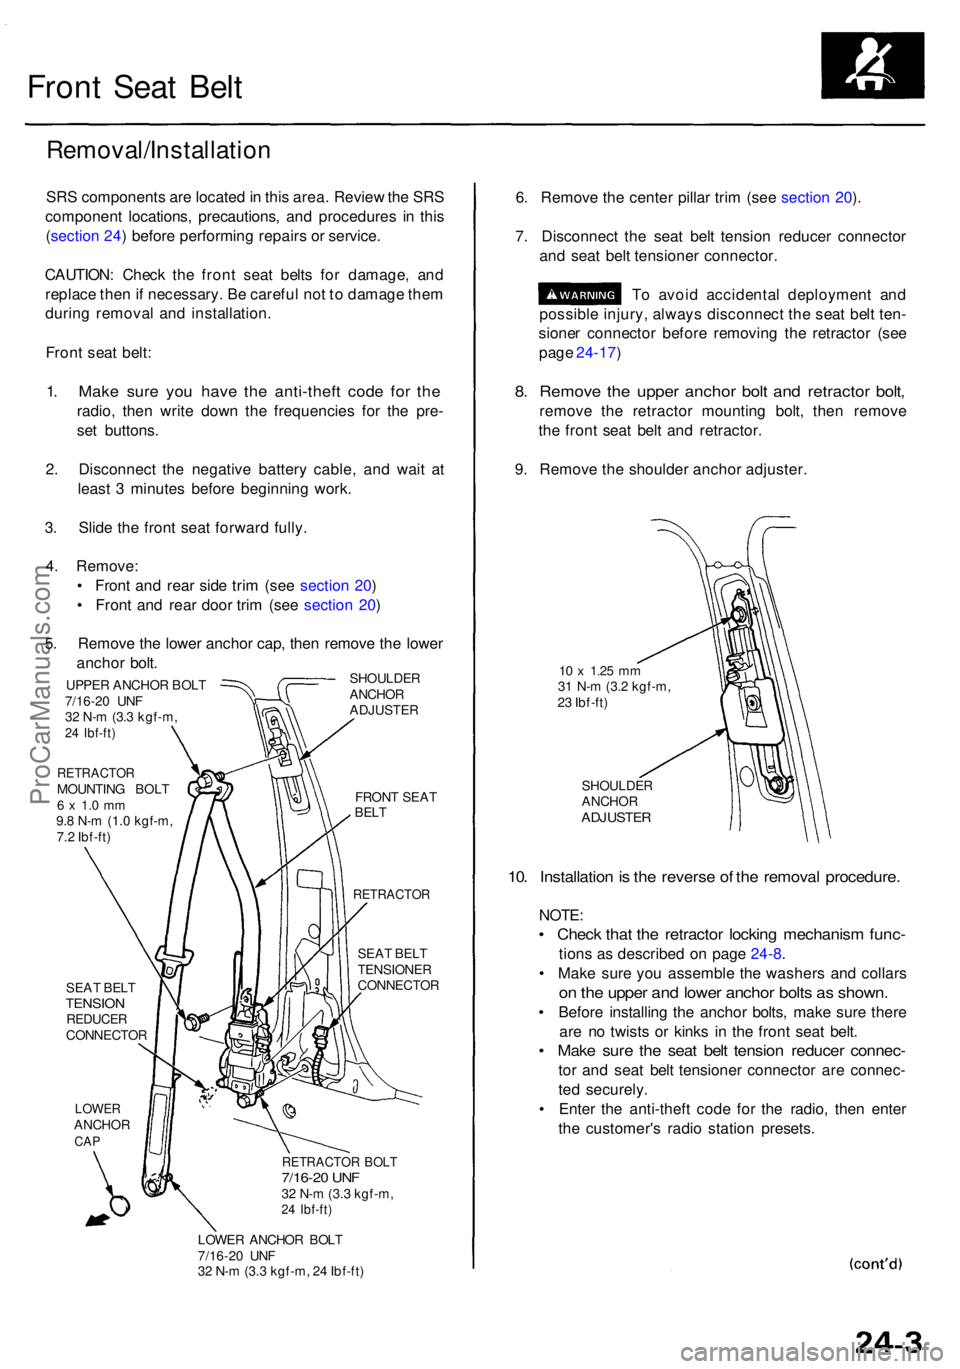
Front Sea t Bel t
Removal/Installatio n
SRS component s ar e locate d in thi s area . Revie w th e SR S
componen t locations , precautions , an d procedure s i n thi s
( sectio n 24 ) befor e performin g repair s o r service .
CAUTION : Chec k th e fron t sea t belt s fo r damage , an d
replac e the n if necessary . B e carefu l no t t o damag e the m
durin g remova l an d installation .
Fron t sea t belt :
1. Mak e sur e yo u hav e th e anti-thef t cod e fo r th e
radio , the n writ e dow n th e frequencie s fo r th e pre -
se t buttons .
2 . Disconnec t th e negativ e batter y cable , an d wai t a t
leas t 3 minute s befor e beginnin g work .
3 . Slid e th e fron t sea t forwar d fully .
4 . Remove :
• Fron t an d rea r sid e tri m (se e sectio n 20 )
• Fron t an d rea r doo r tri m (se e sectio n 20 )
5 . Remov e th e lowe r ancho r cap , the n remov e th e lowe r
ancho r bolt .
SHOULDE R
ANCHO R
ADJUSTE R
UPPER ANCHO R BOL T
7/16-2 0 UN F
3 2 N- m (3. 3 kgf-m ,
24 Ibf-ft )
RETRACTO RMOUNTING BOL T6 x 1. 0 m m9.8 N- m (1. 0 kgf-m ,
7. 2 Ibf-ft )
SEA T BEL T
TENSIO NREDUCE RCONNECTO R
LOWERANCHO RCAP
FRON T SEA TBELT
RETRACTO R
SEAT BEL T
TENSIONE R
CONNECTO R
RETRACTOR BOL T7/16-2 0 UN F32 N- m (3. 3 kgf-m ,24 Ibf-ft )
LOWE R ANCHO R BOL T
7/16-2 0 UN F
3 2 N- m (3. 3 kgf-m , 2 4 Ibf-ft )
6. Remov e th e cente r pilla r tri m (se e sectio n 20 ).
7 . Disconnec t th e sea t bel t tensio n reduce r connecto r
an d sea t bel t tensione r connector .
T o avoi d accidenta l deploymen t an d
possibl e injury , alway s disconnec t th e sea t bel t ten -
sione r connecto r befor e removin g th e retracto r (se e
pag e 24-17 )
8. Remov e th e uppe r ancho r bol t an d retracto r bolt ,
remov e th e retracto r mountin g bolt , the n remov e
th e fron t sea t bel t an d retractor .
9 . Remov e th e shoulde r ancho r adjuster .
10 x 1.2 5 mm31 N- m (3. 2 kgf-m ,
2 3 Ibf-ft )
SHOULDE R
ANCHO R
ADJUSTE R
10. Installatio n is th e revers e o f th e remova l procedure .
NOTE:
• Chec k tha t th e retracto r lockin g mechanis m func -
tions a s described on pag e 24-8 .
• Mak e sur e yo u assembl e th e washer s an d collar s
on th e uppe r an d lowe r ancho r bolt s a s shown .
• Befor e installin g th e ancho r bolts , mak e sur e ther e
ar e n o twist s o r kink s i n th e fron t sea t belt .
• Mak e sur e th e sea t bel t tensio n reduce r connec -
tor an d sea t bel t tensione r connecto r ar e connec -
te d securely .
• Ente r th e anti-thef t cod e fo r th e radio , the n ente r
th e customer' s radi o statio n presets .
ProCarManuals.com
Page 1781 of 1954
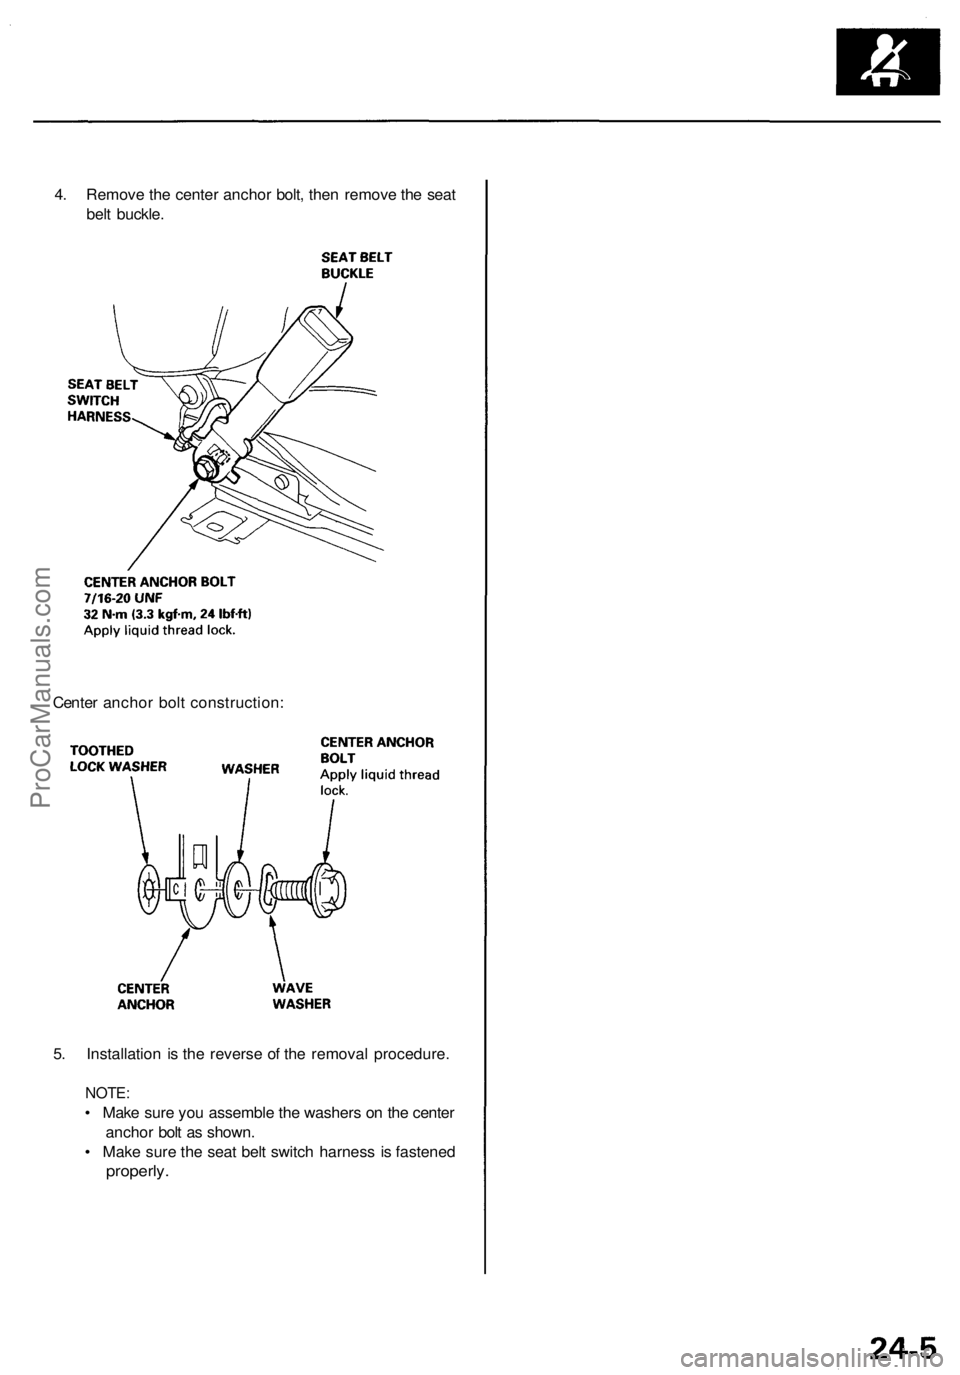
4. Remove the center anchor bolt, then remove the seat
belt buckle.
Center anchor bolt construction:
5. Installation is the reverse of the removal procedure.
NOTE:
• Make sure you assemble the washers on the center
anchor bolt as shown.
• Make sure the seat belt switch harness is fastened
properly.ProCarManuals.com