Page 1723 of 1954
2. Disconnec t th e connector s fro m th e powe r mirro r
switch .
3 . Chec k fo r continuit y betwee n th e terminal s i n eac h
switc h positio n accordin g t o th e table .
Mirro r switch :
Power Mirror s
Switch Tes t
1. Remov e th e driver' s doo r pane l (se e sectio n 20 ).
MIRRO R SWITC H 10 P CONNECTO R
Terminal sid e o f
mal e terminal s
DEFOGGE RINDICATOR(0.91 W)
POWE RMIRRO RSWITCH
DEFOGGE R SWITC H2P CONNECTO R
Terminal sid e o f
mal e terminal s
ProCarManuals.com
Page 1724 of 1954
Power Mirro r Tes t
1. Remov e th e doo r pane l (se e sectio n 20 ).
POWE R MIRRO R10P [8P ]CONNECTO R
2. Disconnec t th e 10 P [8P ] connecto r fro m th e powe r
mirro r actuator .
3 . Chec k actuato r operatio n b y connectin g powe r an d
groun d accordin g t o th e table .
[ ] : Withou t memor y
Defogge r Test :
4 . Chec k fo r continuit y betwee n th e No . 3 [No . 2 ] an d
No . 4 [No . 3 ] terminal s o f th e 10 P [8P ] connector .
Ther e shoul d b e continuity .
5 . I f th e mirro r fail s t o wor k properly , replac e th e mir -
ror actuator or mirror sub assembly (see page
23-360 ).
[ ] : Withou t memor y ('9 8 model )
With memor y
Wire sid e o f
femal e terminal s
Withou t memor y
Wire sid e o f
femal e terminal s
ProCarManuals.com
Page 1725 of 1954

4. Disconnec t th e heate d mirro r 2 P connecto r (wit h
heate d mirror) .
5 . Disconnec t th e powe r mirro r positio n senso r 5 P
connecto r (wit h DPMS) .
Power Mirror s
Power Mirro r Actuato r Replacemen t
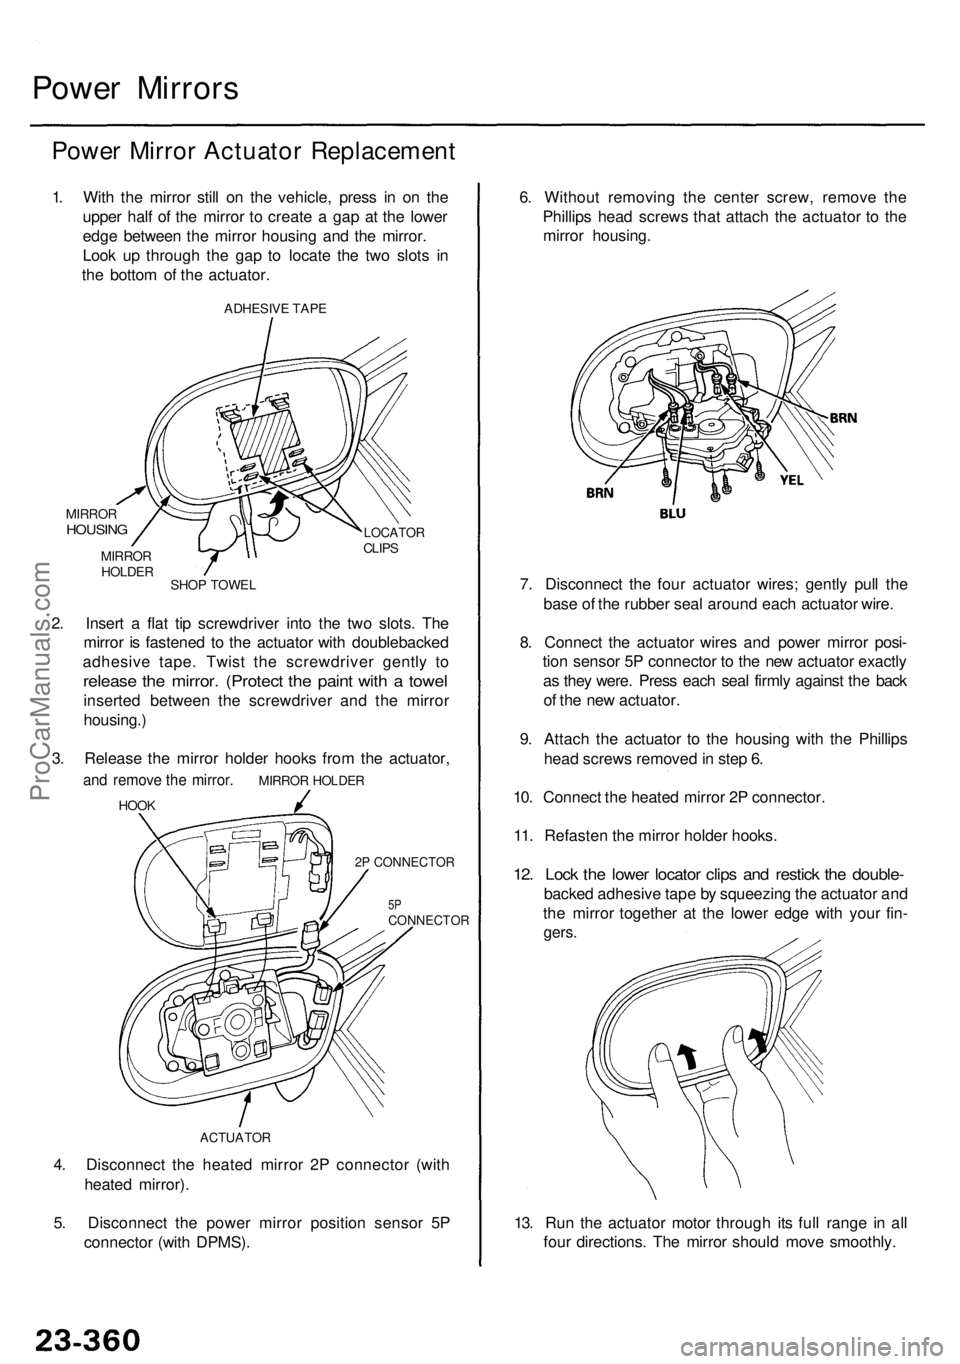
1. Wit h th e mirro r stil l o n th e vehicle , pres s i n o n th e
uppe r hal f o f th e mirro r t o creat e a ga p a t th e lowe r
edg e betwee n th e mirro r housin g an d th e mirror .
Loo k u p throug h th e ga p t o locat e th e tw o slot s i n
th e botto m o f th e actuator .
ADHESIV E TAP E
MIRRO RHOUSIN GLOCATO RCLIPS
SHO P TOWE L
MIRRO
R
HOLDE R
2. Inser t a fla t ti p screwdrive r int o th e tw o slots . Th e
mirro r i s fastene d t o th e actuato r wit h doublebacke d
adhesiv e tape . Twis t th e screwdrive r gentl y t o
releas e th e mirror . (Protec t th e pain t wit h a towe l
inserte d betwee n th e screwdrive r an d th e mirro r
housing. )
3 . Releas e th e mirro r holde r hook s fro m th e actuator ,
and remov e th e mirror . MIRRO R HOLDE R
HOOK
2P CONNECTOR
5PCONNECTO R
ACTUATOR
13. Ru n th e actuato r moto r throug h it s ful l rang e i n al l
fou r directions . Th e mirro r shoul d mov e smoothly .
6
. Withou t removin g th e cente r screw , remov e th e
Phillip s hea d screw s tha t attac h th e actuato r t o th e
mirro r housing .
7 . Disconnec t th e fou r actuato r wires ; gentl y pul l th e
bas e o f th e rubbe r sea l aroun d eac h actuato r wire .
8 . Connec t th e actuato r wire s an d powe r mirro r posi -
tio n senso r 5 P connecto r t o th e ne w actuato r exactl y
a s the y were . Pres s eac h sea l firml y agains t th e bac k
o f th e ne w actuator .
9 . Attac h th e actuato r t o th e housin g wit h th e Phillip s
hea d screw s remove d in ste p 6 .
10 . Connec t th e heate d mirro r 2 P connector .
11 . Refaste n th e mirro r holde r hooks .
12. Loc k th e lowe r locato r clip s an d restic k th e double -
backed adhesiv e tap e b y squeezin g th e actuato r an d
th e mirro r togethe r a t th e lowe r edg e wit h you r fin -
gers .
ProCarManuals.com