Page 1942 of 2543

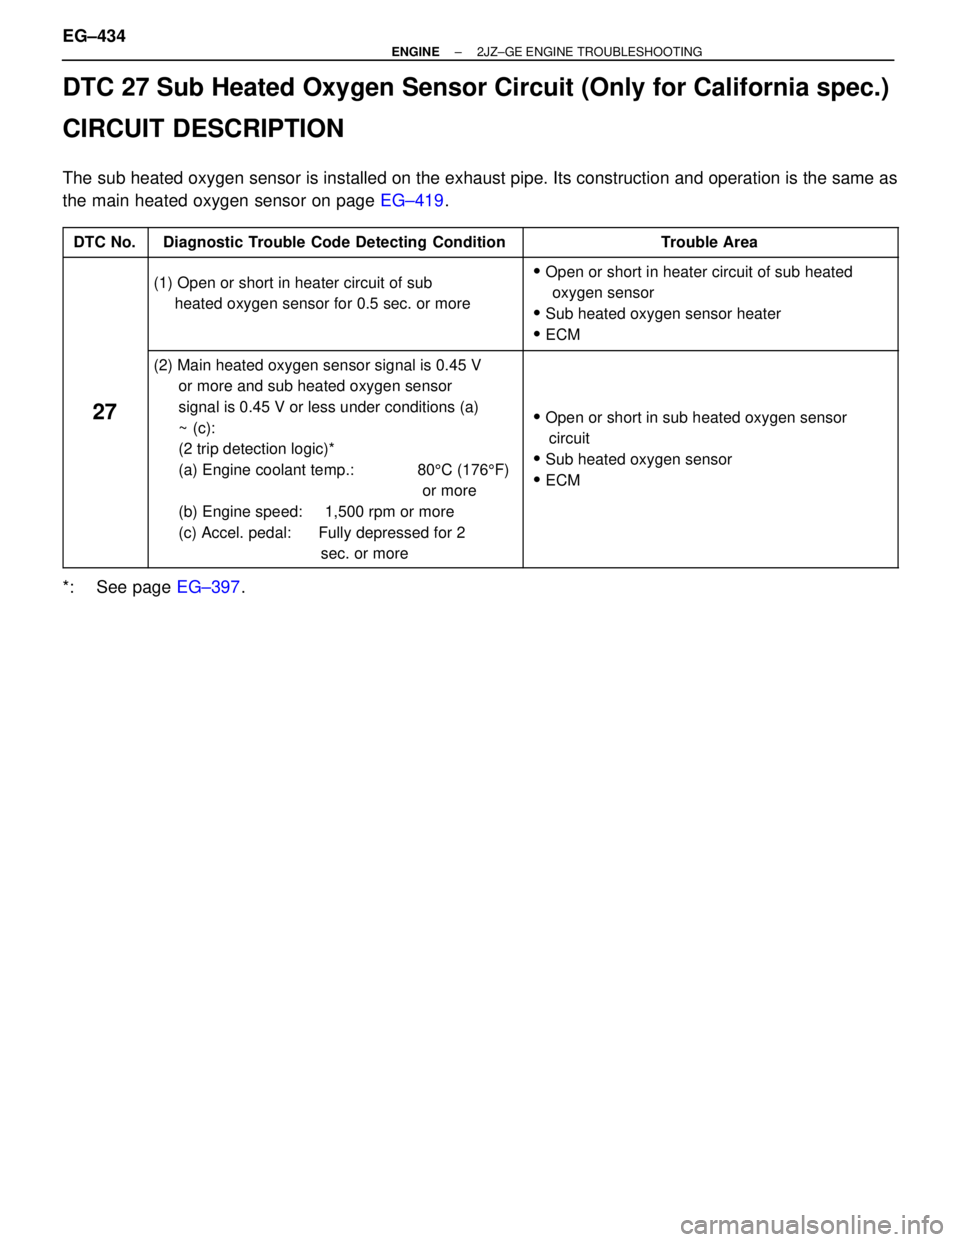
DTC 27 Sub Heated Oxygen Sensor Circuit (Only for California spec.)
CIRCUIT DESCRIPTION
The sub heated oxygen sensor is installed on the exhaust pipe. Its construction and operation is the same as
the main heated oxygen sensor on page EG±419.
����� �����DTC No.���������������� ����������������Diagnostic Trouble Code Detecting Condition����������������� �����������������Trouble Area
����� �
���� �
���� �
���� �����
���������������� �
��������������� �
��������������� �
��������������� ����������������
(1) Open or short in heater circuit of sub
heated oxygen sensor for 0.5 sec. or more
����������������� �
���������������� �
���������������� �
���������������� �����������������
� Open or short in heater circuit of sub heated
oxygen sensor
� Sub heated oxygen sensor heater
� ECM
����� �
���� �
���� �
���� �
���� �
���� �
���� �
���� �
���� �����
27
���������������� �
��������������� �
��������������� �
��������������� �
��������������� �
��������������� �
��������������� �
��������������� �
��������������� ����������������
(2) Main heated oxygen sensor signal is 0.45 V
or more and sub heated oxygen sensor
signal is 0.45 V or less under conditions (a)
~ (c):
(2 trip detection logic)*
(a) Engine coolant temp.: 805C (1765F)
or more
(b) Engine speed: 1,500 rpm or more
(c) Accel. pedal: Fully depressed for 2
sec. or more����������������� �
���������������� �
���������������� �
���������������� �
���������������� �
���������������� �
���������������� �
���������������� �
���������������� �����������������
� Open or short in sub heated oxygen sensor
circuit
� Sub heated oxygen sensor
� ECM
*: See page EG±397. EG±434
± ENGINE2JZ±GE ENGINE TROUBLESHOOTING
Page 1943 of 2543

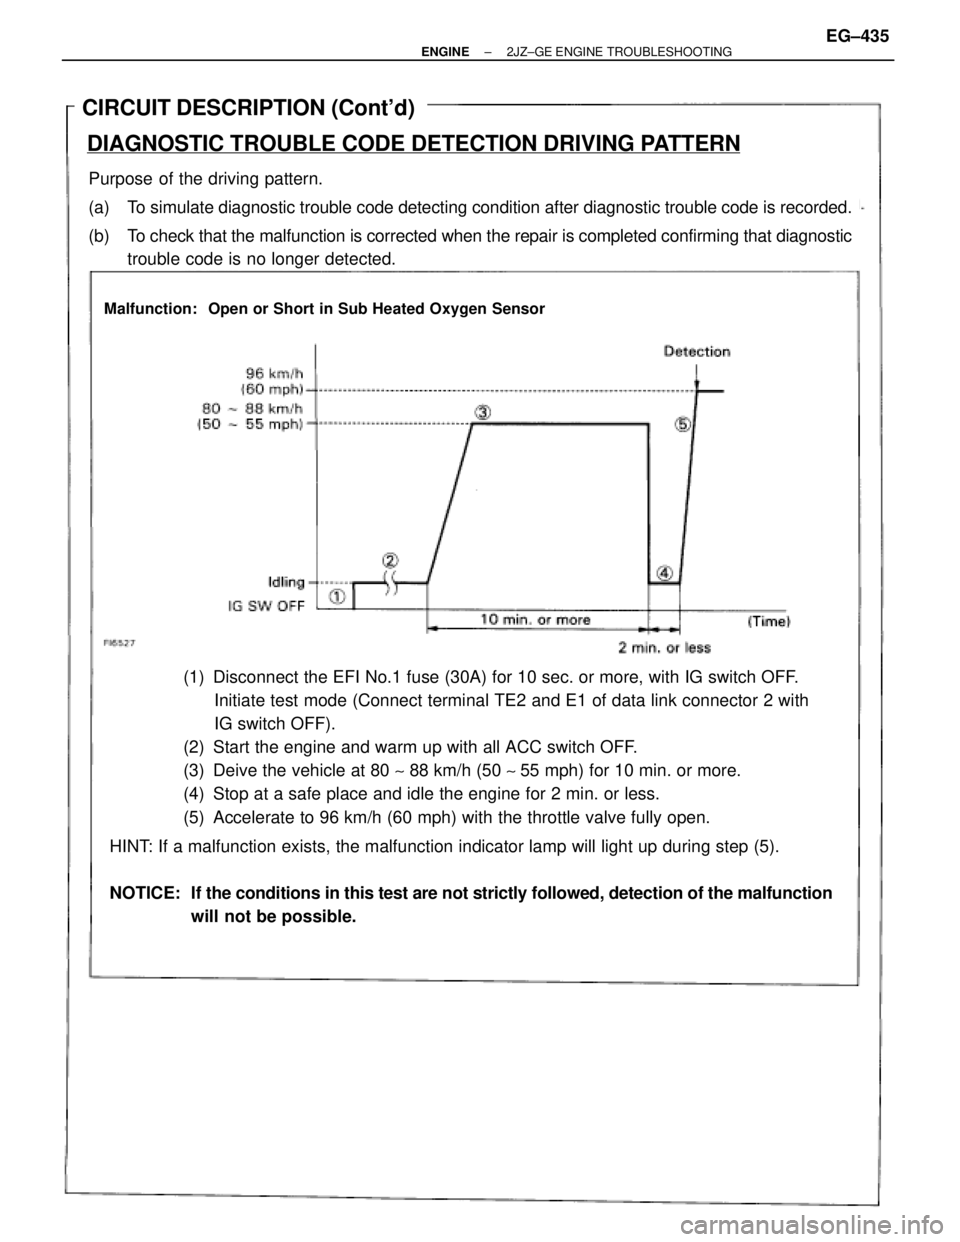
CIRCUIT DESCRIPTION (Cont'd)
DIAGNOSTIC TROUBLE CODE DETECTION DRIVING PATTERN
Purpose of the driving pattern.
(a) To simulate diagnostic trouble code detecting condition after diagnostic trouble code is recorded.
(b) To check that the malfunction is corrected when the repair is completed confirming that diagnostic
trouble code is no longer detected.
(1) Disconnect the EFI No.1 fuse (30A) for 10 sec. or more, with IG switch OFF.
Initiate test mode (Connect terminal TE2 and E1 of data link connector 2 with
IG switch OFF).
(2) Start the engine and warm up with all ACC switch OFF.
(3) Deive the vehicle at 80 ~ 88 km/h (50 ~ 55 mph) for 10 min. or more.
(4) Stop at a safe place and idle the engine for 2 min. or less.
(5) Accelerate to 96 km/h (60 mph) with the throttle valve fully open.
HINT: If a malfunction exists, the malfunction indicator lamp will light up during step (5).
NOTICE: If the conditions in this test are not strictly followed, detection of the malfunction
will not be possible.
Malfunction: Open or Short in Sub Heated Oxygen Sensor
± ENGINE2JZ±GE ENGINE TROUBLESHOOTINGEG±435
Page 1944 of 2543
(See page EG±404)
INSPECTION PROCEDURE
HINT: When other codes are output in addition to 27 at the same time, check the circuits for other codes
first.
Check voltage between terminal HT3 of engine control module connector and
body ground.
(1) Connect SST (check harness ªAº).
(See page EG±404)
SST 09990±01000
(2) Turn ignition switch ON.
Measure voltage between terminal HT3 of engine
control module connector and body ground.
Voltage: 9 Ð 14 V EG±436
± ENGINE2JZ±GE ENGINE TROUBLESHOOTING
Page 1945 of 2543
Check sub heated oxygen sensor heater.
Disconnect sub heated oxygen sensor connector.
(See page EG±250)
Measure resistance between terminals 1 and 2 of
sub heated oxygen sensor connector.
Resistance: 11 Ð 16 � at 20°C (68°F)
Check for open and short in harness and connector between EFI main relay and
engine control module (See page
IN±30).
Replace sub heated oxygen sensor.
Repair or replace harness or connector.
Check and replace engine control module.
Check voltage between terminal HT3 of engine control module connector and
body ground.
Warm up engine to normal operating temperature.
Measure voltage between terminal HT3 of engine
control module connector and body ground, when
engine is idling and racing at 3,500 rpm.
Replace sub heated oxygen sensor.
Check and replace engine control module.
*: It is probable the oxygen sensor has
deteriorated.
Usually, this cannot be confirmed by visual
inspection.
± ENGINE2JZ±GE ENGINE TROUBLESHOOTINGEG±437
Page 1946 of 2543

DTC 31 Volume Air Flow Meter Circuit
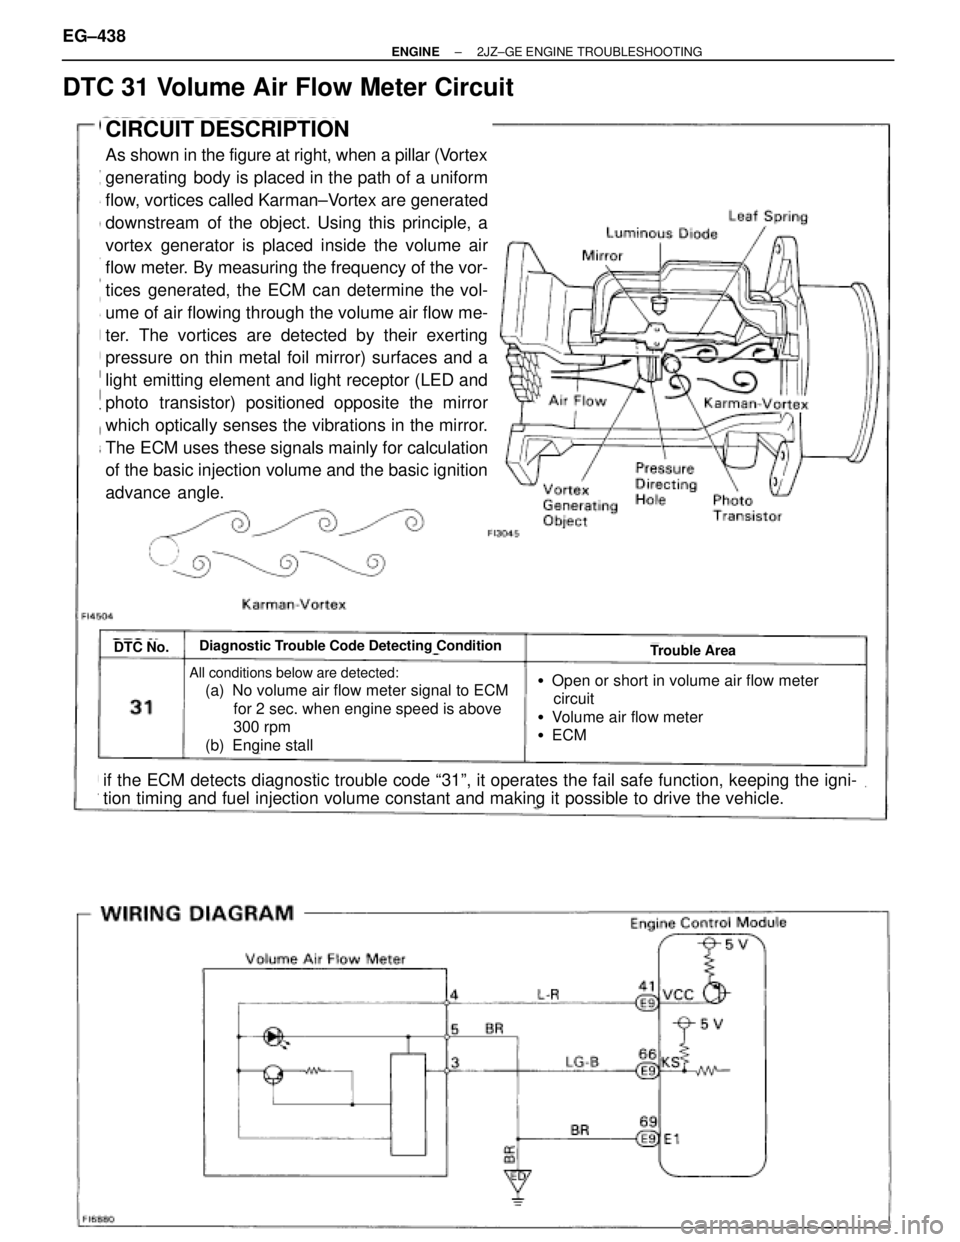
CIRCUIT DESCRIPTION
As shown in the figure at right, when a pillar (Vortex
generating body is placed in the path of a uniform
flow, vortices called Karman±Vortex are generated
downstream of the object. Using this principle, a
vortex generator is placed inside the volume air
flow meter. By measuring the frequency of the vor-
tices generated, the ECM can determine the vol-
ume of air flowing through the volume air flow me-
ter. The vortices are detected by their exerting
pressure on thin metal foil mirror) surfaces and a
light emitting element and light receptor (LED and
photo transistor) positioned opposite the mirror
which optically senses the vibrations in the mirror.
The ECM uses these signals mainly for calculation
of the basic injection volume and the basic ignition
advance angle.
DTC No.Diagnostic Trouble Code Detecting ConditionTrouble Area
All conditions below are detected:
(a) No volume air flow meter signal to ECM
for 2 sec. when engine speed is above
300 rpm
(b) Engine stall �Open or short in volume air flow meter
circuit
�Volume air flow meter
�ECM
if the ECM detects diagnostic trouble code ª31º, it operates the fail safe function, keeping the igni-
tion timing and fuel injection volume constant and making it possible to drive the vehicle. EG±438
± ENGINE2JZ±GE ENGINE TROUBLESHOOTING
Page 1947 of 2543
INSPECTION PROCEDURE
(See page EG±404)
Check voltage between terminals KS and E1 of engine control module
connector.
Connect SST (check harness ªAº).
(See page EG±404)
SST 09990±01000
Measure voltage between terminals KS and E1 of
engine control module connector while engine is
cranked.
Voltage: 2.0 Ð 4.0 V
(Neither 0 V nor 5 V)
INSPECTION USING OSCILLOSCOPE
Check for open and short in harness and connector between engine control
module and volume air flow meter (See page
IN±30).
When diagnostic trouble code 31 is displayed,
check and replace engine control module.
Repair or replace harness or connector.
�During cranking or idling, measure waveform
between terminals KS and E1 of engine control
module.
HINT: The correct waveform is as shown
.
± ENGINE2JZ±GE ENGINE TROUBLESHOOTINGEG±439
Page 1948 of 2543
Disconnect volume air flow meter connector and check voltage between
terminals KS and E1 of engine control module connector.
(1) Disconnect the volume air flow meter connec±
tor.
(2) Turn ignition switch ON.
Measure voltage between terminals KS and E1 of
engine control module connector.
Voltage: 4.5 Ð 5.5 V
(1) Disconnect the volume air flow meter connec±
tor.
(2) Turn ignition switch ON.
Measure voltage between terminals VCC and E1
of engine control module connector.
Voltage: 4.5 Ð 5.5 V
Disconnect volume air flow meter connector and check voltage between
terminals VCC and E1 of engine control module connector.
Check and replace engine control module.
Replace volume air flow meter.
Check and replace engine control module.
EG±440± ENGINE2JZ±GE ENGINE TROUBLESHOOTING
Page 1949 of 2543

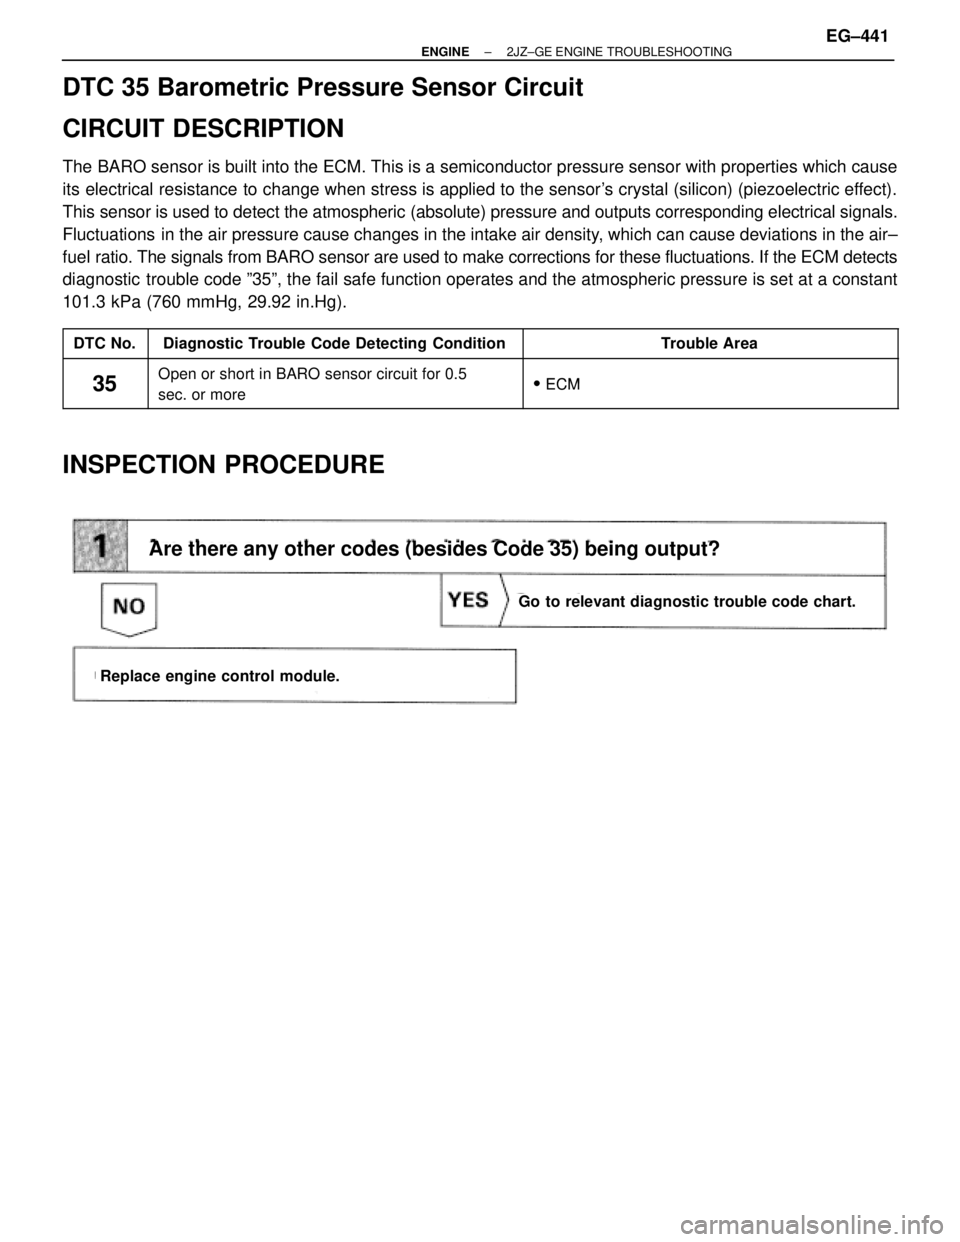
DTC 35 Barometric Pressure Sensor Circuit
CIRCUIT DESCRIPTION
The BARO sensor is built into the ECM. This is a semiconductor pressure sensor with properties which cause
its electrical resistance to change when stress is applied to the sensor's crystal (silicon) (piezoelectric effect).
This sensor is used to detect the atmospheric (absolute) pressure and outputs corresponding electrical signals.
Fluctuations in the air pressure cause changes in the intake air density, which can cause deviations in the air±
fuel ratio. The signals from BARO sensor are used to make corrections for these fluctuations. If the ECM detects
diagnostic trouble code º35º, the fail safe function operates and the atmospheric pressure is set at a constant
101.3 kPa (760 mmHg, 29.92 in.Hg).
����� �����DTC No.���������������� ����������������Diagnostic Trouble Code Detecting Condition����������������� �����������������Trouble Area����� �����
35
���������������� ����������������
Open or short in BARO sensor circuit for 0.5
����������������� �����������������
�ECM����� �����35���������������� ���������������� Oen or short in BARO sensor circuit for 0.5
sec. or more����������������� ����������������� � ECM
INSPECTION PROCEDURE
Are there any other codes (besides Code 35) being output?
Go to relevant diagnostic trouble code chart.
Replace engine control module.
± ENGINE2JZ±GE ENGINE TROUBLESHOOTINGEG±441