Page 1371 of 1701

HOWTOREAD WIRING DIAGRAMS
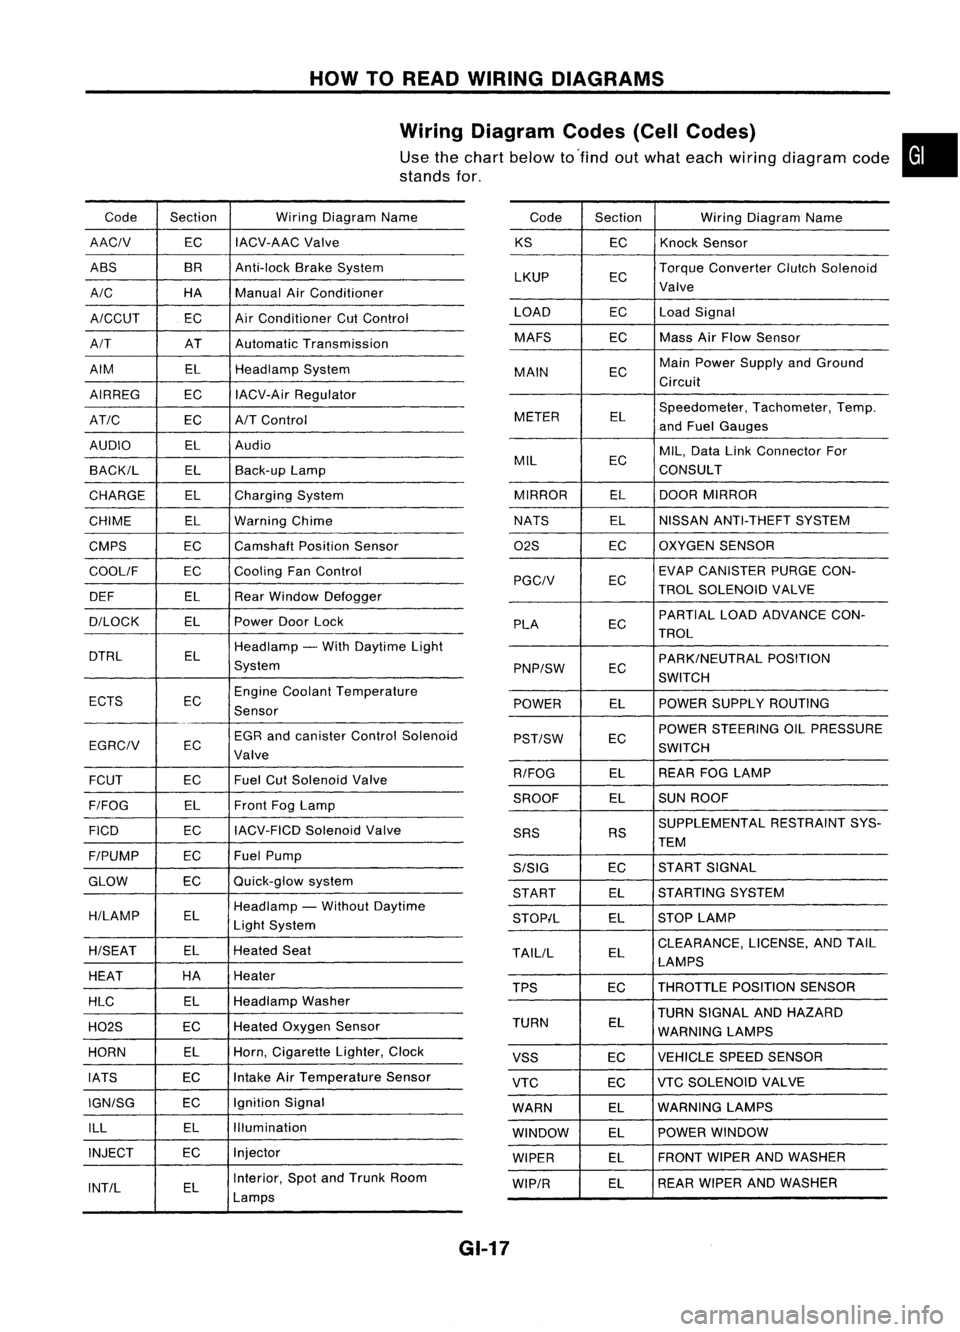
Wiring Diagram Codes(CellCodes)
Use thechart below to'find outwhat each wiring diagram code•
stands for,
Code Section WiringDiagram Name
AACIV ECIACV-AAC
Valve
ABS BR
Anti-lock BrakeSystem
A/C HAManualAirConditioner
A/CCUT ECAir
Conditioner CutControl
A/T ATAutomatic Transmission
AIM ELHeadlamp System
AIRREG ECIACV-Air Regulator
AT/C ECA/TControl
AUDIO ELAudio
BACK/L ELBack-up Lamp
CHARGE ELCharging System
CHIME ELWarning Chime
CMPS EC
Camshaft PositionSensor
COOllF ECCooling
FanControl
DEF ELRearWindow Defogger
D/LOCK ELPowerDoorLock
DTRL ELHeadlamp
-With Daytime Light
System
ECTS ECEngine
Coolant Temperature
Sensor
EGR andcanister ControlSolenoid
EGRCIV EC
Valve
FCUT ECFuel
CutSolenoid Valve
F/FOG ELFront
FogLamp
FICO ECIACV-FICD
SolenoidValve
F/PUMP ECFuel
Pump
GLOW ECQuick-glow
system
H/LAMP ELHeadlamp
-Without Daytime
Light System
H/SEAT ELHeated
Seat
HEAT HA
Heater
HLC ELHeadlamp
Washer
H02S ECHeated
Oxygen Sensor
HORN ELHorn,
Cigarette Lighter,Clock
IATS ECIntake
AirTemperature Sensor
IGN/SG ECIgnition
Signal
ILL ELIllumination
INJECT ECInjector
INT/L ELInterior,
SpotandTrunk Room
Lamps Code
Section WiringDiagram Name
KS ECKnock
Sensor
LKUP ECTorque
Converter ClutchSolenoid
Valve
LOAD ECLoadSignal
MAFS ECMass
AirFlow Sensor
MAIN ECMain
Power Supply andGround
Circuit
METER ELSpeedometer,
Tachometer,Temp.
and Fuel Gauges
MIL ECMIL,
Data LinkConnector For
CONSULT
MIRROR ELDOOR
MIRROR
NATS ELNISSAN
ANTI-THEFT SYSTEM
02S ECOXYGEN
SENSOR
EC EVAP
CANISTER PURGECON-
PGCIV TROLSOLENOID VALVE
PLA ECPARTIAL
LOADADVANCE CON-
TROL
EC PARK/NEUTRAL
POSITION
PNP/SW SWITCH
POWER ELPOWER
SUPPLY ROUTING
POWER STEERING OILPRESSURE
PST/SW EC
SWITCH
R/FOG ELREAR
FOGLAMP
SROOF ELSUN
ROOF
SUPPLEMENTAL RESTRAINTSYS-
SRS RS
TEM
S/SIG ECST
ART SIGNAL
START ELSTARTING
SYSTEM
STOP/L ELSTOP
LAMP
TAllIL ELCLEARANCE,
LICENSE,ANDTAIL
LAMPS
TPS ECTHROTTLE
POSITIONSENSOR
TURN SIGNAL ANDHAZARD
TURN EL
WARNING LAMPS
VSS ECVEHICLE
SPEEDSENSOR
VTC ECVTC
SOLENOID VALVE
WARN ELWARNING
LAMPS
WINDOW ELPOWER
WINDOW
WIPER ELFRONT
WIPERANDWASHER
WIP/R ELREAR
WIPER ANDWASHER
GI-17
Page 1492 of 1701

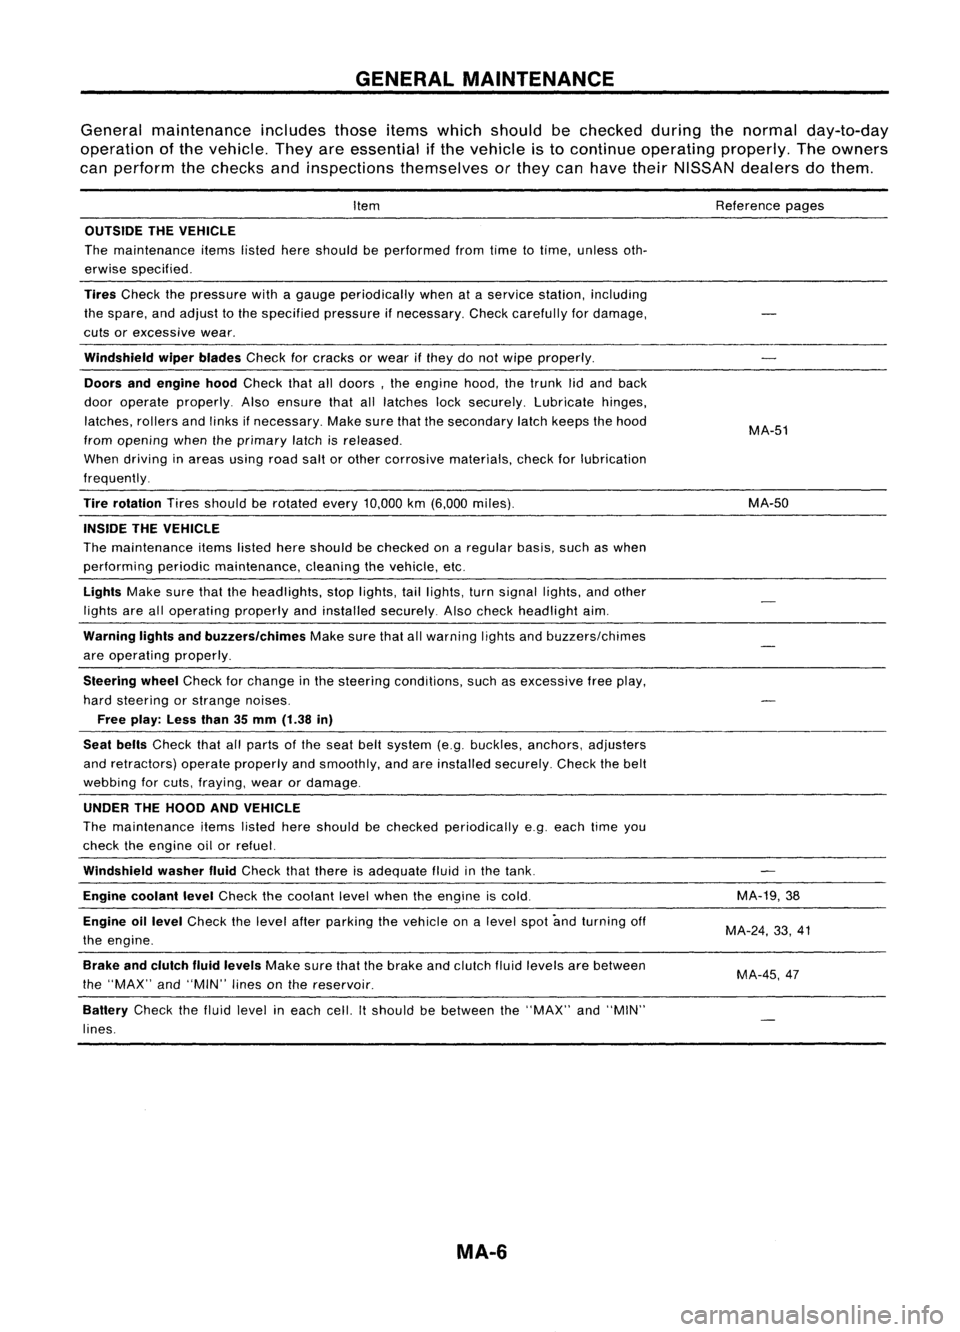
GENERALMAINTENANCE
General maintenance includesthoseitemswhich should bechecked duringthenormal day-to-day
operation ofthe vehicle. Theyareessential ifthe vehicle isto continue operating properly.Theowners
can perform thechecks andinspections themselves orthey canhave theirNISSAN dealersdothem.
Item
OUTSIDE THEVEHICLE
The maintenance itemslistedhereshould beperformed fromtimetotime, unless oth-
erwise specified.
Tires
Check thepressure withagauge periodically whenataservice station, including
the spare, andadjust tothe specified pressureifnecessary. Checkcarefully fordamage,
cuts orexcessive wear.
Windshield wiperblades
Checkforcracks orwear ifthey donot wipe properly.
Doors andengine hood
Check thatalldoors, theengine hood,thetrunk lidand back
door operate properly. Alsoensure thatalllatches locksecurely. Lubricate hinges,
latches, rollersandlinks ifnecessary. Makesurethatthesecondary latchkeeps thehood
from opening whentheprimary latchisreleased.
When driving inareas usingroadsaltorother corrosive materials, checkforlubrication
frequently.
Tire rotation
Tiresshould berotated every
10,000
km
(6,000
miles).
INSIDE THEVEHICLE
The maintenance itemslistedhereshould bechecked onaregular basis,suchaswhen
performing periodicmaintenance, cleaningthevehicle, etc.
Lights
Makesurethattheheadlights, stoplights, taillights, turnsignal lights,andother
lights arealloperating properlyandinstalled securely. Alsocheck headlight aim.
Warning lightsandbuzzers/chimes
Makesurethatallwarning lightsandbuzzers/chimes
are operating properly.
Steering wheel
Check forchange inthe steering conditions, suchasexcessive freeplay,
hard steering orstrange noises.
Free play: Lessthan35mm (1.38 in)
Seat belts
Check thatallparts ofthe seat beltsystem (e.g.buckles, anchors, adjusters
and retractors) operateproperly andsmoothly, andareinstalled securely. Checkthebelt
webbing forcuts, fraying, wearordamage.
UNDER THEHOOD ANDVEHICLE
The maintenance itemslisted hereshould bechecked periodically e.g.each timeyou
check theengine oilorrefuel.
Windshield washerfluid
Check thatthere isadequate fluidinthe tank.
Engine coolant level
Check thecoolant levelwhen theengine iscold.
Engine oillevel
Check thelevel afterparking thevehicle onalevel spotandturning off
the engine.
Brake andclutch fluidlevels
Makesurethatthebrake andclutch fluidlevels arebetween
the "MAX" and"MIN" linesonthe reservoir.
Battery
Checkthefluid level ineach cell.Itshould bebetween the"MAX" and"MIN"
lines.
MA-6
Reference
pages
MA-51
MA-50
MA-19,38
MA-24, 33,41
MA-45,47
Page 1520 of 1701
ENGINEMAINTENANCE [}[]
Changing EngineOil(Cont'd)
4. Check oillevel.
5. Start engine andcheck areaaround drainplugandoilfilter
for oilleakage.
6. Run engine forafew minutes, thenturnitoff. After several
minutes, checkoillevel.
Refill oil10this
"H" level.
Do not overfill.
SMA390C
Changing OilFilter
1. Remove oilfilter withTool.
WARNING:
Be careful nottoburn yourself, asthe engine andtheengine
oil are hot.
2. Clean oilfilter mounting surfaceoncylinder block.Coat
rubber sealofnew oilfilter withengine oil.
2/3
ofaturn
-------
OK SMA010
3.Screw inthe oilfilter untilaslight resistance isfelt, then
tighten anadditional 2/3turn.
4. Add engine oil.
Refer toChanging EngineOil.
• Clean excess oilfrom engine.
Changing SparkPlugs(Platinum-tipped type)
1. Disconnect ignitionwiresfromspark plugsatboot. Donot
pull onthe wire.
MA-34
Page 1529 of 1701
![NISSAN ALMERA N15 1995 Service Manual
2/3
ofaturn
ENGINE
MAINTENANCE @Q]
Changing EngineOilFilter (Cont'd)
3. Screw oilfilter onuntil aslight resistance isfelt, then tighten
an additional 2/3turn.
4. Warm upengine andcheck oillevel NISSAN ALMERA N15 1995 Service Manual
2/3
ofaturn
ENGINE
MAINTENANCE @Q]
Changing EngineOilFilter (Cont'd)
3. Screw oilfilter onuntil aslight resistance isfelt, then tighten
an additional 2/3turn.
4. Warm upengine andcheck oillevel](/manual-img/5/57349/w960_57349-1528.png)
2/3
ofaturn
ENGINE
MAINTENANCE @Q]
Changing EngineOilFilter (Cont'd)
3. Screw oilfilter onuntil aslight resistance isfelt, then tighten
an additional 2/3turn.
4. Warm upengine andcheck oillevel.
5. Adjust oillevel ifnecessary. •
Refer toStep 4in "Changing EngineOil",MA-42.
i
• Clean excess oilfrom engine.
SMA229B Checking InjectionNozzle
1. Remove injection deliverytubesandfuel spill tube.
2. Remove nozzlewithasuitable tool[span 27mm (1.06 in)].
WARNING:
When usingnozzle tester,becareful nottoallow diesel fuel
sprayed fromnozzle tocome intocontact withyour hand or
body, andmake surethatyour eyes areproperly protected.
3. Clean andcheck nozzles.
4. Install nozzle toinjection nozzletesterandbleed airfrom
flare nut.
5. Check initialinjection pressure bypumping testerhandle
one time persecond.
EF791A
6.Install injector topressure tester.
7. Check initialinjection pressure bypumping testerhandle
slowly (onetime persecond).
Injection pressure:
12,749 kPa(127.5 bar,130kg/cm
2,
1,849psi)
• Always checkinitialinjection pressure beforeinstalling new
nozzle.
Good
\
I
,
,
I
Wrong SEF672A
8.Check fuelspray pattern bypumping testerhandle quickly
(4 or 6times persecond).
9. Ifinitial injection pressure orinjection nozzleisnot normal,
adjust orclean injection nozzleorreplace it.
Refer toEC section forinjection pressure adjustment.
10. Install allinjection nozzlesandsecurely connectfuelspill
tube anddelivery tubes.
11. Bleed airfrom fuelsystem andcheck forfuel leakage with
engine running.
EF794A
MA.43
Page:
< prev 1-8 9-16 17-24