1995 JEEP YJ torque
[x] Cancel search: torquePage 1848 of 2158
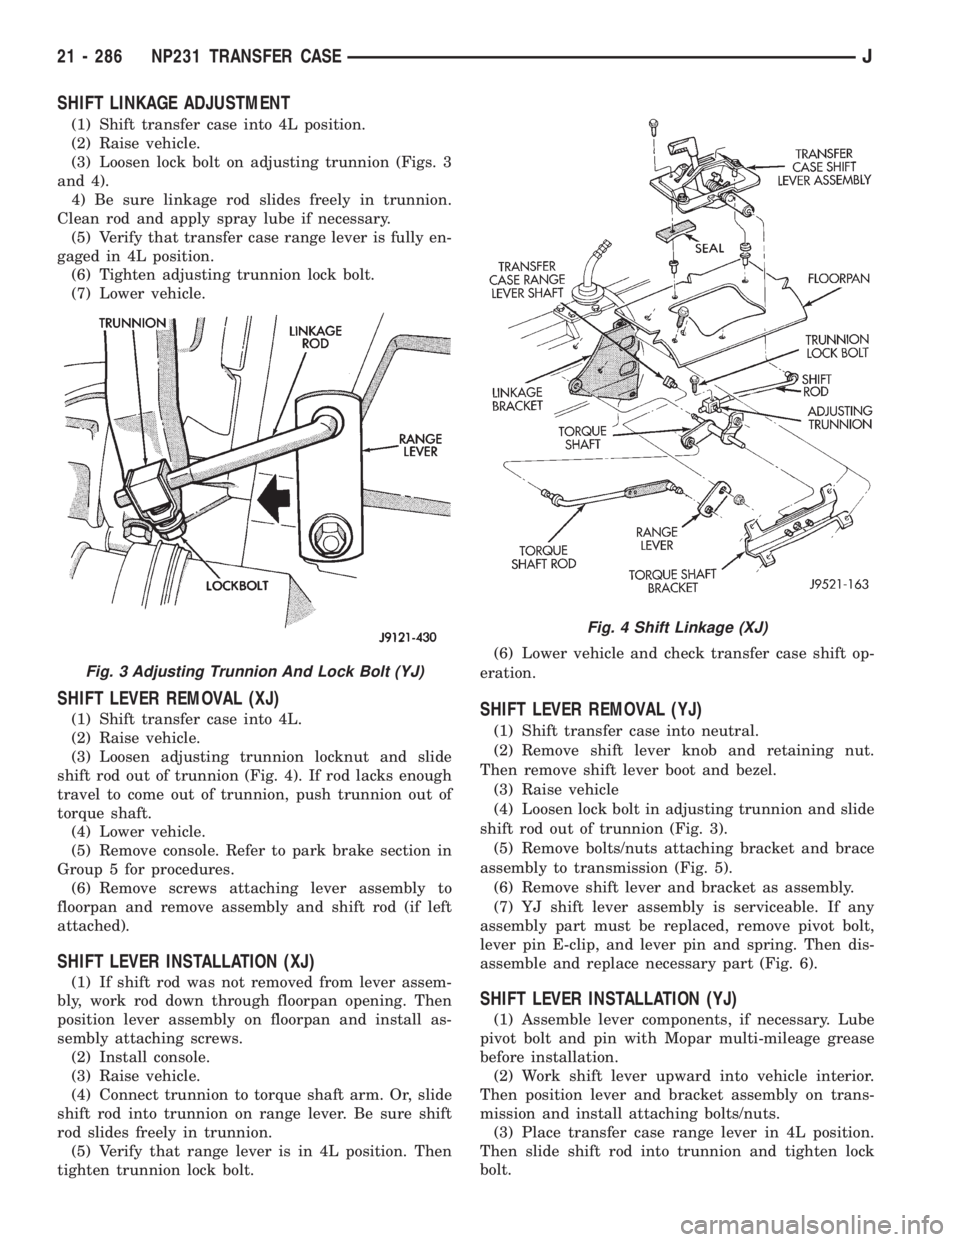
SHIFT LINKAGE ADJUSTMENT
(1) Shift transfer case into 4L position.
(2) Raise vehicle.
(3) Loosen lock bolt on adjusting trunnion (Figs. 3
and 4).
4) Be sure linkage rod slides freely in trunnion.
Clean rod and apply spray lube if necessary.
(5) Verify that transfer case range lever is fully en-
gaged in 4L position.
(6) Tighten adjusting trunnion lock bolt.
(7) Lower vehicle.
SHIFT LEVER REMOVAL (XJ)
(1) Shift transfer case into 4L.
(2) Raise vehicle.
(3) Loosen adjusting trunnion locknut and slide
shift rod out of trunnion (Fig. 4). If rod lacks enough
travel to come out of trunnion, push trunnion out of
torque shaft.
(4) Lower vehicle.
(5) Remove console. Refer to park brake section in
Group 5 for procedures.
(6) Remove screws attaching lever assembly to
floorpan and remove assembly and shift rod (if left
attached).
SHIFT LEVER INSTALLATION (XJ)
(1) If shift rod was not removed from lever assem-
bly, work rod down through floorpan opening. Then
position lever assembly on floorpan and install as-
sembly attaching screws.
(2) Install console.
(3) Raise vehicle.
(4) Connect trunnion to torque shaft arm. Or, slide
shift rod into trunnion on range lever. Be sure shift
rod slides freely in trunnion.
(5) Verify that range lever is in 4L position. Then
tighten trunnion lock bolt.(6) Lower vehicle and check transfer case shift op-
eration.
SHIFT LEVER REMOVAL (YJ)
(1) Shift transfer case into neutral.
(2) Remove shift lever knob and retaining nut.
Then remove shift lever boot and bezel.
(3) Raise vehicle
(4) Loosen lock bolt in adjusting trunnion and slide
shift rod out of trunnion (Fig. 3).
(5) Remove bolts/nuts attaching bracket and brace
assembly to transmission (Fig. 5).
(6) Remove shift lever and bracket as assembly.
(7) YJ shift lever assembly is serviceable. If any
assembly part must be replaced, remove pivot bolt,
lever pin E-clip, and lever pin and spring. Then dis-
assemble and replace necessary part (Fig. 6).
SHIFT LEVER INSTALLATION (YJ)
(1) Assemble lever components, if necessary. Lube
pivot bolt and pin with Mopar multi-mileage grease
before installation.
(2) Work shift lever upward into vehicle interior.
Then position lever and bracket assembly on trans-
mission and install attaching bolts/nuts.
(3) Place transfer case range lever in 4L position.
Then slide shift rod into trunnion and tighten lock
bolt.
Fig. 3 Adjusting Trunnion And Lock Bolt (YJ)
Fig. 4 Shift Linkage (XJ)
21 - 286 NP231 TRANSFER CASEJ
Page 1850 of 2158
(14) Pull transfer case and jack rearward to disen-
gage transfer case.
(15) Remove transfer case from under vehicle.
(16) If transfer case was removed for overhaul, re-
move damper from rear retainer.
TRANSFER CASE INSTALLATION
(1) Mount transfer case on a transmission jack. Se-
cure transfer case to jack with chains.
(2) Position transfer case under vehicle.(3) Align transfer case and transmission shafts and
install transfer case on transmission.
(4) Install and tighten transfer case attaching nuts
to 35 Nzm (26 ft. lbs.) torque.
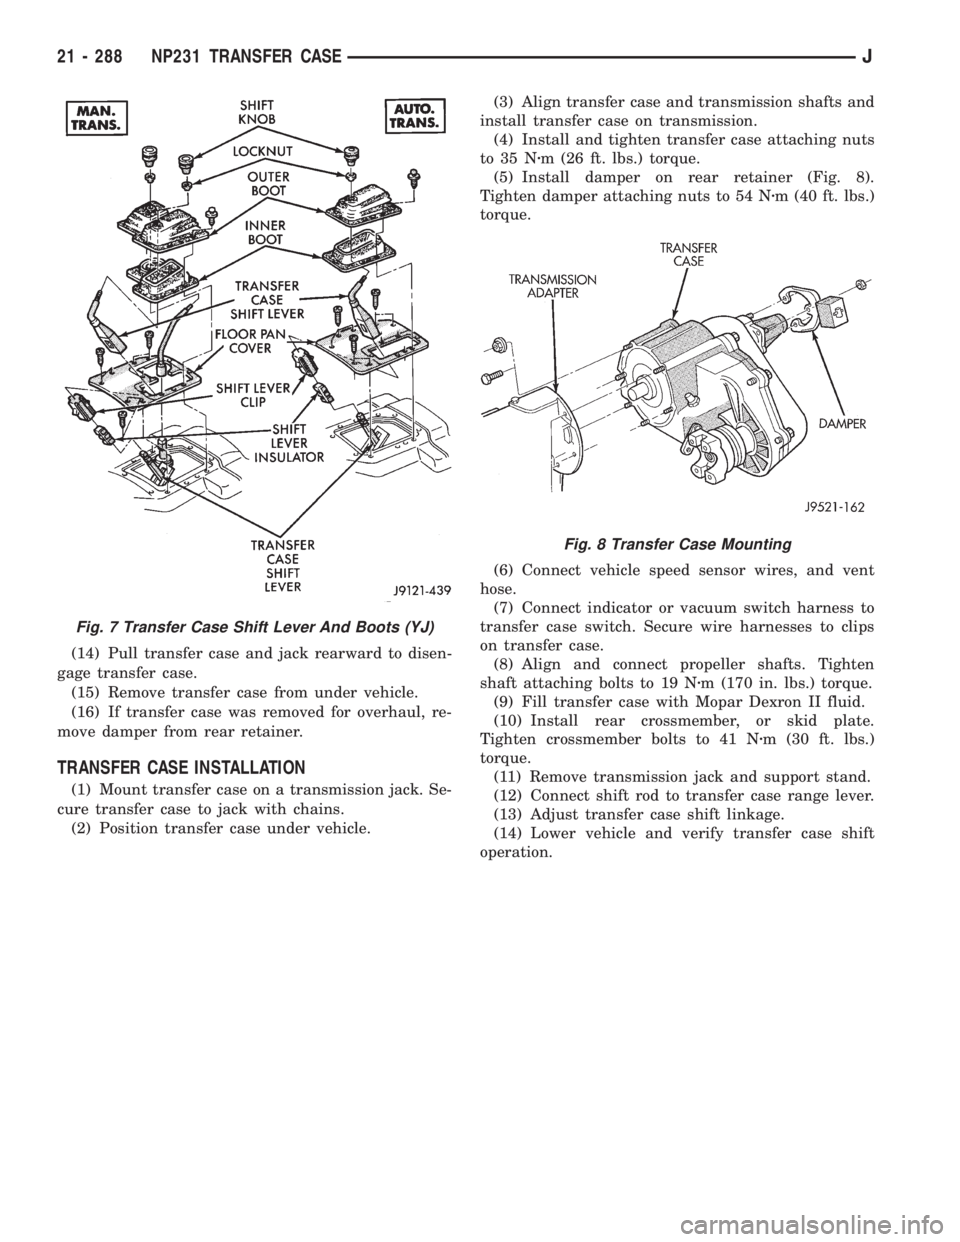
(5) Install damper on rear retainer (Fig. 8).
Tighten damper attaching nuts to 54 Nzm (40 ft. lbs.)
torque.
(6) Connect vehicle speed sensor wires, and vent
hose.
(7) Connect indicator or vacuum switch harness to
transfer case switch. Secure wire harnesses to clips
on transfer case.
(8) Align and connect propeller shafts. Tighten
shaft attaching bolts to 19 Nzm (170 in. lbs.) torque.
(9) Fill transfer case with Mopar Dexron II fluid.
(10) Install rear crossmember, or skid plate.
Tighten crossmember bolts to 41 Nzm (30 ft. lbs.)
torque.
(11) Remove transmission jack and support stand.
(12) Connect shift rod to transfer case range lever.
(13) Adjust transfer case shift linkage.
(14) Lower vehicle and verify transfer case shift
operation.
Fig. 7 Transfer Case Shift Lever And Boots (YJ)
Fig. 8 Transfer Case Mounting
21 - 288 NP231 TRANSFER CASEJ
Page 1860 of 2158
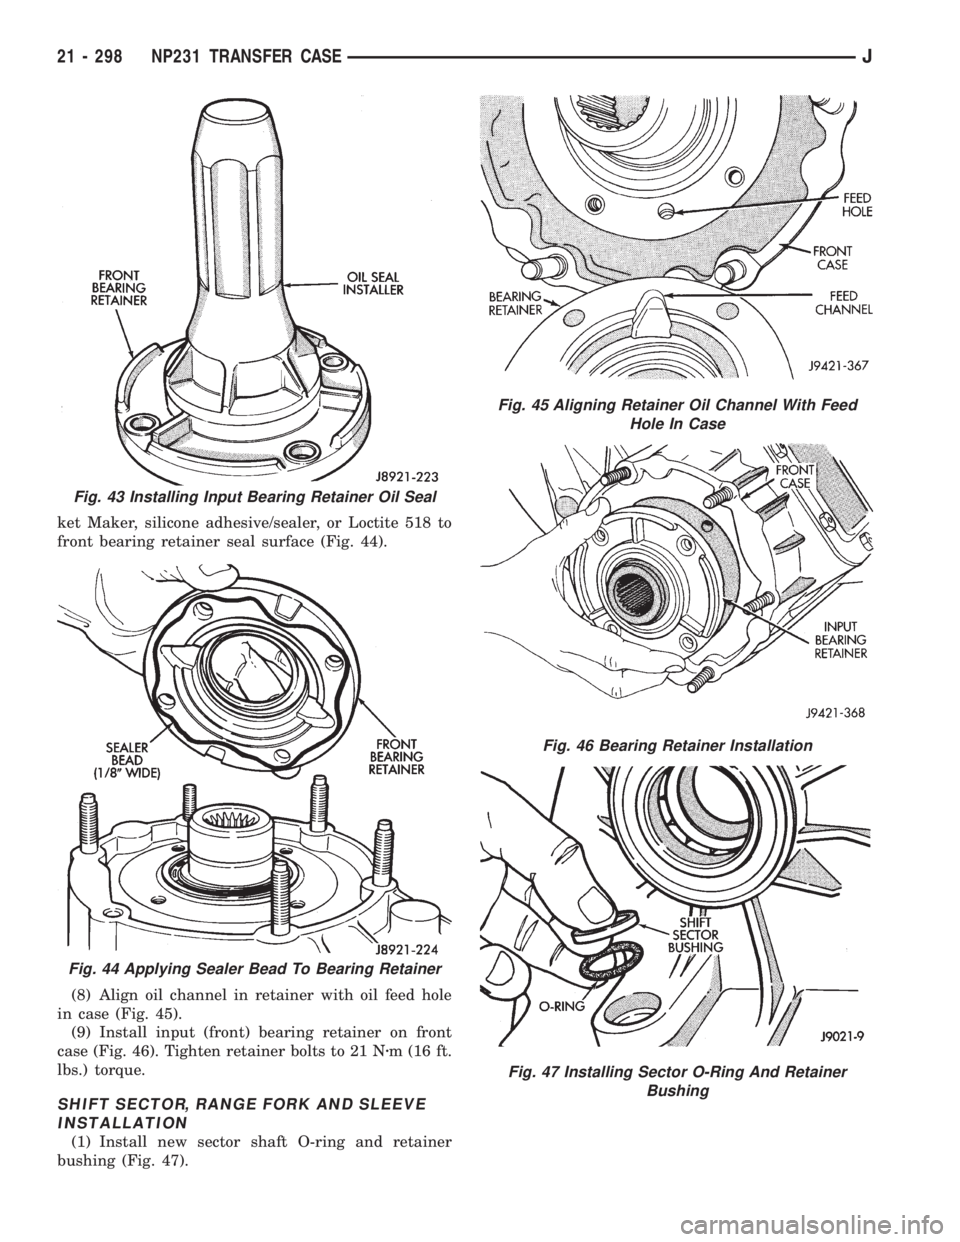
ket Maker, silicone adhesive/sealer, or Loctite 518 to
front bearing retainer seal surface (Fig. 44).
(8) Align oil channel in retainer with oil feed hole
in case (Fig. 45).
(9) Install input (front) bearing retainer on front
case (Fig. 46). Tighten retainer bolts to 21 Nzm (16 ft.
lbs.) torque.
SHIFT SECTOR, RANGE FORK AND SLEEVE
INSTALLATION
(1) Install new sector shaft O-ring and retainer
bushing (Fig. 47).
Fig. 43 Installing Input Bearing Retainer Oil Seal
Fig. 44 Applying Sealer Bead To Bearing Retainer
Fig. 45 Aligning Retainer Oil Channel With Feed
Hole In Case
Fig. 46 Bearing Retainer Installation
Fig. 47 Installing Sector O-Ring And Retainer
Bushing
21 - 298 NP231 TRANSFER CASEJ
Page 1861 of 2158
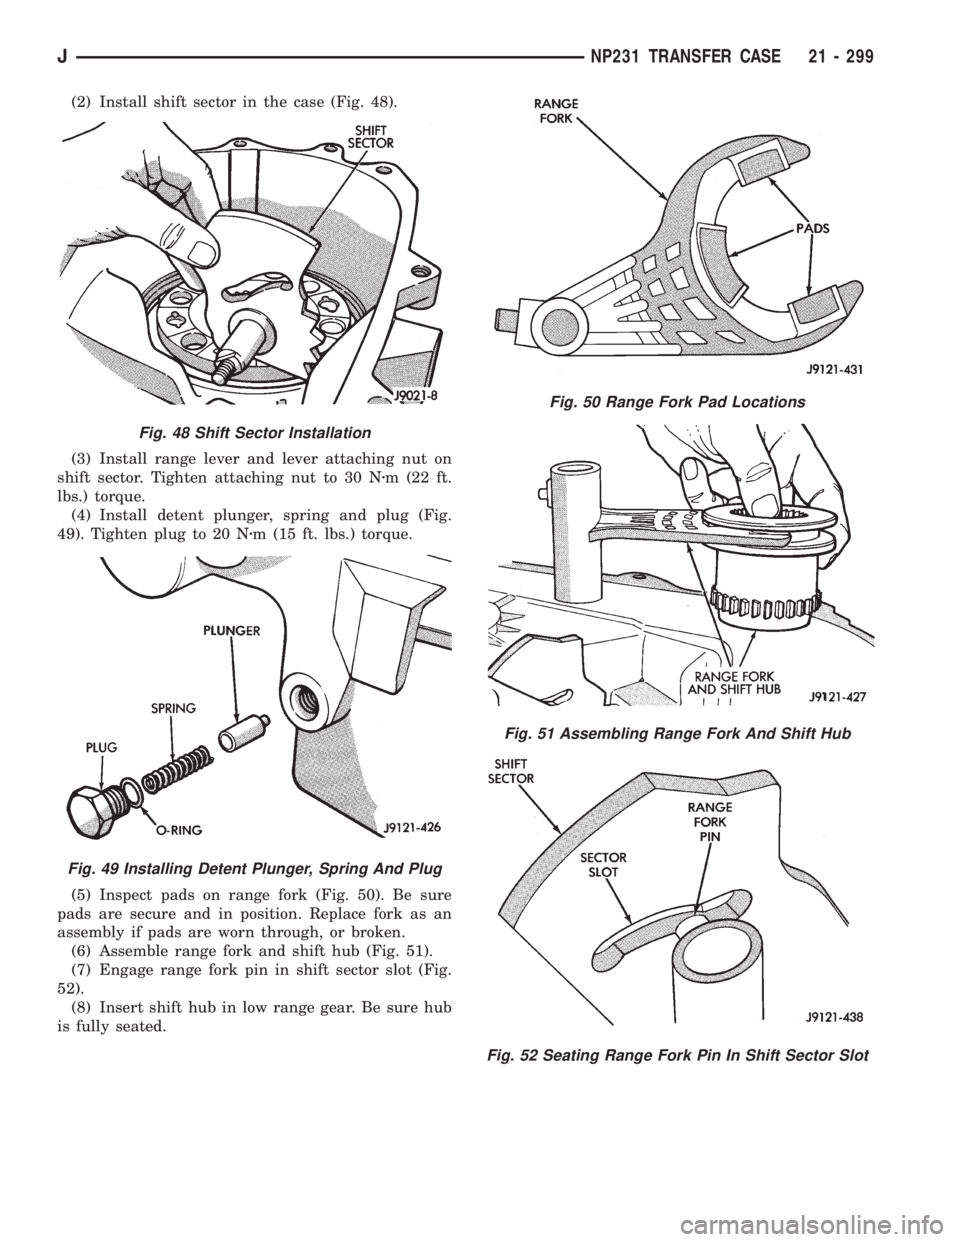
(2) Install shift sector in the case (Fig. 48).
(3) Install range lever and lever attaching nut on
shift sector. Tighten attaching nut to 30 Nzm (22 ft.
lbs.) torque.
(4) Install detent plunger, spring and plug (Fig.
49). Tighten plug to 20 Nzm (15 ft. lbs.) torque.
(5) Inspect pads on range fork (Fig. 50). Be sure
pads are secure and in position. Replace fork as an
assembly if pads are worn through, or broken.
(6) Assemble range fork and shift hub (Fig. 51).
(7) Engage range fork pin in shift sector slot (Fig.
52).
(8) Insert shift hub in low range gear. Be sure hub
is fully seated.
Fig. 48 Shift Sector Installation
Fig. 49 Installing Detent Plunger, Spring And Plug
Fig. 50 Range Fork Pad Locations
Fig. 51 Assembling Range Fork And Shift Hub
Fig. 52 Seating Range Fork Pin In Shift Sector Slot
JNP231 TRANSFER CASE 21 - 299
Page 1865 of 2158
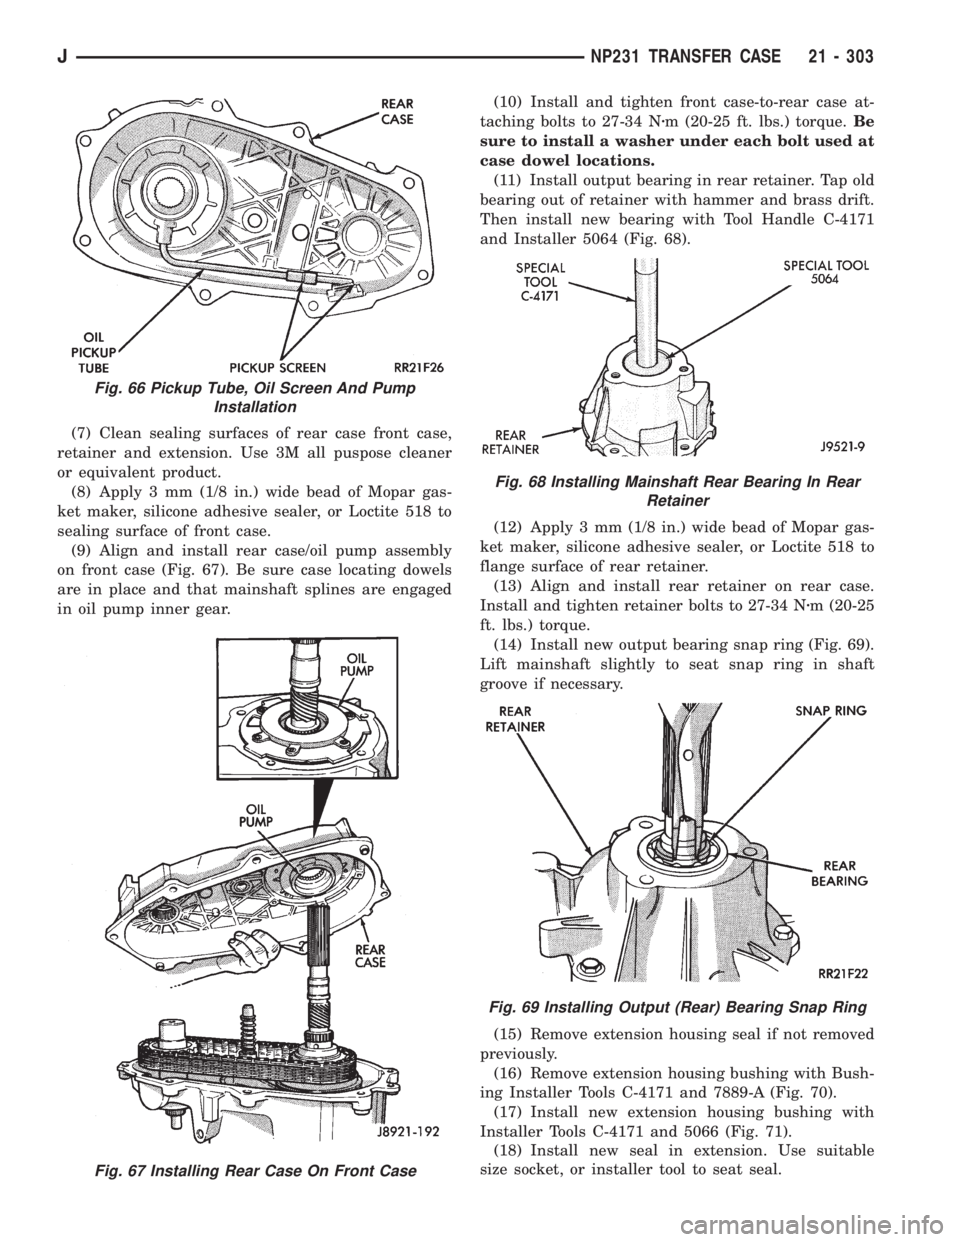
(7) Clean sealing surfaces of rear case front case,
retainer and extension. Use 3M all puspose cleaner
or equivalent product.
(8) Apply 3 mm (1/8 in.) wide bead of Mopar gas-
ket maker, silicone adhesive sealer, or Loctite 518 to
sealing surface of front case.
(9) Align and install rear case/oil pump assembly
on front case (Fig. 67). Be sure case locating dowels
are in place and that mainshaft splines are engaged
in oil pump inner gear.(10) Install and tighten front case-to-rear case at-
taching bolts to 27-34 Nzm (20-25 ft. lbs.) torque.Be
sure to install a washer under each bolt used at
case dowel locations.
(11) Install output bearing in rear retainer. Tap old
bearing out of retainer with hammer and brass drift.
Then install new bearing with Tool Handle C-4171
and Installer 5064 (Fig. 68).
(12) Apply 3 mm (1/8 in.) wide bead of Mopar gas-
ket maker, silicone adhesive sealer, or Loctite 518 to
flange surface of rear retainer.
(13) Align and install rear retainer on rear case.
Install and tighten retainer bolts to 27-34 Nzm (20-25
ft. lbs.) torque.
(14) Install new output bearing snap ring (Fig. 69).
Lift mainshaft slightly to seat snap ring in shaft
groove if necessary.
(15) Remove extension housing seal if not removed
previously.
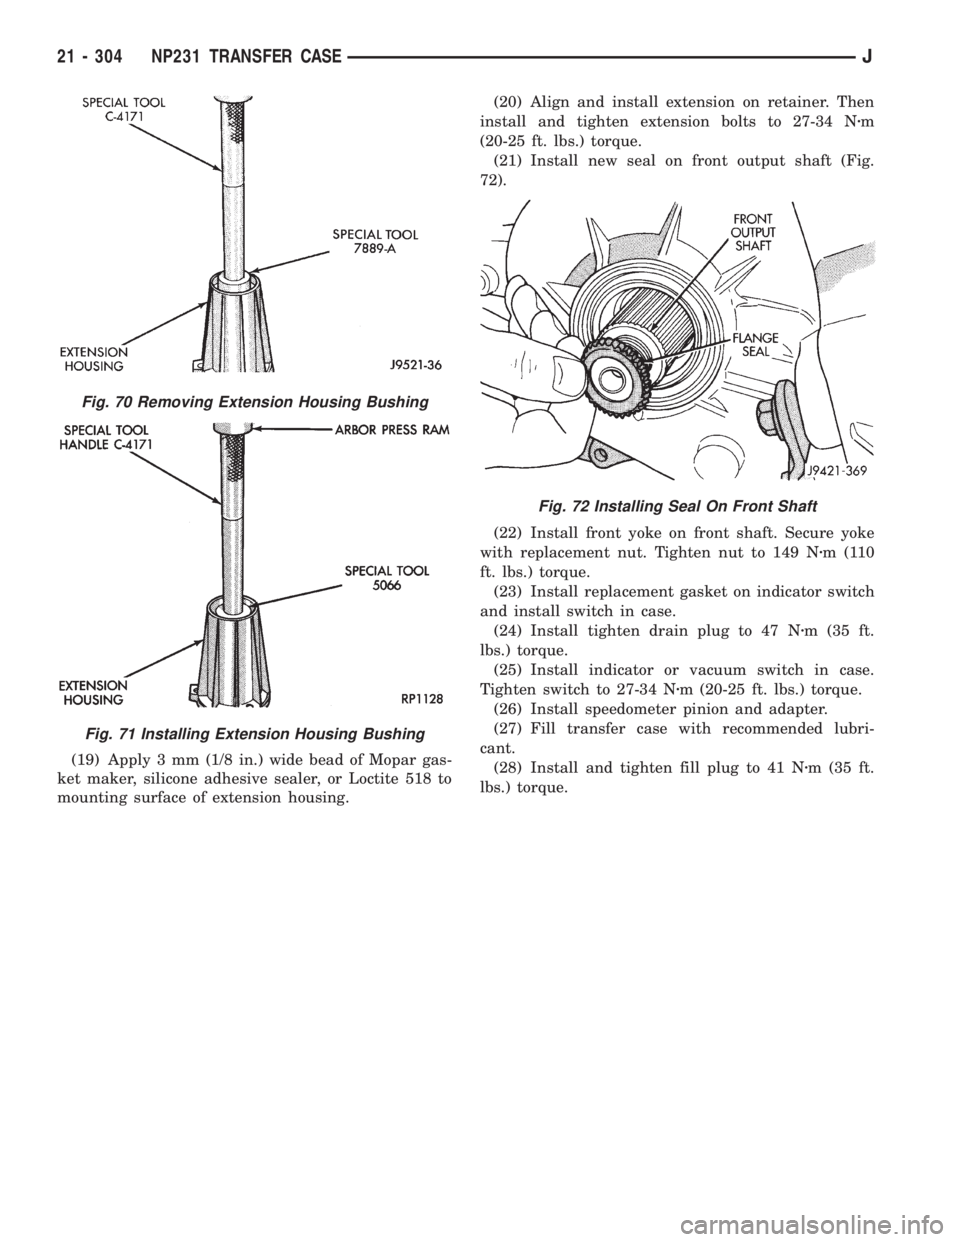
(16) Remove extension housing bushing with Bush-
ing Installer Tools C-4171 and 7889-A (Fig. 70).
(17) Install new extension housing bushing with
Installer Tools C-4171 and 5066 (Fig. 71).
(18) Install new seal in extension. Use suitable
size socket, or installer tool to seat seal.
Fig. 67 Installing Rear Case On Front Case
Fig. 66 Pickup Tube, Oil Screen And Pump
Installation
Fig. 68 Installing Mainshaft Rear Bearing In Rear
Retainer
Fig. 69 Installing Output (Rear) Bearing Snap Ring
JNP231 TRANSFER CASE 21 - 303
Page 1866 of 2158
(19) Apply 3 mm (1/8 in.) wide bead of Mopar gas-
ket maker, silicone adhesive sealer, or Loctite 518 to
mounting surface of extension housing.(20) Align and install extension on retainer. Then
install and tighten extension bolts to 27-34 Nzm
(20-25 ft. lbs.) torque.
(21) Install new seal on front output shaft (Fig.
72).
(22) Install front yoke on front shaft. Secure yoke
with replacement nut. Tighten nut to 149 Nzm(110
ft. lbs.) torque.
(23) Install replacement gasket on indicator switch
and install switch in case.
(24) Install tighten drain plug to 47 Nzm (35 ft.
lbs.) torque.
(25) Install indicator or vacuum switch in case.
Tighten switch to 27-34 Nzm (20-25 ft. lbs.) torque.
(26) Install speedometer pinion and adapter.
(27) Fill transfer case with recommended lubri-
cant.
(28) Install and tighten fill plug to 41 Nzm (35 ft.
lbs.) torque.
Fig. 70 Removing Extension Housing Bushing
Fig. 71 Installing Extension Housing Bushing
Fig. 72 Installing Seal On Front Shaft
21 - 304 NP231 TRANSFER CASEJ
Page 1869 of 2158
NP242 TRANSFER CASE
INDEX
page page
General Information....................... 307
Operating Ranges........................ 307
Overhaul Cleaning and Inspection............ 318
Recommended Lubricant/Capacity/Fill Level..... 307
Shift Lever Installation (XJ)................. 309
Shift Lever Removal (XJ)................... 309
Shift Linkage Adjustment................... 309
Shift Mechanism......................... 307Speedometer Service..................... 309
Transfer Case Assembly................... 319
Transfer Case Changes.................... 307
Transfer Case Disassembly and Overhaul...... 310
Transfer Case Identification................. 307
Transfer Case Installation.................. 309
Transfer Case Removal.................... 309
GENERAL INFORMATION
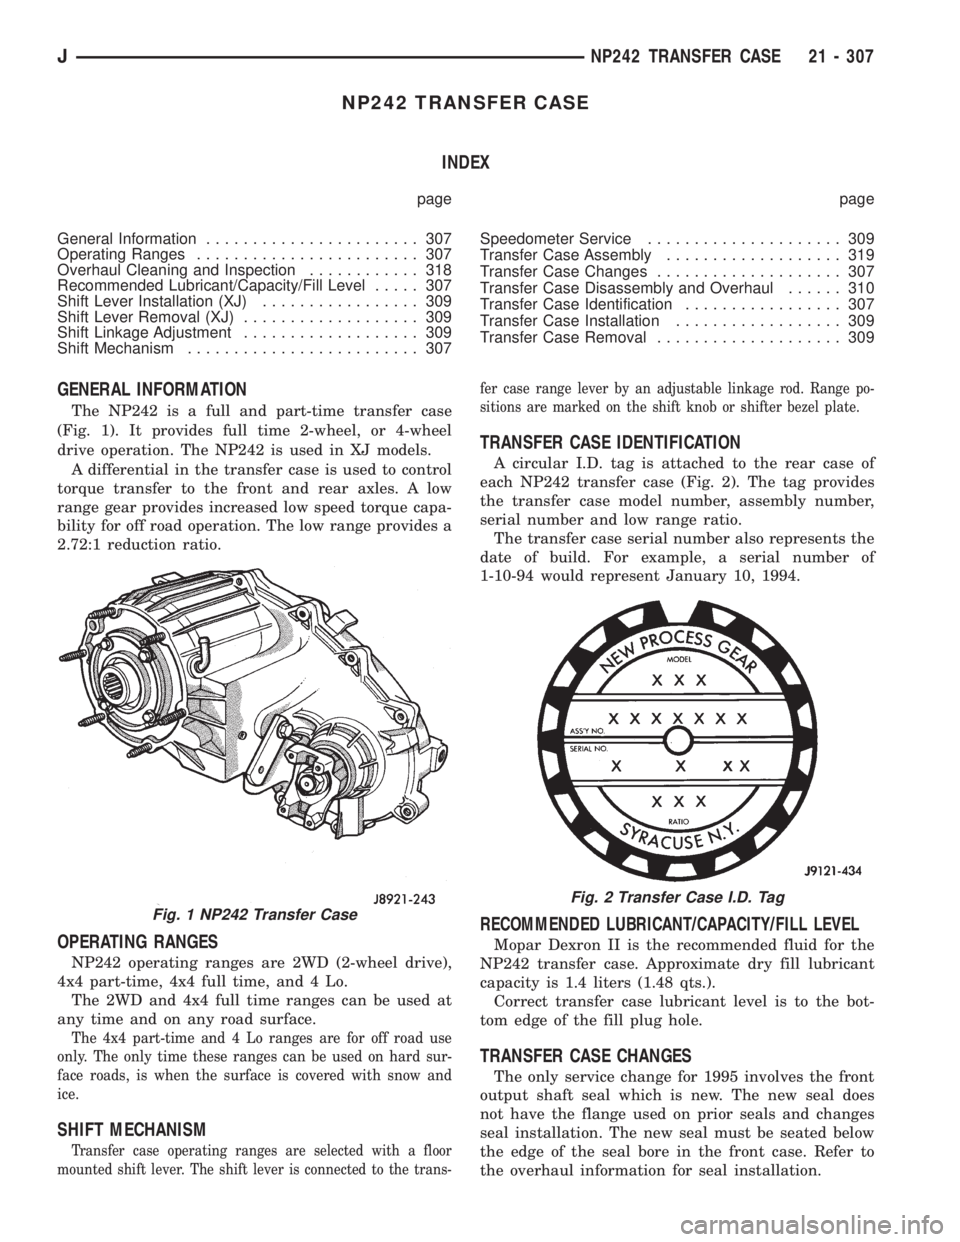
The NP242 is a full and part-time transfer case
(Fig. 1). It provides full time 2-wheel, or 4-wheel
drive operation. The NP242 is used in XJ models.
A differential in the transfer case is used to control
torque transfer to the front and rear axles. A low
range gear provides increased low speed torque capa-
bility for off road operation. The low range provides a
2.72:1 reduction ratio.
OPERATING RANGES
NP242 operating ranges are 2WD (2-wheel drive),
4x4 part-time, 4x4 full time, and 4 Lo.
The 2WD and 4x4 full time ranges can be used at
any time and on any road surface.
The 4x4 part-time and 4 Lo ranges are for off road use
only. The only time these ranges can be used on hard sur-
face roads, is when the surface is covered with snow and
ice.
SHIFT MECHANISM
Transfer case operating ranges are selected with a floor
mounted shift lever. The shift lever is connected to the trans-fer case range lever by an adjustable linkage rod. Range po-
sitions are marked on the shift knob or shifter bezel plate.
TRANSFER CASE IDENTIFICATION
A circular I.D. tag is attached to the rear case of
each NP242 transfer case (Fig. 2). The tag provides
the transfer case model number, assembly number,
serial number and low range ratio.
The transfer case serial number also represents the
date of build. For example, a serial number of
1-10-94 would represent January 10, 1994.
RECOMMENDED LUBRICANT/CAPACITY/FILL LEVEL
Mopar Dexron II is the recommended fluid for the
NP242 transfer case. Approximate dry fill lubricant
capacity is 1.4 liters (1.48 qts.).
Correct transfer case lubricant level is to the bot-
tom edge of the fill plug hole.
TRANSFER CASE CHANGES
The only service change for 1995 involves the front
output shaft seal which is new. The new seal does
not have the flange used on prior seals and changes
seal installation. The new seal must be seated below
the edge of the seal bore in the front case. Refer to
the overhaul information for seal installation.
Fig. 1 NP242 Transfer Case
Fig. 2 Transfer Case I.D. Tag
JNP242 TRANSFER CASE 21 - 307
Page 1871 of 2158
SHIFT LINKAGE ADJUSTMENT
(1) Shift transfer case into 4L position.
(2) Raise vehicle.
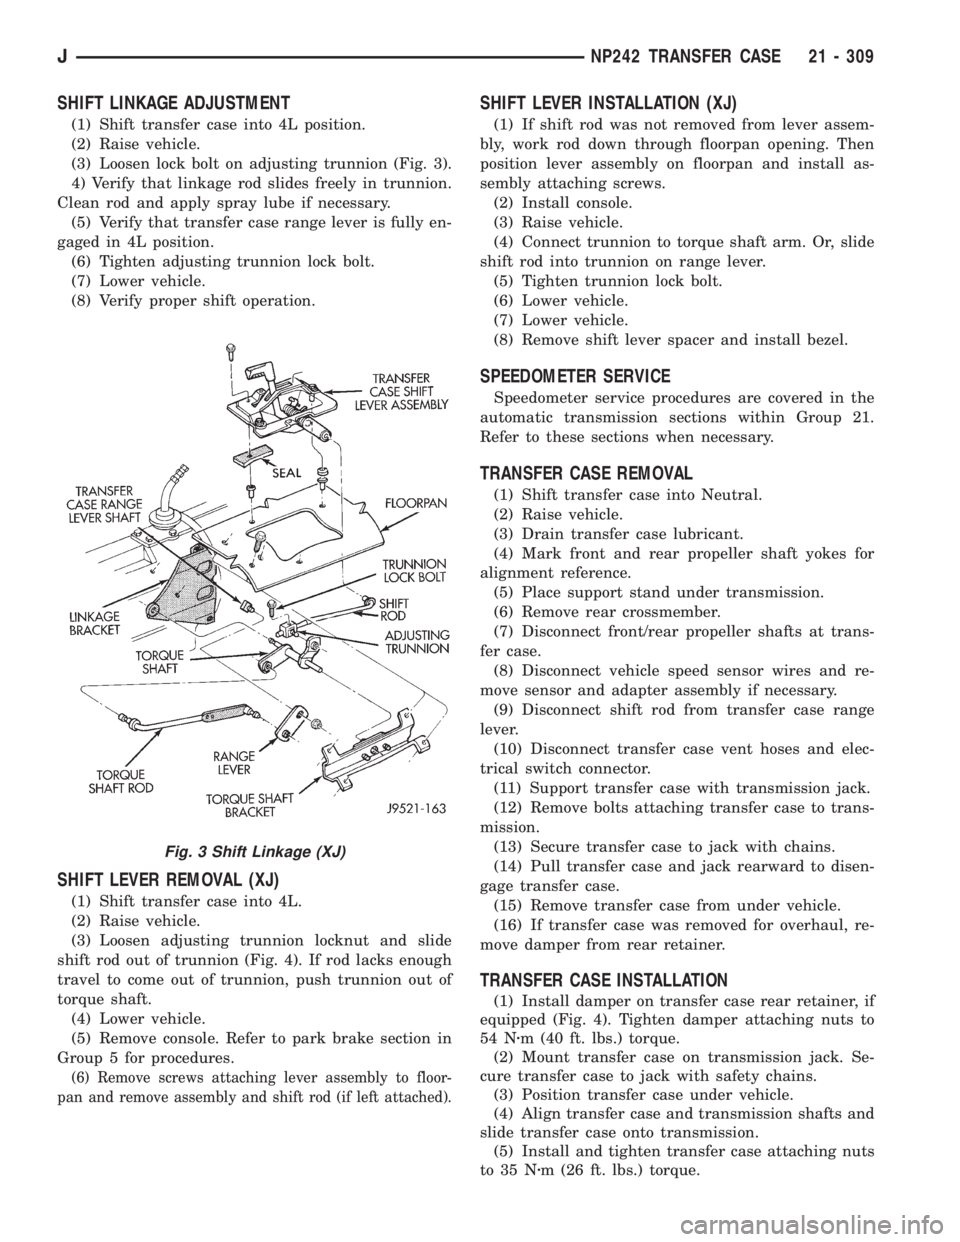
(3) Loosen lock bolt on adjusting trunnion (Fig. 3).
4) Verify that linkage rod slides freely in trunnion.
Clean rod and apply spray lube if necessary.
(5) Verify that transfer case range lever is fully en-
gaged in 4L position.
(6) Tighten adjusting trunnion lock bolt.
(7) Lower vehicle.
(8) Verify proper shift operation.
SHIFT LEVER REMOVAL (XJ)
(1) Shift transfer case into 4L.
(2) Raise vehicle.
(3) Loosen adjusting trunnion locknut and slide
shift rod out of trunnion (Fig. 4). If rod lacks enough
travel to come out of trunnion, push trunnion out of
torque shaft.
(4) Lower vehicle.
(5) Remove console. Refer to park brake section in
Group 5 for procedures.
(6) Remove screws attaching lever assembly to floor-
pan and remove assembly and shift rod (if left attached).
SHIFT LEVER INSTALLATION (XJ)
(1) If shift rod was not removed from lever assem-
bly, work rod down through floorpan opening. Then
position lever assembly on floorpan and install as-
sembly attaching screws.
(2) Install console.
(3) Raise vehicle.
(4) Connect trunnion to torque shaft arm. Or, slide
shift rod into trunnion on range lever.
(5) Tighten trunnion lock bolt.
(6) Lower vehicle.
(7) Lower vehicle.
(8) Remove shift lever spacer and install bezel.
SPEEDOMETER SERVICE
Speedometer service procedures are covered in the
automatic transmission sections within Group 21.
Refer to these sections when necessary.
TRANSFER CASE REMOVAL
(1) Shift transfer case into Neutral.
(2) Raise vehicle.
(3) Drain transfer case lubricant.
(4) Mark front and rear propeller shaft yokes for
alignment reference.
(5) Place support stand under transmission.
(6) Remove rear crossmember.
(7) Disconnect front/rear propeller shafts at trans-
fer case.
(8) Disconnect vehicle speed sensor wires and re-
move sensor and adapter assembly if necessary.
(9) Disconnect shift rod from transfer case range
lever.
(10) Disconnect transfer case vent hoses and elec-
trical switch connector.
(11) Support transfer case with transmission jack.
(12) Remove bolts attaching transfer case to trans-
mission.
(13) Secure transfer case to jack with chains.
(14) Pull transfer case and jack rearward to disen-
gage transfer case.
(15) Remove transfer case from under vehicle.
(16) If transfer case was removed for overhaul, re-
move damper from rear retainer.
TRANSFER CASE INSTALLATION
(1) Install damper on transfer case rear retainer, if
equipped (Fig. 4). Tighten damper attaching nuts to
54 Nzm (40 ft. lbs.) torque.
(2) Mount transfer case on transmission jack. Se-
cure transfer case to jack with safety chains.
(3) Position transfer case under vehicle.
(4) Align transfer case and transmission shafts and
slide transfer case onto transmission.
(5) Install and tighten transfer case attaching nuts
to 35 Nzm (26 ft. lbs.) torque.
Fig. 3 Shift Linkage (XJ)
JNP242 TRANSFER CASE 21 - 309