1995 JEEP CHEROKEE seat
[x] Cancel search: seatPage 1511 of 2198
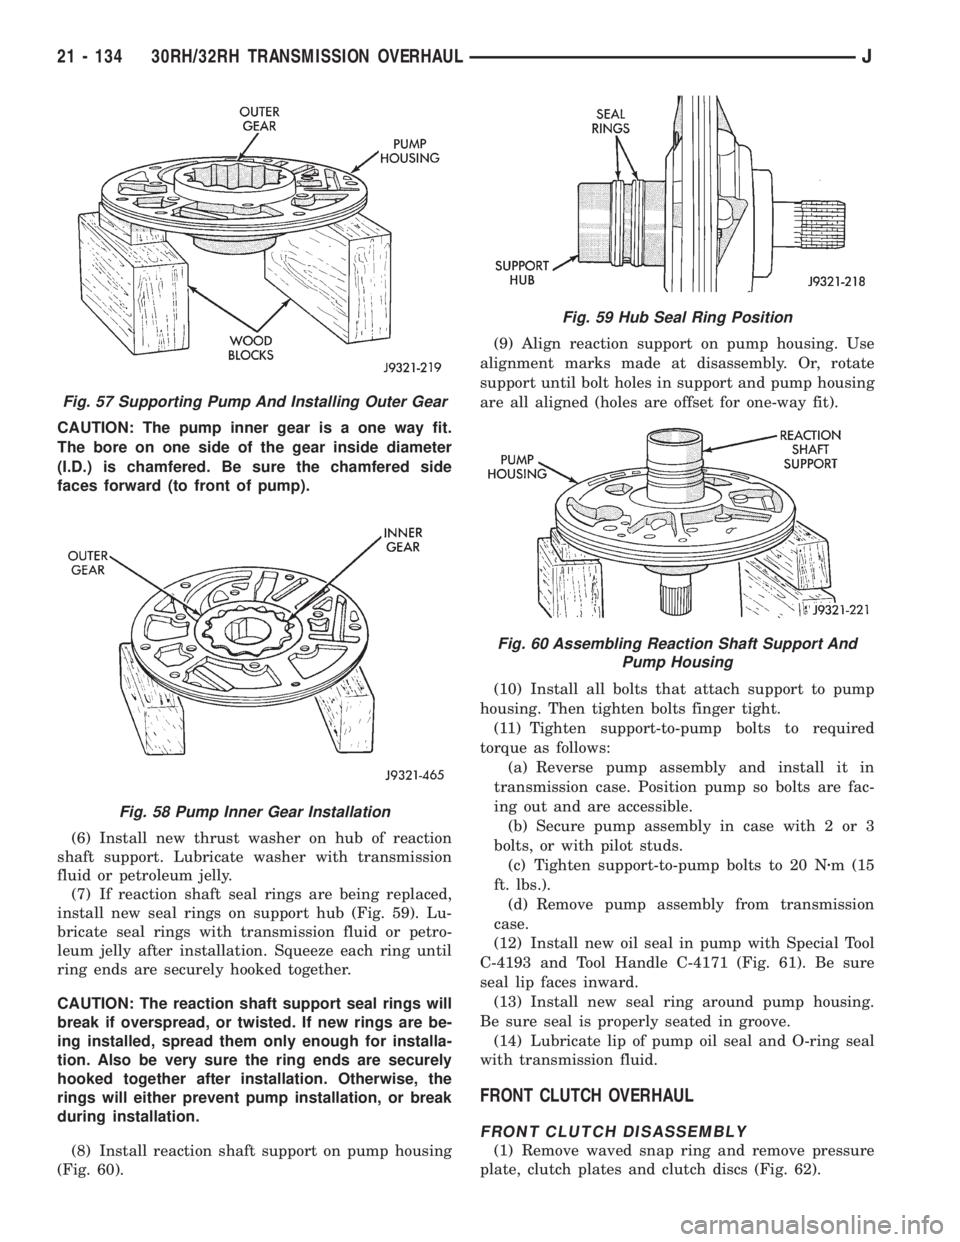
CAUTION: The pump inner gear is a one way fit.
The bore on one side of the gear inside diameter
(I.D.) is chamfered. Be sure the chamfered side
faces forward (to front of pump).
(6) Install new thrust washer on hub of reaction
shaft support. Lubricate washer with transmission
fluid or petroleum jelly.
(7) If reaction shaft seal rings are being replaced,
install new seal rings on support hub (Fig. 59). Lu-
bricate seal rings with transmission fluid or petro-
leum jelly after installation. Squeeze each ring until
ring ends are securely hooked together.
CAUTION: The reaction shaft support seal rings will
break if overspread, or twisted. If new rings are be-
ing installed, spread them only enough for installa-
tion. Also be very sure the ring ends are securely
hooked together after installation. Otherwise, the
rings will either prevent pump installation, or break
during installation.
(8) Install reaction shaft support on pump housing
(Fig. 60).(9) Align reaction support on pump housing. Use
alignment marks made at disassembly. Or, rotate
support until bolt holes in support and pump housing
are all aligned (holes are offset for one-way fit).
(10) Install all bolts that attach support to pump
housing. Then tighten bolts finger tight.
(11) Tighten support-to-pump bolts to required
torque as follows:
(a) Reverse pump assembly and install it in
transmission case. Position pump so bolts are fac-
ing out and are accessible.
(b) Secure pump assembly in case with 2 or 3
bolts, or with pilot studs.
(c) Tighten support-to-pump bolts to 20 Nzm (15
ft. lbs.).
(d) Remove pump assembly from transmission
case.
(12) Install new oil seal in pump with Special Tool
C-4193 and Tool Handle C-4171 (Fig. 61). Be sure
seal lip faces inward.
(13) Install new seal ring around pump housing.
Be sure seal is properly seated in groove.
(14) Lubricate lip of pump oil seal and O-ring seal
with transmission fluid.
FRONT CLUTCH OVERHAUL
FRONT CLUTCH DISASSEMBLY
(1) Remove waved snap ring and remove pressure
plate, clutch plates and clutch discs (Fig. 62).
Fig. 57 Supporting Pump And Installing Outer Gear
Fig. 58 Pump Inner Gear Installation
Fig. 59 Hub Seal Ring Position
Fig. 60 Assembling Reaction Shaft Support And
Pump Housing
21 - 134 30RH/32RH TRANSMISSION OVERHAULJ
Page 1512 of 2198
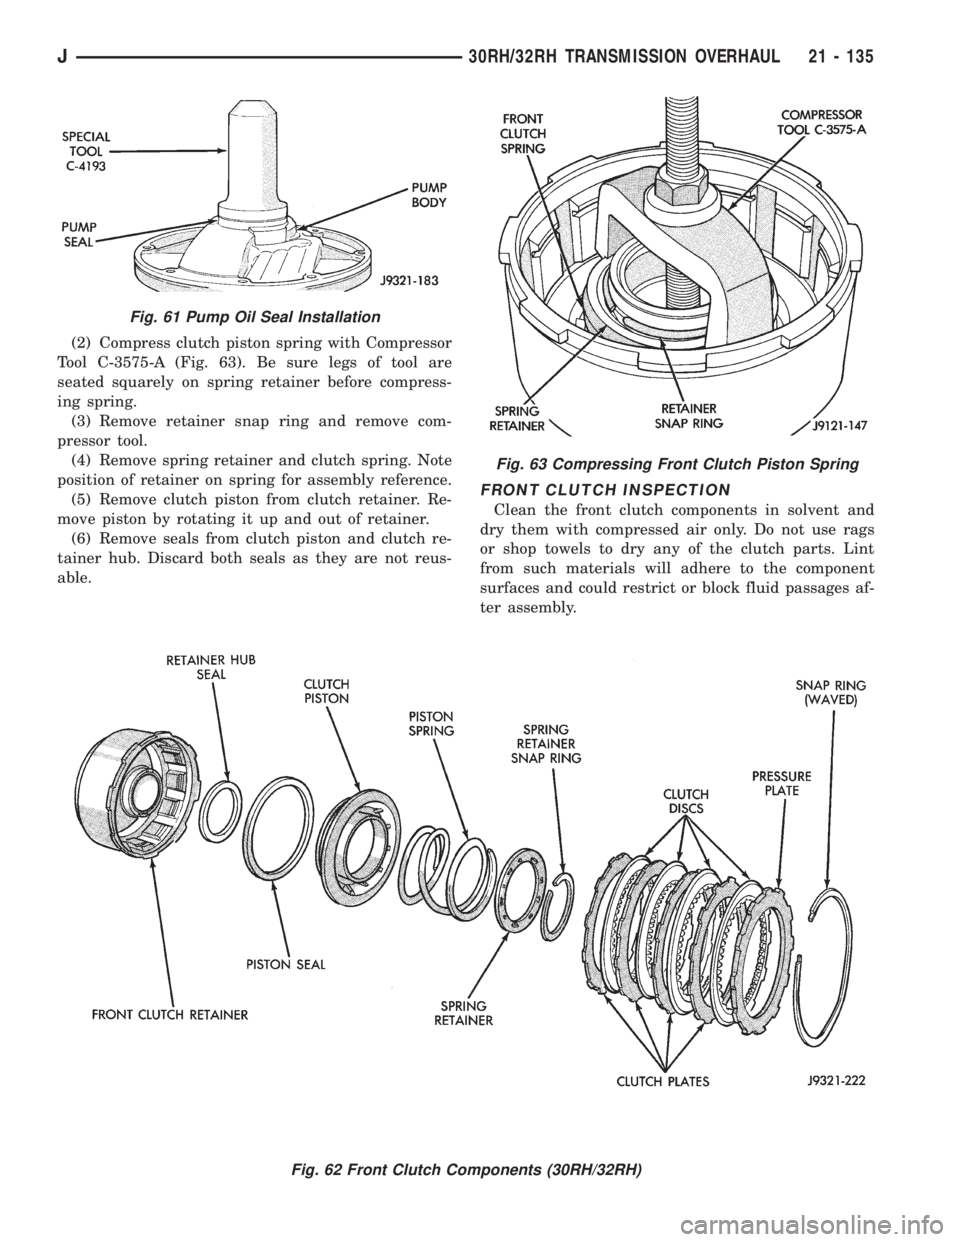
(2) Compress clutch piston spring with Compressor
Tool C-3575-A (Fig. 63). Be sure legs of tool are
seated squarely on spring retainer before compress-
ing spring.
(3) Remove retainer snap ring and remove com-
pressor tool.
(4) Remove spring retainer and clutch spring. Note
position of retainer on spring for assembly reference.
(5) Remove clutch piston from clutch retainer. Re-
move piston by rotating it up and out of retainer.
(6) Remove seals from clutch piston and clutch re-
tainer hub. Discard both seals as they are not reus-
able.
FRONT CLUTCH INSPECTION
Clean the front clutch components in solvent and
dry them with compressed air only. Do not use rags
or shop towels to dry any of the clutch parts. Lint
from such materials will adhere to the component
surfaces and could restrict or block fluid passages af-
ter assembly.
Fig. 63 Compressing Front Clutch Piston Spring
Fig. 62 Front Clutch Components (30RH/32RH)
Fig. 61 Pump Oil Seal Installation
J30RH/32RH TRANSMISSION OVERHAUL 21 - 135
Page 1513 of 2198
Replace the clutch discs if warped, worn, scored,
burned or charred, or if the facing is flaking off. Re-
place the steel plates if heavily scored, warped, or
broken. Be sure the driving lugs on the plates are in
good condition. The lugs must not be bent, cracked or
damaged in any way.
Replace the clutch spring and spring retainer if ei-
ther is distorted, warped or broken.
Check the lug grooves in the clutch retainer. The
steel plates should slide freely in the slots. Replace
the retainer if the grooves are worn or damaged.
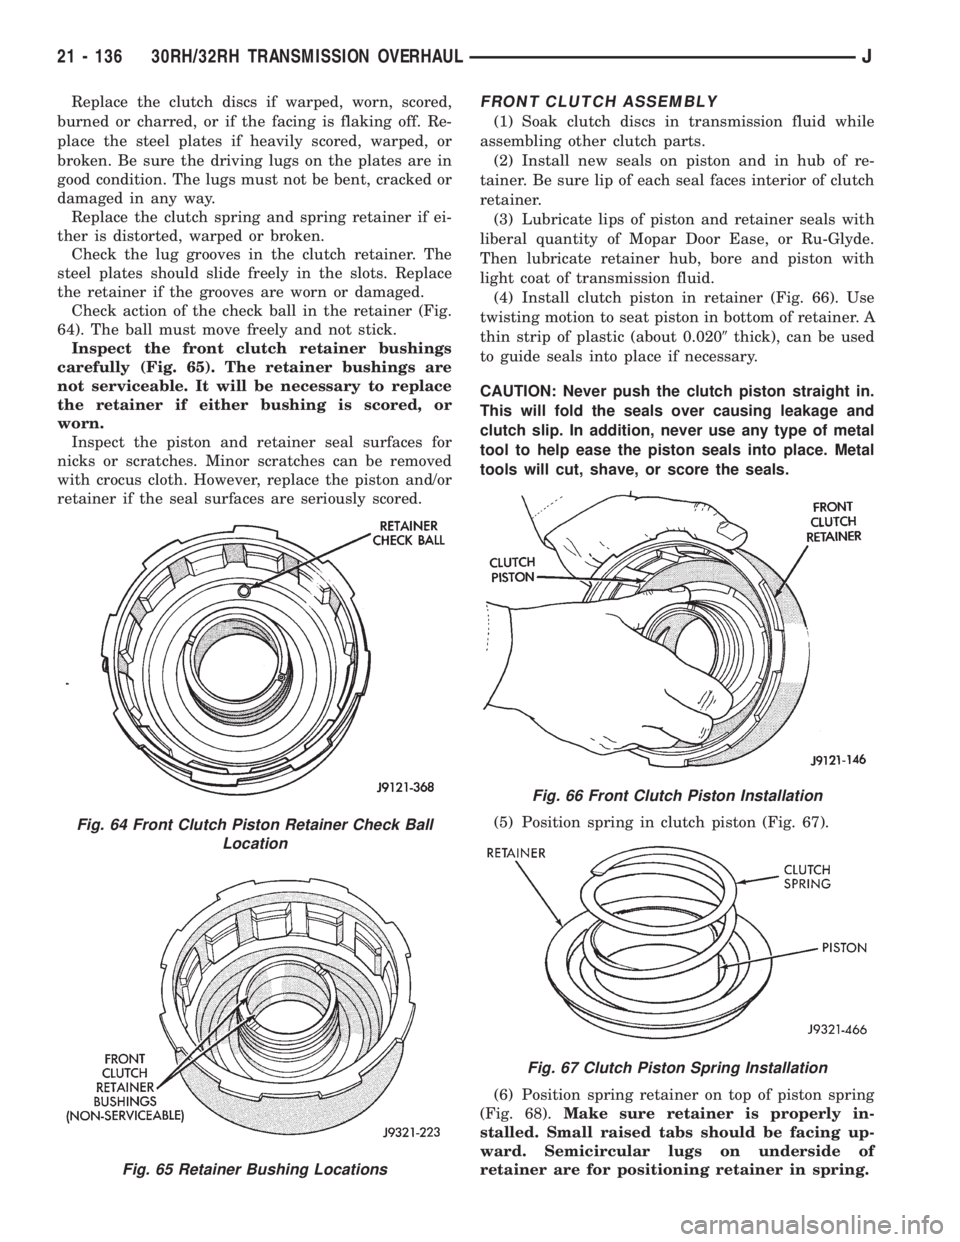
Check action of the check ball in the retainer (Fig.
64). The ball must move freely and not stick.
Inspect the front clutch retainer bushings
carefully (Fig. 65). The retainer bushings are
not serviceable. It will be necessary to replace
the retainer if either bushing is scored, or
worn.
Inspect the piston and retainer seal surfaces for
nicks or scratches. Minor scratches can be removed
with crocus cloth. However, replace the piston and/or
retainer if the seal surfaces are seriously scored.FRONT CLUTCH ASSEMBLY
(1) Soak clutch discs in transmission fluid while
assembling other clutch parts.
(2) Install new seals on piston and in hub of re-
tainer. Be sure lip of each seal faces interior of clutch
retainer.
(3) Lubricate lips of piston and retainer seals with
liberal quantity of Mopar Door Ease, or Ru-Glyde.
Then lubricate retainer hub, bore and piston with
light coat of transmission fluid.
(4) Install clutch piston in retainer (Fig. 66). Use
twisting motion to seat piston in bottom of retainer. A
thin strip of plastic (about 0.0209thick), can be used
to guide seals into place if necessary.
CAUTION: Never push the clutch piston straight in.
This will fold the seals over causing leakage and
clutch slip. In addition, never use any type of metal
tool to help ease the piston seals into place. Metal
tools will cut, shave, or score the seals.
(5) Position spring in clutch piston (Fig. 67).
(6) Position spring retainer on top of piston spring
(Fig. 68).Make sure retainer is properly in-
stalled. Small raised tabs should be facing up-
ward. Semicircular lugs on underside of
retainer are for positioning retainer in spring.
Fig. 64 Front Clutch Piston Retainer Check Ball
Location
Fig. 65 Retainer Bushing Locations
Fig. 66 Front Clutch Piston Installation
Fig. 67 Clutch Piston Spring Installation
21 - 136 30RH/32RH TRANSMISSION OVERHAULJ
Page 1516 of 2198
Replace the retainer bushing if worn, scored, or
doubt exists about bushing condition.
Inspect the piston and retainer seal surfaces for
nicks or scratches. Minor scratches can be removed
with crocus cloth. However, replace the piston and/or
retainer if the seal surfaces are seriously scored.
Check condition of the fiber thrust washer and
metal output shaft thrust washer. Replace either
washer if worn or damaged.
Check condition of the seal rings on the input shaft
and clutch retainer hub. Replace the seal rings only
if worn, distorted, or damaged. The input shaft front
seal ring is teflon with chamfered ends. The rear ring
is metal with interlocking ends.
Check the input shaft for wear, or damage. Replace
the shaft if worn, scored or damaged in any way.
ASSEMBLING REAR CLUTCH
(1) Soak clutch discs in transmission fluid while
assembling other clutch parts.
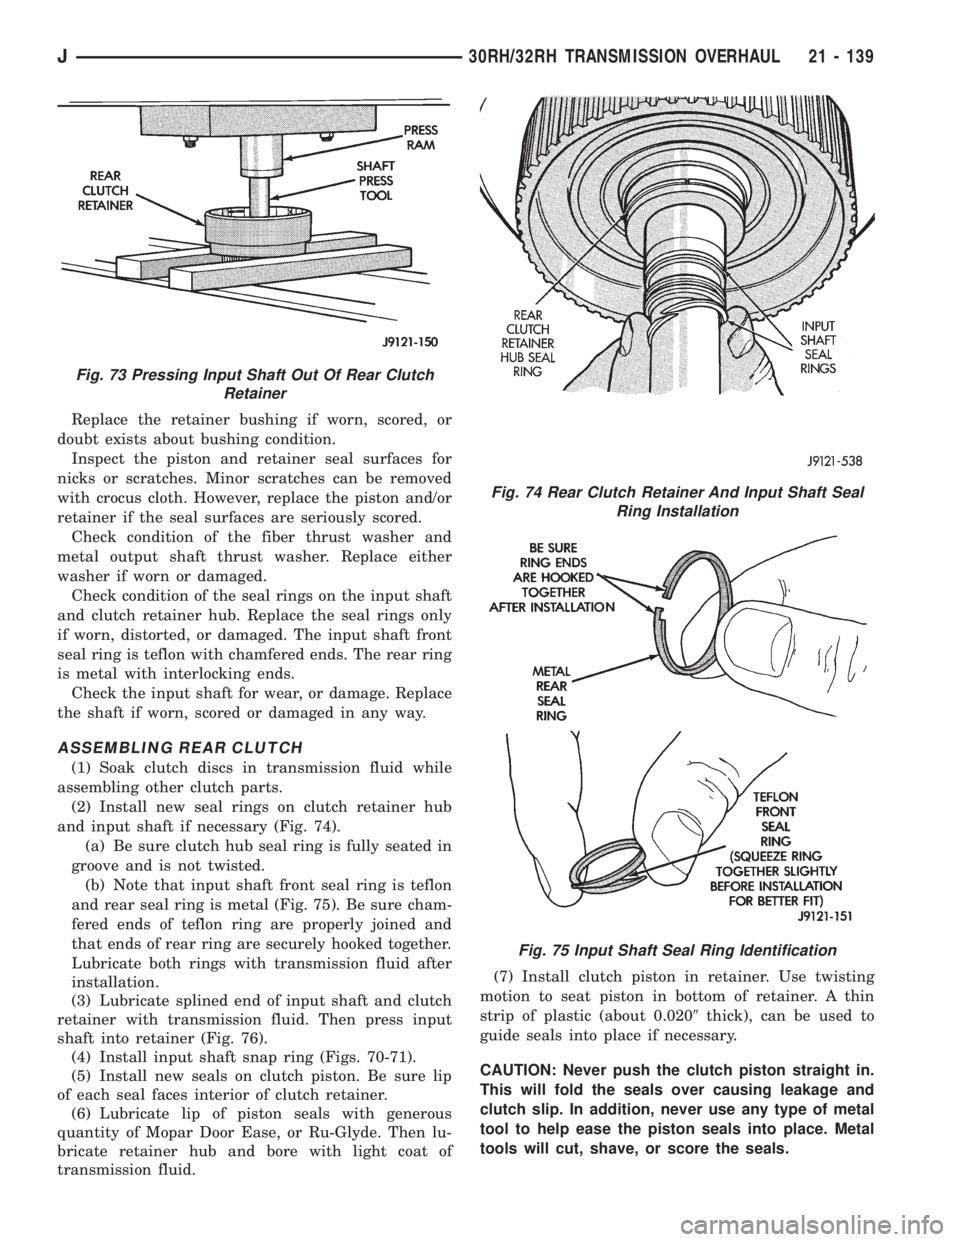
(2) Install new seal rings on clutch retainer hub
and input shaft if necessary (Fig. 74).
(a) Be sure clutch hub seal ring is fully seated in
groove and is not twisted.
(b) Note that input shaft front seal ring is teflon
and rear seal ring is metal (Fig. 75). Be sure cham-
fered ends of teflon ring are properly joined and
that ends of rear ring are securely hooked together.
Lubricate both rings with transmission fluid after
installation.
(3) Lubricate splined end of input shaft and clutch
retainer with transmission fluid. Then press input
shaft into retainer (Fig. 76).
(4) Install input shaft snap ring (Figs. 70-71).
(5) Install new seals on clutch piston. Be sure lip
of each seal faces interior of clutch retainer.
(6) Lubricate lip of piston seals with generous
quantity of Mopar Door Ease, or Ru-Glyde. Then lu-
bricate retainer hub and bore with light coat of
transmission fluid.(7) Install clutch piston in retainer. Use twisting
motion to seat piston in bottom of retainer. A thin
strip of plastic (about 0.0209thick), can be used to
guide seals into place if necessary.
CAUTION: Never push the clutch piston straight in.
This will fold the seals over causing leakage and
clutch slip. In addition, never use any type of metal
tool to help ease the piston seals into place. Metal
tools will cut, shave, or score the seals.
Fig. 73 Pressing Input Shaft Out Of Rear Clutch
Retainer
Fig. 74 Rear Clutch Retainer And Input Shaft Seal
Ring Installation
Fig. 75 Input Shaft Seal Ring Identification
J30RH/32RH TRANSMISSION OVERHAUL 21 - 139
Page 1517 of 2198
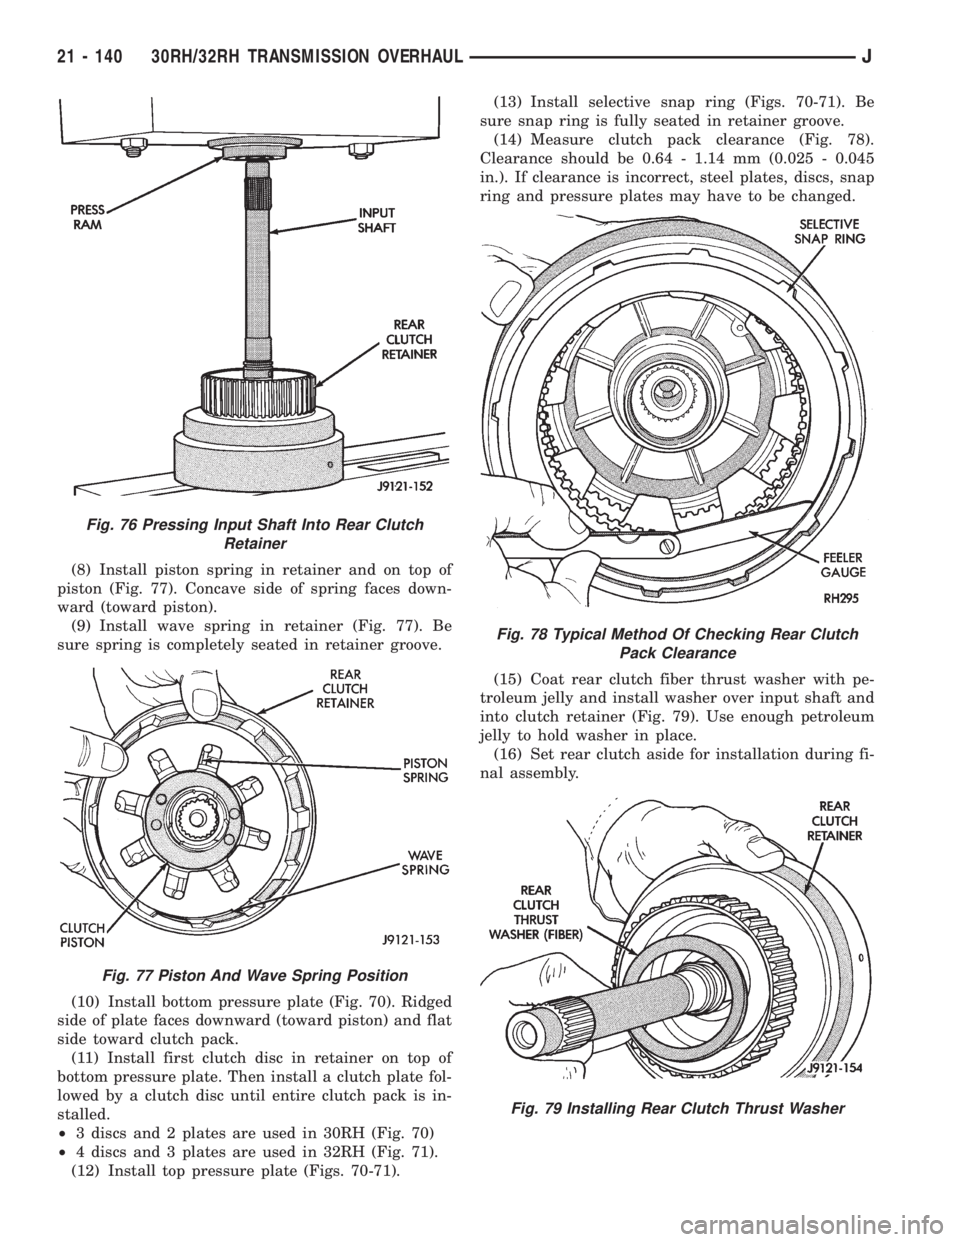
(8) Install piston spring in retainer and on top of
piston (Fig. 77). Concave side of spring faces down-
ward (toward piston).
(9) Install wave spring in retainer (Fig. 77). Be
sure spring is completely seated in retainer groove.
(10) Install bottom pressure plate (Fig. 70). Ridged
side of plate faces downward (toward piston) and flat
side toward clutch pack.
(11) Install first clutch disc in retainer on top of
bottom pressure plate. Then install a clutch plate fol-
lowed by a clutch disc until entire clutch pack is in-
stalled.
²3 discs and 2 plates are used in 30RH (Fig. 70)
²4 discs and 3 plates are used in 32RH (Fig. 71).
(12) Install top pressure plate (Figs. 70-71).(13) Install selective snap ring (Figs. 70-71). Be
sure snap ring is fully seated in retainer groove.
(14) Measure clutch pack clearance (Fig. 78).
Clearance should be 0.64 - 1.14 mm (0.025 - 0.045
in.). If clearance is incorrect, steel plates, discs, snap
ring and pressure plates may have to be changed.
(15) Coat rear clutch fiber thrust washer with pe-
troleum jelly and install washer over input shaft and
into clutch retainer (Fig. 79). Use enough petroleum
jelly to hold washer in place.
(16) Set rear clutch aside for installation during fi-
nal assembly.
Fig. 76 Pressing Input Shaft Into Rear Clutch
Retainer
Fig. 77 Piston And Wave Spring Position
Fig. 78 Typical Method Of Checking Rear Clutch
Pack Clearance
Fig. 79 Installing Rear Clutch Thrust Washer
21 - 140 30RH/32RH TRANSMISSION OVERHAULJ
Page 1519 of 2198
planetary. All the washers have four locating tabs on
them. These tabs fit in the holes or slots provided in
each planetary gear.
Inspect the output shaft carefully. Pay particular
attention to the machined bushing/bearing surfaces
on the shaft and the governor valve shaft bore at the
shaft rear.
Replace the output shaft if the machined surfaces
are scored, pitted, or damaged in any way. Also re-
place the shaft if the splines are damaged, or exhib-
it cracks at any location (especially at the governor
valve shaft bore).
The annulus gears can be removed from their sup-
ports if necessary. Just remove the snap rings and sep-
arate the two parts when replacement is necessary. In
addition, the annulus gear bushings can be replaced if
severely worn, or scored. However it is not necessary to
replace the bushings if they only exhibit normal wear.
Check bushing fit on the output shaft to be sure.
ASSEMBLING PLANETARY GEARTRAIN
(1) Lubricate output shaft and planetary components
with transmission fluid. Use petroleum jelly to lubricate
and hold thrust washers and plates in position.
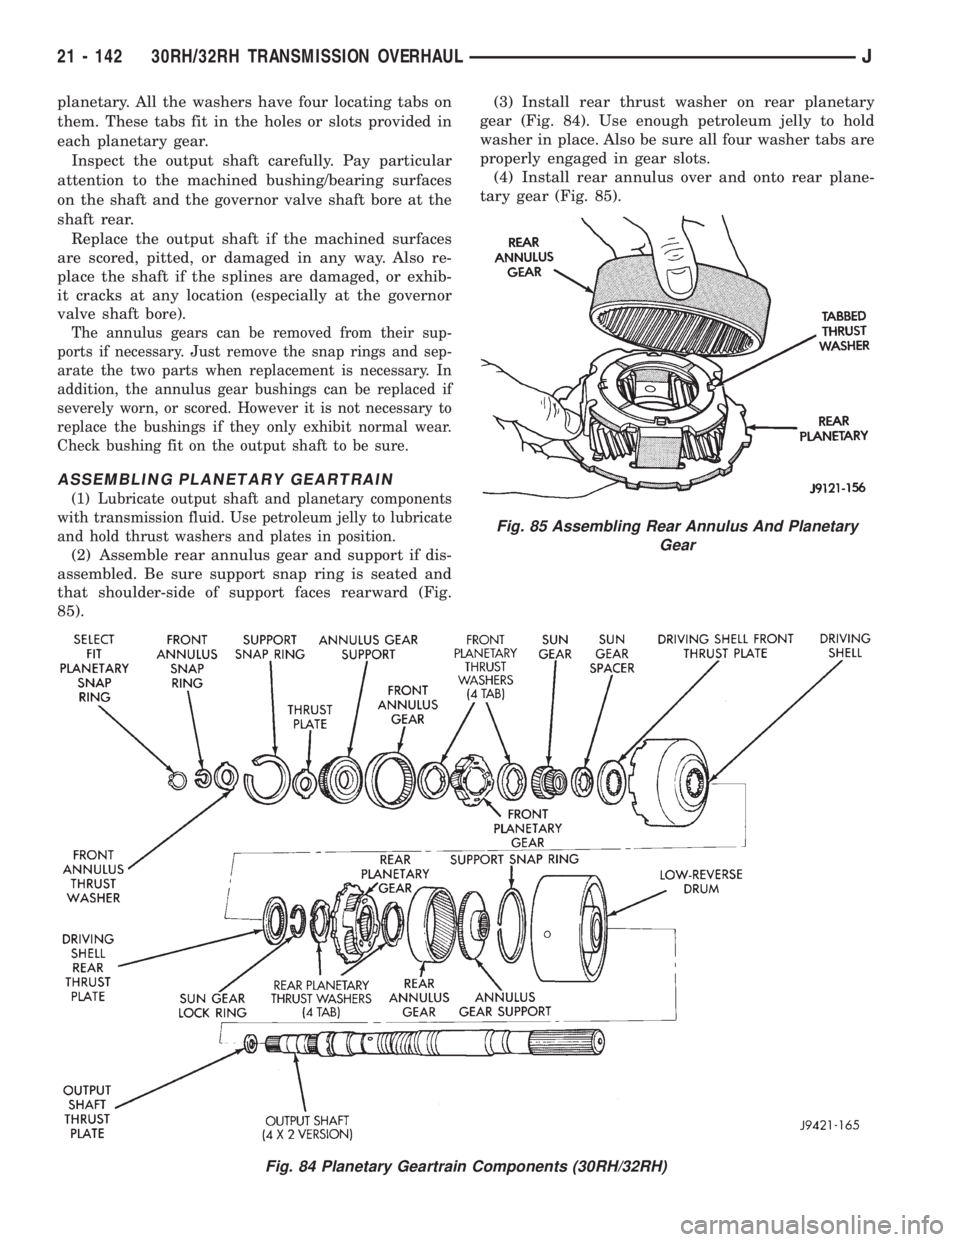
(2) Assemble rear annulus gear and support if dis-
assembled. Be sure support snap ring is seated and
that shoulder-side of support faces rearward (Fig.
85).(3) Install rear thrust washer on rear planetary
gear (Fig. 84). Use enough petroleum jelly to hold
washer in place. Also be sure all four washer tabs are
properly engaged in gear slots.
(4) Install rear annulus over and onto rear plane-
tary gear (Fig. 85).
Fig. 84 Planetary Geartrain Components (30RH/32RH)
Fig. 85 Assembling Rear Annulus And Planetary
Gear
21 - 142 30RH/32RH TRANSMISSION OVERHAULJ
Page 1520 of 2198
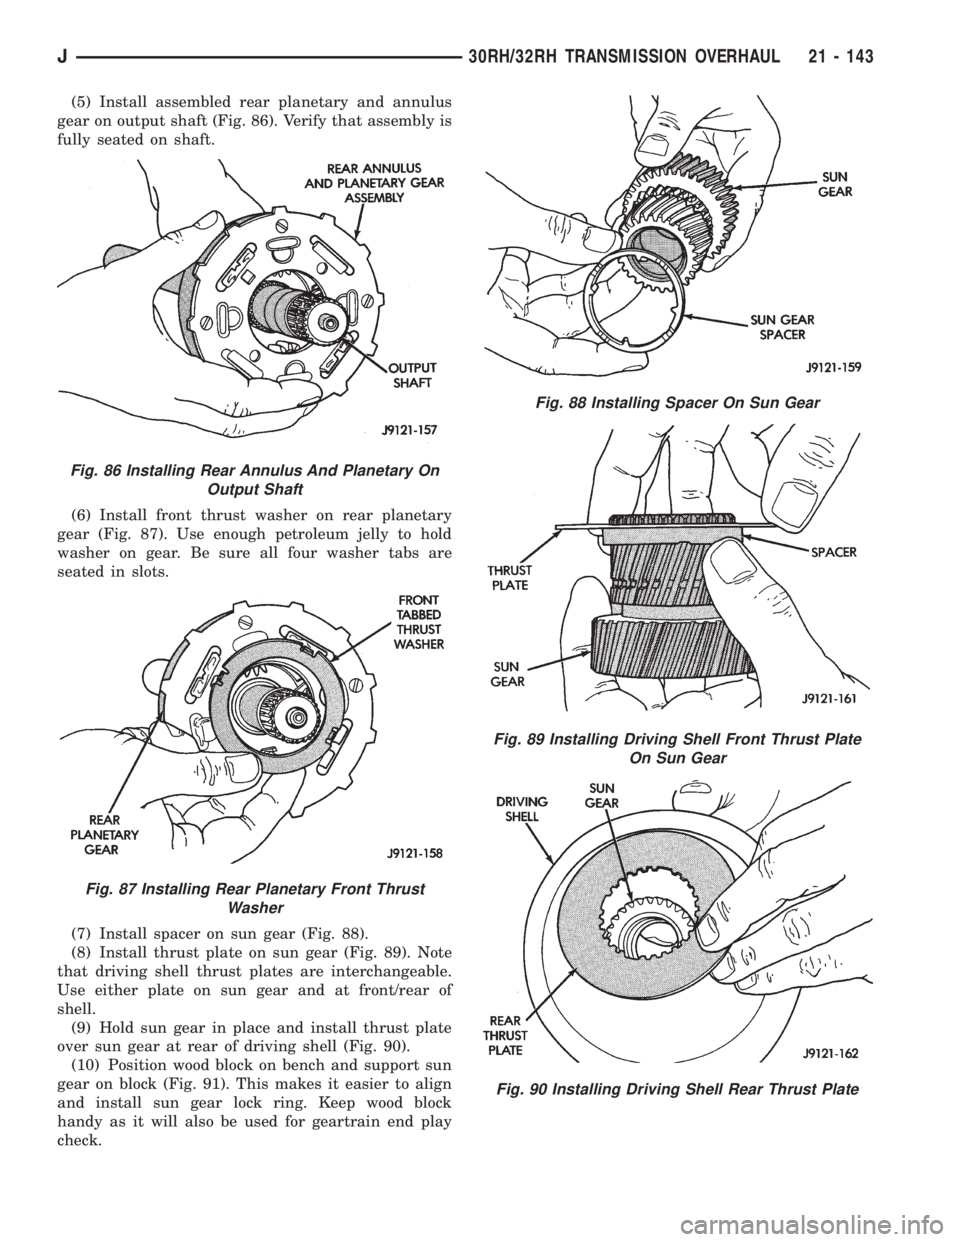
(5) Install assembled rear planetary and annulus
gear on output shaft (Fig. 86). Verify that assembly is
fully seated on shaft.
(6) Install front thrust washer on rear planetary
gear (Fig. 87). Use enough petroleum jelly to hold
washer on gear. Be sure all four washer tabs are
seated in slots.
(7) Install spacer on sun gear (Fig. 88).
(8) Install thrust plate on sun gear (Fig. 89). Note
that driving shell thrust plates are interchangeable.
Use either plate on sun gear and at front/rear of
shell.
(9) Hold sun gear in place and install thrust plate
over sun gear at rear of driving shell (Fig. 90).
(10) Position wood block on bench and support sun
gear on block (Fig. 91). This makes it easier to align
and install sun gear lock ring. Keep wood block
handy as it will also be used for geartrain end play
check.
Fig. 86 Installing Rear Annulus And Planetary On
Output Shaft
Fig. 87 Installing Rear Planetary Front Thrust
Washer
Fig. 88 Installing Spacer On Sun Gear
Fig. 89 Installing Driving Shell Front Thrust Plate
On Sun Gear
Fig. 90 Installing Driving Shell Rear Thrust Plate
J30RH/32RH TRANSMISSION OVERHAUL 21 - 143
Page 1521 of 2198
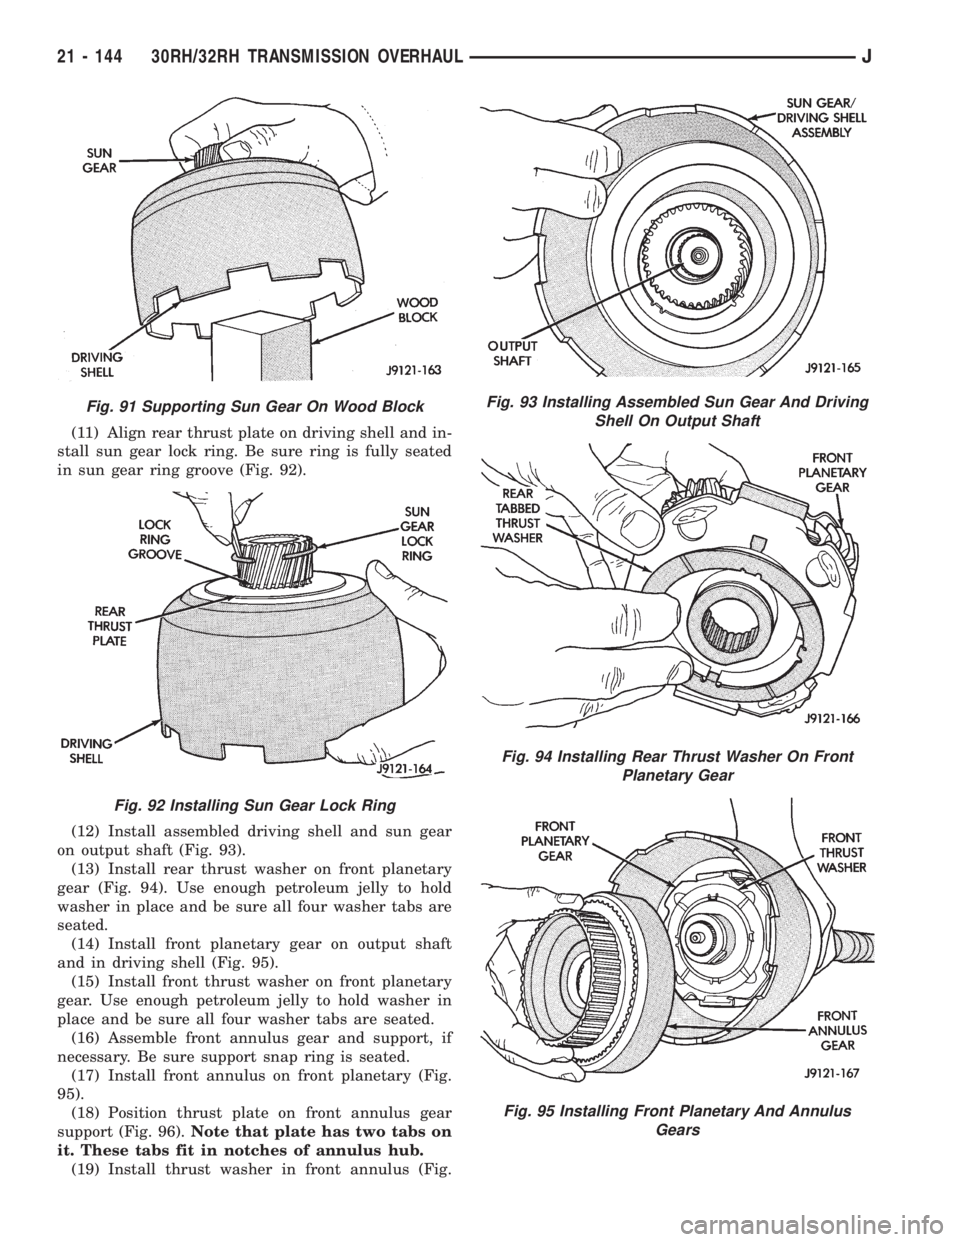
(11) Align rear thrust plate on driving shell and in-
stall sun gear lock ring. Be sure ring is fully seated
in sun gear ring groove (Fig. 92).
(12) Install assembled driving shell and sun gear
on output shaft (Fig. 93).
(13) Install rear thrust washer on front planetary
gear (Fig. 94). Use enough petroleum jelly to hold
washer in place and be sure all four washer tabs are
seated.
(14) Install front planetary gear on output shaft
and in driving shell (Fig. 95).
(15) Install front thrust washer on front planetary
gear. Use enough petroleum jelly to hold washer in
place and be sure all four washer tabs are seated.
(16) Assemble front annulus gear and support, if
necessary. Be sure support snap ring is seated.
(17) Install front annulus on front planetary (Fig.
95).
(18) Position thrust plate on front annulus gear
support (Fig. 96).Note that plate has two tabs on
it. These tabs fit in notches of annulus hub.
(19) Install thrust washer in front annulus (Fig.
Fig. 91 Supporting Sun Gear On Wood Block
Fig. 92 Installing Sun Gear Lock Ring
Fig. 93 Installing Assembled Sun Gear And Driving
Shell On Output Shaft
Fig. 94 Installing Rear Thrust Washer On Front
Planetary Gear
Fig. 95 Installing Front Planetary And Annulus
Gears
21 - 144 30RH/32RH TRANSMISSION OVERHAULJ